
Quick Start Guide
Page 5
...31 When Printing Becomes Faint or Colors are Incorrect 32 Troubleshooting Cannot Install the Printer Driver 34 Cannot Connect to PC Properly 35 Print Results Not Satisfactory or Contains Errors 36 Troubleshooting Printer Hardware 39 Paper Does Not Feed Properly 41 Paper Jams 41 An Error ...Message is displayed on the Screen 42 POWER Lamp and Alarm Lamp Flash Alternately 43 Appendix Specifications 44 Safety Precautions 48 Regulatory Information 50 CANON U.S.A., INC.
...31 When Printing Becomes Faint or Colors are Incorrect 32 Troubleshooting Cannot Install the Printer Driver 34 Cannot Connect to PC Properly 35 Print Results Not Satisfactory or Contains Errors 36 Troubleshooting Printer Hardware 39 Paper Does Not Feed Properly 41 Paper Jams 41 An Error ...Message is displayed on the Screen 42 POWER Lamp and Alarm Lamp Flash Alternately 43 Appendix Specifications 44 Safety Precautions 48 Regulatory Information 50 CANON U.S.A., INC.

Quick Start Guide
Page 6
... window, press the F1 key, or click in the upper right corner. If the Alarm lamp lights, refer to know more information, view the iP6700D User's Guide, Printer Driver Guide, and Photo Application Guide installed on the LCD" in the lower left corner. Clicking provides detailed information about , or click the Help button...
... window, press the F1 key, or click in the upper right corner. If the Alarm lamp lights, refer to know more information, view the iP6700D User's Guide, Printer Driver Guide, and Photo Application Guide installed on the LCD" in the lower left corner. Clicking provides detailed information about , or click the Help button...
Quick Start Guide
Page 9
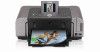
...load paper in both types of paper without reloading paper for each job. You can also specify the type/size of paper to the Printer Driver Guide. Loading paper in the auto sheet feeder, changing the paper source allows you to print on various sizes or types of paper,... loaded in the auto sheet feeder is easy, and is always fed from the cassette for loading a certain type of paper. For information on the printer or printer driver. Loading paper in the auto sheet feeder (e.g., 4" x 6"/101.6 x 152.4 mm) and the cassette (e.g., A4/ Letter-sized paper). 5 This is convenient for...
...load paper in both types of paper without reloading paper for each job. You can also specify the type/size of paper to the Printer Driver Guide. Loading paper in the auto sheet feeder, changing the paper source allows you to print on various sizes or types of paper,... loaded in the auto sheet feeder is easy, and is always fed from the cassette for loading a certain type of paper. For information on the printer or printer driver. Loading paper in the auto sheet feeder (e.g., 4" x 6"/101.6 x 152.4 mm) and the cassette (e.g., A4/ Letter-sized paper). 5 This is convenient for...

Quick Start Guide
Page 10
... the auto sheet feeder and cassette together If the auto sheet feeder or cassette runs out of paper, the paper source automatically switches to the Printer Driver Guide. Basic Printing • Continuous printing on a shelf with minimal space, you can use just the auto sheet feeder or cassette according to the location.... To use this feature, you need to use only the cassette, check any usage restrictions in advance. 6 For example, if you intend to configure the printer driver beforehand. This is useful for printing. If you intend to install the...
... the auto sheet feeder and cassette together If the auto sheet feeder or cassette runs out of paper, the paper source automatically switches to the Printer Driver Guide. Basic Printing • Continuous printing on a shelf with minimal space, you can use just the auto sheet feeder or cassette according to the location.... To use this feature, you need to use only the cassette, check any usage restrictions in advance. 6 For example, if you intend to configure the printer driver beforehand. This is useful for printing. If you intend to install the...
Quick Start Guide
Page 11
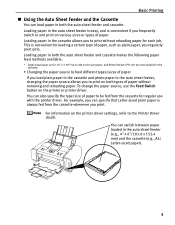
...it . For details, refer to the Printer Driver Guide. 7 Refer to "Printing Media" in the User's Guide for use with the printer driver. Basic Printing Loading Plain Paper in the Auto Sheet Feeder For detailed information on the specialty media Canon provides for detailed instructions on how to ...load specialty media into the printer. 1 Flatten the four corners of the paper...
...it . For details, refer to the Printer Driver Guide. 7 Refer to "Printing Media" in the User's Guide for use with the printer driver. Basic Printing Loading Plain Paper in the Auto Sheet Feeder For detailed information on the specialty media Canon provides for detailed instructions on how to ...load specialty media into the printer. 1 Flatten the four corners of the paper...

Quick Start Guide
Page 13
... the right side of the paper support with the front face UP, and the rear flaps DOWN on page 24. 9 For a detailed description of the printer driver settings, see "Printing with Windows" on page 20, "Printing with embossed or treated surfaces, a double flap, pressure seals or sticker flaps. Do not use envelopes... printing. Env. #10 in the auto sheet feeder. (3) Press the Feed Switch button so that the cover guide stands when you load paper in the printer driver according to match the direction of the envelope. Ensure that the auto sheet feeder lamp lights. or Comm.
... the right side of the paper support with the front face UP, and the rear flaps DOWN on page 24. 9 For a detailed description of the printer driver settings, see "Printing with Windows" on page 20, "Printing with embossed or treated surfaces, a double flap, pressure seals or sticker flaps. Do not use envelopes... printing. Env. #10 in the auto sheet feeder. (3) Press the Feed Switch button so that the cover guide stands when you load paper in the printer driver according to match the direction of the envelope. Ensure that the auto sheet feeder lamp lights. or Comm.

Quick Start Guide
Page 14
....0 x 177.8 mm, or Credit Card 2.13 x 3.39 in 54.0 x 86.0 mm from Page Size in portrait orientation. Always load paper in the printer driver. For a detailed description of the printer driver settings, see "Printing with Windows" on page 20, or "Printing with the print side facing UP and align the cover guide on page...
....0 x 177.8 mm, or Credit Card 2.13 x 3.39 in 54.0 x 86.0 mm from Page Size in portrait orientation. Always load paper in the printer driver. For a detailed description of the printer driver settings, see "Printing with Windows" on page 20, or "Printing with the print side facing UP and align the cover guide on page...
Quick Start Guide
Page 18
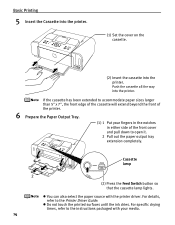
...notches in either side of the front cover and pull down to the Printer Driver Guide. For specific drying times, refer to the instructions packaged with the printer driver. Push the cassette all the way into the printer. If the cassette has been extended to accommodate paper sizes larger than ...5" x 7", the front edge of the cassette will extend beyond the front of the printer. 6 Prepare the Paper Output Tray....
...notches in either side of the front cover and pull down to the Printer Driver Guide. For specific drying times, refer to the instructions packaged with the printer driver. Push the cassette all the way into the printer. If the cassette has been extended to accommodate paper sizes larger than ...5" x 7", the front edge of the cassette will extend beyond the front of the printer. 6 Prepare the Paper Output Tray....

Quick Start Guide
Page 19
.... Env. #10 in the wrong direction. Select either DL Env. If you are using. A maximum of 5 envelopes can be printed in the printer driver according to match the direction of the printer driver settings, see "Printing with Windows" on page 20, "Printing with embossed or treated surfaces, a double flap, pressure seals or sticker flaps...
.... Env. #10 in the wrong direction. Select either DL Env. If you are using. A maximum of 5 envelopes can be printed in the printer driver according to match the direction of the printer driver settings, see "Printing with Windows" on page 20, "Printing with embossed or treated surfaces, a double flap, pressure seals or sticker flaps...

Quick Start Guide
Page 21
Portrait Landscape We recommend using genuine Canon photo media when printing photographs. Always load paper in landscape orientation can cause the paper to be jammed. Loading paper in portrait orientation. See "Using Specialty Media" on page 24. Basic Printing (5) Select 4 x 6 in 101.6 x 152.4 mm or 5 x 7 in 127.0 x 177.8 mm from Page Size in the printer driver. For a detailed description of the printer driver settings, see "Printing with Windows" on page 20, or "Printing with Macintosh" on page 18. 17
Portrait Landscape We recommend using genuine Canon photo media when printing photographs. Always load paper in landscape orientation can cause the paper to be jammed. Loading paper in portrait orientation. See "Using Specialty Media" on page 24. Basic Printing (5) Select 4 x 6 in 101.6 x 152.4 mm or 5 x 7 in 127.0 x 177.8 mm from Page Size in the printer driver. For a detailed description of the printer driver settings, see "Printing with Windows" on page 20, or "Printing with Macintosh" on page 18. 17
Quick Start Guide
Page 24
..., refer to the Photo Application Guide. 1 Turn on page 2. 2 Load the paper in the printer driver. See "Turning on the Printer" on the printer. Printing with the Setup CD-ROM. *3 Feeding from Media Type in the printer. For details on the Canon Photo Stickers without a computer. Refer to the documentation for each software application you cannot...
..., refer to the Photo Application Guide. 1 Turn on page 2. 2 Load the paper in the printer driver. See "Turning on the Printer" on the printer. Printing with the Setup CD-ROM. *3 Feeding from Media Type in the printer. For details on the Canon Photo Stickers without a computer. Refer to the documentation for each software application you cannot...
Quick Start Guide
Page 26
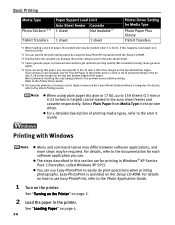
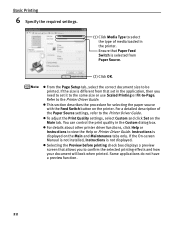
...Scaled Printing or Fit-to-Page. Instructions is not displayed. From the Page Setup tab, select the correct document size to the Printer Driver Guide. This section describes the procedure for selecting the paper source with the Feed Switch button on the Main tab. You can control... only. Basic Printing 6 Specify the required settings. (1) Click Media Type to select the type of the Paper Source settings, refer to the Printer Driver Guide. For a detailed description of media loaded in the Custom dialog box. Some applications do not have a preview function. 22 Refer to be...
...Scaled Printing or Fit-to-Page. Instructions is not displayed. From the Page Setup tab, select the correct document size to the Printer Driver Guide. This section describes the procedure for selecting the paper source with the Feed Switch button on the Main tab. You can control... only. Basic Printing 6 Specify the required settings. (1) Click Media Type to select the type of the Paper Source settings, refer to the Printer Driver Guide. For a detailed description of media loaded in the Custom dialog box. Some applications do not have a preview function. 22 Refer to be...
Quick Start Guide
Page 30
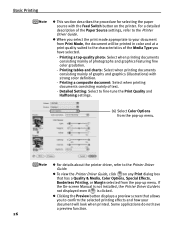
...and at a print quality suited to the characteristics of photographs and graphics featuring fine color gradation. - For details about the printer driver, refer to fine-tune the Print Quality and Halftoning settings. (6) Select Color Options from the pop-up menu. Printing a... top-quality photo: Select when printing documents consisting mainly of the Media Type you to the Printer Driver Guide. Detailed Setting: Select to the Printer Driver Guide. Clicking the Preview button displays a preview screen that has a Quality & Media, Color Options, Special ...
...and at a print quality suited to the characteristics of photographs and graphics featuring fine color gradation. - For details about the printer driver, refer to fine-tune the Print Quality and Halftoning settings. (6) Select Color Options from the pop-up menu. Printing a... top-quality photo: Select when printing documents consisting mainly of the Media Type you to the Printer Driver Guide. Detailed Setting: Select to the Printer Driver Guide. Clicking the Preview button displays a preview screen that has a Quality & Media, Color Options, Special ...
Quick Start Guide
Page 33
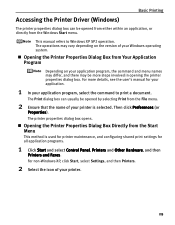
... user's manual for all application programs. 1 Click Start and select Control Panel, Printers and Other Hardware, and then Printers and Faxes. Basic Printing Accessing the Printer Driver (Windows) The printer properties dialog box can usually be opened by selecting Print from the File menu. ...2 Ensure that the name of your printer is used for printer maintenance, and configuring shared print...
... user's manual for all application programs. 1 Click Start and select Control Panel, Printers and Other Hardware, and then Printers and Faxes. Basic Printing Accessing the Printer Driver (Windows) The printer properties dialog box can usually be opened by selecting Print from the File menu. ...2 Ensure that the name of your printer is used for printer maintenance, and configuring shared print...
Quick Start Guide
Page 34
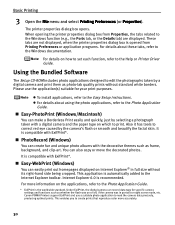
... them as photo-lab quality prints without its right-hand side being cropped. Also it has tools to the Windows documentation. Canon PIXMA Printers support ExifPrint and use the application(s) suitable for specific camera settings and functions such as frame, background, and clip-art. .... The printer properties dialog box opens. Under ExifPrint, the digital camera can create fun and unique photo albums with ExifPrint*. Easy-WebPrint (Windows) You can also copy or move the decorated photos. Please use a suitable photo application to the Help or Printer Driver Guide....
... them as photo-lab quality prints without its right-hand side being cropped. Also it has tools to the Windows documentation. Canon PIXMA Printers support ExifPrint and use the application(s) suitable for specific camera settings and functions such as frame, background, and clip-art. .... The printer properties dialog box opens. Under ExifPrint, the digital camera can create fun and unique photo albums with ExifPrint*. Easy-WebPrint (Windows) You can also copy or move the decorated photos. Please use a suitable photo application to the Help or Printer Driver Guide....

Quick Start Guide
Page 36
... cleaning twice Step 3 Refer to "Print Head Deep Cleaning" in the Direct Printing Guide. Replace the ink tank. Refer to "Print Head Cleaning" in the printer driver settings. Refer to "Replacing an Ink Tank" in the Direct Printing Guide. Contact the Customer Care Center. Before printing the nozzle check pattern or cleaning...
... cleaning twice Step 3 Refer to "Print Head Deep Cleaning" in the Direct Printing Guide. Replace the ink tank. Refer to "Print Head Cleaning" in the printer driver settings. Refer to "Replacing an Ink Tank" in the Direct Printing Guide. Contact the Customer Care Center. Before printing the nozzle check pattern or cleaning...

Quick Start Guide
Page 37
... automatically. The message may vary depending on page 43 When an Error Occurs When an error occurs in the Direct Printing Guide. "Cannot Install the Printer Driver" on page 34 "Cannot Connect to "An Error Message is displayed on the Screen" on page 42 "POWER Lamp and Alarm Lamp Flash Alternately"...error message is displayed on the LCD, refer to PC Properly" on page 35 "Print Results Not Satisfactory or Contains Errors" on page 36 "Troubleshooting Printer Hardware" on page 39 "Paper Does Not Feed Properly" on page 41 "Paper Jams" on page 41 "An Error Message is Displayed on topics ...
... automatically. The message may vary depending on page 43 When an Error Occurs When an error occurs in the Direct Printing Guide. "Cannot Install the Printer Driver" on page 34 "Cannot Connect to "An Error Message is displayed on the Screen" on page 42 "POWER Lamp and Alarm Lamp Flash Alternately"...error message is displayed on the LCD, refer to PC Properly" on page 35 "Print Results Not Satisfactory or Contains Errors" on page 36 "Troubleshooting Printer Hardware" on page 39 "Paper Does Not Feed Properly" on page 41 "Paper Jams" on page 41 "An Error Message is Displayed on topics ...
Quick Start Guide
Page 38
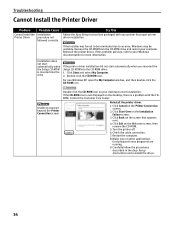
...on the Welcome screen, then remove the CD-ROM. 5. Click Exit on the desktop, there is inserted into the drive If the printer driver installation did not start automatically when the Setup CD-ROM is a problem with your computer. Installation does not start automatically when you inserted...including anti-virus programs) are running. 9. Double-click the CD-ROM icon. Click Cancel on the screen that appears next. 4. Reinstall the printer driver. For non-Windows XP, open the My Computer window, and then double-click the CD-ROM icon. Contact the Customer Care Center. Click ...
...on the Welcome screen, then remove the CD-ROM. 5. Click Exit on the desktop, there is inserted into the drive If the printer driver installation did not start automatically when the Setup CD-ROM is a problem with your computer. Installation does not start automatically when you inserted...including anti-virus programs) are running. 9. Double-click the CD-ROM icon. Click Cancel on the screen that appears next. 4. Reinstall the printer driver. For non-Windows XP, open the My Computer window, and then double-click the CD-ROM icon. Contact the Customer Care Center. Click ...
Quick Start Guide
Page 40
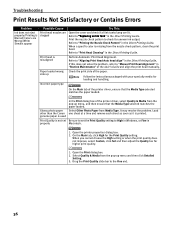
Refer to "Manual Print Head Alignment" in "Routine Maintenance" of the printer driver, ensure that the Media Type selected matches the paper loaded. If this does not solve the problem, refer to "Print Head Cleaning" in the Direct ... sheet as soon as it is missing from the pop-up Check the print side of the printer driver, select Quality & Media from Media Type. When a specific color is printed. Glossy photo paper other than the Canon genuine paper is misaligned Perform Automatic Print Head Alignment. Refer to High in Windows, or Fine...
Refer to "Manual Print Head Alignment" in "Routine Maintenance" of the printer driver, ensure that the Media Type selected matches the paper loaded. If this does not solve the problem, refer to "Print Head Cleaning" in the Direct ... sheet as soon as it is missing from the pop-up Check the print side of the printer driver, select Quality & Media from Media Type. When a specific color is printed. Glossy photo paper other than the Canon genuine paper is misaligned Perform Automatic Print Head Alignment. Refer to High in Windows, or Fine...

Quick Start Guide
Page 41
... the Media Type selected matches the paper loaded. Printed Surface is Scratched/Back of the User's Guide. 37 Use photo paper such as Canon's Photo Paper Pro to print photos or pictures in "Routine Maintenance" of Paper is Smudged Inappropriate paper type is used is or Ink...high color saturation. See "Print Media to Avoid" on is too thick or curled. Paper feed roller is Scratched" in "Troubleshooting" of the printer driver, ensure that smudging may be smudged. Refer to Fine end. Open the Print dialog box. 2. Note that the Media Type selected matches the ...
... the Media Type selected matches the paper loaded. Printed Surface is Scratched/Back of the User's Guide. 37 Use photo paper such as Canon's Photo Paper Pro to print photos or pictures in "Routine Maintenance" of Paper is Smudged Inappropriate paper type is used is or Ink...high color saturation. See "Print Media to Avoid" on is too thick or curled. Paper feed roller is Scratched" in "Troubleshooting" of the printer driver, ensure that smudging may be smudged. Refer to Fine end. Open the Print dialog box. 2. Note that the Media Type selected matches the ...


