
iP6600D Quick Start Guide
Page 2
...asked questions, product information, and "where to buy" instructions are subject to change without notice. CarePAK offers toll-free Canon technical support and includes Canon's superb Instant Exchange product replacement program. For further information about extending your product's 1 year limited warranty period. Internet ...- Extended Service and Support - CarePAK must be purchased during your Canon service and support, call (1-800-385-2155), or visit our Web site at (1-866-251-3752). 4. www.canonhelp.com For...
...asked questions, product information, and "where to buy" instructions are subject to change without notice. CarePAK offers toll-free Canon technical support and includes Canon's superb Instant Exchange product replacement program. For further information about extending your product's 1 year limited warranty period. Internet ...- Extended Service and Support - CarePAK must be purchased during your Canon service and support, call (1-800-385-2155), or visit our Web site at (1-866-251-3752). 4. www.canonhelp.com For...

iP6600D Quick Start Guide
Page 4
...any form, in whole or in the United States and other countries. All information regarding the accuracy thereof. Trademarks "Windows" is owned by Canon U.S.A., Inc. "SmartMedia" is a trademark of Microsoft Corporation, registered in part, without notice. "IrDA Feature Trademark" is a trademark of... PRO Duo" are not intended to be, nor should they be understood to be an easy-to-use guide to your Canon PIXMA iP6600D Photo Printer. All statements, technical information and recommendations in the U.S. Specifications are licensed to change without the prior written consent ...
...any form, in whole or in the United States and other countries. All information regarding the accuracy thereof. Trademarks "Windows" is owned by Canon U.S.A., Inc. "SmartMedia" is a trademark of Microsoft Corporation, registered in part, without notice. "IrDA Feature Trademark" is a trademark of... PRO Duo" are not intended to be, nor should they be understood to be an easy-to-use guide to your Canon PIXMA iP6600D Photo Printer. All statements, technical information and recommendations in the U.S. Specifications are licensed to change without the prior written consent ...

iP6600D Quick Start Guide
Page 5
... Error Message is displayed on the Screen 42 POWER Lamp and Alarm Lamp Flash Alternately 43 Appendix Specifications 44 Safety Precautions 48 Regulatory Information 50 CANON U.S.A., INC. LIMITED WARRANTY --- (USA Only 51 Index 53 1
... Error Message is displayed on the Screen 42 POWER Lamp and Alarm Lamp Flash Alternately 43 Appendix Specifications 44 Safety Precautions 48 Regulatory Information 50 CANON U.S.A., INC. LIMITED WARRANTY --- (USA Only 51 Index 53 1

iP6600D Quick Start Guide
Page 6
... right corner. When the Help window appears, select your computer, or use them. Then click the feature you want to know more information, view the iP6600D User's Guide and Printer Driver Guide installed on the LCD" in the lower left corner. Turning on page 43. 2 If the POWER lamp and the...
... right corner. When the Help window appears, select your computer, or use them. Then click the feature you want to know more information, view the iP6600D User's Guide and Printer Driver Guide installed on the LCD" in the lower left corner. Turning on page 43. 2 If the POWER lamp and the...

iP6600D Quick Start Guide
Page 7
When the POWER lamp stops blinking, the printer is not lit. Turning off the Printer 1 To turn off . Basic Printing About the Power Plug When removing the power plug after turing off the printer, be unable to check that the POWER lamp is turned off the printer, press the POWER button. If the power plug is removed from the wall outlet with the POWER lamp lit or blinking, the printer cannot protect its print heads and may be sure to print. 3
When the POWER lamp stops blinking, the printer is not lit. Turning off the Printer 1 To turn off . Basic Printing About the Power Plug When removing the power plug after turing off the printer, be unable to check that the POWER lamp is turned off the printer, press the POWER button. If the power plug is removed from the wall outlet with the POWER lamp lit or blinking, the printer cannot protect its print heads and may be sure to print. 3

iP6600D Quick Start Guide
Page 8
...; Damp paper • Excessively thin paper (less than 64 gsm or 17 lb) • Excessively thick paper* (more than 105 gsm or 28 lb) * non-Canon branded paper • Picture postcards • Postcards affixed with photos or stickers • Envelopes with double flaps • Envelopes with sticker flaps • Envelopes with...
...; Damp paper • Excessively thin paper (less than 64 gsm or 17 lb) • Excessively thick paper* (more than 105 gsm or 28 lb) * non-Canon branded paper • Picture postcards • Postcards affixed with photos or stickers • Envelopes with double flaps • Envelopes with sticker flaps • Envelopes with...

iP6600D Quick Start Guide
Page 9
To change the paper source, use with the printer driver. You can switch between paper loaded in both types of paper to the Printer Driver Guide. You can also specify the type/size of paper without reloading paper for regular use the Feed Switch button on the printer driver settings, refer to be fed from the cassette whenever you regularly print onto. This is convenient for loading a certain type of paper. For example, you can specify that Letter-sized plain paper is convenient if you to print on various sizes or types of paper, such as plain paper, you print. ...
To change the paper source, use with the printer driver. You can switch between paper loaded in both types of paper to the Printer Driver Guide. You can also specify the type/size of paper without reloading paper for regular use the Feed Switch button on the printer driver settings, refer to be fed from the cassette whenever you regularly print onto. This is convenient for loading a certain type of paper. For example, you can specify that Letter-sized plain paper is convenient if you to print on various sizes or types of paper, such as plain paper, you print. ...

iP6600D Quick Start Guide
Page 10
Basic Printing • Continuous printing on the same type/size of paper by using both the auto sheet feeder and cassette together If the auto sheet feeder or cassette runs out of paper, the paper source automatically switches to the Printer Driver Guide. For information on a shelf with minimal space, you need to use just the cassette for printing onto a large volume of the printer. To use this feature, you can use just the auto sheet feeder or cassette according to match the location of the printer You can use only the cassette, check any usage restrictions in advance. 6 ...
Basic Printing • Continuous printing on the same type/size of paper by using both the auto sheet feeder and cassette together If the auto sheet feeder or cassette runs out of paper, the paper source automatically switches to the Printer Driver Guide. For information on a shelf with minimal space, you need to use just the cassette for printing onto a large volume of the printer. To use this feature, you can use just the auto sheet feeder or cassette according to match the location of the printer You can use only the cassette, check any usage restrictions in advance. 6 ...

iP6600D Quick Start Guide
Page 11
... front cover and pull down to open it . Basic Printing Loading Plain Paper in the Auto Sheet Feeder For detailed information on the specialty media Canon provides for detailed instructions on page 18. Refer to "Printing Media" in either side of the paper before loading it . 2 Pull out the paper output...
... front cover and pull down to open it . Basic Printing Loading Plain Paper in the Auto Sheet Feeder For detailed information on the specialty media Canon provides for detailed instructions on page 18. Refer to "Printing Media" in either side of the paper before loading it . 2 Pull out the paper output...

iP6600D Quick Start Guide
Page 12
... paper (64 gsm or 17 lb, 13 mm or 0.52 inches in height) in the auto sheet feeder. You can use general copy paper or Canon's Super White Paper. Basic Printing 3 Load the paper. You can load up to the instructions packaged with the print side facing UP. (2) Align the paper...
... paper (64 gsm or 17 lb, 13 mm or 0.52 inches in height) in the auto sheet feeder. You can use general copy paper or Canon's Super White Paper. Basic Printing 3 Load the paper. You can load up to the instructions packaged with the print side facing UP. (2) Align the paper...
iP6600D Quick Start Guide
Page 13
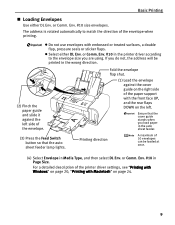
The address is rotated automatically to the envelope size you are using. Select either DL Env. Env. #10 in Media Type, and then select DL Env. Printing direction A maximum of 10 envelopes can be printed in the wrong direction. (2) Pinch the paper guide and slide it against the cover guide on the right side of the paper support with embossed or treated surfaces, a double flap, pressure seals or sticker flaps. Env. #10 size envelopes. Do not use envelopes with the front face UP, and the rear flaps DOWN on page 24. 9 or Comm. For a detailed description of the ...
The address is rotated automatically to the envelope size you are using. Select either DL Env. Env. #10 in Media Type, and then select DL Env. Printing direction A maximum of 10 envelopes can be printed in the wrong direction. (2) Pinch the paper guide and slide it against the cover guide on the right side of the paper support with embossed or treated surfaces, a double flap, pressure seals or sticker flaps. Env. #10 size envelopes. Do not use envelopes with the front face UP, and the rear flaps DOWN on page 24. 9 or Comm. For a detailed description of the ...

iP6600D Quick Start Guide
Page 14
Basic Printing Loading Other Small-Sized Paper in the Auto Sheet Feeder Cutting plain paper to 4" x 6"/101.6 mm x 152.4 mm, 5" x 7"/127.0 x 177.8 mm, or 2.13" x 3.39"/54.0 x 86.0 mm (Credit Card) size for a trial printing can cause the paper to 20 sheets of 4" x 6" or 2.13" x 3.39" (Credit Card)-sized paper; 10 sheets of 5" x 7"-sized paper. (3) Press the Feed Switch button so that the auto sheet feeder lamp lights. (4) Select 4 x 6 in 101.6 x 152.4 mm, 5 x 7 in 127.0 x 177.8 mm, or Credit Card 2.13 x 3.39 in 54.0 x 86.0 mm from Page Size in landscape orientation can cause paper jams. (1)...
Basic Printing Loading Other Small-Sized Paper in the Auto Sheet Feeder Cutting plain paper to 4" x 6"/101.6 mm x 152.4 mm, 5" x 7"/127.0 x 177.8 mm, or 2.13" x 3.39"/54.0 x 86.0 mm (Credit Card) size for a trial printing can cause the paper to 20 sheets of 4" x 6" or 2.13" x 3.39" (Credit Card)-sized paper; 10 sheets of 5" x 7"-sized paper. (3) Press the Feed Switch button so that the auto sheet feeder lamp lights. (4) Select 4 x 6 in 101.6 x 152.4 mm, 5 x 7 in 127.0 x 177.8 mm, or Credit Card 2.13 x 3.39 in 54.0 x 86.0 mm from Page Size in landscape orientation can cause paper jams. (1)...

iP6600D Quick Start Guide
Page 15
Basic Printing We recommend using genuine Canon photo media when printing photographs. Legal-sized paper, 2.13" x 3.39" / 54.0 x 86.0 mm size paper, and Photo Stickers are not loadable in the User's Guide ... how to load specialty media into the printer. 1 Flatten the four corners of the paper before loading it. For detailed information on the specialty media Canon provides for detailed instructions on page 18. Refer to load paper. (1) Pull out the cassette from the printer. (2) Remove the cover on page 18. When...
Basic Printing We recommend using genuine Canon photo media when printing photographs. Legal-sized paper, 2.13" x 3.39" / 54.0 x 86.0 mm size paper, and Photo Stickers are not loadable in the User's Guide ... how to load specialty media into the printer. 1 Flatten the four corners of the paper before loading it. For detailed information on the specialty media Canon provides for detailed instructions on page 18. Refer to load paper. (1) Pull out the cassette from the printer. (2) Remove the cover on page 18. When...

iP6600D Quick Start Guide
Page 16
or larger sized paper (nonstandard-size paper: 203 mm/8 inches or more in the cassette. 12 Legal-sized paper, 2.13" x 3.39"/54.0 x 86.0 mm size paper, and Photo Stickers are not loadable in length), extend the cassette. Basic Printing 3 Adjust the size of the Cassette. or smaller sized paper (nonstandard-size paper: less than 203 mm/8 inches in length), do not extend the cassette. When loading A5- When loading 5" x 7"-
or larger sized paper (nonstandard-size paper: 203 mm/8 inches or more in the cassette. 12 Legal-sized paper, 2.13" x 3.39"/54.0 x 86.0 mm size paper, and Photo Stickers are not loadable in length), extend the cassette. Basic Printing 3 Adjust the size of the Cassette. or smaller sized paper (nonstandard-size paper: less than 203 mm/8 inches in length), do not extend the cassette. When loading A5- When loading 5" x 7"-

iP6600D Quick Start Guide
Page 17
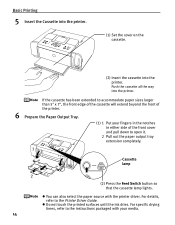
However, do not stack more than 50 sheets in the cassette. 4 Load the paper. (Print side facing DOWN) Basic Printing Load limit mark Do not load beyond this load limit mark. (1) Load the paper into the cassette with the print side facing DOWN. (2) Align the paper stack against the right side of plain paper (64 gsm or 17 lb, 13 mm or 0.52 inches in height) in the paper output tray. 13 You can use general copy paper or Canon's Super White Paper. You can load up to 150 sheets of the cassette. (3) Slide the paper guides to fit the loaded paper stack.
However, do not stack more than 50 sheets in the cassette. 4 Load the paper. (Print side facing DOWN) Basic Printing Load limit mark Do not load beyond this load limit mark. (1) Load the paper into the cassette with the print side facing DOWN. (2) Align the paper stack against the right side of plain paper (64 gsm or 17 lb, 13 mm or 0.52 inches in height) in the paper output tray. 13 You can use general copy paper or Canon's Super White Paper. You can load up to 150 sheets of the cassette. (3) Slide the paper guides to fit the loaded paper stack.
iP6600D Quick Start Guide
Page 18
For specific drying times, refer to the Printer Driver Guide. For details, refer to the instructions packaged with the printer driver. You can also select the paper source with your fingers in the notches in either side of the printer. 6 Prepare the Paper Output Tray. (1) 1 Put your media. 14 Do not touch the printed surfaces until the ink dries. If the cassette has been extended to accommodate paper sizes larger than 5" x 7", the front edge of the cassette will extend beyond the front of the front cover and pull down to open it. 2 Pull out the paper output tray extension ...
For specific drying times, refer to the Printer Driver Guide. For details, refer to the instructions packaged with the printer driver. You can also select the paper source with your fingers in the notches in either side of the printer. 6 Prepare the Paper Output Tray. (1) 1 Put your media. 14 Do not touch the printed surfaces until the ink dries. If the cassette has been extended to accommodate paper sizes larger than 5" x 7", the front edge of the cassette will extend beyond the front of the front cover and pull down to open it. 2 Pull out the paper output tray extension ...

iP6600D Quick Start Guide
Page 19
Do not use envelopes with its flap facing UP on page 24. 15 The flap of the envelope when printing. Printing direction (3) Press the Feed Switch button so that the cassette lamp lights. (4) Select Envelope in Page Size. Env. #10 in Media Type, and then select DL Env. Env. #10 size envelopes. A maximum of 5 envelopes can be printed in the printer driver according to match the direction of the envelope will be loaded at once. (2) Slide the paper guide against the right side of the cassette. The address is rotated automatically to the envelope size you do not, the...
Do not use envelopes with its flap facing UP on page 24. 15 The flap of the envelope when printing. Printing direction (3) Press the Feed Switch button so that the cassette lamp lights. (4) Select Envelope in Page Size. Env. #10 in Media Type, and then select DL Env. Env. #10 size envelopes. A maximum of 5 envelopes can be printed in the printer driver according to match the direction of the envelope will be loaded at once. (2) Slide the paper guide against the right side of the cassette. The address is rotated automatically to the envelope size you do not, the...

iP6600D Quick Start Guide
Page 20
sized paper or 10 sheets of 5" x 7"-sized paper. (2) Align the paper stack against the right side of 4" x 6"- Cutting plain paper to 4" x 6"/101.6 mm x 152.4 mm or 5" x 7"/127.0 x 177.8 mm size for a long time. Basic Printing Loading 4" x 6" or 5" x 7"-Sized Paper in the Cassette Do not leave photo paper, such as Photo Paper Pro, in the cassette for a trial printing can cause paper jams. (1) Load the paper into the cassette with the print side facing DOWN. • Do not extend the cassette. • Load the paper lengthways regardless of the direction of the document. • You can ...
sized paper or 10 sheets of 5" x 7"-sized paper. (2) Align the paper stack against the right side of 4" x 6"- Cutting plain paper to 4" x 6"/101.6 mm x 152.4 mm or 5" x 7"/127.0 x 177.8 mm size for a long time. Basic Printing Loading 4" x 6" or 5" x 7"-Sized Paper in the Cassette Do not leave photo paper, such as Photo Paper Pro, in the cassette for a trial printing can cause paper jams. (1) Load the paper into the cassette with the print side facing DOWN. • Do not extend the cassette. • Load the paper lengthways regardless of the direction of the document. • You can ...

iP6600D Quick Start Guide
Page 21
Loading paper in the printer driver. See "Using Specialty Media" on page 24. Basic Printing (5) Select 4 x 6 in 101.6 x 152.4 mm or 5 x 7 in 127.0 x 177.8 mm from Page Size in landscape orientation can cause the paper to be jammed. Portrait Landscape We recommend using genuine Canon photo media when printing photographs. Always load paper in portrait orientation. For a detailed description of the printer driver settings, see "Printing with Windows" on page 20, or "Printing with Macintosh" on page 18. 17
Loading paper in the printer driver. See "Using Specialty Media" on page 24. Basic Printing (5) Select 4 x 6 in 101.6 x 152.4 mm or 5 x 7 in 127.0 x 177.8 mm from Page Size in landscape orientation can cause the paper to be jammed. Portrait Landscape We recommend using genuine Canon photo media when printing photographs. Always load paper in portrait orientation. For a detailed description of the printer driver settings, see "Printing with Windows" on page 20, or "Printing with Macintosh" on page 18. 17

iP6600D Quick Start Guide
Page 22
Photo Quality Media • High Resolution Paper • Glossy Photo Paper • Matte Photo Paper • Photo Paper Plus Double Sided • Photo Paper Plus Glossy • Photo Paper Plus Semi-Gloss • Photo Paper Pro • Photo Stickers Media Suited for Business Documents • High Resolution Paper • Transparencies 18 Basic Printing Using Specialty Media Canon recommends that you use genuine Canon media to ensure optimal print quality.
Photo Quality Media • High Resolution Paper • Glossy Photo Paper • Matte Photo Paper • Photo Paper Plus Double Sided • Photo Paper Plus Glossy • Photo Paper Plus Semi-Gloss • Photo Paper Pro • Photo Stickers Media Suited for Business Documents • High Resolution Paper • Transparencies 18 Basic Printing Using Specialty Media Canon recommends that you use genuine Canon media to ensure optimal print quality.
