Quick Start Guide
Page 25
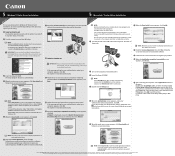
... operates properly. For details on your PC supports USB 2.0 Hi-Speed connection. • Both the USB cable and USB hub support USB 2.0 Hi-Speed connection. Your environment is not fully compatible with USB 2.0. Your environment is not fully compatible with USB 2.0, the printer will operate at a lower speed provided under USB 1.1. Obtain the latest version of your PC...
... operates properly. For details on your PC supports USB 2.0 Hi-Speed connection. • Both the USB cable and USB hub support USB 2.0 Hi-Speed connection. Your environment is not fully compatible with USB 2.0. Your environment is not fully compatible with USB 2.0, the printer will operate at a lower speed provided under USB 1.1. Obtain the latest version of your PC...
Quick Start Guide
Page 31
... , turn the printer on. If successful, the problem may have been with the device. • There could also be a problem with the cable(s). Replace the cable(s) and try printing again. When using Mac OS X v.10.3.x or Mac OS X v.10.2.8, select Edit Printer List from the Printer pop-up... paper" error has not been reset for a certain period. Follow the on the Printer pop-up menu on . A USB port is selected if either USBnnn (Canon iPXXXXX) or MPUSBPRNnn (Canon iPXXXXX) (where n is a number, and XXXXX represents 6320D or 6310D.) is not displayed in the screen displayed in ...
... , turn the printer on. If successful, the problem may have been with the device. • There could also be a problem with the cable(s). Replace the cable(s) and try printing again. When using Mac OS X v.10.3.x or Mac OS X v.10.2.8, select Edit Printer List from the Printer pop-up... paper" error has not been reset for a certain period. Follow the on the Printer pop-up menu on . A USB port is selected if either USBnnn (Canon iPXXXXX) or MPUSBPRNnn (Canon iPXXXXX) (where n is a number, and XXXXX represents 6320D or 6310D.) is not displayed in the screen displayed in ...
Easy Setup Instructions
Page 1
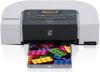
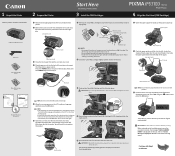
...2 Pinch the paper guide and slide it . •Handle the removed protective tape carefully to a power outlet. NOTE: Do not connect the USB cable at this to register the product. 4 Repeat the procedure for the Photo FINE Cartridge (CL-52), inserting it clicks into the auto sheet feeder... and the card slot cover next. IMPORTANT: For correct printer operation, make sure the FINE Cartridge is Displayed in the LCD" in slots. PIXMA iP6310D Photo Printer Power Cord Color FINE Cartridge (CL-41) 1 Remove the shipping tape from the box. Paper support (b) Front cover Protective material ...
...2 Pinch the paper guide and slide it . •Handle the removed protective tape carefully to a power outlet. NOTE: Do not connect the USB cable at this to register the product. 4 Repeat the procedure for the Photo FINE Cartridge (CL-52), inserting it clicks into the auto sheet feeder... and the card slot cover next. IMPORTANT: For correct printer operation, make sure the FINE Cartridge is Displayed in the LCD" in slots. PIXMA iP6310D Photo Printer Power Cord Color FINE Cartridge (CL-41) 1 Remove the shipping tape from the box. Paper support (b) Front cover Protective material ...
Easy Setup Instructions
Page 2
.... 7 When the Easy Install screen appears, click Install. QT5-0324-V02 ©2006 CANON INC. and other countries. "Adobe" and "Adobe RGB(1998)"are trademarks of the USB cable to the computer, the other to display explanations of each application bellow. 8 Read the ... the operation sound until the printer is restarted automatically. 11 When the Installation completed successfully screen appears, click Exit. Next, remove the USB cable connected to your printer name is restarted automatically. 9 Follow the on -screen instructions. 5 Macintosh® Printer Driver Installation 7 When ...
.... 7 When the Easy Install screen appears, click Install. QT5-0324-V02 ©2006 CANON INC. and other countries. "Adobe" and "Adobe RGB(1998)"are trademarks of the USB cable to the computer, the other to display explanations of each application bellow. 8 Read the ... the operation sound until the printer is restarted automatically. 11 When the Installation completed successfully screen appears, click Exit. Next, remove the USB cable connected to your printer name is restarted automatically. 9 Follow the on -screen instructions. 5 Macintosh® Printer Driver Installation 7 When ...
Direct Printing Guide
Page 26
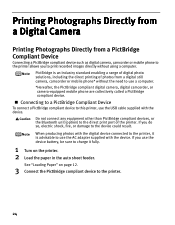
... in the auto sheet feeder. If you do so, electric shock, fire, or damage to print recorded images directly without the need to use the USB cable supplied with the device. Printing Photographs Directly from a Digital Camera Printing Photographs Directly from a digital still camera, camcorder or mobile phone* without using a computer...
... in the auto sheet feeder. If you do so, electric shock, fire, or damage to print recorded images directly without the need to use the USB cable supplied with the device. Printing Photographs Directly from a Digital Camera Printing Photographs Directly from a digital still camera, camcorder or mobile phone* without using a computer...

Direct Printing Guide
Page 27
.... 25 will appear on the model or brand of the device when the printer is turned off. (2) Connect the camera to the printer using the USB cable (for direct printing. Perform necessary operations according to the instruction manual supplied with your PictBridge compliant device, you may differ depending on the LCD display...
.... 25 will appear on the model or brand of the device when the printer is turned off. (2) Connect the camera to the printer using the USB cable (for direct printing. Perform necessary operations according to the instruction manual supplied with your PictBridge compliant device, you may differ depending on the LCD display...
Direct Printing Guide
Page 30
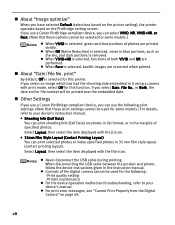
...item displayed with the film icon. • Never disconnect the USB cable during printing. When NR (Noise Reduction) is selected, noise in the margins of photos are corrected when printed. Other Settings If you use a Canon PictBridge-compliant device, you can print shooting Info (Exif Data) ...VIVID+NR is selected, functions of the digital camera cannot be used for some models.) When VIVID is removed. When disconnecting the USB cable between the product and printer, follow the device instructions given in 35 mm film style layout (contact printing layout). About "Image ...
...item displayed with the film icon. • Never disconnect the USB cable during printing. When NR (Noise Reduction) is selected, noise in the margins of photos are corrected when printed. Other Settings If you use a Canon PictBridge-compliant device, you can print shooting Info (Exif Data) ...VIVID+NR is selected, functions of the digital camera cannot be used for some models.) When VIVID is removed. When disconnecting the USB cable between the product and printer, follow the device instructions given in 35 mm film style layout (contact printing layout). About "Image ...
Direct Printing Guide
Page 35
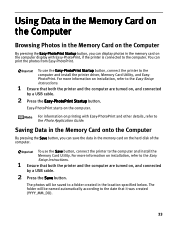
... to the Easy Setup Instructions. 1 Ensure that both the printer and the computer are turned on, and connected by a USB cable. 2 Press the Save button. Easy-PhotoPrint starts on , and connected by a USB cable. 2 Press the Easy-PhotoPrint Startup button. Saving Data in the Memory Card onto the Computer By pressing the Save button...
... to the Easy Setup Instructions. 1 Ensure that both the printer and the computer are turned on, and connected by a USB cable. 2 Press the Save button. Easy-PhotoPrint starts on , and connected by a USB cable. 2 Press the Easy-PhotoPrint Startup button. Saving Data in the Memory Card onto the Computer By pressing the Save button...
Direct Printing Guide
Page 36
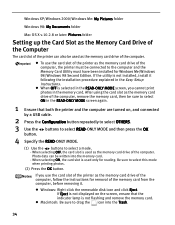
... Memory Card Utility must have been installed for Windows Me/Windows 98/Windows 98 Second Edition. If Eject is not displayed on , and connected by a USB cable. 2 Press the Configuration button repeatedly to select OTHERS. 3 Use the buttons to select READ-ONLY MODE and then press the OK button. 4 Specify the READ...
... Memory Card Utility must have been installed for Windows Me/Windows 98/Windows 98 Second Edition. If Eject is not displayed on , and connected by a USB cable. 2 Press the Configuration button repeatedly to select OTHERS. 3 Use the buttons to select READ-ONLY MODE and then press the OK button. 4 Specify the READ...


