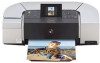
iP6210D Quick Start Guide
Page 1
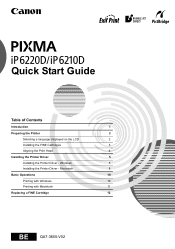
Windows 5 Installing the Printer Driver - Quick Start Guide Table of Contents Introduction 1 Preparing the Printer 2 Selecting a language displayed on the LCD 2 Installing the FINE Cartridges 3 Aligning the Print Head 4 Installing the Printer Driver 5 Installing the Printer Driver - Macintosh 8 Basic Operations 10 Printing with Windows 10 Printing with Macintosh 11 Replacing a FINE Cartridge 12 BE QA7-3655-V02
Windows 5 Installing the Printer Driver - Quick Start Guide Table of Contents Introduction 1 Preparing the Printer 2 Selecting a language displayed on the LCD 2 Installing the FINE Cartridges 3 Aligning the Print Head 4 Installing the Printer Driver 5 Installing the Printer Driver - Macintosh 8 Basic Operations 10 Printing with Windows 10 Printing with Macintosh 11 Replacing a FINE Cartridge 12 BE QA7-3655-V02
iP6210D Quick Start Guide
Page 2
...energy saving through the use a power supply voltage other office equipment. International ENERGY STAR® Program As an ENERGY STAR® Partner, Canon Inc. The International ENERGY STAR® Office Equipment Program is a global program that supplied in the country of purchase. The targeted products... are as follows: AC 110-120V, 50-60Hz AC 220-240V, 50-60Hz Printer Model: K10256 (iP6220D), K10257 (iP6210D) The correct power supply voltages and frequencies are office equipment such as set out in which business can participate ...
...energy saving through the use a power supply voltage other office equipment. International ENERGY STAR® Program As an ENERGY STAR® Partner, Canon Inc. The International ENERGY STAR® Office Equipment Program is a global program that supplied in the country of purchase. The targeted products... are as follows: AC 110-120V, 50-60Hz AC 220-240V, 50-60Hz Printer Model: K10256 (iP6220D), K10257 (iP6210D) The correct power supply voltages and frequencies are office equipment such as set out in which business can participate ...
iP6210D Quick Start Guide
Page 3
...that , if ignored, could result in the U.S. These must be observed for safe operation. No part of this guide refer to Canon Inc. These must be transmitted or copied in death or serious personal injury caused by incorrect operation of SD Association. • "...whatsoever without expressed written permission from Canon Inc. 1 and other countries. • "Macintosh" and "Mac" are trademarks of the equipment. The operations are licensed to the iP6220D. Introduction This Quick Start Guide uses the following symbols to the printer. Always observe the instructions indicated...
...that , if ignored, could result in the U.S. These must be observed for safe operation. No part of this guide refer to Canon Inc. These must be transmitted or copied in death or serious personal injury caused by incorrect operation of SD Association. • "...whatsoever without expressed written permission from Canon Inc. 1 and other countries. • "Macintosh" and "Mac" are trademarks of the equipment. The operations are licensed to the iP6220D. Introduction This Quick Start Guide uses the following symbols to the printer. Always observe the instructions indicated...
iP6210D Quick Start Guide
Page 4
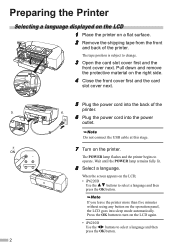
... to change. 3 Open the card slot cover first and the front cover next. If you leave the printer more than five minutes without using any button on the LCD; • iP6220D Use the buttons to select a language and then press the OK button. When the screen appears on the operation panel, the...
... to change. 3 Open the card slot cover first and the front cover next. If you leave the printer more than five minutes without using any button on the LCD; • iP6220D Use the buttons to select a language and then press the OK button. When the screen appears on the operation panel, the...
iP6210D Quick Start Guide
Page 6
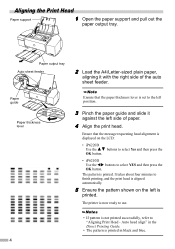
.... 4 Paper guide Paper thickness lever Ensure that the message requesting head alignment is aligned automatically. 5 Ensure the pattern shown on the LCD: • iP6220D Use the buttons to select Yes and then press the OK button. • iP6210D Use the buttons to "Aligning Print Head - Auto head align" ...the paper thickness lever is set to finish printing, and the print head is displayed on the left side of the auto sheet feeder. The printer is now ready to use. • If pattern is printed. It takes about four minutes to the left position. 3 Pinch the paper guide...
.... 4 Paper guide Paper thickness lever Ensure that the message requesting head alignment is aligned automatically. 5 Ensure the pattern shown on the LCD: • iP6220D Use the buttons to select Yes and then press the OK button. • iP6210D Use the buttons to "Aligning Print Head - Auto head align" ...the paper thickness lever is set to finish printing, and the print head is displayed on the left side of the auto sheet feeder. The printer is now ready to use. • If pattern is printed. It takes about four minutes to the left position. 3 Pinch the paper guide...
iP6210D Quick Start Guide
Page 7
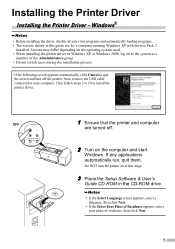
... appears, select a language, then click Next. • If the Select Your Place of residence, then click Next. 5 OFF 1 Ensure that the printer and computer are for a computer running Windows XP with Service Pack 2 installed. Then follow steps 3 to 10 to the system as a member of... the Administrators group. • Do not switch users during the installation process. Do NOT turn off . 2 Turn on to install the printer driver. Next, remove the USB cable connected to your place of Residence appears, select your computer. Windows® • Before installing the driver...
... appears, select a language, then click Next. • If the Select Your Place of residence, then click Next. 5 OFF 1 Ensure that the printer and computer are for a computer running Windows XP with Service Pack 2 installed. Then follow steps 3 to 10 to the system as a member of... the Administrators group. • Do not switch users during the installation process. Do NOT turn off . 2 Turn on to install the printer driver. Next, remove the USB cable connected to your place of Residence appears, select your computer. Windows® • Before installing the driver...
iP6210D Quick Start Guide
Page 8
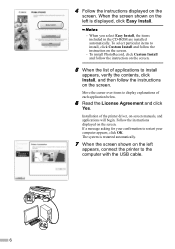
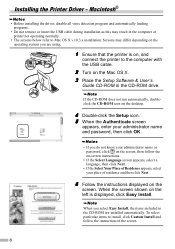
When the screen shown on the left appears, connect the printer to the computer with the USB cable. 6 To install PhotoRecord, click Custom Install and follow the instruction on the screen. 5 When the list of applications ... Custom Install and follow the instructions on the left is displayed, click Easy Install. - If a message asking for your confirmation to display explanations of the printer driver, on the screen. When you select Easy Install, the items included in the CD-ROM are installed automatically. Installation of each application below. 6 Read...
When the screen shown on the left appears, connect the printer to the computer with the USB cable. 6 To install PhotoRecord, click Custom Install and follow the instruction on the screen. 5 When the list of applications ... Custom Install and follow the instructions on the left is displayed, click Easy Install. - If a message asking for your confirmation to display explanations of the printer driver, on the screen. When you select Easy Install, the items included in the CD-ROM are installed automatically. Installation of each application below. 6 Read...

iP6210D Quick Start Guide
Page 9
... On-screen Manual, double-click the iPXXXXX On-screen Manual shortcut icon on . ON 8 Turn the printer on the desktop, or click Start and select All Programs (or Programs), Canon iPXXXXX Manual and iPXXXXX On-screen Manual (XXXXX represents 6220D or 6210D). • Microsoft Internet Explorer ...view the On-screen Manuals. 7 If the connection is restarted automatically. The system is not recognized, refer to "Cannot Install Printer Driver" in the User's Guide. 9 When the Installation Results screen appears, click Next. 10 When the Installation completed successfully screen appears, click ...
... On-screen Manual, double-click the iPXXXXX On-screen Manual shortcut icon on . ON 8 Turn the printer on the desktop, or click Start and select All Programs (or Programs), Canon iPXXXXX Manual and iPXXXXX On-screen Manual (XXXXX represents 6220D or 6210D). • Microsoft Internet Explorer ...view the On-screen Manuals. 7 If the connection is restarted automatically. The system is not recognized, refer to "Cannot Install Printer Driver" in the User's Guide. 9 When the Installation Results screen appears, click Next. 10 When the Installation completed successfully screen appears, click ...
iP6210D Quick Start Guide
Page 10
... and then click Next. 6 Follow the instructions displayed on the Mac OS X. 3 Place the Setup Software & User's Guide CD-ROM in the computer or printer not operating normally. • The screens below refer to the computer with the USB cable. 2 Turn on the screen. Macintosh® • Before installing...the USB cable during installation as this may differ depending on the screen. 8 When the screen shown on the left is on, and connect the printer to Mac OS X v.10.3.x installation. If the CD-ROM does not run automatically, doubleclick the CD-ROM icon on the desktop. 4 Double-click...
... and then click Next. 6 Follow the instructions displayed on the Mac OS X. 3 Place the Setup Software & User's Guide CD-ROM in the computer or printer not operating normally. • The screens below refer to the computer with the USB cable. 2 Turn on the screen. Macintosh® • Before installing...the USB cable during installation as this may differ depending on the screen. 8 When the screen shown on the left is on, and connect the printer to Mac OS X v.10.3.x installation. If the CD-ROM does not run automatically, doubleclick the CD-ROM icon on the desktop. 4 Double-click...
iP6210D Quick Start Guide
Page 11
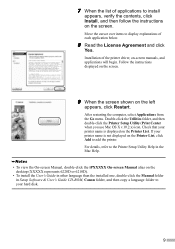
...Follow the instructions displayed on the screen. 9 When the screen shown on -screen manuals, and applications will begin. For details, refer to the Printer Setup Utility Help in the Mac Help. • To view the On-screen Manual, double-click the iPXXXXX On-screen Manual alias on the ..., double-click the Manual folder in Setup Software & User's Guide CD-ROM, Canon folder, and then copy a language folder to install appears, verify the contents, click Install, and then follow the instructions on the Printer List, click Add to display explanations of each application below. 8 Read the License...
...Follow the instructions displayed on the screen. 9 When the screen shown on -screen manuals, and applications will begin. For details, refer to the Printer Setup Utility Help in the Mac Help. • To view the On-screen Manual, double-click the iPXXXXX On-screen Manual alias on the ..., double-click the Manual folder in Setup Software & User's Guide CD-ROM, Canon folder, and then copy a language folder to install appears, verify the contents, click Install, and then follow the instructions on the Printer List, click Add to display explanations of each application below. 8 Read the License...
iP6210D Quick Start Guide
Page 12
Print the nozzle check pattern, check the results, then perform print head cleaning. Contact your local Canon service representative. • To avoid injury, never put your printer is printing. If prints are unclear or specific colors are not reproduced even if there is not displayed. 4 To start in ... refer to produce better quality prints. • If you detect smoke, unusual smells or strange noises around the printer, immediately turn the printer off and always unplug the printer. If the On-screen Manual is not installed, Instructions is plenty of ink, print head nozzles may be clogged...
Print the nozzle check pattern, check the results, then perform print head cleaning. Contact your local Canon service representative. • To avoid injury, never put your printer is printing. If prints are unclear or specific colors are not reproduced even if there is not displayed. 4 To start in ... refer to produce better quality prints. • If you detect smoke, unusual smells or strange noises around the printer, immediately turn the printer off and always unplug the printer. If the On-screen Manual is not installed, Instructions is plenty of ink, print head nozzles may be clogged...
iP6210D Quick Start Guide
Page 13
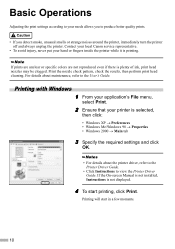
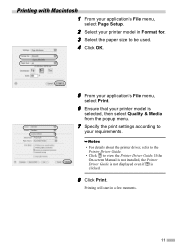
... Quality & Media from the popup menu. 7 Specify the print settings according to your requirements. • For details about the printer driver, refer to the Printer Driver Guide. • Click to be used. 4 Click OK. 5 From your application's File menu, select Print. 6 Ensure that ...your printer model in a few moments. 11 Printing with Macintosh 1 From your application's File menu, select Page Setup. 2 Select your printer model is clicked. 8 Click Print. Printing will start in Format for. 3 Select the paper...
... Quality & Media from the popup menu. 7 Specify the print settings according to your requirements. • For details about the printer driver, refer to the Printer Driver Guide. • Click to be used. 4 Click OK. 5 From your application's File menu, select Print. 6 Ensure that ...your printer model in a few moments. 11 Printing with Macintosh 1 From your application's File menu, select Page Setup. 2 Select your printer model is clicked. 8 Click Print. Printing will start in Format for. 3 Select the paper...
iP6210D Quick Start Guide
Page 14
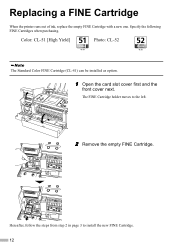
Color: CL-51 [High Yield] Photo: CL-52 The Standard Color FINE Cartridge (CL-41) can be installed as option. 1 Open the card slot cover first and the front cover next. Specify the following FINE Cartridges when purchasing. Hereafter, follow the steps from step 2 in page 3 to the left. 2 Remove the empty FINE Cartridge. The FINE Cartridge holder moves to install the new FINE Cartridge. 12 Replacing a FINE Cartridge When the printer runs out of ink, replace the empty FINE Cartridge with a new one.
Color: CL-51 [High Yield] Photo: CL-52 The Standard Color FINE Cartridge (CL-41) can be installed as option. 1 Open the card slot cover first and the front cover next. Specify the following FINE Cartridges when purchasing. Hereafter, follow the steps from step 2 in page 3 to the left. 2 Remove the empty FINE Cartridge. The FINE Cartridge holder moves to install the new FINE Cartridge. 12 Replacing a FINE Cartridge When the printer runs out of ink, replace the empty FINE Cartridge with a new one.
iP6210D Quick Start Guide
Page 15
... are designed to the following measures: Reorient or relocate the receiving antenna. Operation is connected. Canon U.S.A., Inc. One Canon Plaza Lake Success, NY 11042 1-516-328-5600 Regulatory Information For 110-120V, 50/60 Hz model Color Printer Model: K10256, K10257 This device complies with Part 15 of the FCC Rules. This equipment...
... are designed to the following measures: Reorient or relocate the receiving antenna. Operation is connected. Canon U.S.A., Inc. One Canon Plaza Lake Success, NY 11042 1-516-328-5600 Regulatory Information For 110-120V, 50/60 Hz model Color Printer Model: K10256, K10257 This device complies with Part 15 of the FCC Rules. This equipment...

iP6210D Quick Start Guide
Page 16
QA7-3655-V02 ©CANON INC.2005 PRINTED IN THAILAND The following FINE Cartridges (High Yield) are compatible with this printer. The following FINE Cartridge is compatible with this printer as an option. For details on FINE Cartridge replacement, refer to "Replacing a FINE Cartridge" in this guide.
QA7-3655-V02 ©CANON INC.2005 PRINTED IN THAILAND The following FINE Cartridges (High Yield) are compatible with this printer. The following FINE Cartridge is compatible with this printer as an option. For details on FINE Cartridge replacement, refer to "Replacing a FINE Cartridge" in this guide.

iP6220D Direct Printing Guide
Page 5
... 30 Printing Photographs Directly from a Digital Camera 32 Printing Photographs Directly from a PictBridge Compliant Device 32 Printing Photographs Directly from a Canon Bubble Jet Direct Compatible Digital Camera . . . . . .37 Printing Photographs from a Wireless Communication Device 39 Setting the Page...Panel and Menu Display 3 Operation Panel Names and Functions 3 Menu Displays 5 Using a Memory Card 8 Memory Cards Supported by This Printer 8 Inserting a Memory Card 9 Removing a Memory Card 10 Loading Paper 11 Changing the Print Settings 14 Printing a Photograph 17 Printing a ...
... 30 Printing Photographs Directly from a Digital Camera 32 Printing Photographs Directly from a PictBridge Compliant Device 32 Printing Photographs Directly from a Canon Bubble Jet Direct Compatible Digital Camera . . . . . .37 Printing Photographs from a Wireless Communication Device 39 Setting the Page...Panel and Menu Display 3 Operation Panel Names and Functions 3 Menu Displays 5 Using a Memory Card 8 Memory Cards Supported by This Printer 8 Inserting a Memory Card 9 Removing a Memory Card 10 Loading Paper 11 Changing the Print Settings 14 Printing a Photograph 17 Printing a ...

iP6220D Direct Printing Guide
Page 7
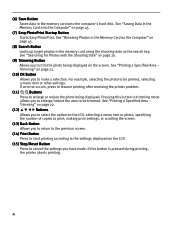
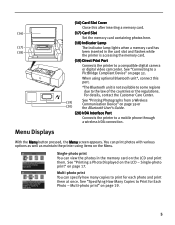
...has occurred that may require a service call. (3) LCD Monitor When you to print. See "Changing the Print Settings" on or off . Lighting: the printer is ready to set the page size, media type, Bordered/Borderless printing, printing with the date, etc. See "Menu Displays" on page 5. (5) Settings ...are described below: Operation Panel Names and Functions (1) (2) (3) (4) (5) (10) (6) (7) (11) (12) (8) (9) (13) (14) (15) (1) POWER Button Press to print. Flashing: the printer is preparing to print, or is preparing to turn off. (2) Alarm Lamp Lighting: an error has occurred and the...
...has occurred that may require a service call. (3) LCD Monitor When you to print. See "Changing the Print Settings" on or off . Lighting: the printer is ready to set the page size, media type, Bordered/Borderless printing, printing with the date, etc. See "Menu Displays" on page 5. (5) Settings ...are described below: Operation Panel Names and Functions (1) (2) (3) (4) (5) (10) (6) (7) (11) (12) (8) (9) (13) (14) (15) (1) POWER Button Press to print. Flashing: the printer is preparing to print, or is preparing to turn off. (2) Alarm Lamp Lighting: an error has occurred and the...
iP6220D Direct Printing Guide
Page 8
... print, making print settings, or scrolling the screen. (13) Back Button Allows you have made. Pressing this button is pressed during printing, the printer aborts printing. 4 For example, selecting the photo to be printed, selecting a menu item or other settings. Trimming" on page 22. (12)... - See "Searching for Photos with the Shooting Date" on the screen. If an error occurs, press to resume printing after resolving the printer problem. (11) Buttons Press to trim the photo being displayed. (6) Save Button Saves data in the memory card using the shooting date as...
... print, making print settings, or scrolling the screen. (13) Back Button Allows you have made. Pressing this button is pressed during printing, the printer aborts printing. 4 For example, selecting the photo to be printed, selecting a menu item or other settings. Trimming" on page 22. (12)... - See "Searching for Photos with the Shooting Date" on the screen. If an error occurs, press to resume printing after resolving the printer problem. (11) Buttons Press to trim the photo being displayed. (6) Save Button Saves data in the memory card using the shooting date as...
iP6220D Direct Printing Guide
Page 9
... 5 When using items on page 17. Multi-photo print" on page 39 or the Bluetooth User's Guide. (20) IrDA Interface Port Connects the printer to a mobile phone through a wireless IrDA connection. See "Specifying How Many Copies to Print for each photo and print them . See "Printing ... digital video camcorder. Single-photo print" on the Menu. Single-photo print You can print photos with various options as well as maintain the printer using optional Bluetooth unit*, connect this after inserting a memory card. (16) (17) Card Slot Set the memory card containing photos here. ...
... 5 When using items on page 17. Multi-photo print" on page 39 or the Bluetooth User's Guide. (20) IrDA Interface Port Connects the printer to a mobile phone through a wireless IrDA connection. See "Specifying How Many Copies to Print for each photo and print them . See "Printing ... digital video camcorder. Single-photo print" on the Menu. Single-photo print You can print photos with various options as well as maintain the printer using optional Bluetooth unit*, connect this after inserting a memory card. (16) (17) Card Slot Set the memory card containing photos here. ...
iP6220D Direct Printing Guide
Page 11
... automatically. See "Changing the Other Settings" on page 14. Read/write attribute See "Setting up the Card Slot as the Memory Card Drive of the printer is dirty" on page 52. Save settings See "Changing the Print Settings" on page 30. Manual head align See "Adjusting the Print Head Manually" on...
... automatically. See "Changing the Other Settings" on page 14. Read/write attribute See "Setting up the Card Slot as the Memory Card Drive of the printer is dirty" on page 52. Save settings See "Changing the Print Settings" on page 30. Manual head align See "Adjusting the Print Head Manually" on...


