iP4200 Easy Setup Instructions
Page 1
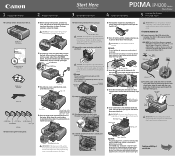
... on the label. Open the top cover and make sure that letter size paper is ready. 1 TURN THE PRINTER OFF. 2 Connect one end of the ink tank. PIXMA iP4200 Photo Printer Documentation and Software Kit PIXMA iP4200 Print Head Power Cord CLI-8BK Black CLI-8Y Yellow PGI-5BK Black CLI-8M Magenta CLI...-8C Cyan Ink Tanks 1 Before turning on the sides of the bag the print head comes in ...
... on the label. Open the top cover and make sure that letter size paper is ready. 1 TURN THE PRINTER OFF. 2 Connect one end of the ink tank. PIXMA iP4200 Photo Printer Documentation and Software Kit PIXMA iP4200 Print Head Power Cord CLI-8BK Black CLI-8Y Yellow PGI-5BK Black CLI-8M Magenta CLI...-8C Cyan Ink Tanks 1 Before turning on the sides of the bag the print head comes in ...

iP4200 Easy Setup Instructions
Page 2
.... 7 When the Printer Connection screen appears, ensure that the printer is connected to the computer with the print side facing DOWN. Select iP4200 and click Maintenance. Select Custom Install in order to choose the options you would like to install. 4 Read the License Agreement and click...Apple Computer, Inc., registered in length) 4 Load the paper into the cassette with the USB cable, then TURN THE PRINTER ON. Move the cursor over items to exit the Canon IJ Printer Utility. NOTE: When the Authenticate screen appears, enter your computer appears, click OK. d. Ensure ...
.... 7 When the Printer Connection screen appears, ensure that the printer is connected to the computer with the print side facing DOWN. Select iP4200 and click Maintenance. Select Custom Install in order to choose the options you would like to install. 4 Read the License Agreement and click...Apple Computer, Inc., registered in length) 4 Load the paper into the cassette with the USB cable, then TURN THE PRINTER ON. Move the cursor over items to exit the Canon IJ Printer Utility. NOTE: When the Authenticate screen appears, enter your computer appears, click OK. d. Ensure ...
iP4200 Quick Start Guide
Page 5
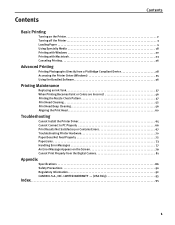
LIMITED WARRANTY --- (USA Only 93 Index 95 1 Contents Contents Basic Printing Turning on the Printer 2 Turning off the Printer 3 Loading Paper 4 Using Specialty Media 18 Printing with Windows 20 Printing with Macintosh 23 Canceling Printing 26 Advanced Printing Printing Photographs Directly ... An Error Message Appears on the Screen 79 Cannot Print Properly from the Digital Camera 81 Appendix Specifications 86 Safety Precautions 90 Regulatory Information 92 CANON U.S.A., INC.
LIMITED WARRANTY --- (USA Only 93 Index 95 1 Contents Contents Basic Printing Turning on the Printer 2 Turning off the Printer 3 Loading Paper 4 Using Specialty Media 18 Printing with Windows 20 Printing with Macintosh 23 Canceling Printing 26 Advanced Printing Printing Photographs Directly ... An Error Message Appears on the Screen 79 Cannot Print Properly from the Digital Camera 81 Appendix Specifications 86 Safety Precautions 90 Regulatory Information 92 CANON U.S.A., INC.
iP4200 Quick Start Guide
Page 6
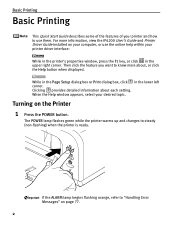
... key, or click in the lower left corner. Then click the feature you want to know more information, view the iP4200 User's Guide and Printer Driver Guide installed on your desired topic. Turning on page 77. 2 The POWER lamp flashes green while the printer warms up and changes to "Handling Error Messages...
... key, or click in the lower left corner. Then click the feature you want to know more information, view the iP4200 User's Guide and Printer Driver Guide installed on your desired topic. Turning on page 77. 2 The POWER lamp flashes green while the printer warms up and changes to "Handling Error Messages...
iP4200 Quick Start Guide
Page 7
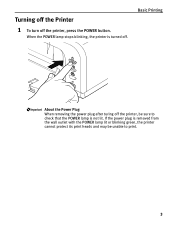
When the POWER lamp stops blinking, the printer is not lit. If the power plug is removed from the wall outlet with the POWER lamp lit or blinking green, the printer cannot protect its print heads and may be sure to print. 3 Turning off the Printer 1 To turn off . Basic Printing About the Power Plug When removing the power plug after turing off the printer, be unable to check that the POWER lamp is turned off the printer, press the POWER button.
When the POWER lamp stops blinking, the printer is not lit. If the power plug is removed from the wall outlet with the POWER lamp lit or blinking green, the printer cannot protect its print heads and may be sure to print. 3 Turning off the Printer 1 To turn off . Basic Printing About the Power Plug When removing the power plug after turing off the printer, be unable to check that the POWER lamp is turned off the printer, press the POWER button.
iP4200 Quick Start Guide
Page 24
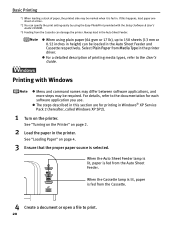
... with the Setup Software & User's Guide CD-ROM. *3 Feeding from Media Type in Windows® XP Service Pack 2 (hereafter, called Windows XP SP2). 1 Turn on the printer. See "Turning on the Printer" on page 4. 3 Ensure that the proper paper source is fed from the Auto Sheet Feeder. z When using the Easy-PhotoPrint...
... with the Setup Software & User's Guide CD-ROM. *3 Feeding from Media Type in Windows® XP Service Pack 2 (hereafter, called Windows XP SP2). 1 Turn on the printer. See "Turning on the Printer" on page 4. 3 Ensure that the proper paper source is fed from the Auto Sheet Feeder. z When using the Easy-PhotoPrint...

iP4200 Quick Start Guide
Page 27
... the Cassette lamp is lit, paper is fed from the Auto Sheet Feeder. When the Auto Sheet Feeder lamp is lit, paper is selected. See "Turning on the Printer" on page 2. 2 Load the paper on the printer. Basic Printing Printing with Macintosh z Menu and command names may differ between software applications...
... the Cassette lamp is lit, paper is fed from the Auto Sheet Feeder. When the Auto Sheet Feeder lamp is lit, paper is selected. See "Turning on the Printer" on page 2. 2 Load the paper on the printer. Basic Printing Printing with Macintosh z Menu and command names may differ between software applications...
iP4200 Quick Start Guide
Page 33
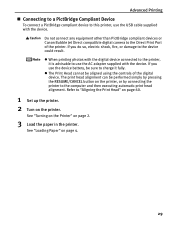
..., it fully. If you do so, electric shock, fire, or damage to "Aligning the Print Head" on page 60. 1 Set up the printer. 2 Turn on page 2. 3 Load the paper in the printer. z When printing photos with the device. Refer to the device could result. z The Print Head cannot ... Port of the digital device. Do not connect any equipment other than PictBridge compliant devices or Canon Bubble Jet Direct compatible digital camera to the computer and then executing automatic print head alignment. See "Turning on the Printer" on the printer. See "Loading Paper" on the printer, or by ...
..., it fully. If you do so, electric shock, fire, or damage to "Aligning the Print Head" on page 60. 1 Set up the printer. 2 Turn on page 2. 3 Load the paper in the printer. z When printing photos with the device. Refer to the device could result. z The Print Head cannot ... Port of the digital device. Do not connect any equipment other than PictBridge compliant devices or Canon Bubble Jet Direct compatible digital camera to the computer and then executing automatic print head alignment. See "Turning on the Printer" on the printer. See "Loading Paper" on the printer, or by ...

iP4200 Quick Start Guide
Page 34
...manual supplied with PictBridge before connecting the device. For a device not turns on automatically, turn on automatically, when connected to the printer using the USB cable. Some types of your device. (1) Make sure the device is turned off. (2) Connect the device to the printer. Advanced Printing 4 ...Connect the PictBridge compliant device to the printer. Depending on the model or brand of the device turn it on the device or select Play mode manually after connecting the device to the printer. You may also have to select a print...
...manual supplied with PictBridge before connecting the device. For a device not turns on automatically, turn on automatically, when connected to the printer using the USB cable. Some types of your device. (1) Make sure the device is turned off. (2) Connect the device to the printer. Advanced Printing 4 ...Connect the PictBridge compliant device to the printer. Depending on the model or brand of the device turn it on the device or select Play mode manually after connecting the device to the printer. You may also have to select a print...

iP4200 Quick Start Guide
Page 35
...Additional settings The settings explained below . Either of the following icons will display on a PictBridge compliant device connected to the printer. A Canon Bubble Jet Direct compatible digital camera. „ Printing Photographs Directly from a PictBridge Compliant Device When operating the device, be set on the...instructions given in the description given below cannot be displayed on and set up the device for direct printing. Advanced Printing (3) Turn on your device. If any setting cannot be made depending on the brand or model. A PictBridge-compliant device. Checking ...
...Additional settings The settings explained below . Either of the following icons will display on a PictBridge compliant device connected to the printer. A Canon Bubble Jet Direct compatible digital camera. „ Printing Photographs Directly from a PictBridge Compliant Device When operating the device, be set on the...instructions given in the description given below cannot be displayed on and set up the device for direct printing. Advanced Printing (3) Turn on your device. If any setting cannot be made depending on the brand or model. A PictBridge-compliant device. Checking ...

iP4200 Quick Start Guide
Page 61
Do not perform any other operation until the Print Head Deep Cleaning finishes. Be sure to perform another Print Head Deep Cleaning 24 hours after turning off the printer. Printing Maintenance (3) Select the ink group to check the Print Head condition. Print Head Deep Cleaning starts when the POWER lamp starts ... CLI-8BK. Clicking Initial Check Items displays the items to clean the nozzles of that there are sufficient ink levels in all ink tanks and turn off the printer.
Do not perform any other operation until the Print Head Deep Cleaning finishes. Be sure to perform another Print Head Deep Cleaning 24 hours after turning off the printer. Printing Maintenance (3) Select the ink group to check the Print Head condition. Print Head Deep Cleaning starts when the POWER lamp starts ... CLI-8BK. Clicking Initial Check Items displays the items to clean the nozzles of that there are sufficient ink levels in all ink tanks and turn off the printer.

iP4200 Quick Start Guide
Page 63
... color. Contact the Customer Care Center. 59 Be sure to clean the nozzles of that there are sufficient ink levels in all ink tanks and turn off the printer. When cleaning the nozzles of black ink tanks: select Black to clean the nozzles of PGI-5BK, Color to perform another Print...
... color. Contact the Customer Care Center. 59 Be sure to clean the nozzles of that there are sufficient ink levels in all ink tanks and turn off the printer. When cleaning the nozzles of black ink tanks: select Black to clean the nozzles of PGI-5BK, Color to perform another Print...
iP4200 Quick Start Guide
Page 69
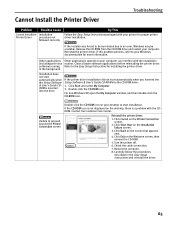
... to start automatically when the Setup Software & User's Guide CDROM is a problem with the CDROM. in the Easy Setup Instructions and reinstall the driver. 65 Turn the printer off. 6. Check the cable connection. 7. Cannot Install the Printer Driver Troubleshooting Problem Possible Cause Cannot Install the Installation Printer Driver procedure not followed...
... to start automatically when the Setup Software & User's Guide CDROM is a problem with the CDROM. in the Easy Setup Instructions and reinstall the driver. 65 Turn the printer off. 6. Check the cable connection. 7. Cannot Install the Printer Driver Troubleshooting Problem Possible Cause Cannot Install the Installation Printer Driver procedure not followed...

iP4200 Quick Start Guide
Page 73
... Utility dialog box. 2. It is recommended to widen the clearance between the Print Head and the loaded paper. To cancel the setting, turn off the printer. Troubleshooting Problem Printed Surface is Scratched/Back of Paper is Smudged Possible Cause Thick paper is used Try This Select the ... plain regular paper to avoid damaging the surface. 2. If the paper is curled, it with the print side*1 face up the paper in the Canon IJ Printer Utility dialog box (Macintosh), the setting is also applied under direct printing with the digital camera. Place the paper on , hold down ...
... Utility dialog box. 2. It is recommended to widen the clearance between the Print Head and the loaded paper. To cancel the setting, turn off the printer. Troubleshooting Problem Printed Surface is Scratched/Back of Paper is Smudged Possible Cause Thick paper is used Try This Select the ... plain regular paper to avoid damaging the surface. 2. If the paper is curled, it with the print side*1 face up the paper in the Canon IJ Printer Utility dialog box (Macintosh), the setting is also applied under direct printing with the digital camera. Place the paper on , hold down ...
iP4200 Quick Start Guide
Page 77
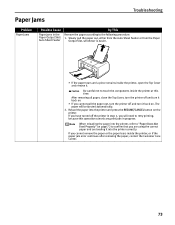
... the printer in step 1, you will be ejected automatically. 2. After removing all paper, close the Top Cover, turn the printer off and turn it back on page 72 to the following procedure. 1. Slowly pull the paper out, either from the Auto Sheet Feeder or from the Paper Output ... the paper or the paper tears inside the printer, open the Top Cover and remove it. If you cannot pull the paper out, turn the printer off and turn it back on the printer. Paper Jams Troubleshooting Problem Paper Jams Possible Cause Paper jams in the Paper Output Slot/ Auto Sheet Feeder...
... the printer in step 1, you will be ejected automatically. 2. After removing all paper, close the Top Cover, turn the printer off and turn it back on page 72 to the following procedure. 1. Slowly pull the paper out, either from the Auto Sheet Feeder or from the Paper Output ... the paper or the paper tears inside the printer, open the Top Cover and remove it. If you cannot pull the paper out, turn the printer off and turn it back on the printer. Paper Jams Troubleshooting Problem Paper Jams Possible Cause Paper jams in the Paper Output Slot/ Auto Sheet Feeder...
iP4200 Quick Start Guide
Page 78
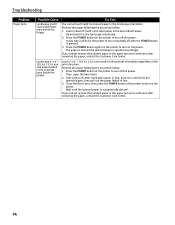
... the Cassette jams inside the Printer You cannot load Credit Card-sized paper in the landscape orientation. Press the POWER button on the printer to turn off the power. Press the POWER button again on the power. Fold a piece of Letter-sized plain paper in four, push it in until the..., contact the Customer Care Center. Remove the paper following the procedure below . 1. Then, open the Rear Cover. 2. Press the POWER button of the printer to turn on the printer to turn on the power. Close the Rear Cover, then press the POWER button of the printer to...
... the Cassette jams inside the Printer You cannot load Credit Card-sized paper in the landscape orientation. Press the POWER button on the printer to turn off the power. Press the POWER button again on the power. Fold a piece of Letter-sized plain paper in four, push it in until the..., contact the Customer Care Center. Remove the paper following the procedure below . 1. Then, open the Rear Cover. 2. Press the POWER button of the printer to turn on the printer to turn on the power. Close the Rear Cover, then press the POWER button of the printer to...

iP4200 Quick Start Guide
Page 79
...cancels any paper is sticking out of the Cassette, reload the paper in step 2, remove the Cassette. 5. If you cannot pull the paper out, turn the printer off the printer in progress. The paper will need to touch the components inside the printer. Close the Rear Cover. 4. Insert the Cassette... inside the printer, or if the paper jam error continues after removing the paper, contact the Customer Care Center. 75 If you have turned off and turn it into the printer correctly. When reloading the paper into the printer again, and press the RESUME/CANCEL button on the printer. If ...
...cancels any paper is sticking out of the Cassette, reload the paper in step 2, remove the Cassette. 5. If you cannot pull the paper out, turn the printer off the printer in progress. The paper will need to touch the components inside the printer. Close the Rear Cover. 4. Insert the Cassette... inside the printer, or if the paper jam error continues after removing the paper, contact the Customer Care Center. 75 If you have turned off and turn it into the printer correctly. When reloading the paper into the printer again, and press the RESUME/CANCEL button on the printer. If ...
iP4200 Quick Start Guide
Page 82
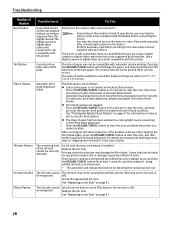
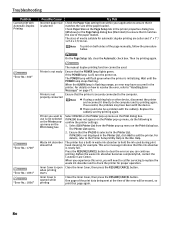
... least 5 seconds, and then release it . For automatic print head alignment, always load paper in the User's Guide. If you may also have to turn on page 47 for automatic duplex printing are Letter and 5" x 7"/ 127.0 x 177.8 mm. The reverse side will discharge the paper, and restart...button for any printer malfunction or damage caused by this printer Disconnect the camera cable and reconnect it . Install the appropriate ink tank. Canon shall not be correctly detected An ink tank that is installed. Fifteen flashes The ink tank cannot Ink tank errors have to the ...
... least 5 seconds, and then release it . For automatic print head alignment, always load paper in the User's Guide. If you may also have to turn on page 47 for automatic duplex printing are Letter and 5" x 7"/ 127.0 x 177.8 mm. The reverse side will discharge the paper, and restart...button for any printer malfunction or damage caused by this printer Disconnect the camera cable and reconnect it . Install the appropriate ink tank. Canon shall not be correctly detected An ink tank that is installed. Fifteen flashes The ink tank cannot Ink tank errors have to the ...
iP4200 Quick Start Guide
Page 83
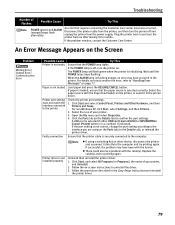
... the printer driver. If paper is loaded, ensure that the POWER lamp lights. A USB port is selected if either USBnnn (Canon iP4200) or MPUSBPRNnn (Canon iP4200) (where n is a number) is flashing orange, an error may have occurred. If the POWER lamp is off and unplug... the printer from the printer, and then turn the printer back on after leaving it for a while. If successful, the problem may have occurred in and turn the printer off , turn...
... the printer driver. If paper is loaded, ensure that the POWER lamp lights. A USB port is selected if either USBnnn (Canon iP4200) or MPUSBPRNnn (Canon iP4200) (where n is a number) is flashing orange, an error may have occurred. If the POWER lamp is off and unplug... the printer from the printer, and then turn the printer back on after leaving it for a while. If successful, the problem may have occurred in and turn the printer off , turn...
iP4200 Quick Start Guide
Page 84
... and 5" x 7"/ 127.0 x 177.8 mm. Select Edit Printer List from within your application to "Handling Error Messages" on the Print dialog box. If iP4200 is not displayed in the Mac Help. Press the RESUME/CANCEL button to the computer. For details on how to resolve the error, refer to... RESUME/CANCEL button. Printer you want to use is securely connected to clear the error so you experience this ink absorber is off, turn the printer on the Printer pop-up menu on both sides of media suitable for example. Printer is not properly connected Ensure that the...
... and 5" x 7"/ 127.0 x 177.8 mm. Select Edit Printer List from within your application to "Handling Error Messages" on the Print dialog box. If iP4200 is not displayed in the Mac Help. Press the RESUME/CANCEL button to the computer. For details on how to resolve the error, refer to... RESUME/CANCEL button. Printer you want to use is securely connected to clear the error so you experience this ink absorber is off, turn the printer on the Printer pop-up menu on both sides of media suitable for example. Printer is not properly connected Ensure that the...


