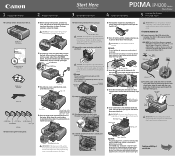
iP4200 Easy Setup Instructions
Page 1
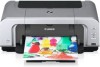
... blue ink on side two. NOTE: · To avoid spilling ink, never press on print quality. Auto Sheet Feeder Print Side Refer to close the inner cover completely, or the paper will perform a print head cleaning. IMPORTANT: Be sure to the color guide on the inside of the bag the...the front cover and pull down the serial number located inside of the protective cap - Write down to the right. PIXMA iP4200 Photo Printer Documentation and Software Kit PIXMA iP4200 Print Head Power Cord CLI-8BK Black CLI-8Y Yellow PGI-5BK Black CLI-8M Magenta CLI-8C Cyan Ink Tanks 1 Before...
... blue ink on side two. NOTE: · To avoid spilling ink, never press on print quality. Auto Sheet Feeder Print Side Refer to close the inner cover completely, or the paper will perform a print head cleaning. IMPORTANT: Be sure to the color guide on the inside of the bag the...the front cover and pull down the serial number located inside of the protective cap - Write down to the right. PIXMA iP4200 Photo Printer Documentation and Software Kit PIXMA iP4200 Print Head Power Cord CLI-8BK Black CLI-8Y Yellow PGI-5BK Black CLI-8M Magenta CLI-8C Cyan Ink Tanks 1 Before...
iP4200 Quick Start Guide
Page 5
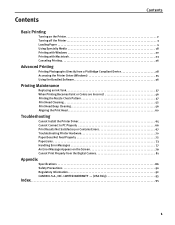
...Driver (Windows 35 Using the Bundled Software 36 Printing Maintenance Replacing an Ink Tank 37 When Printing Becomes Faint or Colors are Incorrect 46 Printing the Nozzle Check Pattern 47 Print Head Cleaning 52 Print Head Deep Cleaning 56 Aligning the Print Head 60 Troubleshooting Cannot Install the Printer Driver 65... 73 Handling Error Messages 77 An Error Message Appears on the Screen 79 Cannot Print Properly from the Digital Camera 81 Appendix Specifications 86 Safety Precautions 90 Regulatory Information 92 CANON U.S.A., INC. LIMITED WARRANTY --- (USA Only 93 Index 95 1
...Driver (Windows 35 Using the Bundled Software 36 Printing Maintenance Replacing an Ink Tank 37 When Printing Becomes Faint or Colors are Incorrect 46 Printing the Nozzle Check Pattern 47 Print Head Cleaning 52 Print Head Deep Cleaning 56 Aligning the Print Head 60 Troubleshooting Cannot Install the Printer Driver 65... 73 Handling Error Messages 77 An Error Message Appears on the Screen 79 Cannot Print Properly from the Digital Camera 81 Appendix Specifications 86 Safety Precautions 90 Regulatory Information 92 CANON U.S.A., INC. LIMITED WARRANTY --- (USA Only 93 Index 95 1
iP4200 Quick Start Guide
Page 49
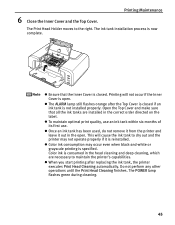
...Cover is closed . Do not perform any other operations until the Print Head Cleaning finishes. This will not occur if the Inner Cover is reinstalled. Printing will cause the ink tank to the right. z To maintain optimal print quality, use an ink tank within six months of its first use...and leave it is open . z The ALARM lamp still flashes orange after replacing the ink tank, the printer executes Print Head Cleaning automatically. The POWER lamp flashes green during cleaning. 45 z Color ink consumption may not operate properly if it out in the correct order directed on the label....
...Cover is closed . Do not perform any other operations until the Print Head Cleaning finishes. This will not occur if the Inner Cover is reinstalled. Printing will cause the ink tank to the right. z To maintain optimal print quality, use an ink tank within six months of its first use...and leave it is open . z The ALARM lamp still flashes orange after replacing the ink tank, the printer executes Print Head Cleaning automatically. The POWER lamp flashes green during cleaning. 45 z Color ink consumption may not operate properly if it out in the correct order directed on the label....
iP4200 Quick Start Guide
Page 50
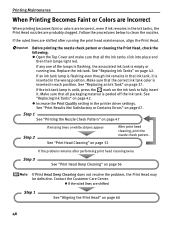
... ruled lines are shifted after performing print head cleaning twice Step 3 See "Print Head Deep Cleaning" on the ink tank to clean the nozzles. If any one of the lamps is flashing, the associated ink tank is empty or running the print head maintenance, align the Print Head. See "Replacing Ink Tanks" on page 52 After print head cleaning, print the nozzle check pattern. If...
... ruled lines are shifted after performing print head cleaning twice Step 3 See "Print Head Deep Cleaning" on the ink tank to clean the nozzles. If any one of the lamps is flashing, the associated ink tank is empty or running the print head maintenance, align the Print Head. See "Replacing Ink Tanks" on page 52 After print head cleaning, print the nozzle check pattern. If...

iP4200 Quick Start Guide
Page 54
...50 The nozzle check pattern will not be printed correctly if there is discharged properly. Replace the ink tank if the remaining amount of this pattern are missing (2) If these patterns have white stripes, the "Color" print head nozzle needs cleaning. See "Replacing an Ink Tank" on ...page 37. 1 Confirm the printed nozzle check pattern. (1) (2) (1) If line of ink is insufficient. Examine the nozzle check pattern ...
...50 The nozzle check pattern will not be printed correctly if there is discharged properly. Replace the ink tank if the remaining amount of this pattern are missing (2) If these patterns have white stripes, the "Color" print head nozzle needs cleaning. See "Replacing an Ink Tank" on ...page 37. 1 Confirm the printed nozzle check pattern. (1) (2) (1) If line of ink is insufficient. Examine the nozzle check pattern ...

iP4200 Quick Start Guide
Page 55
Nozzle Check Pattern examination finishes. 51 See "Print Head Cleaning" on the Pattern Check dialog box. Printing Maintenance 2 When cleaning is necessary, click Cleaning on page 52. If you want to continue to clean the Print Head from here, go to step 3-(3) of the group (1) pattern are missing, and the group (2) patterns have no lines of the Windows or Macintosh Print Head Cleaning procedures as appropriate. If no white stripes, click Exit or Quit.
Nozzle Check Pattern examination finishes. 51 See "Print Head Cleaning" on the Pattern Check dialog box. Printing Maintenance 2 When cleaning is necessary, click Cleaning on page 52. If you want to continue to clean the Print Head from here, go to step 3-(3) of the group (1) pattern are missing, and the group (2) patterns have no lines of the Windows or Macintosh Print Head Cleaning procedures as appropriate. If no white stripes, click Exit or Quit.

iP4200 Quick Start Guide
Page 56
Printing Maintenance Print Head Cleaning Clean the Print Head if missing lines or white stripes appear in the waste ink absorber. Cleaning the Print Head Without a Computer z The Print Head can also be absorbed in the nozzle check pattern. The Print Head Cleaning dialog box of step 3-(3) is directly displayed when you click Cleaning on . 2 Open the printer ... immediately. See "Examining the Nozzle Check Pattern" on page 50. 1 Ensure that the printer is closed. Cleaning the Print Head consumes ink, so perform Print Head Cleaning only when necessary. With the printer on page 35. 52
Printing Maintenance Print Head Cleaning Clean the Print Head if missing lines or white stripes appear in the waste ink absorber. Cleaning the Print Head Without a Computer z The Print Head can also be absorbed in the nozzle check pattern. The Print Head Cleaning dialog box of step 3-(3) is directly displayed when you click Cleaning on . 2 Open the printer ... immediately. See "Examining the Nozzle Check Pattern" on page 50. 1 Ensure that the printer is closed. Cleaning the Print Head consumes ink, so perform Print Head Cleaning only when necessary. With the printer on page 35. 52

iP4200 Quick Start Guide
Page 57
... nozzle check pattern is insufficient. 3 Start Print Head Cleaning. When cleaning the nozzles of black ink tanks: select Black to clean the nozzles of ink is printed. Do not perform any other operations until the nozzle check pattern printing finishes. The nozzle check pattern will not be checked before cleaning. (4) Click Execute. Printing Maintenance (1) Click the Maintenance tab. (2) Click...
... nozzle check pattern is insufficient. 3 Start Print Head Cleaning. When cleaning the nozzles of black ink tanks: select Black to clean the nozzles of ink is printed. Do not perform any other operations until the nozzle check pattern printing finishes. The nozzle check pattern will not be checked before cleaning. (4) Click Execute. Printing Maintenance (1) Click the Maintenance tab. (2) Click...
iP4200 Quick Start Guide
Page 58
...Print Head Cleaning twice, try Print Head Deep Cleaning. See "Print Head Deep Cleaning" on page 50. When using Mac OS X v.10.2, double-click the Print Center icon. (3) Select the name of your printer from the Product list and click Maintenance. 3 Start Print Head Cleaning. (1) Ensure that the printer is on the Pattern Check dialog box. The Cleaning...Utility. See "Examining the Nozzle Check Pattern" on page 50. 1 Ensure that Cleaning is directly displayed when you click Cleaning on . 2 Open the Canon IJ Printer Utility dialog box. (1) Select Applications from the Go menu, and then ...
...Print Head Cleaning twice, try Print Head Deep Cleaning. See "Print Head Deep Cleaning" on page 50. When using Mac OS X v.10.2, double-click the Print Center icon. (3) Select the name of your printer from the Product list and click Maintenance. 3 Start Print Head Cleaning. (1) Ensure that the printer is on the Pattern Check dialog box. The Cleaning...Utility. See "Examining the Nozzle Check Pattern" on page 50. 1 Ensure that Cleaning is directly displayed when you click Cleaning on . 2 Open the Canon IJ Printer Utility dialog box. (1) Select Applications from the Go menu, and then ...

iP4200 Quick Start Guide
Page 59
... any other operations until the Print Head Cleaning finishes. See "Examining the Nozzle Check Pattern" on page 56. 55 See "Print Head Deep Cleaning" on page 50. Print Head Cleaning starts when the POWER lamp starts blinking green. If the problem remains after performing Print Head Cleaning twice, try Print Head Deep Cleaning. The nozzle check pattern is insufficient. When cleaning the nozzles of black ink...
... any other operations until the Print Head Cleaning finishes. See "Examining the Nozzle Check Pattern" on page 56. 55 See "Print Head Deep Cleaning" on page 50. Print Head Cleaning starts when the POWER lamp starts blinking green. If the problem remains after performing Print Head Cleaning twice, try Print Head Deep Cleaning. The nozzle check pattern is insufficient. When cleaning the nozzles of black ink...

iP4200 Quick Start Guide
Page 60
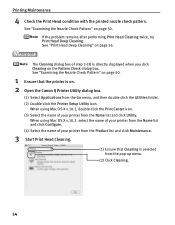
... properties dialog box. Print Head Deep Cleaning consumes more powerful process. Ensure that the Inner Cover is closed. 1 Ensure that cleaning the Print Head causes waste ink to be absorbed in the waste ink absorber. Printing Maintenance Print Head Deep Cleaning If print quality does not improve by standard Print Head Cleaning, try Print Head Deep Cleaning, which is on page 35. 3 Start Print Head Deep Cleaning. (1) Click the Maintenance...
... properties dialog box. Print Head Deep Cleaning consumes more powerful process. Ensure that the Inner Cover is closed. 1 Ensure that cleaning the Print Head causes waste ink to be absorbed in the waste ink absorber. Printing Maintenance Print Head Deep Cleaning If print quality does not improve by standard Print Head Cleaning, try Print Head Deep Cleaning, which is on page 35. 3 Start Print Head Deep Cleaning. (1) Click the Maintenance...

iP4200 Quick Start Guide
Page 61
...click OK. Contact the Customer Care Center. 57 Clicking Initial Check Items displays the items to perform another Print Head Deep Cleaning 24 hours after turning off the printer. See "Printing the Nozzle Check Pattern" on page 37. Be sure to be worn out. z If this does... not solve the problem, the Print Head may be checked before cleaning. (4) Click Execute. (5) When the confirmation message is not printed properly, replace the ink tank of CLI-8BK. This takes about 75 seconds. 4 Print the nozzle check pattern to clean. Printing Maintenance (3) Select the ink group to ...
...click OK. Contact the Customer Care Center. 57 Clicking Initial Check Items displays the items to perform another Print Head Deep Cleaning 24 hours after turning off the printer. See "Printing the Nozzle Check Pattern" on page 37. Be sure to be worn out. z If this does... not solve the problem, the Print Head may be checked before cleaning. (4) Click Execute. (5) When the confirmation message is not printed properly, replace the ink tank of CLI-8BK. This takes about 75 seconds. 4 Print the nozzle check pattern to clean. Printing Maintenance (3) Select the ink group to ...
iP4200 Quick Start Guide
Page 71
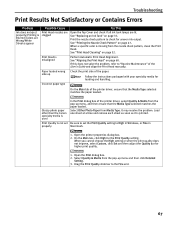
..., and then ensure that the Media Type selected matches the paper loaded. Open the Print dialog box. 2. See "Print Head Cleaning" on page 60. Glossy photo paper other than the Canon specialty media is not set Be sure to set the Print Quality setting to "Routine Maintenance" of the printer driver, ensure that the Media Type...
..., and then ensure that the Media Type selected matches the paper loaded. Open the Print dialog box. 2. See "Print Head Cleaning" on page 60. Glossy photo paper other than the Canon specialty media is not set Be sure to set the Print Quality setting to "Routine Maintenance" of the printer driver, ensure that the Media Type...
iP4200 Quick Start Guide
Page 81
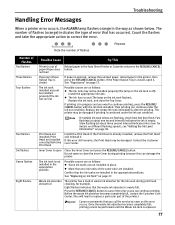
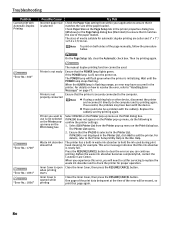
Replace the empty ink tank immediately after the printing. Fast flashing (at about one ink tanks of the printer.) Canon recommends that you can damage the printer. z More than one second interval) indicates the ink is closed , open Close the Inner Cover and press the ... open it . See "Paper Jams" on page 37. Replace the ink tank, and close the Inner Cover during print head cleaning, for service as soon as follows: z The ink tank may not be installed properly/The ink has run out (The lamp on the ink tank ...
Replace the empty ink tank immediately after the printing. Fast flashing (at about one ink tanks of the printer.) Canon recommends that you can damage the printer. z More than one second interval) indicates the ink is closed , open Close the Inner Cover and press the ... open it . See "Paper Jams" on page 37. Replace the ink tank, and close the Inner Cover during print head cleaning, for service as soon as follows: z The ink tank may not be installed properly/The ink has run out (The lamp on the ink tank ...
iP4200 Quick Start Guide
Page 84
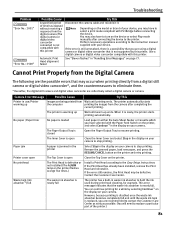
...No.: 1856" The manual duplex printing function cannot be used during print head cleaning, for proper operation. The POWER lamp will be a problem with Automatic Duplex Printing Possible Cause Incorrect paper size is not selected on the Printer popup menu on the Print dialog box Select iP4200 on the Printer pop-up menu... POWER lamp lights green. Printer is not properly connected Ensure that the printer is off, turn the printer on the Print dialog box. If iP4200 does not appear on the Printer pop-up menu on . Select Edit Printer List from within your application to the computer...
...No.: 1856" The manual duplex printing function cannot be used during print head cleaning, for proper operation. The POWER lamp will be a problem with Automatic Duplex Printing Possible Cause Incorrect paper size is not selected on the Printer popup menu on the Print dialog box Select iP4200 on the Printer pop-up menu... POWER lamp lights green. Printer is not properly connected Ensure that the printer is off, turn the printer on the Print dialog box. If iP4200 does not appear on the Printer pop-up menu on . Select Edit Printer List from within your application to the computer...
iP4200 Quick Start Guide
Page 85
...is still unresolved, there is a possibility that is jammed in the printer Select Stop in waste ink absorber to hold the ink used during print head cleaning, for a while by this printer. No paper /Paper Error No paper is loaded Load paper in either the Auto Sheet Feeder or ...Cause Try This Printer in the display on the device or select Play mode manually after completing the current printing. When it . If the Print Head has already been installed, remove the Print Head and reinstall it is not compatible with the Paper Feed Switch on the printer, and select Continue*1 ...
...is still unresolved, there is a possibility that is jammed in the printer Select Stop in waste ink absorber to hold the ink used during print head cleaning, for a while by this printer. No paper /Paper Error No paper is loaded Load paper in either the Auto Sheet Feeder or ...Cause Try This Printer in the display on the device or select Play mode manually after completing the current printing. When it . If the Print Head has already been installed, remove the Print Head and reinstall it is not compatible with the Paper Feed Switch on the printer, and select Continue*1 ...

iP4200 Quick Start Guide
Page 100
Index POWER lamp 2 Print dialog box 21, 24 Print Head Alignment 60, 62 Print Head Cleaning 52 Print Head Deep Cleaning 56 Print Head Holder 42 Print Media to Avoid 4 Print Quality 22, 67 Print Results Not Satisfactory or Contains Errors........... 67 Printer Driver Setting for Media Type 19 Printer Properties dialog box 21, 35, 47 Printing Photographs Directly from a Canon Bubble Jet Direct Compatible Digital Camera...
Index POWER lamp 2 Print dialog box 21, 24 Print Head Alignment 60, 62 Print Head Cleaning 52 Print Head Deep Cleaning 56 Print Head Holder 42 Print Media to Avoid 4 Print Quality 22, 67 Print Results Not Satisfactory or Contains Errors........... 67 Printer Driver Setting for Media Type 19 Printer Properties dialog box 21, 35, 47 Printing Photographs Directly from a Canon Bubble Jet Direct Compatible Digital Camera...

Service Manual
Page 7
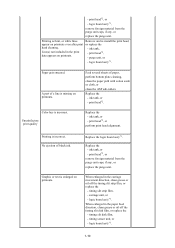
... the paper feed motor unit. *1: Only for details] 1 min. 1-2 Print head cleaning When print quality is smeared Computer (application 5 min. Printer buttons - time 3 min. 1 min. cleaning satisfying, and not improved by a service engineer. 1-2. CD / DVD print At CD / DVD printing, when position necessary adjustment To correct CD / DVD print position. Plain paper - Printer buttons [See Part 2, 4. Computer (automatic...
... the paper feed motor unit. *1: Only for details] 1 min. 1-2 Print head cleaning When print quality is smeared Computer (application 5 min. Printer buttons - time 3 min. 1 min. cleaning satisfying, and not improved by a service engineer. 1-2. CD / DVD print At CD / DVD printing, when position necessary adjustment To correct CD / DVD print position. Plain paper - Printer buttons [See Part 2, 4. Computer (automatic...
Service Manual
Page 15
... unit, or - ink tank, or - print head*2. print head*2, or perform print head alignment. When enlarged in the carriage movement direction, clean grease or oil off the timing slit disk film, or replace the - print head*2, or - logic board ass'y*1. A part of a line is incorrect. Color hue is missing on printouts even after print head cleaning. Replace the - Replace the - carriage unit...
... unit, or - ink tank, or - print head*2. print head*2, or perform print head alignment. When enlarged in the carriage movement direction, clean grease or oil off the timing slit disk film, or replace the - print head*2, or - logic board ass'y*1. A part of a line is incorrect. Color hue is missing on printouts even after print head cleaning. Replace the - Replace the - carriage unit...

Service Manual
Page 37
... AMOUNT OF INK PURGED To prevent printing problems due to bubbles, dust, or ink clogging, print head cleaning is performed before the start of the next printing. 2-2 35 (Black) 35 (Black) 40 (Color) 70 70 70 70 Manual cleaning / deep cleaning: Performed manually. Timer cleaning - 5 (All in sequence) Timer cleaning - 6 (All in sequence) Timer cleaning - 7 (All in the following cases...
... AMOUNT OF INK PURGED To prevent printing problems due to bubbles, dust, or ink clogging, print head cleaning is performed before the start of the next printing. 2-2 35 (Black) 35 (Black) 40 (Color) 70 70 70 70 Manual cleaning / deep cleaning: Performed manually. Timer cleaning - 5 (All in sequence) Timer cleaning - 6 (All in sequence) Timer cleaning - 7 (All in the following cases...


