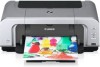
iP4200 Quick Start Guide
Page 7
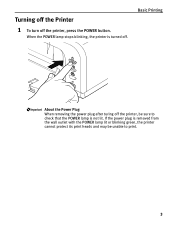
Turning off the Printer 1 To turn off . Basic Printing About the Power Plug When removing the power plug after turing off the printer, be unable to check that the POWER lamp is not lit. If the power plug is turned off the printer, press the POWER button. When the POWER lamp stops blinking, the printer is removed from the wall outlet with the POWER lamp lit or blinking green, the printer cannot protect its print heads and may be sure to print. 3
Turning off the Printer 1 To turn off . Basic Printing About the Power Plug When removing the power plug after turing off the printer, be unable to check that the POWER lamp is not lit. If the power plug is turned off the printer, press the POWER button. When the POWER lamp stops blinking, the printer is removed from the wall outlet with the POWER lamp lit or blinking green, the printer cannot protect its print heads and may be sure to print. 3
Service Manual
Page 10
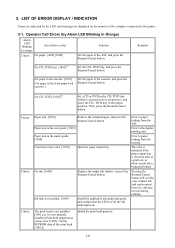
... No CD / DVD tray. [1001]*1 Set the CD / DVD tray, and press the Resume/Cancel button. LIST OF ERROR DISPLAY / INDICATION Errors are indicated by Alarm LED Blinking in Orange) Alarm LED blinking in orange Error [Error code] 2 times No paper. (ASF) [1000] Solution Set the paper in the proper position. No CD...
... No CD / DVD tray. [1001]*1 Set the CD / DVD tray, and press the Resume/Cancel button. LIST OF ERROR DISPLAY / INDICATION Errors are indicated by Alarm LED Blinking in Orange) Alarm LED blinking in orange Error [Error code] 2 times No paper. (ASF) [1000] Solution Set the paper in the proper position. No CD...

Service Manual
Page 12
...MOTOR (QK1-1502) 4 times Purge cam sensor error [5C00] - Purge unit (QM2-2208) 1-7 Resume/Cancel button, the automatic print is continued without replacing the "nogood" ink tank, press the Resume/Cancel button for models not supporting CD / DVD printing 2-2. head alignment will not be faulty) - Replace the applicable ink ... are likely to detect the remaining ink amount is installed. Service Call Errors (by Cyclic Blinking in Orange (Alarm LED) and Green (Power LED), or Alarm LED Lit in Orange) Cycles of blinking in an ink tank (the ink tank LED is turned off ). Timing slit strip film...
...MOTOR (QK1-1502) 4 times Purge cam sensor error [5C00] - Purge unit (QM2-2208) 1-7 Resume/Cancel button, the automatic print is continued without replacing the "nogood" ink tank, press the Resume/Cancel button for models not supporting CD / DVD printing 2-2. head alignment will not be faulty) - Replace the applicable ink ... are likely to detect the remaining ink amount is installed. Service Call Errors (by Cyclic Blinking in Orange (Alarm LED) and Green (Power LED), or Alarm LED Lit in Orange) Cycles of blinking in an ink tank (the ink tank LED is turned off ). Timing slit strip film...
Service Manual
Page 27
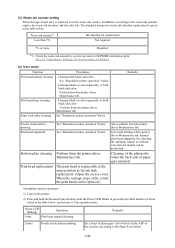
... (A4 or letter) in the ASF or the cassette (according to the waste ink amount, replace the waste ink absorber (ink absorber kit). Power LED blinking Operation 1 time Print head manual cleaning Remarks 2 times Nozzle check pattern printing Set a sheet of the printer driver Maintenance tab, manual print head alignment (by... replacement The print head is replaceable at the center, the print head can be replaced.) 1) Turn on the printer. 2) Press and hold the Resume/Cancel button until the Power LED blinks in the table below, and release it.
... (A4 or letter) in the ASF or the cassette (according to the waste ink amount, replace the waste ink absorber (ink absorber kit). Power LED blinking Operation 1 time Print head manual cleaning Remarks 2 times Nozzle check pattern printing Set a sheet of the printer driver Maintenance tab, manual print head alignment (by... replacement The print head is replaceable at the center, the print head can be replaced.) 1) Turn on the printer. 2) Press and hold the Resume/Cancel button until the Power LED blinks in the table below, and release it.
Service Manual
Page 45
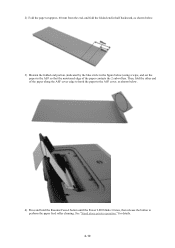
... mm from the end, and fold the folded end in half backward, as shown below. 4) Press and hold the Resume/Cancel button until the Power LED blinks 3 times, then release the button to the ASF cover, as shown below. 3) Moisten the folded end portion (indicated by the blue circle in the figure below...
... mm from the end, and fold the folded end in half backward, as shown below. 4) Press and hold the Resume/Cancel button until the Power LED blinks 3 times, then release the button to the ASF cover, as shown below. 3) Moisten the folded end portion (indicated by the blue circle in the figure below...


