

iP4000 Quick Start Guide
Page 8
.... To use this feature, you need to install the printer in the User's Guide. • Continuous printing on the printer driver settings, refer to the other one. See "Canon Specialty Media" on the printer or printer driver. This is convenient if you frequently switch to be fed...to the location of paper you use or during printer maintenance, you may have to print without removing and reloading paper. For information on various sizes or types of paper you require. See "Aligning the Print Head" on the size of the printer. Depending on page 61. 4 For example, ...
.... To use this feature, you need to install the printer in the User's Guide. • Continuous printing on the printer driver settings, refer to the other one. See "Canon Specialty Media" on the printer or printer driver. This is convenient if you frequently switch to be fed...to the location of paper you use or during printer maintenance, you may have to print without removing and reloading paper. For information on various sizes or types of paper you require. See "Aligning the Print Head" on the size of the printer. Depending on page 61. 4 For example, ...

iP4000 Quick Start Guide
Page 49
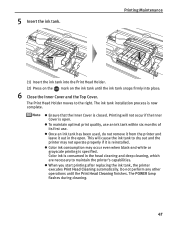
...when replacing more than one ink tank. 45 remove only the ink tank. Be sure to the local laws and regulations regarding disposal of the 2 Open the Top Cover, and pull down the Inner Cover forward to open. The Print Head Holder moves to avoid staining clothing or the ...surrounding area. Do not touch the lock lever; z Handle ink tanks carefully to the center. 3 Remove the empty ink tank. Printing Maintenance „ Replacing Ink Tanks When an ink tank runs...
...when replacing more than one ink tank. 45 remove only the ink tank. Be sure to the local laws and regulations regarding disposal of the 2 Open the Top Cover, and pull down the Inner Cover forward to open. The Print Head Holder moves to avoid staining clothing or the ...surrounding area. Do not touch the lock lever; z Handle ink tanks carefully to the center. 3 Remove the empty ink tank. Printing Maintenance „ Replacing Ink Tanks When an ink tank runs...
iP4000 Quick Start Guide
Page 51
...do not remove it from the printer and leave it is specified. z Color ink consumption may not operate properly if it out in the head cleaning and deep cleaning, which are necessary to the right. The Print Head Holder moves to maintain the printer's capabilities. Printing will cause... its first use. z When you start printing after replacing the ink tank, the printer executes Print Head Cleaning automatically. Printing Maintenance (1) Insert the ink tank into the Print Head Holder. (2) Press on the mark on the ink tank until the Print Head Cleaning finishes. This will not occur if ...
...do not remove it from the printer and leave it is specified. z Color ink consumption may not operate properly if it out in the head cleaning and deep cleaning, which are necessary to the right. The Print Head Holder moves to maintain the printer's capabilities. Printing will cause... its first use. z When you start printing after replacing the ink tank, the printer executes Print Head Cleaning automatically. Printing Maintenance (1) Insert the ink tank into the Print Head Holder. (2) Press on the mark on the ink tank until the Print Head Cleaning finishes. This will not occur if ...
iP4000 Quick Start Guide
Page 71
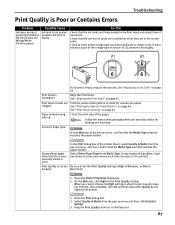
...an Ink Tank" on page 49. Follow the instructions packaged with your specialty media for the Print Quality setting. Load one sheet at a time and remove each sheet as soon as shown in (2), remove it is empty, replace the ink tank. Paper loaded wrong side up menu, and then ... tab, click High for loading and handling. Glossy photo paper other than the Canon specialty media is misaligned Align the Print Head. Open the Print dialog box. 2. Check to the Fine end. 67 Print Head is used In the Print dialog box of the printer driver, select Quality & Media from the pop-up...
...an Ink Tank" on page 49. Follow the instructions packaged with your specialty media for the Print Quality setting. Load one sheet at a time and remove each sheet as soon as shown in (2), remove it is empty, replace the ink tank. Paper loaded wrong side up menu, and then ... tab, click High for loading and handling. Glossy photo paper other than the Canon specialty media is misaligned Align the Print Head. Open the Print dialog box. 2. Check to the Fine end. 67 Print Head is used In the Print dialog box of the printer driver, select Quality & Media from the pop-up...
iP4000 Quick Start Guide
Page 79
... be damaged. If the Print Head is nearly full. After reinstalling the Print Head, you continue printing with this error still remains, the Print Head may need to resume printing with a new ink tank immediately after the printing. If this printer. 75 Eight flashes indicates that the waste ink absorber is already installed, remove the Print Head and check the electrical contacts...
... be damaged. If the Print Head is nearly full. After reinstalling the Print Head, you continue printing with this error still remains, the Print Head may need to resume printing with a new ink tank immediately after the printing. If this printer. 75 Eight flashes indicates that the waste ink absorber is already installed, remove the Print Head and check the electrical contacts...
iP4000 Quick Start Guide
Page 84
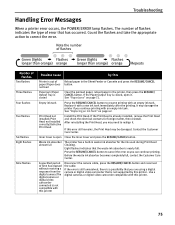
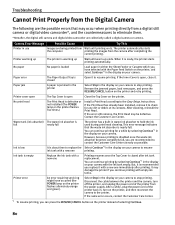
...lamp on your camera to the printer. After cleaning, reinstall the Print Head. Camera Error Message Possible Cause Try This Printer in the display on the printer flashes five times.) Install a Print Head according to stop printing. Remove the jammed paper, load new paper, and press the RESUME/CANCEL ... the Select Continue*1 in , turn off the printer, and unplug the power cord of selecting Continue. 80 If the Print Head has already been installed, remove it to check for a while by selecting Continue*1 in the display on the printer, and select Continue*1 in waste ...
...lamp on your camera to the printer. After cleaning, reinstall the Print Head. Camera Error Message Possible Cause Try This Printer in the display on the printer flashes five times.) Install a Print Head according to stop printing. Remove the jammed paper, load new paper, and press the RESUME/CANCEL ... the Select Continue*1 in , turn off the printer, and unplug the power cord of selecting Continue. 80 If the Print Head has already been installed, remove it to check for a while by selecting Continue*1 in the display on the printer, and select Continue*1 in waste ...

iP4000 Quick Start Guide
Page 93
Never remove the plug by pulling on a Print Head after printing. Never use an extension lead/ cord. AC 110-120 V, 50/60 Hz AC 220-240 V, 50/60 Hz Working around the power outlet is kept clear at all times so you purchased the printer. Print heads and ink tanks For safety reasons store Print Heads and...not place metal objects (paper clips, staples, etc.) or containers of fire or electric shocks, install the printer in a location that is printing. Do not shake Print Heads or ink tanks. Ink may be very hot and could cause burns. 89 The metal parts may leak out and stain clothing or the...
Never remove the plug by pulling on a Print Head after printing. Never use an extension lead/ cord. AC 110-120 V, 50/60 Hz AC 220-240 V, 50/60 Hz Working around the power outlet is kept clear at all times so you purchased the printer. Print heads and ink tanks For safety reasons store Print Heads and...not place metal objects (paper clips, staples, etc.) or containers of fire or electric shocks, install the printer in a location that is printing. Do not shake Print Heads or ink tanks. Ink may be very hot and could cause burns. 89 The metal parts may leak out and stain clothing or the...
iP3000 Easy Setup Instructions
Page 1
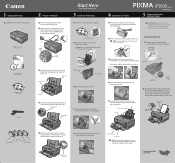
... number located to the color guide on the print head holder). Paper Support Top Cover 3 Remove the shipping tape from its package. PIXMA iP3000 Series Photo Printer Documentation and Software Kit PIXMA iP3000 Series Print Head Power Cord 2 Prepare the Printer 1 Remove the shipping tape from the print head. Protective Tape Serial Number 4 Slide the print head into place. You will rest at notch...
... number located to the color guide on the print head holder). Paper Support Top Cover 3 Remove the shipping tape from its package. PIXMA iP3000 Series Photo Printer Documentation and Software Kit PIXMA iP3000 Series Print Head Power Cord 2 Prepare the Printer 1 Remove the shipping tape from the print head. Protective Tape Serial Number 4 Slide the print head into place. You will rest at notch...
iP3000 Easy Setup Instructions
Page 2
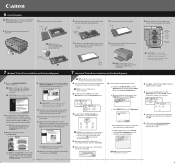
...Canon is now complete. 8 Access your CD-ROM drive. 3 When the main menu appears, click Easy Install. 6 Cassette Loading NOTE: Loading paper in the auto sheet feeder (top paper feeder). For additional information visit the electronic User's Guide. 1 Pull out the cassette from the bottom of the printer. 2 Remove...OS 9.x printer driver instructions, refer to Windows as an Administrator before continuing. 6 Start the print head alignment procedure. When the Printer List screen appears, select PIXMA iP3000, then click the Utility icon. 7 Ensure that the top right corner touches the inside ...
...Canon is now complete. 8 Access your CD-ROM drive. 3 When the main menu appears, click Easy Install. 6 Cassette Loading NOTE: Loading paper in the auto sheet feeder (top paper feeder). For additional information visit the electronic User's Guide. 1 Pull out the cassette from the bottom of the printer. 2 Remove...OS 9.x printer driver instructions, refer to Windows as an Administrator before continuing. 6 Start the print head alignment procedure. When the Printer List screen appears, select PIXMA iP3000, then click the Utility icon. 7 Ensure that the top right corner touches the inside ...


