
iP4000 Quick Start Guide
Page 5
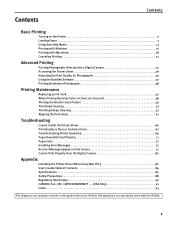
... and computer screens in this guide refer to the iP4000. The operations are Incorrect 48 Printing the Nozzle Check Pattern 49 Print Head Cleaning 53 Print Head Deep Cleaning 57 Aligning the Print Head 61 Troubleshooting Cannot Install the Printer Driver 66 Print Quality is Poor or...Printing Borderless Photographs 38 Printing Maintenance Replacing an Ink Tank 42 When Printing Becomes Faint or Colors are exactly the same with the iP3000. 1 Contents Contents Basic Printing Turning on the Screen 77 Cannot Print Properly from the Digital Camera 80 Appendix Installing the Printer ...
... and computer screens in this guide refer to the iP4000. The operations are Incorrect 48 Printing the Nozzle Check Pattern 49 Print Head Cleaning 53 Print Head Deep Cleaning 57 Aligning the Print Head 61 Troubleshooting Cannot Install the Printer Driver 66 Print Quality is Poor or...Printing Borderless Photographs 38 Printing Maintenance Replacing an Ink Tank 42 When Printing Becomes Faint or Colors are exactly the same with the iP3000. 1 Contents Contents Basic Printing Turning on the Screen 77 Cannot Print Properly from the Digital Camera 80 Appendix Installing the Printer ...

iP4000 Quick Start Guide
Page 52
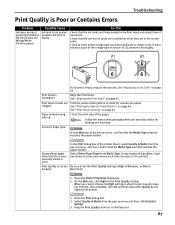
...z Ensure that each ink tank is Poor or Contains Errors" on page 53 After print head cleaning, print the nozzle check pattern. See "Print Quality is installed at the correct location. Step 1 See "Printing the Nozzle Check Pattern" on page 49 Step 2 If white stripes appear See "Print Head... Cleaning" on page 67. z If the ruled lines are shifted after performing print head cleaning three times Step 3 See "Print Head Deep Cleaning" on the ink tank and ensure ...
...z Ensure that each ink tank is Poor or Contains Errors" on page 53 After print head cleaning, print the nozzle check pattern. See "Print Quality is installed at the correct location. Step 1 See "Printing the Nozzle Check Pattern" on page 49 Step 2 If white stripes appear See "Print Head... Cleaning" on page 67. z If the ruled lines are shifted after performing print head cleaning three times Step 3 See "Print Head Deep Cleaning" on the ink tank and ensure ...

iP4000 Quick Start Guide
Page 54
... the Sheet Feeder or Cassette. 2 Press the Paper Feed Switch to start Print Head Cleaning, click Cleaning on , load a sheet of Letter-sized plain paper in which you loaded the paper. 50 The nozzle check pattern will be checked before cleaning. (4) When the confirmation message is displayed, click OK. (5) Ensure that the pattern is...
... the Sheet Feeder or Cassette. 2 Press the Paper Feed Switch to start Print Head Cleaning, click Cleaning on , load a sheet of Letter-sized plain paper in which you loaded the paper. 50 The nozzle check pattern will be checked before cleaning. (4) When the confirmation message is displayed, click OK. (5) Ensure that the pattern is...

iP4000 Quick Start Guide
Page 55
... Mac OS X v.10.3.x, double-click the Print Center icon. (3) Select the name of your printer from the pop-up menu. (2) Click Nozzle Check. (3) Read the message and click Print Check Pattern. Otherwise, click Quit to be printed. 3 Open the BJ Printer Utility dialog box....Items displays the items to finish. 51 See "Examining the Nozzle Check Pattern" on page 52. (5) If you want to start Print Head Cleaning, click Cleaning on the Pattern Check dialog box. The nozzle check pattern will be checked before cleaning. (4) Ensure that the pattern is printed properly. Printing Maintenance...
... Mac OS X v.10.3.x, double-click the Print Center icon. (3) Select the name of your printer from the pop-up menu. (2) Click Nozzle Check. (3) Read the message and click Print Check Pattern. Otherwise, click Quit to be printed. 3 Open the BJ Printer Utility dialog box....Items displays the items to finish. 51 See "Examining the Nozzle Check Pattern" on page 52. (5) If you want to start Print Head Cleaning, click Cleaning on the Pattern Check dialog box. The nozzle check pattern will be checked before cleaning. (4) Ensure that the pattern is printed properly. Printing Maintenance...

iP4000 Quick Start Guide
Page 56
... the remaining amount of ink is discharged properly. iP3000 (1) (1) (2) (2) (1) If lines of the group (1) pattern are missing, and the group (2) patterns have white stripes, the "Color" print head nozzle needs cleaning. See "Print Head Cleaning" on page 42. Printing Maintenance „ Examining the Nozzle Check Pattern The nozzle check pattern should appear as follows when ink...
... the remaining amount of ink is discharged properly. iP3000 (1) (1) (2) (2) (1) If lines of the group (1) pattern are missing, and the group (2) patterns have white stripes, the "Color" print head nozzle needs cleaning. See "Print Head Cleaning" on page 42. Printing Maintenance „ Examining the Nozzle Check Pattern The nozzle check pattern should appear as follows when ink...

iP4000 Quick Start Guide
Page 57
...The Print Head can also be cleaned from the Start Menu" on page 52. 1 Ensure that the Inner Cover is directly displayed when you click Cleaning on , hold down the RESUME/CANCEL button until the POWER lamp flashes once. See "Examining the Nozzle Check Pattern" on page 28. ...3 Start Print Head Cleaning. (1) Click the Maintenance tab. (2) Click Cleaning. 53 Printing Maintenance Print Head Cleaning Clean the Print Head if ...
...The Print Head can also be cleaned from the Start Menu" on page 52. 1 Ensure that the Inner Cover is directly displayed when you click Cleaning on , hold down the RESUME/CANCEL button until the POWER lamp flashes once. See "Examining the Nozzle Check Pattern" on page 28. ...3 Start Print Head Cleaning. (1) Click the Maintenance tab. (2) Click Cleaning. 53 Printing Maintenance Print Head Cleaning Clean the Print Head if ...

iP4000 Quick Start Guide
Page 58
...of step 3-(3) is on page 57. z If the problem remains after performing Print Head Cleaning three times, try Print Head Deep Cleaning. See "Print Head Deep Cleaning" on . 54 See "Examining the Nozzle Check Pattern" on page 52. 1 Ensure that the printer is directly displayed when you click...Black (BCI-3eBK), Color to 40 seconds. Printing Maintenance (3) Select the ink group to print the nozzle check pattern. z Clicking Initial Check Items displays the items to be checked before cleaning. (5) When the confirmation message is displayed, click OK. (6) Read the message and click Print ...
...of step 3-(3) is on page 57. z If the problem remains after performing Print Head Cleaning three times, try Print Head Deep Cleaning. See "Print Head Deep Cleaning" on . 54 See "Examining the Nozzle Check Pattern" on page 52. 1 Ensure that the printer is directly displayed when you click...Black (BCI-3eBK), Color to 40 seconds. Printing Maintenance (3) Select the ink group to print the nozzle check pattern. z Clicking Initial Check Items displays the items to be checked before cleaning. (5) When the confirmation message is displayed, click OK. (6) Read the message and click Print ...
iP4000 Quick Start Guide
Page 60
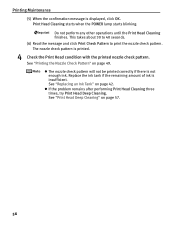
... the problem remains after performing Print Head Cleaning three times, try Print Head Deep Cleaning. See "Print Head Deep Cleaning" on page 42. Printing Maintenance (5) When the confirmation message is printed. 4 Check the Print Head condition with the printed nozzle check pattern. This takes about 30 to...Check Pattern to print the nozzle check pattern. The nozzle check pattern is displayed, click OK. See "Printing the Nozzle Check Pattern" on page 49. z The nozzle check pattern will not be printed correctly if there is insufficient. Print Head Cleaning starts when the POWER lamp...
... the problem remains after performing Print Head Cleaning three times, try Print Head Deep Cleaning. See "Print Head Deep Cleaning" on page 42. Printing Maintenance (5) When the confirmation message is printed. 4 Check the Print Head condition with the printed nozzle check pattern. This takes about 30 to...Check Pattern to print the nozzle check pattern. The nozzle check pattern is displayed, click OK. See "Printing the Nozzle Check Pattern" on page 49. z The nozzle check pattern will not be printed correctly if there is insufficient. Print Head Cleaning starts when the POWER lamp...

iP4000 Quick Start Guide
Page 62
Print Head Deep Cleaning starts when the POWER lamp starts blinking. This takes about one minute. 4 Print the nozzle check pattern to be worn out. See "Printing the Nozzle Check Pattern" on page 42. z Clicking Initial Check Items displays the items to check the Print Head condition. See "Replacing ...Print Center icon. (3) Select the name of your printer from the Product list and click Maintenance. 58 z If the print head nozzles are still not clean, open the Top Cover and ensure that there are sufficient ink levels in all ink tanks and turn off the printer. Printing ...
Print Head Deep Cleaning starts when the POWER lamp starts blinking. This takes about one minute. 4 Print the nozzle check pattern to be worn out. See "Printing the Nozzle Check Pattern" on page 42. z Clicking Initial Check Items displays the items to check the Print Head condition. See "Replacing ...Print Center icon. (3) Select the name of your printer from the Product list and click Maintenance. 58 z If the print head nozzles are still not clean, open the Top Cover and ensure that there are sufficient ink levels in all ink tanks and turn off the printer. Printing ...

iP4000 Quick Start Guide
Page 64
... Pattern" on page 42. Contact the Customer Care Center. 60 See "Replacing an Ink Tank" on page 49. z If the print head nozzles are still not clean, open the Top Cover and ensure that color. z If this does not solve the problem, the Print Head may be worn out. Printing Maintenance ...4 Print the nozzle check pattern to perform another Print Head Deep Cleaning 24 hours after turning off the printer. If a particular color is not printed properly, replace the ink tank of that there...
... Pattern" on page 42. Contact the Customer Care Center. 60 See "Replacing an Ink Tank" on page 49. z If the print head nozzles are still not clean, open the Top Cover and ensure that color. z If this does not solve the problem, the Print Head may be worn out. Printing Maintenance ...4 Print the nozzle check pattern to perform another Print Head Deep Cleaning 24 hours after turning off the printer. If a particular color is not printed properly, replace the ink tank of that there...
iP4000 Quick Start Guide
Page 71
...and reseat them if necessary. Print Head is empty, replace the ink tank. See "Print Head Cleaning" on page 42. Follow the instructions packaged with your specialty media for higher print quality. 1.... wrong side up menu and then click Detailed Setting. 3. Glossy photo paper other than the Canon specialty media is used In the Print dialog box of the orange tape as shown in (2),...select Custom, click Set and then adjust the Quality bar for loading and handling. Print Head nozzles are installed and that the Media Type selected matches the paper loaded. Open the Printer Properties dialog...
...and reseat them if necessary. Print Head is empty, replace the ink tank. See "Print Head Cleaning" on page 42. Follow the instructions packaged with your specialty media for higher print quality. 1.... wrong side up menu and then click Detailed Setting. 3. Glossy photo paper other than the Canon specialty media is used In the Print dialog box of the orange tape as shown in (2),...select Custom, click Set and then adjust the Quality bar for loading and handling. Print Head nozzles are installed and that the Media Type selected matches the paper loaded. Open the Printer Properties dialog...
iP4000 Quick Start Guide
Page 88
... (Windows) Printer Setup Utility (Macintosh) Routine Maintenance Replacing an Ink Tank When Printing Becomes Faint or Colors are Incorrect Printing the Nozzle Check Pattern Print Head Cleaning Print Head Deep Cleaning Aligning the Print Head Transporting Printer Troubleshooting Cannot Install Printer Driver Print Quality is Poor Printer Does Not Start or Stops During...
... (Windows) Printer Setup Utility (Macintosh) Routine Maintenance Replacing an Ink Tank When Printing Becomes Faint or Colors are Incorrect Printing the Nozzle Check Pattern Print Head Cleaning Print Head Deep Cleaning Aligning the Print Head Transporting Printer Troubleshooting Cannot Install Printer Driver Print Quality is Poor Printer Does Not Start or Stops During...
iP4000 Quick Start Guide
Page 97
... Opening the Printer Properties Dialog Box from the Digital Camera 80 CANON U.S.A., INC. LIMITED WARRANTY --- (USA Only).. 91 Cleaning 53, 55 D Deep Cleaning 57, 59 Driver saving setting 35 settings 16 uninstalling 77 E Easy-PhotoPrint 37, 38, 39 Easy-WebPrint 37 Examining the Nozzle Check Pattern 52 ExifPrint 37 G Glossy Photo Paper 14 H Handling...
... Opening the Printer Properties Dialog Box from the Digital Camera 80 CANON U.S.A., INC. LIMITED WARRANTY --- (USA Only).. 91 Cleaning 53, 55 D Deep Cleaning 57, 59 Driver saving setting 35 settings 16 uninstalling 77 E Easy-PhotoPrint 37, 38, 39 Easy-WebPrint 37 Examining the Nozzle Check Pattern 52 ExifPrint 37 G Glossy Photo Paper 14 H Handling...
iP3000 Easy Setup Instructions
Page 1
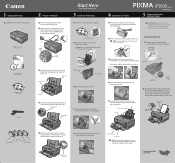
Press the POWER button. The printer will perform a print head cleaning. Raise the top cover. Protective Tape Serial Number 4 Slide the print head into place. Protective Cap 1 TURN THE PRINTER OFF. 2 Connect one end of the... click Paper Output Tray Inner Cover NOTE: The printer will initialize. PIXMA iP3000 Series Photo Printer Documentation and Software Kit PIXMA iP3000 Series Print Head Power Cord 2 Prepare the Printer 1 Remove the shipping tape from its package. Top Cover Inner Cover Print Head Nozzles Electrical Contacts 3 Raise the print head lock lever. The print head...
Press the POWER button. The printer will perform a print head cleaning. Raise the top cover. Protective Tape Serial Number 4 Slide the print head into place. Protective Cap 1 TURN THE PRINTER OFF. 2 Connect one end of the... click Paper Output Tray Inner Cover NOTE: The printer will initialize. PIXMA iP3000 Series Photo Printer Documentation and Software Kit PIXMA iP3000 Series Print Head Power Cord 2 Prepare the Printer 1 Remove the shipping tape from its package. Top Cover Inner Cover Print Head Nozzles Electrical Contacts 3 Raise the print head lock lever. The print head...


