iP1500 Quick Start Guide
Page 5
...Media 7 Printing with Windows 9 Printing with Macintosh 11 Canceling Printing 13 Advanced Printing Accessing Printer Driver 14 Adjusting Print Quality for Photographs 15 Using the Bundle Software 22 Printing Borderless Photographs 23 Printing Maintenance When Printing Becomes Faint or Colors are Incorrect 26 Printing the Nozzle Check Pattern 27 Print Head Cleaning 31 Print Head Deep Cleaning 34 Aligning the Print Head 37 ... Driver when using Mac OS 9.x 57 User's Guide Table of Contents 59 Specifications 60 Safety Precautions 62 Regulatory Information 64 CANON U.S.A., INC.
...Media 7 Printing with Windows 9 Printing with Macintosh 11 Canceling Printing 13 Advanced Printing Accessing Printer Driver 14 Adjusting Print Quality for Photographs 15 Using the Bundle Software 22 Printing Borderless Photographs 23 Printing Maintenance When Printing Becomes Faint or Colors are Incorrect 26 Printing the Nozzle Check Pattern 27 Print Head Cleaning 31 Print Head Deep Cleaning 34 Aligning the Print Head 37 ... Driver when using Mac OS 9.x 57 User's Guide Table of Contents 59 Specifications 60 Safety Precautions 62 Regulatory Information 64 CANON U.S.A., INC.
iP1500 Quick Start Guide
Page 18
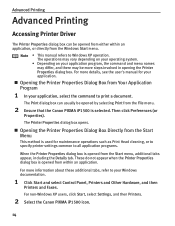
...8226; This manual refers to Windows XP operation. For more details, see the user's manual for maintenance operations such as Print Head cleaning, or to specify printer settings common to all application programs. When the Printer Properties dialog box is used for your ...non-Windows XP users, click Start, select Settings, and then Printers. 2 Select the Canon PIXMA iP1500 icon. 14 The operations may be opened by selecting Print from the File menu. 2 Ensure that the Canon PIXMA iP1500 is opened from within an application, or directly from the Windows Start menu. Then click...
...8226; This manual refers to Windows XP operation. For more details, see the user's manual for maintenance operations such as Print Head cleaning, or to specify printer settings common to all application programs. When the Printer Properties dialog box is used for your ...non-Windows XP users, click Start, select Settings, and then Printers. 2 Select the Canon PIXMA iP1500 icon. 14 The operations may be opened by selecting Print from the File menu. 2 Ensure that the Canon PIXMA iP1500 is opened from within an application, or directly from the Windows Start menu. Then click...
iP1500 Quick Start Guide
Page 30
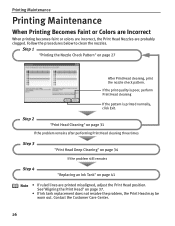
... procedures below to clean the nozzles. Step 1 "Printing the Nozzle Check Pattern" on page 27 After Print Head cleaning, print the nozzle check pattern. Printing Maintenance Printing Maintenance When Printing Becomes Faint or Colors are Incorrect When printing becomes faint or colors are incorrect, the Print Head Nozzles are printed misaligned, adjust the Print Head position. If the print quality is poor, perform Print Head cleaning If the pattern...
... procedures below to clean the nozzles. Step 1 "Printing the Nozzle Check Pattern" on page 27 After Print Head cleaning, print the nozzle check pattern. Printing Maintenance Printing Maintenance When Printing Becomes Faint or Colors are Incorrect When printing becomes faint or colors are incorrect, the Print Head Nozzles are printed misaligned, adjust the Print Head position. If the print quality is poor, perform Print Head cleaning If the pattern...
iP1500 Quick Start Guide
Page 32
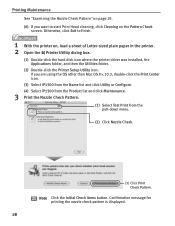
... Note Click the Initial Check Items button. Printing Maintenance See "Examining the Nozzle Check Pattern" on page 29. (6) If you are using the OS other than Mac OS X v.10.3, double-click the Print Center icon. (3) Select iP1500 from the Name list and click Utility or... Configure. (4) Select iP1500 from the Product list and click Maintenance. 3 Print the Nozzle Check Pattern. (1) Select Test Print from the pull-down menu. (2) Click Nozzle Check. (3) Click Print Check Pattern. Otherwise, click Exit to start Print Head cleaning, click Cleaning on , load a sheet of Letter...
... Note Click the Initial Check Items button. Printing Maintenance See "Examining the Nozzle Check Pattern" on page 29. (6) If you are using the OS other than Mac OS X v.10.3, double-click the Print Center icon. (3) Select iP1500 from the Name list and click Utility or... Configure. (4) Select iP1500 from the Product list and click Maintenance. 3 Print the Nozzle Check Pattern. (1) Select Test Print from the pull-down menu. (2) Click Nozzle Check. (3) Click Print Check Pattern. Otherwise, click Exit to start Print Head cleaning, click Cleaning on , load a sheet of Letter...

iP1500 Quick Start Guide
Page 33
...) Note If the ink level is low, the nozzle check pattern is discharged properly. See "Print Head Cleaning" on the Pattern Check screen to proceed to Print Head cleaning. Click the Cleaning button on page 31. 29 Lines missing or white stripes in this pattern require running Print Head cleaning. See "Replacing an Ink Tank" on the Pattern Check screen...
...) Note If the ink level is low, the nozzle check pattern is discharged properly. See "Print Head Cleaning" on the Pattern Check screen to proceed to Print Head cleaning. Click the Cleaning button on page 31. 29 Lines missing or white stripes in this pattern require running Print Head cleaning. See "Replacing an Ink Tank" on the Pattern Check screen...

iP1500 Quick Start Guide
Page 35
... other operations until the Print Head cleaning finishes. Otherwise, click Cancel to unclog the Print Head Nozzles. Note If you want to print the nozzle check pattern, click Print Check Pattern. Cleaning the Print Head consumes ink, so perform Print Head cleaning only when necessary. Print Head Cleaning Printing Maintenance If missing lines or white stripes are found in the printed nozzle check pattern, perform Print Head cleaning to finish. This...
... other operations until the Print Head cleaning finishes. Otherwise, click Cancel to unclog the Print Head Nozzles. Note If you want to print the nozzle check pattern, click Print Check Pattern. Cleaning the Print Head consumes ink, so perform Print Head cleaning only when necessary. Print Head Cleaning Printing Maintenance If missing lines or white stripes are found in the printed nozzle check pattern, perform Print Head cleaning to finish. This...
iP1500 Quick Start Guide
Page 36
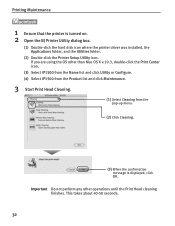
... other than Mac OS X v.10.3, double-click the Print Center icon. (3) Select iP1500 from the Name list and click Utility or Configure. (4) Select iP1500 from the Product list and click Maintenance. 3 Start Print Head Cleaning. (1) Select Cleaning from the pop-up menu. (2) Click Cleaning. (3) When the confirmation message is turned on. 2 ... Utilities folder. (2) Double-click the Printer Setup Utility icon. If you are using the OS other operations until the Print Head cleaning finishes. This takes about 40-50 seconds. 32 Printing Maintenance 1 Ensure that the printer is displayed, click OK.
... other than Mac OS X v.10.3, double-click the Print Center icon. (3) Select iP1500 from the Name list and click Utility or Configure. (4) Select iP1500 from the Product list and click Maintenance. 3 Start Print Head Cleaning. (1) Select Cleaning from the pop-up menu. (2) Click Cleaning. (3) When the confirmation message is turned on. 2 ... Utilities folder. (2) Double-click the Printer Setup Utility icon. If you are using the OS other operations until the Print Head cleaning finishes. This takes about 40-50 seconds. 32 Printing Maintenance 1 Ensure that the printer is displayed, click OK.
iP1500 Quick Start Guide
Page 37
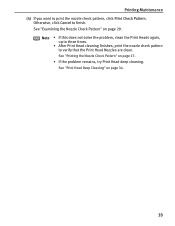
Note • If this does not solve the problem, clean the Print Heads again, up to three times. • After Print Head cleaning finishes, print the nozzle check pattern to finish. See "Examining the Nozzle Check Pattern" on page 27. • If the problem remains, try Print Head deep cleaning. See "Printing the Nozzle Check Pattern" on page 29. See "Print Head Deep Cleaning" on page 34. 33 Otherwise, click Cancel to verify that the Print Head Nozzles are clean. Printing Maintenance (4) If you want to print the nozzle check pattern, click Print Check Pattern.
Note • If this does not solve the problem, clean the Print Heads again, up to three times. • After Print Head cleaning finishes, print the nozzle check pattern to finish. See "Examining the Nozzle Check Pattern" on page 27. • If the problem remains, try Print Head deep cleaning. See "Printing the Nozzle Check Pattern" on page 29. See "Print Head Deep Cleaning" on page 34. 33 Otherwise, click Cancel to verify that the Print Head Nozzles are clean. Printing Maintenance (4) If you want to print the nozzle check pattern, click Print Check Pattern.

iP1500 Quick Start Guide
Page 38
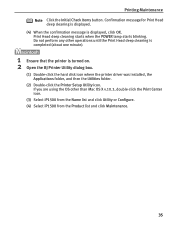
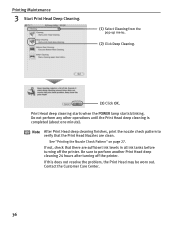
... Dialog Box Directly from the Start Menu" on . 2 Open the Printer Properties dialog box. Print Head deep cleaning consumes more powerful process. Printing Maintenance Print Head Deep Cleaning If print quality does not improve by standard Print Head cleaning, try Print Head deep cleaning, which is a more ink than standard Print Head cleaning, so perform this procedure only when necessary. 1 Ensure that the printer is displayed, click...
... Dialog Box Directly from the Start Menu" on . 2 Open the Printer Properties dialog box. Print Head deep cleaning consumes more powerful process. Printing Maintenance Print Head Deep Cleaning If print quality does not improve by standard Print Head cleaning, try Print Head deep cleaning, which is a more ink than standard Print Head cleaning, so perform this procedure only when necessary. 1 Ensure that the printer is displayed, click...
iP1500 Quick Start Guide
Page 39
... when the POWER lamp starts blinking. Confirmation message for Print Head deep cleaning is displayed. (4) When the confirmation message is turned on. 2 Open the BJ Printer Utility dialog box. (1) Double-click the hard disk icon where the printer ... icon. If you are using the OS other operations until the Print Head deep cleaning is completed (about one minute). 1 Ensure that the printer is displayed, click OK. Do not perform any other than Mac OS X v.10.3, double-click the Print Center icon. (3) Select iP1500 from the Name list and click Utility or Configure. (4) Select...
... when the POWER lamp starts blinking. Confirmation message for Print Head deep cleaning is displayed. (4) When the confirmation message is turned on. 2 Open the BJ Printer Utility dialog box. (1) Double-click the hard disk icon where the printer ... icon. If you are using the OS other operations until the Print Head deep cleaning is completed (about one minute). 1 Ensure that the printer is displayed, click OK. Do not perform any other than Mac OS X v.10.3, double-click the Print Center icon. (3) Select iP1500 from the Name list and click Utility or Configure. (4) Select...
iP1500 Quick Start Guide
Page 40
... turning off the printer. Contact the Customer Care Center. 36 Printing Maintenance 3 Start Print Head Deep Cleaning. (1) Select Cleaning from the pop-up menu. (2) Click Deep Cleaning. (3) Click OK. Print Head deep cleaning starts when the POWER lamp starts blinking. If this does not resolve the problem, the Print Head may be worn out. Be sure to verify that there are...
... turning off the printer. Contact the Customer Care Center. 36 Printing Maintenance 3 Start Print Head Deep Cleaning. (1) Select Cleaning from the pop-up menu. (2) Click Deep Cleaning. (3) Click OK. Print Head deep cleaning starts when the POWER lamp starts blinking. If this does not resolve the problem, the Print Head may be worn out. Be sure to verify that there are...

iP1500 Quick Start Guide
Page 45
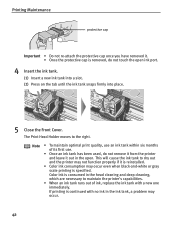
When replacing an ink tank, check the model number very carefully. The Print Head Holder moves to the local laws and regulations regarding disposal of consumables. 3 Prepare a replacement ink tank. (1) Unpack a new ink tank and remove the orange protective ... if the wrong ink tank is turned on, and then open the Front Cover. Replacing an Ink Tank Printing Maintenance If the print result is not improved after maintenance such as Print Head cleaning, an ink tank runs out of ink, replace it using the following steps. 1 Ensure that the printer is used, or installed...
When replacing an ink tank, check the model number very carefully. The Print Head Holder moves to the local laws and regulations regarding disposal of consumables. 3 Prepare a replacement ink tank. (1) Unpack a new ink tank and remove the orange protective ... if the wrong ink tank is turned on, and then open the Front Cover. Replacing an Ink Tank Printing Maintenance If the print result is not improved after maintenance such as Print Head cleaning, an ink tank runs out of ink, replace it using the following steps. 1 Ensure that the printer is used, or installed...
iP1500 Quick Start Guide
Page 46
...tank, a problem may occur even when black-and-white or gray scale printing is specified. If printing is continued with a new one immediately. The Print Head Holder moves to maintain the printer's capabilities. • When an ink ... a slot. (2) Press on the tab until the ink tank snaps firmly into place. 5 Close the Front Cover. Printing Maintenance protective cap Important • Do not re-attach the protective cap once you have removed it. • Once... consumption may occur. 42 Color ink is consumed in the head cleaning and deep cleaning, which are necessary to the right.
...tank, a problem may occur even when black-and-white or gray scale printing is specified. If printing is continued with a new one immediately. The Print Head Holder moves to maintain the printer's capabilities. • When an ink ... a slot. (2) Press on the tab until the ink tank snaps firmly into place. 5 Close the Front Cover. Printing Maintenance protective cap Important • Do not re-attach the protective cap once you have removed it. • Once... consumption may occur. 42 Color ink is consumed in the head cleaning and deep cleaning, which are necessary to the right.

iP1500 Quick Start Guide
Page 54
...the Intensity setting in the Print Head and reseat them if necessary. On the Main tab, select Manual for the Print Quality setting. 1. In the Print dialog box, select Color Option from the nozzle check pattern, clean the Print Head. Drag the Intensity slide bar to print images that the Media ...printer driver and try printing again. See "Printing the Nozzle Check Pattern" on page 37. In the Print dialog box, select Quality & Media from Media Type, which may resolve the problem. See "Aligning the Print Head" on page 27. Glossy photo paper other than the Canon speciality media is ...
...the Intensity setting in the Print Head and reseat them if necessary. On the Main tab, select Manual for the Print Quality setting. 1. In the Print dialog box, select Color Option from the nozzle check pattern, clean the Print Head. Drag the Intensity slide bar to print images that the Media ...printer driver and try printing again. See "Printing the Nozzle Check Pattern" on page 37. In the Print dialog box, select Quality & Media from Media Type, which may resolve the problem. See "Aligning the Print Head" on page 27. Glossy photo paper other than the Canon speciality media is ...
iP1500 Quick Start Guide
Page 55
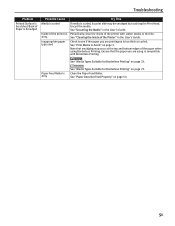
...that smudging may be smudged by touching the Print Head. Clean the Paper Feed Roller. dirty. See "Media Types Suitable for Borderless Printing" on is compatible with cotton swabs or the like. See "Paper Does Not Feed Properly" on page 23. Troubleshooting Problem Printed Surface is Scratched/Back of Paper is ...top and bottom edges of the Printer" in the User's Guide. See "Print Media to see if the paper you are printing on page 23. See "Uncurling the Media" in the User's Guide. See "Cleaning the Inside of the paper when using is too thick or curled. Note ...
...that smudging may be smudged by touching the Print Head. Clean the Paper Feed Roller. dirty. See "Media Types Suitable for Borderless Printing" on is compatible with cotton swabs or the like. See "Paper Does Not Feed Properly" on page 23. Troubleshooting Problem Printed Surface is Scratched/Back of Paper is ...top and bottom edges of the Printer" in the User's Guide. See "Print Media to see if the paper you are printing on page 23. See "Uncurling the Media" in the User's Guide. See "Cleaning the Inside of the paper when using is too thick or curled. Note ...

iP1500 Quick Start Guide
Page 58
Count the flashes and take the appropriate action to hold the ink consumed during Print almost full Head cleaning. incorrectly Five flashes No Print Head Install a Print Head correctly. Four flashes Ink tanks installed Reinstall the ink tanks. Ensure that this error, you experience this absorber is out of error that requires contacting ...
Count the flashes and take the appropriate action to hold the ink consumed during Print almost full Head cleaning. incorrectly Five flashes No Print Head Install a Print Head correctly. Four flashes Ink tanks installed Reinstall the ink tanks. Ensure that this error, you experience this absorber is out of error that requires contacting ...
iP1500 Quick Start Guide
Page 63
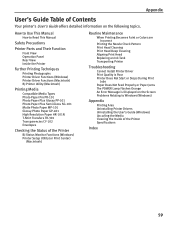
... of the Printer BJ Status Monitor Functions (Windows) Printer Setup Utility (or Print Center) (Macintosh) Routine Maintenance When Printing Becomes Faint or Colors are Incorrect Printing the Nozzle Check Pattern Print Head Cleaning Print Head Deep Cleaning Aligning Print Head Replacing an Ink Tank Transporting Printer Troubleshooting Cannot Install Printer Driver Print Quality is Poor Printer Does Not Start or Stops During...
... of the Printer BJ Status Monitor Functions (Windows) Printer Setup Utility (or Print Center) (Macintosh) Routine Maintenance When Printing Becomes Faint or Colors are Incorrect Printing the Nozzle Check Pattern Print Head Cleaning Print Head Deep Cleaning Aligning Print Head Replacing an Ink Tank Transporting Printer Troubleshooting Cannot Install Printer Driver Print Quality is Poor Printer Does Not Start or Stops During...
iP1500 Quick Start Guide
Page 71
... dialog box 28 BJ Status Monitor 48, 52 Borderless (full 25 Borderless Print 22 Borderless Printing 23, 51 C Canceling Print Jobs 11 Cannot Install the Printer Driver 49 CANON U.S.A., INC. LIMITED WARRANTY --- (USA Only) ..65 Cleaning 31, 32 D Deep Cleaning 34, 36 Driver saving settings 20 settings 10, 12 uninstalling 55 E ... Glossy 8 Photo Paper Plus Semi-Gloss 8 Photo Paper Pro 8 PhotoRecord 22 POWER button 2 POWER lamp 2 POWER/ERROR lamp 54 Preview before printing 10 Print Center 28 Print Check Pattern 27, 28 Print dialog box 9, 12 Print Head Alignment 37, 39 67
... dialog box 28 BJ Status Monitor 48, 52 Borderless (full 25 Borderless Print 22 Borderless Printing 23, 51 C Canceling Print Jobs 11 Cannot Install the Printer Driver 49 CANON U.S.A., INC. LIMITED WARRANTY --- (USA Only) ..65 Cleaning 31, 32 D Deep Cleaning 34, 36 Driver saving settings 20 settings 10, 12 uninstalling 55 E ... Glossy 8 Photo Paper Plus Semi-Gloss 8 Photo Paper Pro 8 PhotoRecord 22 POWER button 2 POWER lamp 2 POWER/ERROR lamp 54 Preview before printing 10 Print Center 28 Print Check Pattern 27, 28 Print dialog box 9, 12 Print Head Alignment 37, 39 67

iP1500 Quick Start Guide
Page 72
Index Print Head Cleaning 31 Print Head Deep Cleaning 34 Print Media to Avoid 3 Print Mode 12 Print Quality 10, 15, 50 Printer Driver Settings for Media Type 8 Printer Properties dialog box 9, 14, 27, 50 Printer Setup Utility 28 Printing Borderless Photographs 23 Printing the Nozzle Check Pattern 27 R Recalling Driver Settings 20 Replacing an Ink Tank 41 Resetting ... Transfers 8 Turning on the Printer 2 U Uninstalling the printer driver 55 User's Guide Table of Contents 59 Using Speciality Media 7 V Vivid Photo 18 W When Printing Becomes Faint or Colors are Incorrect ....26 68
Index Print Head Cleaning 31 Print Head Deep Cleaning 34 Print Media to Avoid 3 Print Mode 12 Print Quality 10, 15, 50 Printer Driver Settings for Media Type 8 Printer Properties dialog box 9, 14, 27, 50 Printer Setup Utility 28 Printing Borderless Photographs 23 Printing the Nozzle Check Pattern 27 R Recalling Driver Settings 20 Replacing an Ink Tank 41 Resetting ... Transfers 8 Turning on the Printer 2 U Uninstalling the printer driver 55 User's Guide Table of Contents 59 Using Speciality Media 7 V Vivid Photo 18 W When Printing Becomes Faint or Colors are Incorrect ....26 68
Service Manual
Page 7
... computer. Connect the printer to the computer. 4. Load A4-sized paper. Using the iP1500 service tool (QY9-0066), select "USB PORT." (See APPENDIX 2, ip1500 SERVICE TOOL.) d. See APPENDIX 1, SHIPMENT INSPECTION PATTERN 1, for the iP1500 are required. Print head deep cleaning Select "Deep Cleaning" from the ASF. EEPROM information check Refer to turn on the printer. (The LED...
... computer. Connect the printer to the computer. 4. Load A4-sized paper. Using the iP1500 service tool (QY9-0066), select "USB PORT." (See APPENDIX 2, ip1500 SERVICE TOOL.) d. See APPENDIX 1, SHIPMENT INSPECTION PATTERN 1, for the iP1500 are required. Print head deep cleaning Select "Deep Cleaning" from the ASF. EEPROM information check Refer to turn on the printer. (The LED...


