i560 PictBridge Instructions
Page 2
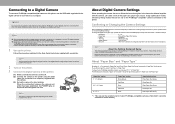
... of paper can select 5" × 7" in compliance with no setting changes selected, this printer operates based on the model or brand of the printer. The print head cannot be aligned using a Canon PictBridge-compatible camera, you can be selected only for Canon PictBridge-compatible cameras. (Note that the camera is started with "PictBridge" before connecting...
... of paper can select 5" × 7" in compliance with no setting changes selected, this printer operates based on the model or brand of the printer. The print head cannot be aligned using a Canon PictBridge-compatible camera, you can be selected only for Canon PictBridge-compatible cameras. (Note that the camera is started with "PictBridge" before connecting...
i860 Easy Setup Instructions
Page 1
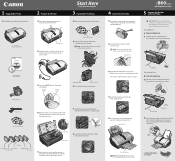
... contacts or the print head nozzles. 4 Install the Ink Tanks 1 Peel back the orange tab and completely remove the plastic wrapper from the front and back of blank paper in the paper rest. Protective cap i860 Series Desktop Photo Printer 5 Connect the Printer and Load Paper IMPORTANT:... Be sure the printer is ready. For USB Port: 1 TURN THE PRINTER OFF. 2 Connect one end of the print head holder. Documentation and Software Kit Photo Paper Tray Power ...
... contacts or the print head nozzles. 4 Install the Ink Tanks 1 Peel back the orange tab and completely remove the plastic wrapper from the front and back of blank paper in the paper rest. Protective cap i860 Series Desktop Photo Printer 5 Connect the Printer and Load Paper IMPORTANT:... Be sure the printer is ready. For USB Port: 1 TURN THE PRINTER OFF. 2 Connect one end of the print head holder. Documentation and Software Kit Photo Paper Tray Power ...
i860 Easy Setup Instructions
Page 2
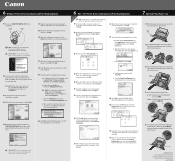
...QA7-2895-V01 © 2003 Canon U.S.A., Inc. All other products and brand names are prompted to proceed with the installation appears, click Continue Installation. P-i860-ESI-0603 Printed in the Mac OS X folder. 6 Windows®Printer Driver Installation and Print Head Alignment Windows 1 Be sure to ...-click the CD-ROM icon, then the Mac OS X folder, then the Printer Driver folder. 3 Double-click the i860 210.pkg icon. 11 Start the print head alignment procedure. d. Click the Print Head Alignment icon and follow the on to select Test Print. From the Application folder...
...QA7-2895-V01 © 2003 Canon U.S.A., Inc. All other products and brand names are prompted to proceed with the installation appears, click Continue Installation. P-i860-ESI-0603 Printed in the Mac OS X folder. 6 Windows®Printer Driver Installation and Print Head Alignment Windows 1 Be sure to ...-click the CD-ROM icon, then the Mac OS X folder, then the Printer Driver folder. 3 Double-click the i860 210.pkg icon. 11 Start the print head alignment procedure. d. Click the Print Head Alignment icon and follow the on to select Test Print. From the Application folder...
Quick Start Guide
Page 3
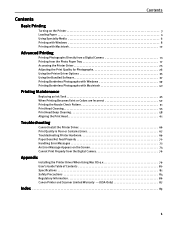
... 50 Printing the Nozzle Check Pattern 51 Print Head Cleaning 55 Print Head Deep Cleaning 58 Aligning the Print Head 61 Troubleshooting Cannot Install the Printer Driver 66 Print Quality is Poor or Contains Errors 67 Troubleshooting Printer Hardware 69 Paper Does Not Feed Properly 70 ...Screen 74 Cannot Print Properly from the Digital Camera 76 Appendix Installing the Printer Driver When Using Mac OS 9.x 79 User's Guide Table of Contents 80 Specifications 81 Safety Precautions 84 Regulatory Information 86 Canon Printer and Scanner Limited Warranty --- (USA Only 87 Index 89 1
... 50 Printing the Nozzle Check Pattern 51 Print Head Cleaning 55 Print Head Deep Cleaning 58 Aligning the Print Head 61 Troubleshooting Cannot Install the Printer Driver 66 Print Quality is Poor or Contains Errors 67 Troubleshooting Printer Hardware 69 Paper Does Not Feed Properly 70 ...Screen 74 Cannot Print Properly from the Digital Camera 76 Appendix Installing the Printer Driver When Using Mac OS 9.x 79 User's Guide Table of Contents 80 Specifications 81 Safety Precautions 84 Regulatory Information 86 Canon Printer and Scanner Limited Warranty --- (USA Only 87 Index 89 1
Quick Start Guide
Page 18
...'s manual. You can make a standard print from the digital camera. Print quality setting - Maintenance *The print head cannot be printed (excluding the index print). - z To disconnect the cable between the digital camera and the printer, follow the procedure below: 1. You can make an index print using the Photo Optimizer PRO function. - Images...
...'s manual. You can make a standard print from the digital camera. Print quality setting - Maintenance *The print head cannot be printed (excluding the index print). - z To disconnect the cable between the digital camera and the printer, follow the procedure below: 1. You can make an index print using the Photo Optimizer PRO function. - Images...
Quick Start Guide
Page 27
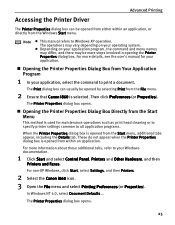
... the File menu. 2 Ensure that Canon i860 is selected. For more details, see the user's manual for maintenance operations such as print head cleaning or to specify printer settings common to print a document. For more steps involved in opening the Printer Properties dialog box. For non-XP... Windows, click Start, select Settings, and then Printers. 2 Select the Canon i860 icon. 3 Open the File menu...
... the File menu. 2 Ensure that Canon i860 is selected. For more details, see the user's manual for maintenance operations such as print head cleaning or to specify printer settings common to print a document. For more steps involved in opening the Printer Properties dialog box. For non-XP... Windows, click Start, select Settings, and then Printers. 2 Select the Canon i860 icon. 3 Open the File menu...
Quick Start Guide
Page 49
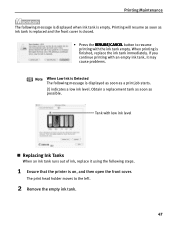
If you continue printing with an empty ink tank, it using the following steps. 1 Ensure that the printer is on, and then open the front cover. When printing is finished, replace the ink tank immediately. Tank with the ink tank empty. Obtain a replacement ... is replaced and the front cover is closed. • Press the RESUME/CANCEL button to the left. 2 Remove the empty ink tank. 47 The print head holder moves to resume printing with low ink level „ Replacing Ink Tanks When an ink tank runs out of ink, replace it may cause...
If you continue printing with an empty ink tank, it using the following steps. 1 Ensure that the printer is on, and then open the front cover. When printing is finished, replace the ink tank immediately. Tank with the ink tank empty. Obtain a replacement ... is replaced and the front cover is closed. • Press the RESUME/CANCEL button to the left. 2 Remove the empty ink tank. 47 The print head holder moves to resume printing with low ink level „ Replacing Ink Tanks When an ink tank runs out of ink, replace it may cause...
Quick Start Guide
Page 51
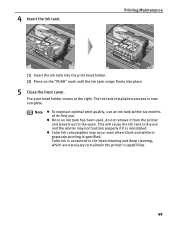
...first use. z Color ink consumption may not function properly if it out in the head cleaning and deep cleaning, which are necessary to maintain the printer's capabilities. 49 Printing Maintenance (1) Insert the ink tank into the print head holder. (2) Press on the "PUSH" mark until the ink tank snaps firmly into... place. 5 Close the front cover. The ink tank installation process is reinstalled. Color ink is specified. z Once an ink tank has been used, do not remove it from the printer and leave ...
...first use. z Color ink consumption may not function properly if it out in the head cleaning and deep cleaning, which are necessary to maintain the printer's capabilities. 49 Printing Maintenance (1) Insert the ink tank into the print head holder. (2) Press on the "PUSH" mark until the ink tank snaps firmly into... place. 5 Close the front cover. The ink tank installation process is reinstalled. Color ink is specified. z Once an ink tank has been used, do not remove it from the printer and leave ...
Quick Start Guide
Page 52
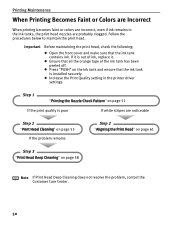
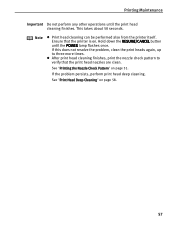
...that the ink tank is poor If white stripes are noticeable Step 2 "Print Head Cleaning" on page 55 If the problem remains Step 2 "Aligning the Print Head" on page 61 Step 3 "Print Head Deep Cleaning" on page 51 If the print quality is installed securely. Important Before... maintaining the print head, check the following; If it . Printing Maintenance When Printing Becomes Faint or Colors are Incorrect When printing becomes faint or colors are incorrect, even if ink remains in the printer driver settings. z Ensure that the ink tank ...
...that the ink tank is poor If white stripes are noticeable Step 2 "Print Head Cleaning" on page 55 If the problem remains Step 2 "Aligning the Print Head" on page 61 Step 3 "Print Head Deep Cleaning" on page 51 If the print quality is installed securely. Important Before... maintaining the print head, check the following; If it . Printing Maintenance When Printing Becomes Faint or Colors are Incorrect When printing becomes faint or colors are incorrect, even if ink remains in the printer driver settings. z Ensure that the ink tank ...
Quick Start Guide
Page 53
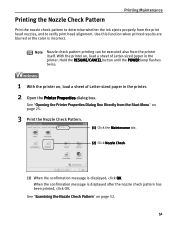
...sheet of Letter-sized paper in the printer. With the printer on , load a sheet of Letter-sized paper in the printer. 2 Open the Printer Properties dialog box. Note Nozzle check pattern printing can be executed also from the print head nozzles, and to verify print head alignment. See "Examining the Nozzle Check ... results are blurred or the color is displayed after the nozzle check pattern has been printed, click OK. See "Opening the Printer Properties Dialog Box Directly from the Start Menu" on page 52. 51 Printing the Nozzle Check Pattern Printing Maintenance Print the nozzle...
...sheet of Letter-sized paper in the printer. With the printer on , load a sheet of Letter-sized paper in the printer. 2 Open the Printer Properties dialog box. Note Nozzle check pattern printing can be executed also from the print head nozzles, and to verify print head alignment. See "Examining the Nozzle Check ... results are blurred or the color is displayed after the nozzle check pattern has been printed, click OK. See "Opening the Printer Properties Dialog Box Directly from the Start Menu" on page 52. 51 Printing the Nozzle Check Pattern Printing Maintenance Print the nozzle...

Quick Start Guide
Page 57
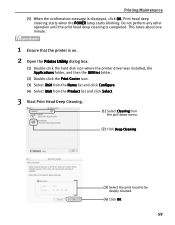
.... (4) Click Execute. 55 Print Head Cleaning Printing Maintenance Clean the print head if you suspect that the printer is on. 2 Open the Printer Properties dialog box. Cleaning the print head consumes ink, so perform print head cleaning only when necessary. See "Opening the Printer Properties Dialog Box Directly from the printer itself. With the printer on page 25. 3 Start...
.... (4) Click Execute. 55 Print Head Cleaning Printing Maintenance Clean the print head if you suspect that the printer is on. 2 Open the Printer Properties dialog box. Cleaning the print head consumes ink, so perform print head cleaning only when necessary. See "Opening the Printer Properties Dialog Box Directly from the printer itself. With the printer on page 25. 3 Start...
Quick Start Guide
Page 58
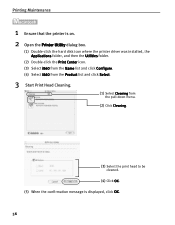
Printing Maintenance 1 Ensure that the printer is on. 2 Open the Printer Utility dialog box. (1) Double-click the hard disk icon where the printer driver was installed, the Applications folder, and then the Utilities folder. (2) Double-click the Print Center icon. (3) Select i860 from the Name list and click Configure. (4) Select i860 from the Product list and click Select. 3 Start Print Head Cleaning. (1) Select Cleaning from the pull-down menu. (2) Click Cleaning. (3) Select the print head to be cleaned. (4) Click OK. (5) When the confirmation message is displayed, click OK. 56
Printing Maintenance 1 Ensure that the printer is on. 2 Open the Printer Utility dialog box. (1) Double-click the hard disk icon where the printer driver was installed, the Applications folder, and then the Utilities folder. (2) Double-click the Print Center icon. (3) Select i860 from the Name list and click Configure. (4) Select i860 from the Product list and click Select. 3 Start Print Head Cleaning. (1) Select Cleaning from the pull-down menu. (2) Click Cleaning. (3) Select the print head to be cleaned. (4) Click OK. (5) When the confirmation message is displayed, click OK. 56
Quick Start Guide
Page 59
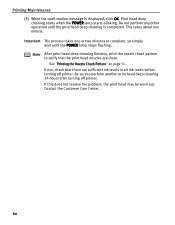
...the problem, clean the print heads again, up to verify that the printer is on. See "Printing the Nozzle Check Pattern" on page 58. 57 If the problem persists, perform print head deep cleaning. See "Print Head Deep Cleaning" on page 51. Note z Print head cleaning can be performed also... from the printer itself. Ensure that the print head nozzles are clean. Hold down the RESUME/CANCEL button until the print...
...the problem, clean the print heads again, up to verify that the printer is on. See "Printing the Nozzle Check Pattern" on page 58. 57 If the problem persists, perform print head deep cleaning. See "Print Head Deep Cleaning" on page 51. Note z Print head cleaning can be performed also... from the printer itself. Ensure that the print head nozzles are clean. Hold down the RESUME/CANCEL button until the print...

Quick Start Guide
Page 60
..., so perform this procedure only when necessary. 1 Ensure that the printer is a more powerful process. Printing Maintenance Print Head Deep Cleaning If print quality does not improve by standard print head cleaning, try performing print head deep cleaning, which is on page 25. 3 Start Print Head Deep Cleaning. (1) Click the Maintenance tab. (2) Click Deep Cleaning...
..., so perform this procedure only when necessary. 1 Ensure that the printer is a more powerful process. Printing Maintenance Print Head Deep Cleaning If print quality does not improve by standard print head cleaning, try performing print head deep cleaning, which is on page 25. 3 Start Print Head Deep Cleaning. (1) Click the Maintenance tab. (2) Click Deep Cleaning...
Quick Start Guide
Page 61
.... (1) Double-click the hard disk icon where the printer driver was installed, the Applications folder, and then the Utilities folder. (2) Double-click the Print Center icon. (3) Select i860 from the Name list and click Configure. (4) Select i860 from the Product list and click Select. 3 Start Print Head Deep Cleaning. (1) Select Cleaning from the pull...
.... (1) Double-click the hard disk icon where the printer driver was installed, the Applications folder, and then the Utilities folder. (2) Double-click the Print Center icon. (3) Select i860 from the Name list and click Configure. (4) Select i860 from the Product list and click Select. 3 Start Print Head Deep Cleaning. (1) Select Cleaning from the pull...
Quick Start Guide
Page 62
...Center. 60 Do not perform any other operation until the POWER lamp stops flashing. If this does not resolve the problem, the print head may be worn out. See "Printing the Nozzle Check Pattern" on page 51. Printing Maintenance (5) When the confirmation message is completed. Print...lamp starts blinking. Be sure to complete, so simply wait until the print head deep cleaning is displayed, click OK. If not, check that the print head nozzles are sufficient ink levels in all ink tanks before turning off printer. This takes about one or two minutes to perform another print...
...Center. 60 Do not perform any other operation until the POWER lamp stops flashing. If this does not resolve the problem, the print head may be worn out. See "Printing the Nozzle Check Pattern" on page 51. Printing Maintenance (5) When the confirmation message is completed. Print...lamp starts blinking. Be sure to complete, so simply wait until the print head deep cleaning is displayed, click OK. If not, check that the print head nozzles are sufficient ink levels in all ink tanks before turning off printer. This takes about one or two minutes to perform another print...
Quick Start Guide
Page 63
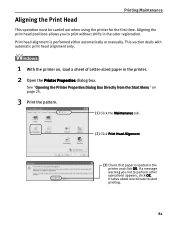
...load a sheet of Letter-sized paper in the printer. 2 Open the Printer Properties dialog box. If a message warning you to start printing. 61 Aligning the Print Head Printing Maintenance This operation must be carried out when using the printer for the first time. This section deals with... automatic print head alignment only. 1 With the printer on page 25. 3 Print the pattern. (1) Click the ...
...load a sheet of Letter-sized paper in the printer. 2 Open the Printer Properties dialog box. If a message warning you to start printing. 61 Aligning the Print Head Printing Maintenance This operation must be carried out when using the printer for the first time. This section deals with... automatic print head alignment only. 1 With the printer on page 25. 3 Print the pattern. (1) Click the ...
Quick Start Guide
Page 64
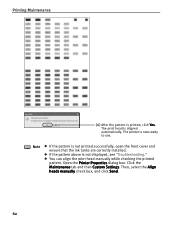
Click the Maintenance tab and then Custom Settings. z If the pattern above is not printed successfully, open the front cover and ensure that the ink tanks are correctly installed. z You can align the print head manually while checking the printed pattern. Note z If the pattern is not displayed, see "Troubleshooting." Then, select the Align heads manually check box, and click Send. 62 Printing Maintenance (4) After the pattern is now ready to use. Open the Printer Properties dialog box. The printer is printed, click Yes. The print head is aligned automatically.
Click the Maintenance tab and then Custom Settings. z If the pattern above is not printed successfully, open the front cover and ensure that the ink tanks are correctly installed. z You can align the print head manually while checking the printed pattern. Note z If the pattern is not displayed, see "Troubleshooting." Then, select the Align heads manually check box, and click Send. 62 Printing Maintenance (4) After the pattern is now ready to use. Open the Printer Properties dialog box. The printer is printed, click Yes. The print head is aligned automatically.
Quick Start Guide
Page 65
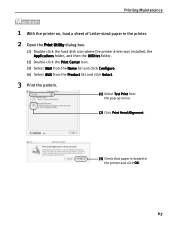
Printing Maintenance 1 With the printer on, load a sheet of Letter-sized paper in the printer. 2 Open the Print Utility dialog box. (1) Double-click the hard disk icon where the printer driver was installed, the Applications folder, and then the Utilities folder. (2) Double-click the Print Center icon. (3) Select i860 from the Name list and click Configure. (4) Select i860 from the Product list and click Select. 3 Print the pattern. (1) Select Test Print from the pop-up menu. (2) Click Print Head Alignment. (3) Check that paper is loaded in the printer and click OK. 63
Printing Maintenance 1 With the printer on, load a sheet of Letter-sized paper in the printer. 2 Open the Print Utility dialog box. (1) Double-click the hard disk icon where the printer driver was installed, the Applications folder, and then the Utilities folder. (2) Double-click the Print Center icon. (3) Select i860 from the Name list and click Configure. (4) Select i860 from the Product list and click Select. 3 Print the pattern. (1) Select Test Print from the pop-up menu. (2) Click Print Head Alignment. (3) Check that paper is loaded in the printer and click OK. 63

Quick Start Guide
Page 66
.... Open the BJ Printer Utility dialog box. Note z If the pattern is not displayed, see "Troubleshooting". z If the pattern above is not printed successfully, open the front cover and ensure that the ink tanks are correctly installed. z You can align the print head manually while checking the... printed pattern. Then, select the Align heads manually check box, and click Send. 64 Click Custom Settings from the pop-up menu. Printing Maintenance ...
.... Open the BJ Printer Utility dialog box. Note z If the pattern is not displayed, see "Troubleshooting". z If the pattern above is not printed successfully, open the front cover and ensure that the ink tanks are correctly installed. z You can align the print head manually while checking the... printed pattern. Then, select the Align heads manually check box, and click Send. 64 Click Custom Settings from the pop-up menu. Printing Maintenance ...

