

i455 Quick Start Guide
Page 1
BUBBLE JET PRINTER Quick Start Guide Table of Contents Preface 1 Shipping Materials 1 Introduction 1 Setting Up 2 Preparing the Printer 2 Connecting the Printer to the Computer 3 Installing the Print Head 4 Loading Paper 7 Installing the Printer Driver 8 Aligning the Print Head 12 Basic Operations 16 Printing with Windows 16 Printing with Macintosh 18 Print Head Maintenance 20 Appendix 21 Printing Photographs Directly from a Digital Camera 21 Notes on Handling the USB Interface (for Windows Users) 22 For Further Details... 22 BE QA7-2815-V01
BUBBLE JET PRINTER Quick Start Guide Table of Contents Preface 1 Shipping Materials 1 Introduction 1 Setting Up 2 Preparing the Printer 2 Connecting the Printer to the Computer 3 Installing the Print Head 4 Loading Paper 7 Installing the Printer Driver 8 Aligning the Print Head 12 Basic Operations 16 Printing with Windows 16 Printing with Macintosh 18 Print Head Maintenance 20 Appendix 21 Printing Photographs Directly from a Digital Camera 21 Notes on Handling the USB Interface (for Windows Users) 22 For Further Details... 22 BE QA7-2815-V01
i455 Quick Start Guide
Page 3
... be purchased separately according to your Canon Authorized Dealer or Sales Representative. ‰ Printer ‰ Setup Software & User's Guide CD-ROM ‰ Quick Start Guide ‰ Print Head ‰ 2 Ink Tanks * A USB cable should be observed for safe operation. Also read the Safety Precautions in personal injury or material damage caused by incorrect operation of their respective owners. Trademark Notices • Canon® is a registered trademark of...
... be purchased separately according to your Canon Authorized Dealer or Sales Representative. ‰ Printer ‰ Setup Software & User's Guide CD-ROM ‰ Quick Start Guide ‰ Print Head ‰ 2 Ink Tanks * A USB cable should be observed for safe operation. Also read the Safety Precautions in personal injury or material damage caused by incorrect operation of their respective owners. Trademark Notices • Canon® is a registered trademark of...
i455 Quick Start Guide
Page 9
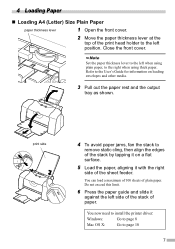
print side 4 To avoid paper jams, fan the stack to page 10 7 You now need to install the printer driver: Windows: Go to page 8 Mac OS X: Go to remove static cling, then align the edges of the stack by tapping it on loading envelopes and other media. 3 Pull out the paper rest and the output tray as shown. Set the paper thickness lever to the right when using plain paper, to the left side of the stack...
print side 4 To avoid paper jams, fan the stack to page 10 7 You now need to install the printer driver: Windows: Go to page 8 Mac OS X: Go to remove static cling, then align the edges of the stack by tapping it on loading envelopes and other media. 3 Pull out the paper rest and the output tray as shown. Set the paper thickness lever to the right when using plain paper, to the left side of the stack...
i455 Quick Start Guide
Page 10
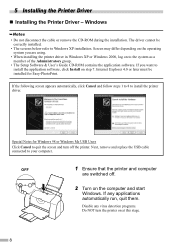
... virus detection programs. Do NOT turn off . 2 Turn on the operating system you want to the system as a member of the Administrators group. • The Setup Software & User's Guide CD-ROM contains the application software. Disable any applications automatically run, quit them. 5 Installing the Printer Driver „ Installing the Printer Driver - If you are switched off the printer. Next, remove and replace the USB cable connected to install the printer driver. Special Notes for Easy-PhotoPrint...
... virus detection programs. Do NOT turn off . 2 Turn on the operating system you want to the system as a member of the Administrators group. • The Setup Software & User's Guide CD-ROM contains the application software. Disable any applications automatically run, quit them. 5 Installing the Printer Driver „ Installing the Printer Driver - If you are switched off the printer. Next, remove and replace the USB cable connected to install the printer driver. Special Notes for Easy-PhotoPrint...

i455 Quick Start Guide
Page 11
... on Handling the USB Interface (for Windows Users)" on page 22. If the connection is recognized, the printer driver will be automatically installed. When the screen shown on the left is displayed, click Install. 5 When the screen shown on the left appears, turn the printer on page 12. 9 Before you use the printer, you must carry out print head alignment on . ON 6 Click OK. 3 Place the Setup Software & User's Guide CD-ROM...
... on Handling the USB Interface (for Windows Users)" on page 22. If the connection is recognized, the printer driver will be automatically installed. When the screen shown on the left is displayed, click Install. 5 When the screen shown on the left appears, turn the printer on page 12. 9 Before you use the printer, you must carry out print head alignment on . ON 6 Click OK. 3 Place the Setup Software & User's Guide CD-ROM...

i455 Quick Start Guide
Page 12
... you to "Applications Included in the CD-ROM Package" on page 23. „ Installing the Printer Driver - If you want to install the printer driver. 1 Turn on the Mac. 2 Place the Setup Software & User's Guide CD-ROM in the computer or printer not operating normally. • Before installing the driver, disable all virus detection programs and automatically loading programs or remove them , refer to restart the computer is completed." 7 If...
... you to "Applications Included in the CD-ROM Package" on page 23. „ Installing the Printer Driver - If you want to install the printer driver. 1 Turn on the Mac. 2 Place the Setup Software & User's Guide CD-ROM in the computer or printer not operating normally. • Before installing the driver, disable all virus detection programs and automatically loading programs or remove them , refer to restart the computer is completed." 7 If...
i455 Quick Start Guide
Page 16
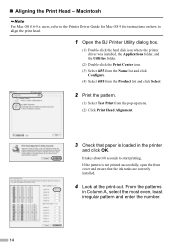
... folder. (2) Double-click the Print Center icon. (3) Select i455 from the Name list and click Configure. (4) Select i455 from the Product list and click Select. 2 Print the pattern. (1) Select Test Print from the pop-up menu. (2) Click Print Head Alignment. 3 Check that the ink tanks are correctly installed. 4 Look at the print-out. Macintosh For Mac OS 8.6-9.x users, refer to the Printer Driver Guide for Mac OS 9 for instructions on how to start printing. „ Aligning the Print Head -
... folder. (2) Double-click the Print Center icon. (3) Select i455 from the Name list and click Configure. (4) Select i455 from the Product list and click Select. 2 Print the pattern. (1) Select Test Print from the pop-up menu. (2) Click Print Head Alignment. 3 Check that the ink tanks are correctly installed. 4 Look at the print-out. Macintosh For Mac OS 8.6-9.x users, refer to the Printer Driver Guide for Mac OS 9 for instructions on how to start printing. „ Aligning the Print Head -

i455 Quick Start Guide
Page 19
...) Canon i455 - If this ? Select the media loaded in the Main tab. Select Custom to control the color adjustment settings in more detailed explanation of the functions in the tab. (This may not appear in the Page Setup tab is the same as that you wish to set the paper size and paper orientation. Guide). Before printing, open the settings screen and check that the Page Size in Windows XP or Windows 2000...
...) Canon i455 - If this ? Select the media loaded in the Main tab. Select Custom to control the color adjustment settings in more detailed explanation of the functions in the tab. (This may not appear in the Page Setup tab is the same as that you wish to set the paper size and paper orientation. Guide). Before printing, open the settings screen and check that the Page Size in Windows XP or Windows 2000...

i455 Quick Start Guide
Page 20
... File menu, click Page Setup. Printing with Macintosh Adjusting the print settings according to your needs allows you to produce better quality prints. „ Printing 1 Open the Page Setup dialog box in your application to print the document. For details, refer to your requirements. On the File menu, click Print. Check the application's user's manual for the actual procedures. 2 Specify the page setup. Check the application's users manual for the actual procedures. 4 Specify the print settings according to "Basic Print Settings...
... File menu, click Page Setup. Printing with Macintosh Adjusting the print settings according to your needs allows you to produce better quality prints. „ Printing 1 Open the Page Setup dialog box in your application to print the document. For details, refer to your requirements. On the File menu, click Print. Check the application's user's manual for the actual procedures. 2 Specify the page setup. Check the application's users manual for the actual procedures. 4 Specify the print settings according to "Basic Print Settings...

i455 Quick Start Guide
Page 22
... Cleaning. When you enable the low ink warning, reset the ink counter of Ink Replace the empty ink tank with a new one. Refer to the User's Guide for details on how to improve the print quality. Click Cleaning. See page 14 for details on and follow the instructions below. • Windows Open the printer driver settings screen and click the Maintenance tab. Close the front cover when finished. Ink Tank BCI-24 Color Ink Tank BCI-24 Black 1 Open...
... Cleaning. When you enable the low ink warning, reset the ink counter of Ink Replace the empty ink tank with a new one. Refer to the User's Guide for details on how to improve the print quality. Click Cleaning. See page 14 for details on and follow the instructions below. • Windows Open the printer driver settings screen and click the Maintenance tab. Close the front cover when finished. Ink Tank BCI-24 Color Ink Tank BCI-24 Black 1 Open...
i455 Quick Start Guide
Page 23
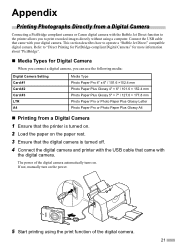
.... If not, manually turn on the power. 5 Start printing using a computer. This section describes how to print recorded images directly without using the print function of the digital camera automatically turns on. Appendix Printing Photographs Directly from a Digital Camera 1 Ensure that the printer is turned on. 2 Load the paper on the paper rest. 3 Ensure that the digital camera is turned off. 4 Connect the digital camera and printer with the USB cable that came...
.... If not, manually turn on the power. 5 Start printing using a computer. This section describes how to print recorded images directly without using the print function of the digital camera automatically turns on. Appendix Printing Photographs Directly from a Digital Camera 1 Ensure that the printer is turned on. 2 Load the paper on the paper rest. 3 Ensure that the digital camera is turned off. 4 Connect the digital camera and printer with the USB cable that came...

i455 Quick Start Guide
Page 24
... (1) Load the CD-ROM in this Quick Start Guide, there may be a problem with the USB driver installation. Contents • Printer parts and their functions • Further printing techniques • Routine maintenance • Printing media • Troubleshooting • Specifications „ How to View the User's Guide For Windows Double-click the User's Guide short-cut icon on the desk top, or select All Programs (or Programs) from the Start menu, then Canon i455 - Notes...
... (1) Load the CD-ROM in this Quick Start Guide, there may be a problem with the USB driver installation. Contents • Printer parts and their functions • Further printing techniques • Routine maintenance • Printing media • Troubleshooting • Specifications „ How to View the User's Guide For Windows Double-click the User's Guide short-cut icon on the desk top, or select All Programs (or Programs) from the Start menu, then Canon i455 - Notes...

i455 Quick Start Guide
Page 25
... can operate. • USB* interface • CD-ROM drive • Available hard-disk space for printer driver installation (including temporary files) Windows XP/Windows 2000: 65MB Windows Me/Windows 98: 30MB (Including the capacity for the electric manual) * USB operation can only be guaranteed on a PC with pre-installed Windows XP, Windows 2000, Windows Me, or Windows 98. (This includes Windows XP, Windows 2000, or Windows Me upgraded from User's Guide (HTML manual of this printer) in full size.
... can operate. • USB* interface • CD-ROM drive • Available hard-disk space for printer driver installation (including temporary files) Windows XP/Windows 2000: 65MB Windows Me/Windows 98: 30MB (Including the capacity for the electric manual) * USB operation can only be guaranteed on a PC with pre-installed Windows XP, Windows 2000, Windows Me, or Windows 98. (This includes Windows XP, Windows 2000, or Windows Me upgraded from User's Guide (HTML manual of this printer) in full size.

i455 PictBridge Instructions
Page 2
... mode manually after connecting the camera to the Direct Print Port of the digital camera. Connecting to a Digital Camera To connect a PictBridge-compatible digital camera to this printer, use the USB cable supplied with the digital camera for direct printing. z Open the front cover and adjust the paper thickness lever to select a mode of the camera. z When printing photos with your printer. You may differ depending on the printer will flash green one time. Perform necessary operations...
... mode manually after connecting the camera to the Direct Print Port of the digital camera. Connecting to a Digital Camera To connect a PictBridge-compatible digital camera to this printer, use the USB cable supplied with the digital camera for direct printing. z Open the front cover and adjust the paper thickness lever to select a mode of the camera. z When printing photos with your printer. You may differ depending on the printer will flash green one time. Perform necessary operations...
i455 PictBridge Instructions
Page 3
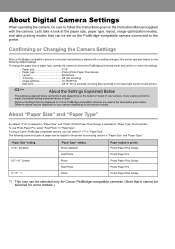
Image optimize On (ExifPrint) - Names of settings that are displayed on Canon PictBridge-compatible cameras are used . Trimming Off (No trimming) - Different names may be set on your camera. The following default settings: To change the paper size or paper type, operate the camera to select the PictBridge print setup mode and confirm or check the settings. - Paper type Photo (Photo Paper Plus Glossy) - Confirming or Changing the Camera Settings When a PictBridge-compatible camera is connected and printing is started with...
Image optimize On (ExifPrint) - Names of settings that are displayed on Canon PictBridge-compatible cameras are used . Trimming Off (No trimming) - Different names may be set on your camera. The following default settings: To change the paper size or paper type, operate the camera to select the PictBridge print setup mode and confirm or check the settings. - Paper type Photo (Photo Paper Plus Glossy) - Confirming or Changing the Camera Settings When a PictBridge-compatible camera is connected and printing is started with...

i455 PictBridge Instructions
Page 4
... print" By default, "Off" is selected for this printer. z When disconnecting the USB cable between the digital camera and the printer, follow the instructions given in the lower-right corner of each photo. z Controls of Camera. z This printer can handle only Exif/JPEG image data to produce photos using Pict Bridge. If "On" is selected, shooting date recorded in Exif image data is printed in the Instruction Manual of...
... print" By default, "Off" is selected for this printer. z When disconnecting the USB cable between the digital camera and the printer, follow the instructions given in the lower-right corner of each photo. z Controls of Camera. z This printer can handle only Exif/JPEG image data to produce photos using Pict Bridge. If "On" is selected, shooting date recorded in Exif image data is printed in the Instruction Manual of...

i455 PictBridge
Page 3
... the PictBridge print setup mode and confirm or check the settings. - To use Photo Paper Pro, select "Fast Photo" in printer Photo Paper Plus Glossy Photo Paper Pro Photo Paper Plus Glossy Photo Paper Pro Photo Paper Plus Glossy Photo Paper Pro PR-101 Let's take a look at the paper size, paper type, layout, image optimization modes, and date printing modes that are displayed on the following sizes and types of your camera depending on the brand or model. Paper size 10×15cm / 4"×6" - Image optimize...
... the PictBridge print setup mode and confirm or check the settings. - To use Photo Paper Pro, select "Fast Photo" in printer Photo Paper Plus Glossy Photo Paper Pro Photo Paper Plus Glossy Photo Paper Pro Photo Paper Plus Glossy Photo Paper Pro PR-101 Let's take a look at the paper size, paper type, layout, image optimization modes, and date printing modes that are displayed on the following sizes and types of your camera depending on the brand or model. Paper size 10×15cm / 4"×6" - Image optimize...

i455 PictBridge
Page 4
... Exif image data is selected for the following: • Print quality setting • Printer maintenance QA7-2823-V01 XX2003XX © CANON INC. 2003 PRINTED IN VIETNAM z When disconnecting the USB cable between the digital camera and printer, follow the instructions given in the lower-right corner of the digital camera cannot be used for this printer. z Never disconnect the USB cable during printing. About "Image optimize" By default, "On...
... Exif image data is selected for the following: • Print quality setting • Printer maintenance QA7-2823-V01 XX2003XX © CANON INC. 2003 PRINTED IN VIETNAM z When disconnecting the USB cable between the digital camera and printer, follow the instructions given in the lower-right corner of the digital camera cannot be used for this printer. z Never disconnect the USB cable during printing. About "Image optimize" By default, "On...
i455 Easy Setup Instructions
Page 1
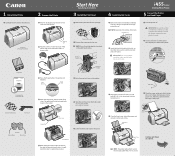
... the cover is securely seated. i455 Series Desktop Photo Printer 5 Connect the Printer and Load Paper 1 Turn the printer off. Tear at the bottom of the paper. NOTE: Avoid ink at notch to the right of the printer. Start Here Easy Setup Instructions 3 Install the Print Head 4 Install the Ink Tanks 1 Remove the print head from the box. Click USB Cable USB Port Documentation and Software Kit i455 Series Print Head Power Cord Ink Tanks BCI-24 Black BCI-24 Color 4 Open the output tray, then open 2 Remove the orange protective cap. Serial Number 5 Write...
... the cover is securely seated. i455 Series Desktop Photo Printer 5 Connect the Printer and Load Paper 1 Turn the printer off. Tear at the bottom of the paper. NOTE: Avoid ink at notch to the right of the printer. Start Here Easy Setup Instructions 3 Install the Print Head 4 Install the Ink Tanks 1 Remove the print head from the box. Click USB Cable USB Port Documentation and Software Kit i455 Series Print Head Power Cord Ink Tanks BCI-24 Black BCI-24 Color 4 Open the output tray, then open 2 Remove the orange protective cap. Serial Number 5 Write...

i455 Easy Setup Instructions
Page 2
... change without notice. Click the Maintenance tab, then click the Print Head Alignment icon. 6 Mac®OS X Printer Driver Installation and Print Head Alignment Macintosh For Mac OS 8.6 to 9.x printer driver instructions, refer to restart your printer and insert the "Setup Software & User's Guide" CD-ROM. 2 Double-click the CD-ROM icon, then the Mac OS X folder, then the Printer Driver folder. 11 Start the print head alignment procedure. Power Button Power Lamp off 5 When the Printer Port window appears, TURN THE PRINTER ON so the printer port (connection...
... change without notice. Click the Maintenance tab, then click the Print Head Alignment icon. 6 Mac®OS X Printer Driver Installation and Print Head Alignment Macintosh For Mac OS 8.6 to 9.x printer driver instructions, refer to restart your printer and insert the "Setup Software & User's Guide" CD-ROM. 2 Double-click the CD-ROM icon, then the Mac OS X folder, then the Printer Driver folder. 11 Start the print head alignment procedure. Power Button Power Lamp off 5 When the Printer Port window appears, TURN THE PRINTER ON so the printer port (connection...


