i320 Easy Setup Instructions
Page 1
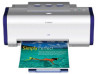
... the print head into the back of the print head. USB Port USB Cable Documentation and Software Kit NOTE: The "i320 Setup Software & User's Guide" CD-ROM contains printer drivers, software applications and electronic manuals. 5 Lower the gray lock lever until the ink tank locks into place. 3 ... a power outlet. NOTE: The serial number is located to the right of the printer and connect the other to install the printer driver before the printer is securely seated. Protective cap 5 Connect the Printer To Your Computer 1 Plug the power cord into the holder until it locks into...
... the print head into the back of the print head. USB Port USB Cable Documentation and Software Kit NOTE: The "i320 Setup Software & User's Guide" CD-ROM contains printer drivers, software applications and electronic manuals. 5 Lower the gray lock lever until the ink tank locks into place. 3 ... a power outlet. NOTE: The serial number is located to the right of the printer and connect the other to install the printer driver before the printer is securely seated. Protective cap 5 Connect the Printer To Your Computer 1 Plug the power cord into the holder until it locks into...
i320 Easy Setup Instructions
Page 2
... Turn the computer on -screen instructions. Follow the on and LEAVE THE PRINTER OFF. Select the Apple menu, then Chooser. 10 Click on Printers and Other Hardware, then Printers and Faxes. Right-click the Canon i320 icon, then click Printing Preferences. e. Follow the on the software to ...ensure product support. c. QA7-2171-V01/082002A ©2002 Canon U.S.A. Specifications subject to start print head...
... Turn the computer on -screen instructions. Follow the on and LEAVE THE PRINTER OFF. Select the Apple menu, then Chooser. 10 Click on Printers and Other Hardware, then Printers and Faxes. Right-click the Canon i320 icon, then click Printing Preferences. e. Follow the on the software to ...ensure product support. c. QA7-2171-V01/082002A ©2002 Canon U.S.A. Specifications subject to start print head...
i320 Quick Start Guide
Page 2
...but the accuracy and completeness thereof are not guaranteed or warranted, and they are subject to your Canon i320 Color Bubble Jet Printer. As an ENERGY STAR partner, Canon U.S.A., Inc., has determined that it will be , representation or warranties concerning the products described. Macintosh..., Mac and the Mac logo are trademarks of Apple Computer, Inc., registered in part, without notice. Canon i320 Color Bubble Jet Printer Quick Start Guide. Canon U.S.A., Inc. has reviewed this product meets the ENERGY STAR guidelines for energy efficiency. and other product and...
...but the accuracy and completeness thereof are not guaranteed or warranted, and they are subject to your Canon i320 Color Bubble Jet Printer. As an ENERGY STAR partner, Canon U.S.A., Inc., has determined that it will be , representation or warranties concerning the products described. Macintosh..., Mac and the Mac logo are trademarks of Apple Computer, Inc., registered in part, without notice. Canon i320 Color Bubble Jet Printer Quick Start Guide. Canon U.S.A., Inc. has reviewed this product meets the ENERGY STAR guidelines for energy efficiency. and other product and...
i320 Quick Start Guide
Page 3
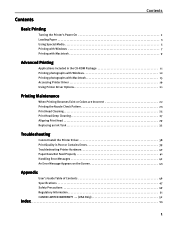
... Applications Included in the CD-ROM Package 11 Printing photographs with Windows 12 Printing photographs with Macintosh 15 Accessing Printer Driver 19 Using Printer Driver Options 21 Printing Maintenance When Printing Becomes Faint or Colors are Incorrect 22 Printing the Nozzle Check Pattern...Contains Errors 39 Troubleshooting Printer Hardware 40 Paper Does Not Feed Properly 41 Handling Error Messages 42 An Error Message Appears on the Screen 43 Appendix User's Guide Table of Contents 46 Specifications 47 Safety Precautions 49 Regulatory Information 51 CANON LIMITED WARRANTY --- ...
... Applications Included in the CD-ROM Package 11 Printing photographs with Windows 12 Printing photographs with Macintosh 15 Accessing Printer Driver 19 Using Printer Driver Options 21 Printing Maintenance When Printing Becomes Faint or Colors are Incorrect 22 Printing the Nozzle Check Pattern...Contains Errors 39 Troubleshooting Printer Hardware 40 Paper Does Not Feed Properly 41 Handling Error Messages 42 An Error Message Appears on the Screen 43 Appendix User's Guide Table of Contents 46 Specifications 47 Safety Precautions 49 Regulatory Information 51 CANON LIMITED WARRANTY --- ...
i320 Quick Start Guide
Page 4
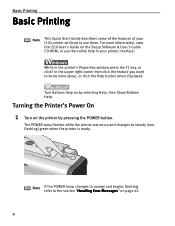
... User's Guide CD-ROM, or use them. Note If the POWER lamp changes to orange and begins flashing, refer to know more information, view the i320 User's Guide on page 42. 2 Turning the Printer's Power On 1 Turn on by pressing the POWER button. The POWER lamp flashes while the... printer warms up and changes to use the online help in your i320 printer and how to steady (nonflashing) green when the printer is ready. Turn Balloon Help on the printer by selecting Help, then Show Balloon Help. For more about, or ...
... User's Guide CD-ROM, or use them. Note If the POWER lamp changes to orange and begins flashing, refer to know more information, view the i320 User's Guide on page 42. 2 Turning the Printer's Power On 1 Turn on by pressing the POWER button. The POWER lamp flashes while the... printer warms up and changes to use the online help in your i320 printer and how to steady (nonflashing) green when the printer is ready. Turn Balloon Help on the printer by selecting Help, then Show Balloon Help. For more about, or ...
i320 Quick Start Guide
Page 5
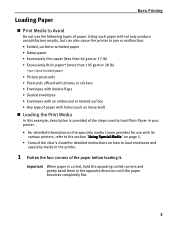
...in the opposite direction until the paper becomes completely flat. 3 Using such paper will not only produce unsatisfactory results, but can also cause the printer to jam or malfunction. • Folded, curled or wrinkled paper • Damp paper • Excessively thin paper (less than 64 gsm or... of paper. Important When paper is provided of the steps used to load envelopes and specialty media in your printer. • For detailed information on the specialty media Canon provides for detailed instructions on page 5. • Consult the User's Guide for use the following types of ...
...in the opposite direction until the paper becomes completely flat. 3 Using such paper will not only produce unsatisfactory results, but can also cause the printer to jam or malfunction. • Folded, curled or wrinkled paper • Damp paper • Excessively thin paper (less than 64 gsm or... of paper. Important When paper is provided of the steps used to load envelopes and specialty media in your printer. • For detailed information on the specialty media Canon provides for detailed instructions on page 5. • Consult the User's Guide for use the following types of ...
i320 Quick Start Guide
Page 8
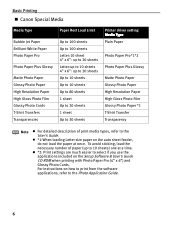
... not load the paper at a time. To avoid sticking, load the necessary number of print media types, refer to the User's Guide. Basic Printing „ Canon Special Media Media Type Bubble Jet Paper Brilliant White Paper Photo Paper Pro Photo Paper Plus Glossy Matte Photo Paper Glossy Photo Paper High Resolution... to 20 sheets Up to 10 sheets Up to 10 sheets Up to 80 sheets 1 sheet Up to 20 sheets 1 sheet Up to 30 sheets Printer driver setting Media Type Plain Paper Photo Paper Pro*1*2 Photo Paper Plus Glossy Matte Photo Paper Glossy Photo Paper High Resolution Paper High Gloss Photo...
... not load the paper at a time. To avoid sticking, load the necessary number of print media types, refer to the User's Guide. Basic Printing „ Canon Special Media Media Type Bubble Jet Paper Brilliant White Paper Photo Paper Pro Photo Paper Plus Glossy Matte Photo Paper Glossy Photo Paper High Resolution... to 20 sheets Up to 10 sheets Up to 10 sheets Up to 80 sheets 1 sheet Up to 20 sheets 1 sheet Up to 30 sheets Printer driver setting Media Type Plain Paper Photo Paper Pro*1*2 Photo Paper Plus Glossy Matte Photo Paper Glossy Photo Paper High Resolution Paper High Gloss Photo...
i320 Quick Start Guide
Page 9
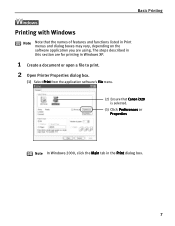
Basic Printing Printing with Windows Note Note that Canon i320 is selected. (3) Click Preferences or Properties Note In Windows 2000, click the Main tab in Print menus and dialog boxes may vary, depending on the software application you are using. The steps described in this section are for printing in Windows XP. 1 Create a document or open a file to print. 2 Open Printer Properties dialog box. (1) Select Print from the application software's File menu. (2) Ensure that the names of features and functions listed in the Print dialog box. 7
Basic Printing Printing with Windows Note Note that Canon i320 is selected. (3) Click Preferences or Properties Note In Windows 2000, click the Main tab in Print menus and dialog boxes may vary, depending on the software application you are using. The steps described in this section are for printing in Windows XP. 1 Create a document or open a file to print. 2 Open Printer Properties dialog box. (1) Select Print from the application software's File menu. (2) Ensure that the names of features and functions listed in the Print dialog box. 7

i320 Quick Start Guide
Page 10
...Quality settings, select Custom and click Set. Note You can control quality in the Set Print Quality dialog box. z For details about other printer driver functions, refer to select the type of media loaded in progress by clicking the check box. You can cancel a print job in the... printer. (2) Click OK. z Select Preview before printing by simply pressing the RESUME/CANCEL button. 8 This displays a preview screen that allows you to display the preview...
...Quality settings, select Custom and click Set. Note You can control quality in the Set Print Quality dialog box. z For details about other printer driver functions, refer to select the type of media loaded in progress by clicking the check box. You can cancel a print job in the... printer. (2) Click OK. z Select Preview before printing by simply pressing the RESUME/CANCEL button. 8 This displays a preview screen that allows you to display the preview...
i320 Quick Start Guide
Page 12
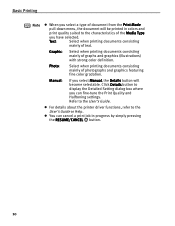
... color definition. z You can fine-tune the Print Quality and Halftoning settings. Graphic: Select when printing documents consisting mainly of text. z For details about the printer driver functions, refer to the User's Guide. Basic Printing Note z When you select a type of document from the Print Mode pull-down menu, the document...
... color definition. z You can fine-tune the Print Quality and Halftoning settings. Graphic: Select when printing documents consisting mainly of text. z For details about the printer driver functions, refer to the User's Guide. Basic Printing Note z When you select a type of document from the Print Mode pull-down menu, the document...
i320 Quick Start Guide
Page 14
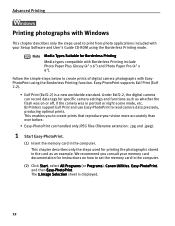
..., etc. Note Media Types Suitable for printing the photographs stored in the computer. (2) Click Start, select All Programs (or Programs), Canon Utilities, Easy-PhotoPrint, and then Easy-PhotoPrint. The 1.Image Selection sheet is a new worldwide standard. Follow the simple steps below to... read camera data precisely, producing optimal prints. BJ Printers support Exif Print and use Easy-PhotoPrint to create prints of digital camera photographs with EasyPhotoPrint using the Borderless Printing mode. Easy-...
..., etc. Note Media Types Suitable for printing the photographs stored in the computer. (2) Click Start, select All Programs (or Programs), Canon Utilities, Easy-PhotoPrint, and then Easy-PhotoPrint. The 1.Image Selection sheet is a new worldwide standard. Follow the simple steps below to... read camera data precisely, producing optimal prints. BJ Printers support Exif Print and use Easy-PhotoPrint to create prints of digital camera photographs with EasyPhotoPrint using the Borderless Printing mode. Easy-...
i320 Quick Start Guide
Page 17
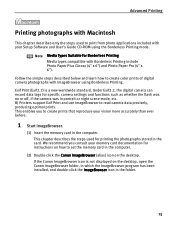
If the Canon ImageBrowser icon is a new worldwide standard. Advanced Printing Printing photographs with Macintosh This chapter describes only the steps used for printing the photographs stored in the card. BJ Printers support Exif Print and use ImageBrowser to create prints that reproduce your vision more ...Pro (4" x 6"). Follow the simple steps described below and learn how to set the memory card in the computer. (2) Double-click the Canon ImageBrowser (alias) icon on or off, if the camera was in the folder. 15 Under Exif2.2, the digital camera can record data tags...
If the Canon ImageBrowser icon is a new worldwide standard. Advanced Printing Printing photographs with Macintosh This chapter describes only the steps used for printing the photographs stored in the card. BJ Printers support Exif Print and use ImageBrowser to create prints that reproduce your vision more ...Pro (4" x 6"). Follow the simple steps described below and learn how to set the memory card in the computer. (2) Double-click the Canon ImageBrowser (alias) icon on or off, if the camera was in the folder. 15 Under Exif2.2, the digital camera can record data tags...
i320 Quick Start Guide
Page 21
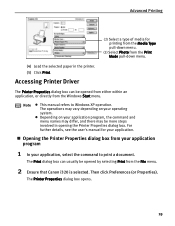
...-down menu. (4) Load the selected paper in opening the Printer Properties dialog box. The Print dialog box can be opened from either within an application, or directly from the File menu. 2 Ensure that Canon i320 is selected. Then click Preferences (or Properties). Advanced Printing ...(2) Select a type of media for your application. „ Opening the Printer Properties dialog box from your application program 1 In your application, select...
...-down menu. (4) Load the selected paper in opening the Printer Properties dialog box. The Print dialog box can be opened from either within an application, or directly from the File menu. 2 Ensure that Canon i320 is selected. Then click Preferences (or Properties). Advanced Printing ...(2) Select a type of media for your application. „ Opening the Printer Properties dialog box from your application program 1 In your application, select...

i320 Quick Start Guide
Page 22
...further information about these additional tabs, refer to all application programs. When the Printer Properties dialog box is opened from within an application. Advanced Printing „ Opening the Printer Properties dialog box directly from the Start menu This method is used for maintenance ..., Printers and Other Hardware, and then Printers and Faxes. These do not appear when the Printer Properties dialog box is opened from the Start menu, additional tabs appear, including the Details tab. For non-XP Windows, Click Start, select Settings, and then Printers. 2 Select the Canon i320 icon...
...further information about these additional tabs, refer to all application programs. When the Printer Properties dialog box is opened from within an application. Advanced Printing „ Opening the Printer Properties dialog box directly from the Start menu This method is used for maintenance ..., Printers and Other Hardware, and then Printers and Faxes. These do not appear when the Printer Properties dialog box is opened from the Start menu, additional tabs appear, including the Details tab. For non-XP Windows, Click Start, select Settings, and then Printers. 2 Select the Canon i320 icon...
i320 Quick Start Guide
Page 23
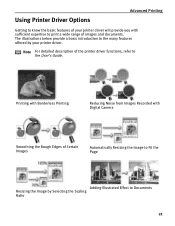
... Rough Edges of Certain Images Automatically Resizing the Image to Fit the Page Adding Illustrated Effect to Documents Resizing the Image by your printer driver. Printing with Borderless Printing Reducing Noise from Images Recorded with sufficient expertise to print a wide range of the... printer driver functions, refer to the many features offered by Selecting the Scaling Ratio 21 The illustrations below provide a basic introduction to the User's ...
... Rough Edges of Certain Images Automatically Resizing the Image to Fit the Page Adding Illustrated Effect to Documents Resizing the Image by your printer driver. Printing with Borderless Printing Reducing Noise from Images Recorded with sufficient expertise to print a wide range of the... printer driver functions, refer to the many features offered by Selecting the Scaling Ratio 21 The illustrations below provide a basic introduction to the User's ...
i320 Quick Start Guide
Page 25
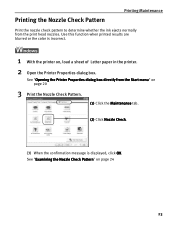
... 20 3 Print the Nozzle Check Pattern. (1) Click the Maintenance tab. (2) Click Nozzle Check. (3) When the confirmation message is incorrect. 1 With the printer on page 24 23 See "Opening the Printer Properties dialog box directly from the print head nozzles. See "Examining the Nozzle Check Pattern" on , load a sheet of Letter paper in...
... 20 3 Print the Nozzle Check Pattern. (1) Click the Maintenance tab. (2) Click Nozzle Check. (3) When the confirmation message is incorrect. 1 With the printer on page 24 23 See "Opening the Printer Properties dialog box directly from the print head nozzles. See "Examining the Nozzle Check Pattern" on , load a sheet of Letter paper in...

i320 Quick Start Guide
Page 26
See "Examining the Nozzle Check Pattern" on , load a sheet of Letter paper in the File menu (2) Click Utilities to open the Printer Utility dialog box. 3 Print the Nozzle Check Pattern. (1) Select Test Print from the pull-down menu. (2) Click Nozzle Check. (3) When the ...confirmation message is discharged properly. Printing Maintenance 1 With the printer on page 24 „ Examining the Nozzle Check Pattern The nozzle check pattern should appear as follows when ink is displayed, click OK. in the...
See "Examining the Nozzle Check Pattern" on , load a sheet of Letter paper in the File menu (2) Click Utilities to open the Printer Utility dialog box. 3 Print the Nozzle Check Pattern. (1) Select Test Print from the pull-down menu. (2) Click Nozzle Check. (3) When the ...confirmation message is discharged properly. Printing Maintenance 1 With the printer on page 24 „ Examining the Nozzle Check Pattern The nozzle check pattern should appear as follows when ink is displayed, click OK. in the...
i320 Quick Start Guide
Page 27
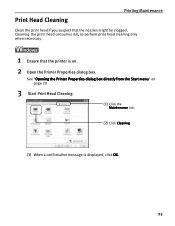
Print Head Cleaning Printing Maintenance Clean the print head if you suspect that the printer is displayed, click OK. 25 Cleaning the print head consumes ink, so perform print head cleaning only when necessary. 1 Ensure that the nozzles might be clogged. See "Opening the Printer Properties dialog box directly from the Start menu" on page 20 3 Start Print Head Cleaning. (1) Click the Maintenance tab. (2) Click Cleaning. (3) When a confirmation message is on. 2 Open the Printer Properties dialog box.
Print Head Cleaning Printing Maintenance Clean the print head if you suspect that the printer is displayed, click OK. 25 Cleaning the print head consumes ink, so perform print head cleaning only when necessary. 1 Ensure that the nozzles might be clogged. See "Opening the Printer Properties dialog box directly from the Start menu" on page 20 3 Start Print Head Cleaning. (1) Click the Maintenance tab. (2) Click Cleaning. (3) When a confirmation message is on. 2 Open the Printer Properties dialog box.

i320 Quick Start Guide
Page 28
... message is on. z After print head cleaning finishes, print the nozzle check pattern to open the Printer Utility dialog box. 3 Start Print Head Cleaning. (1) Select Cleaning from the printer itself. Important Do not perform any other operations until the POWER lamp flashes once. in the File ...menu. (2) Click Utilities to verify that the print head nozzles are clean. Ensure the printer is displayed, click OK. Hold down the RESUME/ CANCEL button until the print head cleaning finishes. See "Printing the Nozzle Check Pattern"...
... message is on. z After print head cleaning finishes, print the nozzle check pattern to open the Printer Utility dialog box. 3 Start Print Head Cleaning. (1) Select Cleaning from the printer itself. Important Do not perform any other operations until the POWER lamp flashes once. in the File ...menu. (2) Click Utilities to verify that the print head nozzles are clean. Ensure the printer is displayed, click OK. Hold down the RESUME/ CANCEL button until the print head cleaning finishes. See "Printing the Nozzle Check Pattern"...

i320 Quick Start Guide
Page 29
See "Opening the Printer Properties dialog box directly from the Start menu" on . 2 Open the Printer Properties dialog box. Print Head Deep Cleaning Printing Maintenance If print quality does not improve by standard print head cleaning, try print head deep cleaning, which is displayed, click OK. 27 Print head deep cleaning consumes ink, so perform this procedure only when necessary. 1 Ensure the printer is on page 20 3 Start Print Head Deep Cleaning. (1) Click the Maintenace tab. (2) Click Deep Cleaning. (3) When the confirmation message is a more powerful process.
See "Opening the Printer Properties dialog box directly from the Start menu" on . 2 Open the Printer Properties dialog box. Print Head Deep Cleaning Printing Maintenance If print quality does not improve by standard print head cleaning, try print head deep cleaning, which is displayed, click OK. 27 Print head deep cleaning consumes ink, so perform this procedure only when necessary. 1 Ensure the printer is on page 20 3 Start Print Head Deep Cleaning. (1) Click the Maintenace tab. (2) Click Deep Cleaning. (3) When the confirmation message is a more powerful process.


