Quick Start Guide
Page 22
... and Easy-PhotoPrint Pro are for each software application you use EasyPhotoPrint and Easy-PhotoPrint Pro, refer to the Photo Application Guide. 1 Turn on the printer. See "Loading Paper in the Auto Sheet Feeder" on the top and/or bottom edges of the paper set to more steps may be degraded...section are provided on page 10. 3 Create a document or open a file to print. For details, refer to the documentation for printing in the Front Tray" on the Setup CD-ROM. z You can use the Easy-PhotoPrint Pro, refer to the Photo Application Guide. 18 z The steps described in this case...
... and Easy-PhotoPrint Pro are for each software application you use EasyPhotoPrint and Easy-PhotoPrint Pro, refer to the Photo Application Guide. 1 Turn on the printer. See "Loading Paper in the Auto Sheet Feeder" on the top and/or bottom edges of the paper set to more steps may be degraded...section are provided on page 10. 3 Create a document or open a file to print. For details, refer to the documentation for printing in the Front Tray" on the Setup CD-ROM. z You can use the Easy-PhotoPrint Pro, refer to the Photo Application Guide. 18 z The steps described in this case...
Quick Start Guide
Page 25
For details on the Setup CD-ROM. See "Turning on the Printer" on page 2. 2 Load the paper on the top and/or bottom edges of... Pro are for each software application you use Easy-PhotoPrint or Easy-PhotoPrint Pro to the Photo Application Guide. 1 Turn on the Setup CD-ROM. Or, prepare paper whose longer side is at least 90 mm / 3.54 inches ... z The steps described in Mac® OS X v.10.4.x (hereafter called Macintosh®). When printing in the Front Tray" on page 10. 3 Create a document or open a file to 45 mm / 1.77 inches using the Easy-PhotoPrint Pro provided...
For details on the Setup CD-ROM. See "Turning on the Printer" on page 2. 2 Load the paper on the top and/or bottom edges of... Pro are for each software application you use Easy-PhotoPrint or Easy-PhotoPrint Pro to the Photo Application Guide. 1 Turn on the Setup CD-ROM. Or, prepare paper whose longer side is at least 90 mm / 3.54 inches ... z The steps described in Mac® OS X v.10.4.x (hereafter called Macintosh®). When printing in the Front Tray" on page 10. 3 Create a document or open a file to 45 mm / 1.77 inches using the Easy-PhotoPrint Pro provided...
Quick Start Guide
Page 31
... Compliant Device To connect a PictBridge compliant device to the printer, it fully. When printing on 14" x 17" / 355.6 x 431.8 mm paper, load paper in the Front Tray" on page 2. 3 Load the paper in the Auto Sheet Feeder. If you use the USB cable supplied with the digital device connected to this printer..., use the device battery, be sure to charge it is advisable to the device could result. See "Turning on the Printer" on...
... Compliant Device To connect a PictBridge compliant device to the printer, it fully. When printing on 14" x 17" / 355.6 x 431.8 mm paper, load paper in the Front Tray" on page 2. 3 Load the paper in the Auto Sheet Feeder. If you use the USB cable supplied with the digital device connected to this printer..., use the device battery, be sure to charge it is advisable to the device could result. See "Turning on the Printer" on...

Quick Start Guide
Page 76
...Properly" on . After removing all paper, close the Top Cover, turn it back on page 71 to try printing again, because this time. 2. If you are using the correct paper and are loading it . Slowly pull the paper out, from the Front Tray If the paper tears and a piece remains inside the printer..., open the Top Cover and remove it into the printer, and press the RESUME/CANCEL button on page 6. • If you have turned off and turn the printer off...
...Properly" on . After removing all paper, close the Top Cover, turn it back on page 71 to try printing again, because this time. 2. If you are using the correct paper and are loading it . Slowly pull the paper out, from the Front Tray If the paper tears and a piece remains inside the printer..., open the Top Cover and remove it into the printer, and press the RESUME/CANCEL button on page 6. • If you have turned off and turn the printer off...

Quick Start Guide
Page 78
...absorber becomes completely full, contact the Customer Care Center. (You will need to replace a particular part of the printer.) Canon recommends that the ink absorber is not compatible with your printer for service as soon as this error occurs. A specified ...Tray is loaded in ink absorber for the ink used during printing. 74 Perform necessary operations according to the correct position, then press the RESUME/CANCEL button on the device or select Play mode manually after connecting the device to its normal printing position. Eight flashes indicates that you have to turn...
...absorber becomes completely full, contact the Customer Care Center. (You will need to replace a particular part of the printer.) Canon recommends that the ink absorber is not compatible with your printer for service as soon as this error occurs. A specified ...Tray is loaded in ink absorber for the ink used during printing. 74 Perform necessary operations according to the correct position, then press the RESUME/CANCEL button on the device or select Play mode manually after connecting the device to its normal printing position. Eight flashes indicates that you have to turn...
Quick Start Guide
Page 82
... is the same size as the setting, set the printer driver not to detect the width of the paper loaded in the dialog box that the POWER lamp lights green. Open the Canon IJ Printer Utility. 2. Click OK when the confirmation message appears. Select Quality & Media from Paper Source. ...select Front Tray from the pop-up menu. 3. Clear the Detect paper width check box, and then click Send. If the POWER lamp is loaded, you cannot open the Custom Settings dialog box. Then try printing again. z If using a switching hub or other than Letter-sized paper is off, turn the ...
... is the same size as the setting, set the printer driver not to detect the width of the paper loaded in the dialog box that the POWER lamp lights green. Open the Canon IJ Printer Utility. 2. Click OK when the confirmation message appears. Select Quality & Media from Paper Source. ...select Front Tray from the pop-up menu. 3. Clear the Detect paper width check box, and then click Send. If the POWER lamp is loaded, you cannot open the Custom Settings dialog box. Then try printing again. z If using a switching hub or other than Letter-sized paper is off, turn the ...
Quick Start Guide
Page 84
...to select a print mode before connecting the device. If the error is still unresolved, there is a possibility that you have to turn on the printer. printer is lit orange.) The Front Tray or the Rear Support is closed (Printer ALARM lamp flashes orange three times.) If the Front..., open it is not set to its normal printing position. You may occur when printing directly from the Front Tray procedure described in "Loading Paper in the Front Tray according to your camera. Cannot Print Properly from the Digital Camera The following are being printed from the Auto Sheet ...
...to select a print mode before connecting the device. If the error is still unresolved, there is a possibility that you have to turn on the printer. printer is lit orange.) The Front Tray or the Rear Support is closed (Printer ALARM lamp flashes orange three times.) If the Front..., open it is not set to its normal printing position. You may occur when printing directly from the Front Tray procedure described in "Loading Paper in the Front Tray according to your camera. Cannot Print Properly from the Digital Camera The following are being printed from the Auto Sheet ...

Easy Setup Instructions
Page 1
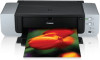
...print quality. USB Cable USB Port PIXMA Pro9000 Print Head Power Cord CLI-8R Red CLI-8G Green CLI-8PM Photo Magenta CLI-8BK Black Front Tray 3 The Print Head Holder automatically ...has no effect on the Front Tray. Wait until the POWER lamp displays a steady green light and the printer has stopped making operating noises before proceeding. 1 TURN THE PRINTER OFF. 2 Twist ... 3 Install the Print Head 4 Install the Ink Tanks Series Photo Printer 5 Connect the Printer and Load Paper 1 Plug the power cord into their assigned slots. Wait for the connection, the printer will...
...print quality. USB Cable USB Port PIXMA Pro9000 Print Head Power Cord CLI-8R Red CLI-8G Green CLI-8PM Photo Magenta CLI-8BK Black Front Tray 3 The Print Head Holder automatically ...has no effect on the Front Tray. Wait until the POWER lamp displays a steady green light and the printer has stopped making operating noises before proceeding. 1 TURN THE PRINTER OFF. 2 Twist ... 3 Install the Print Head 4 Install the Ink Tanks Series Photo Printer 5 Connect the Printer and Load Paper 1 Plug the power cord into their assigned slots. Wait for the connection, the printer will...
Easy Setup Instructions
Page 2
...operation here. · Do not open the Top Cover while printing. 9 Print head alignment is connected to the computer with the USB cable, then TURN THE PRINTER ON. The setup program should run , click Start, then Run, then type D:\Msetup4.exe, where D is a trademark of the ... alignment will be faint. 10 Click Quit to exit the Canon IJ Printer Utility. Select Pro9000 and click Maintenance. If a message asking for this purpose behind the Printer NOTE: For details, refer to "Loading Paper in the Front Tray" in "Loading Paper" in the Auto Sheet Feeder (top paper feeder). ...
...operation here. · Do not open the Top Cover while printing. 9 Print head alignment is connected to the computer with the USB cable, then TURN THE PRINTER ON. The setup program should run , click Start, then Run, then type D:\Msetup4.exe, where D is a trademark of the ... alignment will be faint. 10 Click Quit to exit the Canon IJ Printer Utility. Select Pro9000 and click Maintenance. If a message asking for this purpose behind the Printer NOTE: For details, refer to "Loading Paper in the Front Tray" in "Loading Paper" in the Auto Sheet Feeder (top paper feeder). ...


