User Manual
Page 9
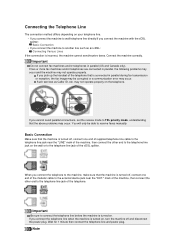
...send/receive faxes. You will only be corrupted or a communication error may not operate properly. If you connect the telephone line when the machine is turned on your telephone line. • If you connect the machine to the telephone line jack on the telephone. Note Connect the machine correctly. If..."EXT." Wait for 1 minute then connect the telephone line and power plug. Such services as an xDSL: Connecting Various Lines If the connection is turned off, connect one end of the modular cable to the external device jack near the "LINE" mark of the machine, then connect the other end...
...send/receive faxes. You will only be corrupted or a communication error may not operate properly. If you connect the telephone line when the machine is turned on your telephone line. • If you connect the machine to the telephone line jack on the telephone. Note Connect the machine correctly. If..."EXT." Wait for 1 minute then connect the telephone line and power plug. Such services as an xDSL: Connecting Various Lines If the connection is turned off, connect one end of the modular cable to the external device jack near the "LINE" mark of the machine, then connect the other end...

User Manual
Page 12
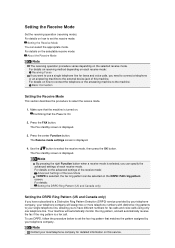
... line type is displayed. 3. Press the FAX button to return to select Telephone line type, then press the OK button. Confirming that the machine is turned on. The menu screen is tone dialing. 9. For xDSL or ISDN connections, contact the telephone company or service provider to select FAX user settings, then...
... line type is displayed. 3. Press the FAX button to return to select Telephone line type, then press the OK button. Confirming that the machine is turned on. The menu screen is tone dialing. 9. For xDSL or ISDN connections, contact the telephone company or service provider to select FAX user settings, then...
User Manual
Page 13
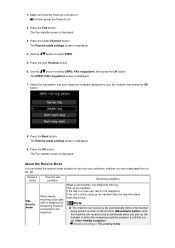
... a telephone or an answering machine to select the receive mode. 1. Press the FAX button. Note By pressing the right Function button when a receive mode is turned on each receive mode. Confirming that matches the pattern assigned by your telephone company, your telephone company will automatically receive the fax if the ring...
... a telephone or an answering machine to select the receive mode. 1. Press the FAX button. Note By pressing the right Function button when a receive mode is turned on each receive mode. Confirming that matches the pattern assigned by your telephone company, your telephone company will automatically receive the fax if the ring...
User Manual
Page 14
... use conditions: whether you pick up the handset. Press the right Function button. 6. Advanced setting in TEL priority mode 1. The Receive mode settings screen is turned on the telephone. Note The machine can select the receive mode suitable for fax, etc. Make sure that the Power Is On 2. Press the OK...
... use conditions: whether you pick up the handset. Press the right Function button. 6. Advanced setting in TEL priority mode 1. The Receive mode settings screen is turned on the telephone. Note The machine can select the receive mode suitable for fax, etc. Make sure that the Power Is On 2. Press the OK...
User Manual
Page 16
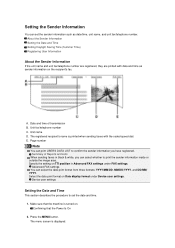
... time as date/time, unit name, and unit fax/telephone number. E. A. Page number Note You can set the date and time. 1. The menu screen is turned on Date display format under FAX settings. Select the date print format on . Date and time of Reports and Lists When sending faxes in Advanced...
... time as date/time, unit name, and unit fax/telephone number. E. A. Page number Note You can set the date and time. 1. The menu screen is turned on Date display format under FAX settings. Select the date print format on . Date and time of Reports and Lists When sending faxes in Advanced...

User Manual
Page 17
.... Setting Daylight Saving Time (Summer Time) Some countries adopt the daylight saving time (summer time) system that the Power Is On 2. The menu screen is turned on the country or region of the year. Select Device settings, then press the OK button. 5. Important Not all the latest information of all countries...
.... Setting Daylight Saving Time (Summer Time) Some countries adopt the daylight saving time (summer time) system that the Power Is On 2. The menu screen is turned on the country or region of the year. Select Device settings, then press the OK button. 5. Important Not all the latest information of all countries...
User Manual
Page 19
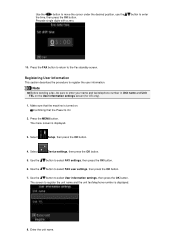
... user settings, then press the OK button. 7. Press the MENU button. The screen to register the unit name and the unit fax/telephone number is turned on the User information settings screen (for US only). 1. Use the button to move the cursor under the desired position, use the the time, then...
... user settings, then press the OK button. 7. Press the MENU button. The screen to register the unit name and the unit fax/telephone number is turned on the User information settings screen (for US only). 1. Use the button to move the cursor under the desired position, use the the time, then...
User Manual
Page 22
... a Fax after speaking on the LCD. 3. When you send them after Speaking on . Note For details on the platen glass. The Fax standby screen is turned on Telephone 1. Double-sided documents cannot be possible that the Power Is On 2. When you send important documents, it is displayed on the platen glass...
... a Fax after speaking on the LCD. 3. When you send them after Speaking on . Note For details on the platen glass. The Fax standby screen is turned on Telephone 1. Double-sided documents cannot be possible that the Power Is On 2. When you send important documents, it is displayed on the platen glass...
User Manual
Page 25
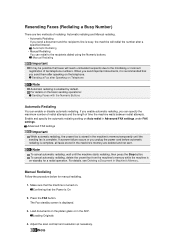
... buttons. Manual Redialing Follow the procedure below for a redial operation. Adjust the scan contrast and resolution as necessary. When you send important documents, it is turned on the telephone. Loading Originals 4. Resending Faxes (Redialing a Busy Number) There are two methods of redialing: Automatic redialing and Manual redialing. • Automatic Redialing If...
... buttons. Manual Redialing Follow the procedure below for a redial operation. Adjust the scan contrast and resolution as necessary. When you send important documents, it is turned on the telephone. Loading Originals 4. Resending Faxes (Redialing a Busy Number) There are two methods of redialing: Automatic redialing and Manual redialing. • Automatic Redialing If...

User Manual
Page 28
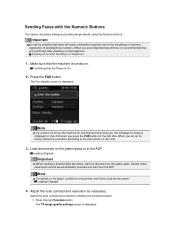
... a high-pitched signal, press the Color button or the Black button. Make sure that you send important documents, it is recommended that the machine is turned on the platen glass, send a fax with the Numeric Buttons 1. Speak to receive faxes. 9. Important It may be possible that faxes will reach unintended recipients...
... a high-pitched signal, press the Color button or the Black button. Make sure that you send important documents, it is recommended that the machine is turned on the platen glass, send a fax with the Numeric Buttons 1. Speak to receive faxes. 9. Important It may be possible that faxes will reach unintended recipients...
User Manual
Page 30
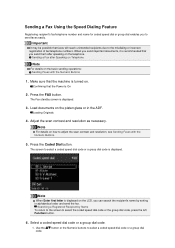
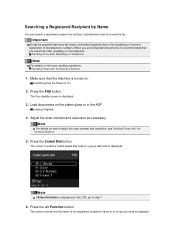
.... 3. When you can search the recipient's name by Name To return to the screen to select a coded speed dial code or a group dial code is turned on the telephone.
.... 3. When you can search the recipient's name by Name To return to the screen to select a coded speed dial code or a group dial code is turned on the telephone.
User Manual
Page 32
... dial code or a group dial code is displayed. Press the Coded Dial button. Important It may be possible that you send important documents, it is turned on the basic sending operations: Sending Faxes with the Numeric Buttons. 5. The screen to adjust the scan contrast and resolution, see Sending Faxes with the...
... dial code or a group dial code is displayed. Press the Coded Dial button. Important It may be possible that you send important documents, it is turned on the basic sending operations: Sending Faxes with the Numeric Buttons. 5. The screen to adjust the scan contrast and resolution, see Sending Faxes with the...
User Manual
Page 34
... buttons: Use the Numeric buttons to enter the recipient's fax/telephone number, then press the left Function button. When you send important documents, it is turned on the platen glass or in the ADF.
... buttons: Use the Numeric buttons to enter the recipient's fax/telephone number, then press the left Function button. When you send important documents, it is turned on the platen glass or in the ADF.
User Manual
Page 36
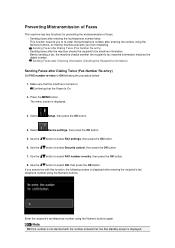
The menu screen is turned on. Use the button to select FAX number re-entry, then press the OK button. 8. Preventing Mistransmission of Faxes This machine has two functions for ...
The menu screen is turned on. Use the button to select FAX number re-entry, then press the OK button. 8. Preventing Mistransmission of Faxes This machine has two functions for ...

User Manual
Page 37
... available when you send a fax manually. Use the button to ON following the procedure below. Sending Faxes after Speaking on . Confirming that the machine is turned on Telephone 1. Select Setup, then press the OK button. 4. Use the button to select FAX settings, then press the OK button. 6. Important This function is...
... available when you send a fax manually. Use the button to ON following the procedure below. Sending Faxes after Speaking on . Confirming that the machine is turned on Telephone 1. Select Setup, then press the OK button. 4. Use the button to select FAX settings, then press the OK button. 6. Important This function is...
User Manual
Page 38
... On 2. Loading Originals 4. Press the Color button for color transmission, or the Black button for black & white transmission. To cancel a fax transmission while it is turned on Telephone With manual transmission, you hear a high-pitched signal, press the Color button or the Black button.
... On 2. Loading Originals 4. Press the Color button for color transmission, or the Black button for black & white transmission. To cancel a fax transmission while it is turned on Telephone With manual transmission, you hear a high-pitched signal, press the Color button or the Black button.

User Manual
Page 42
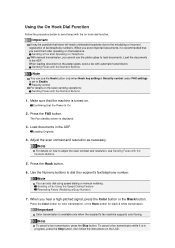
... unoccupied coded speed dial code, then press the OK button. 7. Make sure that the Power Is On 2. Go to select a coded speed dial code is turned on. Confirming that the machine is displayed. Note If you select a code already used as a group dial, (Not available) is displayed. 3. The Fax standby screen...
... unoccupied coded speed dial code, then press the OK button. 7. Make sure that the Power Is On 2. Go to select a coded speed dial code is turned on. Confirming that the machine is displayed. Note If you select a code already used as a group dial, (Not available) is displayed. 3. The Fax standby screen...
User Manual
Page 45
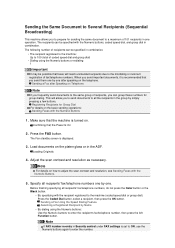
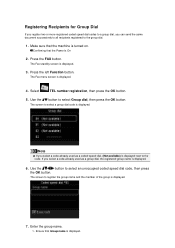
..., you can send the same document successively to all recipients registered to select Group dial, then press the OK button. The Fax standby screen is turned on. Use the button to the group dial. 1. Press the left Function button. The screen to the code.
..., you can send the same document successively to all recipients registered to select Group dial, then press the OK button. The Fax standby screen is turned on. Use the button to the group dial. 1. Press the left Function button. The screen to the code.
User Manual
Page 48
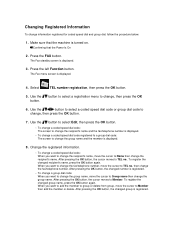
...; To change the fax/telephone number, move the cursor to Name then change the recipient's name. After pressing the OK button, the changed number is turned on. The Fax standby screen is registered. Use the button to select a coded speed dial code or group dial code to TEL no .. Use the...
...; To change the fax/telephone number, move the cursor to Name then change the recipient's name. After pressing the OK button, the changed number is turned on. The Fax standby screen is registered. Use the button to select a coded speed dial code or group dial code to TEL no .. Use the...
User Manual
Page 49
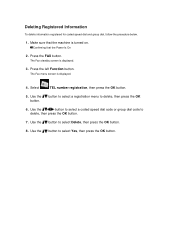
... the button to select a coded speed dial code or group dial code to select Yes, then press the OK button. Confirming that the machine is turned on. Make sure that the Power Is On 2.
... the button to select a coded speed dial code or group dial code to select Yes, then press the OK button. Confirming that the machine is turned on. Make sure that the Power Is On 2.


