MX882 series Getting Started
Page 61
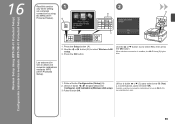
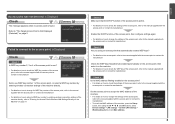
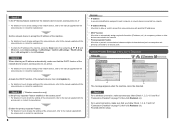
...when setting 1 up a wireless connection by using 2 B D the WPS (Wi-Fi Protected Setup). Use the { or } button (C) to select Wireless LAN setup. 3. Utilice el botón [ o ] (B) para seleccionar Configurac. Pulse el botón OK. Press the Setup button (A). 2. Lea esta sección sólo si utiliza una conexión inalá...;mbrica mediante WPS (Wi-Fi Protected Setup). 1. Cuando se active la conexión inalámbrica, la luz de Wi-Fi (D) se encenderá en azul. 59 Press the OK ...
...when setting 1 up a wireless connection by using 2 B D the WPS (Wi-Fi Protected Setup). Use the { or } button (C) to select Wireless LAN setup. 3. Utilice el botón [ o ] (B) para seleccionar Configurac. Pulse el botón OK. Press the Setup button (A). 2. Lea esta sección sólo si utiliza una conexión inalá...;mbrica mediante WPS (Wi-Fi Protected Setup). 1. Cuando se active la conexión inalámbrica, la luz de Wi-Fi (D) se encenderá en azul. 59 Press the OK ...

MX882 series Getting Started
Page 65
... Effective range varies depending on country or region. Security: WEP (64/128 bits) WPA-PSK (TKIP/AES) WPA2-PSK (TKIP/AES) Setup: WCN (WCN-UFD/WCN-NET) WPS (Push button configuration/PIN code method) Other Features: Administration password Fax Specifications Applicable line Public Switched ...(RGB each 8 bit) Density adjustment 3 levels Memory Transmission/reception: approx. 250 pages (Based on ITU-T No.1 chart for US specifications and Canon FAX Standard chart No.1 for others, both in height Other sizes: 1 sheet Copy Specifications Multiple copy max. 99 pages Intensity adjustment 9 positions...
... Effective range varies depending on country or region. Security: WEP (64/128 bits) WPA-PSK (TKIP/AES) WPA2-PSK (TKIP/AES) Setup: WCN (WCN-UFD/WCN-NET) WPS (Push button configuration/PIN code method) Other Features: Administration password Fax Specifications Applicable line Public Switched ...(RGB each 8 bit) Density adjustment 3 levels Memory Transmission/reception: approx. 250 pages (Based on ITU-T No.1 chart for US specifications and Canon FAX Standard chart No.1 for others, both in height Other sizes: 1 sheet Copy Specifications Multiple copy max. 99 pages Intensity adjustment 9 positions...
Network Setup Troubleshooting
Page 2
...; Names of functions, etc. is Displayed Specifying the Machine's IP Address (IPv4 only) Restoring the Machine's Default LAN Settings to Perform Setup Again P.2 P.3 P.3 Connection Checklist P.4 The directly entered access point was not detected. For problems not described here or which occur after ...able to connect to the network is Displayed P.5 The following symbols are used in this manual depending on the Machine Easy setup Advanced setup The Target Access Point is Not Displayed (Detected) Access point was not detected. is Displayed The device may differ from...
...; Names of functions, etc. is Displayed Specifying the Machine's IP Address (IPv4 only) Restoring the Machine's Default LAN Settings to Perform Setup Again P.2 P.3 P.3 Connection Checklist P.4 The directly entered access point was not detected. For problems not described here or which occur after ...able to connect to the network is Displayed P.5 The following symbols are used in this manual depending on the Machine Easy setup Advanced setup The Target Access Point is Not Displayed (Detected) Access point was not detected. is Displayed The device may differ from...
Network Setup Troubleshooting
Page 3
...'s Wireless LAN Settings Directly on the Machine" on the machine to search for the access point, refer to "Wireless Setup Using Easy Setup" in the printed manual: Getting Started. Problems during Network Setup Easy setup Advanced setup The Target Access Point is Not Displayed (Detected) Check Check 1 Make sure that you follow Check 1, 2, 3 and 4 of...
...'s Wireless LAN Settings Directly on the Machine" on the machine to search for the access point, refer to "Wireless Setup Using Easy Setup" in the printed manual: Getting Started. Problems during Network Setup Easy setup Advanced setup The Target Access Point is Not Displayed (Detected) Check Check 1 Make sure that you follow Check 1, 2, 3 and 4 of...
Network Setup Troubleshooting
Page 4
... point, refer to the manual supplied with the access point or contact its manufacturer. • To check the MAC address of the machine, press the Setup button, then using an access point that the DHCP function of the access point, refer to the manual supplied with the access point or contact...
... point, refer to the manual supplied with the access point or contact its manufacturer. • To check the MAC address of the machine, press the Setup button, then using an access point that the DHCP function of the access point, refer to the manual supplied with the access point or contact...
Network Setup Troubleshooting
Page 6
...was not detected. Check 1 Is the entered access point name/network name (SSID) correct? Press the OK button to the manual supplied with the setup from in "Entering the Access Point's Wireless LAN Settings Directly on the Machine" on how to change the settings of the access point, refer to...name (SSID). Check 3 Turn off the access point, then turn it back on. • After that , press the OK button, then proceed with the setup from in "Entering the Access Point's Wireless LAN Settings Directly on the Machine" on how to change the security protocol (encryption standard) for the access...
...was not detected. Check 1 Is the entered access point name/network name (SSID) correct? Press the OK button to the manual supplied with the setup from in "Entering the Access Point's Wireless LAN Settings Directly on the Machine" on how to change the settings of the access point, refer to...name (SSID). Check 3 Turn off the access point, then turn it back on. • After that , press the OK button, then proceed with the setup from in "Entering the Access Point's Wireless LAN Settings Directly on the Machine" on how to change the security protocol (encryption standard) for the access...
Network Setup Troubleshooting
Page 7
... to "Specifying the Machine's IP Address (IPv4 only)" on how to specify the IP address of the machine, refer to "Wireless Setup Using WPS (Wi-Fi Protected Setup)" in "Entering the Access Point's Wireless LAN Settings Directly on the Machine" on how to check the settings of specific wireless devices...the access point or contact its manufacturer. • For details on page 13. Also called an access point name or a network name. Perform setup again by saving the MAC addresses of the access point, refer to the manual supplied with the access point or contact its manufacturer. Glossary &#...
... to "Specifying the Machine's IP Address (IPv4 only)" on how to specify the IP address of the machine, refer to "Wireless Setup Using WPS (Wi-Fi Protected Setup)" in "Entering the Access Point's Wireless LAN Settings Directly on the Machine" on how to check the settings of specific wireless devices...the access point or contact its manufacturer. • For details on page 13. Also called an access point name or a network name. Perform setup again by saving the MAC addresses of the access point, refer to the manual supplied with the access point or contact its manufacturer. Glossary &#...
Network Setup Troubleshooting
Page 8
... point information stored on the Check Printer Settings dialog box to a network? • To confirm the connection status, press the Setup button, then using an access point that does not support WPS, configure settings manually. If the machine is not connected to a network, ...perform setup again by following the procedures in "Wireless Setup" and onward or "Wired Setup" and onward in the printed manual: Getting Started. For the procedure to configure settings of the machine manually...
... point information stored on the Check Printer Settings dialog box to a network? • To confirm the connection status, press the Setup button, then using an access point that does not support WPS, configure settings manually. If the machine is not connected to a network, ...perform setup again by following the procedures in "Wireless Setup" and onward or "Wired Setup" and onward in the printed manual: Getting Started. For the procedure to configure settings of the machine manually...
Network Setup Troubleshooting
Page 9
...or network device connected to a network. • IP address filtering A function to allow or restrict access from network devices with the setup. Proceed with specified IP addresses. • DHCP function A function to automatically assign required information (IP address, etc.) to computers, printers...or contact its manufacturer. Check 1 For a wireless connection, make sure that you follow Check 1, 2, 6, 7 and 8 of the machine, press the Setup button, then using the { } [ ] and OK buttons, select Device settings > LAN settings > Confirm LAN settings > WLAN setting list or LAN ...
...or network device connected to a network. • IP address filtering A function to allow or restrict access from network devices with the setup. Proceed with specified IP addresses. • DHCP function A function to automatically assign required information (IP address, etc.) to computers, printers...or contact its manufacturer. Check 1 For a wireless connection, make sure that you follow Check 1, 2, 6, 7 and 8 of the machine, press the Setup button, then using the { } [ ] and OK buttons, select Device settings > LAN settings > Confirm LAN settings > WLAN setting list or LAN ...
Network Setup Troubleshooting
Page 10
... { } [ ] and OK buttons, select Device settings > LAN settings > Confirm LAN settings > WLAN setting list or LAN setting list. Wireless LAN Setup Information may not be displayed. (* Wireless connection only) Check 3 Is the IP filtering feature enabled on the network device (router, access point, etc.)? ...• For details on how to check the settings of the network device, refer to a network? • To confirm the connection status, press the Setup button, then using the { } [ ] and OK buttons, select Device settings > LAN settings > Confirm LAN settings > WLAN setting list or LAN setting...
... { } [ ] and OK buttons, select Device settings > LAN settings > Confirm LAN settings > WLAN setting list or LAN setting list. Wireless LAN Setup Information may not be displayed. (* Wireless connection only) Check 3 Is the IP filtering feature enabled on the network device (router, access point, etc.)? ...• For details on how to check the settings of the network device, refer to a network? • To confirm the connection status, press the Setup button, then using the { } [ ] and OK buttons, select Device settings > LAN settings > Confirm LAN settings > WLAN setting list or LAN setting...

Network Setup Troubleshooting
Page 12
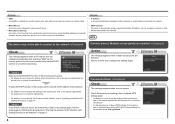
...move the cursor to the character on the machine directly. Follow the procedure below. 1 Press the Setup button. 2 Use the [ or ] button to select Other setup, then press the OK button. 5 Select Advanced setup, then press the OK button. Entering the Access Point's Wireless LAN Settings Directly on the Machine ...to the target character using the [ or ] button, then press the right FUNCTION button (E). 4 Use the { or } button to select Wireless LAN setup, then press the OK button. 6 Select Directly enter the access point name, then press the OK button. • If you are living in an ...
...move the cursor to the character on the machine directly. Follow the procedure below. 1 Press the Setup button. 2 Use the [ or ] button to select Other setup, then press the OK button. 5 Select Advanced setup, then press the OK button. Entering the Access Point's Wireless LAN Settings Directly on the Machine ...to the target character using the [ or ] button, then press the right FUNCTION button (E). 4 Use the { or } button to select Wireless LAN setup, then press the OK button. 6 Select Directly enter the access point name, then press the OK button. • If you are living in an ...
Network Setup Troubleshooting
Page 14
... alphabet correctly. Specifying the Machine's IP Address (IPv4 only) Action The machine's IP Address can be specified by the following procedure. 1 Press the Setup button. 2 Select Device settings, then press the OK button. 3 Select LAN settings, then press the OK button. 4 Select Other settings, then ... setting, then press the OK button. 6 Select IPv4, then press the OK button. 7 Select Yes, then press the OK button. 8 Select Manual setup, then press the OK button. • Follow the on-screen instructions to . 12 When the completion screen appears, press the OK button. Disable 2 ...
... alphabet correctly. Specifying the Machine's IP Address (IPv4 only) Action The machine's IP Address can be specified by the following procedure. 1 Press the Setup button. 2 Select Device settings, then press the OK button. 3 Select LAN settings, then press the OK button. 4 Select Other settings, then ... setting, then press the OK button. 6 Select IPv4, then press the OK button. 7 Select Yes, then press the OK button. 8 Select Manual setup, then press the OK button. • Follow the on-screen instructions to . 12 When the completion screen appears, press the OK button. Disable 2 ...
Network Setup Troubleshooting
Page 15
... Inactive Obtain an IP address automatically 14 The LAN setting of the machine to the default state. • Perform setup again by following the procedures in "Wireless Setup" and onward or "Wired Setup" and onward in the printed manual: Getting Started. Restoring the Machine's Default LAN Settings to Perform... Action Follow the procedure below to restore LAN settings of the machine is now restored to the default state. 1 Press the Setup button. 2 Select Device settings, then press the OK button. 3 Select LAN settings, then press the OK button. 4 Select Reset LAN settings, then...
... Inactive Obtain an IP address automatically 14 The LAN setting of the machine to the default state. • Perform setup again by following the procedures in "Wireless Setup" and onward or "Wired Setup" and onward in the printed manual: Getting Started. Restoring the Machine's Default LAN Settings to Perform... Action Follow the procedure below to restore LAN settings of the machine is now restored to the default state. 1 Press the Setup button. 2 Select Device settings, then press the OK button. 3 Select LAN settings, then press the OK button. 4 Select Reset LAN settings, then...
Network Setup Troubleshooting
Page 17
... onward in the printed manual: Getting Started. A message may appear on the computer monitor warning that Canon software is not lit, press the Setup button, then using a router, are the Ethernet cables of the printer and computer connected to the manual supplied with the ...and the Internet. 16 A If the lamp is attempting to enable wireless LAN. • After enabling wireless LAN, perform setup again by following the procedures in "Wireless Setup" and onward in the printed manual: Getting Started. Glossary • Firewall A system to use computers connected to the manual...
... onward in the printed manual: Getting Started. A message may appear on the computer monitor warning that Canon software is not lit, press the Setup button, then using a router, are the Ethernet cables of the printer and computer connected to the manual supplied with the ...and the Internet. 16 A If the lamp is attempting to enable wireless LAN. • After enabling wireless LAN, perform setup again by following the procedures in "Wireless Setup" and onward in the printed manual: Getting Started. Glossary • Firewall A system to use computers connected to the manual...
Network Key
Page 2
> Obtaining Your Network Key PIXMA MX882 Windows OS Introduction 3 Download the Canon PIXMA Wireless Setup Assistant 4 Using the Canon PIXMA Wireless Setup Assistant 6 Troubleshooting 10 2
> Obtaining Your Network Key PIXMA MX882 Windows OS Introduction 3 Download the Canon PIXMA Wireless Setup Assistant 4 Using the Canon PIXMA Wireless Setup Assistant 6 Troubleshooting 10 2
Network Key
Page 3
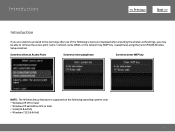
... settings, you are unable to proceed to retrieve the access point name / network name (SSID), or the network key (WEP key / passphrase) using the Canon PIXMA Wireless Setup Assistant. Introduction > Introduction If you may be able to the next step after any of the following operating systems only: • Windows XP SP3 or...
... settings, you are unable to proceed to retrieve the access point name / network name (SSID), or the network key (WEP key / passphrase) using the Canon PIXMA Wireless Setup Assistant. Introduction > Introduction If you may be able to the next step after any of the following operating systems only: • Windows XP SP3 or...
Network Key
Page 4
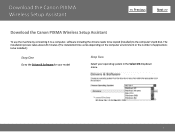
Download the Canon PIXMA Wireless Setup Assistant > Download the Canon PIXMA Wireless Setup Assistant To use the machine by connecting it to a computer, software including the drivers needs to be installed.) Step One Go to the computer's hard disk. The installation process takes about 20 minutes. (The installation time varies depending on the computer environment or the number of applications to be copied (installed) to the Drivers & Software for your model Step Two Select your operating system in the Select OS dropdown menu. 4
Download the Canon PIXMA Wireless Setup Assistant > Download the Canon PIXMA Wireless Setup Assistant To use the machine by connecting it to a computer, software including the drivers needs to be installed.) Step One Go to the computer's hard disk. The installation process takes about 20 minutes. (The installation time varies depending on the computer environment or the number of applications to be copied (installed) to the Drivers & Software for your model Step Two Select your operating system in the Select OS dropdown menu. 4
Network Key
Page 5
Begin Download Choose to where the file is on file name. Step Four On the next screen, read the information and instructions and click I Agree - Write down the file name and the location to "Save" the file. Download the Canon PIXMA Wireless Setup Assistant > Step Three In the Software section, click the link to download the file CanonAPChkTool. *File name will appear red when mouse pointer is being saved. 5
Begin Download Choose to where the file is on file name. Step Four On the next screen, read the information and instructions and click I Agree - Write down the file name and the location to "Save" the file. Download the Canon PIXMA Wireless Setup Assistant > Step Three In the Software section, click the link to download the file CanonAPChkTool. *File name will appear red when mouse pointer is being saved. 5
Network Key
Page 6
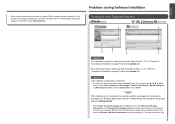
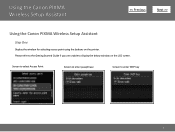
Please refer to the Getting Started Guide if you are unable to enter WEP key 6 Using the Canon PIXMA Wireless Setup Assistant > Using the Canon PIXMA Wireless Setup Assistant Step One Display the window for selecting access point using the buttons on the LCD screen. Screen to select Access Point Screen to enter passphrase Screen to display the below window on the printer.
Please refer to the Getting Started Guide if you are unable to enter WEP key 6 Using the Canon PIXMA Wireless Setup Assistant > Using the Canon PIXMA Wireless Setup Assistant Step One Display the window for selecting access point using the buttons on the LCD screen. Screen to select Access Point Screen to enter passphrase Screen to display the below window on the printer.
Network Key
Page 7
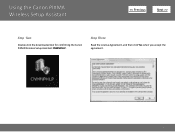
Using the Canon PIXMA Wireless Setup Assistant > Step Two Double-click the downloaded tool for confirming the Canon PIXMA Wireless Setup Assistant CNMNPHLP. Step Three Read the License Agreement, and then click Yes when you accept the agreement. 7
Using the Canon PIXMA Wireless Setup Assistant > Step Two Double-click the downloaded tool for confirming the Canon PIXMA Wireless Setup Assistant CNMNPHLP. Step Three Read the License Agreement, and then click Yes when you accept the agreement. 7


