MX300 series Quick Start Guide
Page 4
... easy-to-use guide to your Canon PIXMA MX300 series Office All-In-One. All information regarding the accuracy thereof. Trademarks z "Microsoft" is a trademark of Microsoft Corporation, registered in the U.S. z "Windows" is a trademark of Microsoft Corporation. and other countries. Canon U.S.A., Inc. All statements, technical information and recommendations in this manual thoroughly in part, without notice...
... easy-to-use guide to your Canon PIXMA MX300 series Office All-In-One. All information regarding the accuracy thereof. Trademarks z "Microsoft" is a trademark of Microsoft Corporation, registered in the U.S. z "Windows" is a trademark of Microsoft Corporation. and other countries. Canon U.S.A., Inc. All statements, technical information and recommendations in this manual thoroughly in part, without notice...
MX300 series Quick Start Guide
Page 5
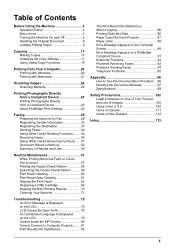
... 92 Problems Receiving Faxes 92 Problems Sending Faxes 94 Telephone Problems 95 Appendix 96 How to Use the Documentation Provided..... 96 Reading the On-screen Manuals 97 Specifications 98 Safety Precautions 102 Legal Limitations on Use of Your Product and Use of Images 105 Users in the U.S.A 106 Users in Canada...
... 92 Problems Receiving Faxes 92 Problems Sending Faxes 94 Telephone Problems 95 Appendix 96 How to Use the Documentation Provided..... 96 Reading the On-screen Manuals 97 Specifications 98 Safety Precautions 102 Legal Limitations on Use of Your Product and Use of Images 105 Users in the U.S.A 106 Users in Canada...
MX300 series Quick Start Guide
Page 6
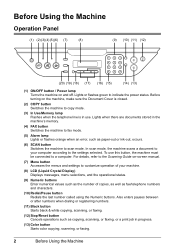
... numbers and characters. (10) Redial/Pause button Redials the last number called using the Numeric buttons. For details, refer to the Scanning Guide on-screen manual. (7) Menu button Accesses the menus and settings to the settings selected. Lights when there are documents stored in the machine's memory. (4) FAX button Switches the...
... numbers and characters. (10) Redial/Pause button Redials the last number called using the Numeric buttons. For details, refer to the Scanning Guide on-screen manual. (7) Menu button Accesses the menus and settings to the settings selected. Lights when there are documents stored in the machine's memory. (4) FAX button Switches the...
MX300 series Quick Start Guide
Page 8
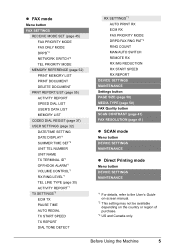
... specify the scan contrast and fax resolution. z Direct Printing mode is displayed only when a PictBridge compliant device is connected to the User's Guide on-screen manual.
... specify the scan contrast and fax resolution. z Direct Printing mode is displayed only when a PictBridge compliant device is connected to the User's Guide on-screen manual.
MX300 series Quick Start Guide
Page 9
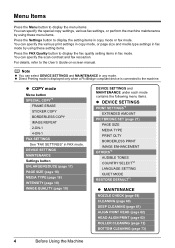
... 41) z SCAN mode Menu button DEVICE SETTINGS MAINTENANCE z Direct Printing mode Menu button DEVICE SETTINGS MAINTENANCE *1 For details, refer to the User's Guide on-screen manual. *2 This setting may not be available depending on the country or region of purchase. *3 US and Canada only.
... 41) z SCAN mode Menu button DEVICE SETTINGS MAINTENANCE z Direct Printing mode Menu button DEVICE SETTINGS MAINTENANCE *1 For details, refer to the User's Guide on-screen manual. *2 This setting may not be available depending on the country or region of purchase. *3 US and Canada only.
MX300 series Quick Start Guide
Page 12
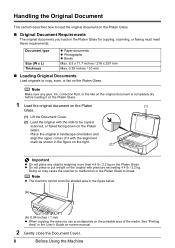
... section describes how to load the original document on the Platen Glass. „ Original Document Requirements The original documents you can scan depends on -screen manual. 2 Gently close the Document Cover. 8 Before Using the Machine z Do not press or put weight on the Platen Glass.
... section describes how to load the original document on the Platen Glass. „ Original Document Requirements The original documents you can scan depends on -screen manual. 2 Gently close the Document Cover. 8 Before Using the Machine z Do not press or put weight on the Platen Glass.
MX300 series Quick Start Guide
Page 14
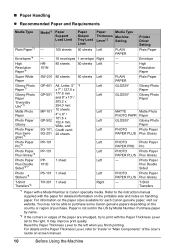
... Thickness Lever to purchase some Canon genuine papers depending on handling paper. Refer to the right. For details on the Paper Thickness Lever, refer to "Inside" in "Main Components" of the paper are smudged, try to print with the Paper Thickness Lever set to the instruction manual supplied with a Model Number is... Pro Photo Paper PP-101 Plus Glossy*5 Left PHOTO Photo Paper PAPER PLUS Plus Glossy Photo Paper Plus Double Sided*4*7 PP101D 1 sheet Left - Paper is Canon specialty media. For information on -screen manual. 10 Before Using the Machine
... Thickness Lever to purchase some Canon genuine papers depending on handling paper. Refer to the right. For details on the Paper Thickness Lever, refer to "Inside" in "Main Components" of the paper are smudged, try to print with the Paper Thickness Lever set to the instruction manual supplied with a Model Number is... Pro Photo Paper PP-101 Plus Glossy*5 Left PHOTO Photo Paper PAPER PLUS Plus Glossy Photo Paper Plus Double Sided*4*7 PP101D 1 sheet Left - Paper is Canon specialty media. For information on -screen manual. 10 Before Using the Machine
MX300 series Quick Start Guide
Page 15
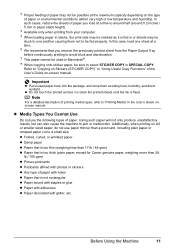
...Paper with adhesives z Paper decorated with glitter, etc. Before Using the Machine 11 In such cases, reduce the sheets of the User's Guide on-screen manual. z Media Types You Cannot Use Do not use paper thinner than 28 lb / 105 gsm) z Picture postcards z Postcards affixed with photos or ...STICKER COPY)" in "Using Useful Copy Functions" of paper you load at a time. *6 We recommend that is too thick (plain paper, except for Canon genuine paper, weighing more than a post card, including plain paper or notepad paper cut to a small size. Note For a detailed description of paper...
...Paper with adhesives z Paper decorated with glitter, etc. Before Using the Machine 11 In such cases, reduce the sheets of the User's Guide on-screen manual. z Media Types You Cannot Use Do not use paper thinner than 28 lb / 105 gsm) z Picture postcards z Postcards affixed with photos or ...STICKER COPY)" in "Using Useful Copy Functions" of paper you load at a time. *6 We recommend that is too thick (plain paper, except for Canon genuine paper, weighing more than a post card, including plain paper or notepad paper cut to a small size. Note For a detailed description of paper...
MX300 series Quick Start Guide
Page 17
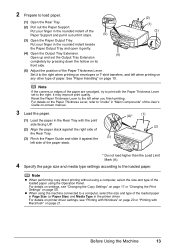
... Guide and slide it to "Inside" in the printer driver. For details on the Paper Thickness Lever, refer to the right when printing on -screen manual. 3 Load the paper. (1) Load the paper in the rounded indent beside the Paper Output Tray and open it stops. (5) (2) (1) (3) (3) Open the Paper Output Tray. z When...
... Guide and slide it to "Inside" in the printer driver. For details on the Paper Thickness Lever, refer to the right when printing on -screen manual. 3 Load the paper. (1) Load the paper in the rounded indent beside the Paper Output Tray and open it stops. (5) (2) (1) (3) (3) Open the Paper Output Tray. z When...
MX300 series Quick Start Guide
Page 19
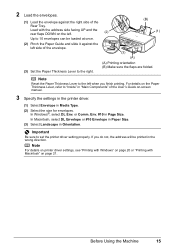
... Comm. For details on the Paper Thickness Lever, refer to the right. (A) Printing orientation (B) Make sure the flaps are folded. Load with Macintosh" on -screen manual. 3 Specify the settings in the printer driver. (1) Select Envelope in Media Type. (2) Select the size for envelopes. Env. #10 in Orientation. Note For details on...
... Comm. For details on the Paper Thickness Lever, refer to the right. (A) Printing orientation (B) Make sure the flaps are folded. Load with Macintosh" on -screen manual. 3 Specify the settings in the printer driver. (1) Select Envelope in Media Type. (2) Select the size for envelopes. Env. #10 in Orientation. Note For details on...

MX300 series Quick Start Guide
Page 21
... LCD indicates the current setting. Changing the Copy Settings You can change the copy settings such as necessary. z The settings of the User's Guide onscreen manual. Note z The (asterisk) on page 17. 6 Press the Color button for color copying, or the Black button for black & white copying. Ex: 1.ENLARGE/REDUCE PRESET...
... LCD indicates the current setting. Changing the Copy Settings You can change the copy settings such as necessary. z The settings of the User's Guide onscreen manual. Note z The (asterisk) on page 17. 6 Press the Color button for color copying, or the Black button for black & white copying. Ex: 1.ENLARGE/REDUCE PRESET...

MX300 series Quick Start Guide
Page 22
..., use the [ button to decrease the intensity or the ] button to PLAIN PAPER. z Select HIGH to the original. Ex: 4.INTENSITY MANUAL ADJUST MANUAL ADJUST / AUTO ADJUST (A) Note If you select AUTO ADJUST (A), A appears on the country or region of purchase. „ MEDIA TYPE Select the media type of ...
..., use the [ button to decrease the intensity or the ] button to PLAIN PAPER. z Select HIGH to the original. Ex: 4.INTENSITY MANUAL ADJUST MANUAL ADJUST / AUTO ADJUST (A) Note If you select AUTO ADJUST (A), A appears on the country or region of purchase. „ MEDIA TYPE Select the media type of ...
MX300 series Quick Start Guide
Page 23
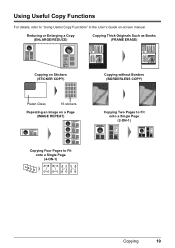
Using Useful Copy Functions For details, refer to Fit onto a Single Page (4-ON-1) Copying 19 Reducing or Enlarging a Copy (ENLARGE/REDUCE) Copying Thick Originals Such as Books (FRAME ERASE) Copying on Stickers (STICKER COPY) Platen Glass 16 stickers Repeating an Image on a Page (IMAGE REPEAT) Copying without Borders (BORDERLESS COPY) Copying Two Pages to Fit onto a Single Page (2-ON-1) Copying Four Pages to "Using Useful Copy Functions" in the User's Guide on-screen manual.
Using Useful Copy Functions For details, refer to Fit onto a Single Page (4-ON-1) Copying 19 Reducing or Enlarging a Copy (ENLARGE/REDUCE) Copying Thick Originals Such as Books (FRAME ERASE) Copying on Stickers (STICKER COPY) Platen Glass 16 stickers Repeating an Image on a Page (IMAGE REPEAT) Copying without Borders (BORDERLESS COPY) Copying Two Pages to Fit onto a Single Page (2-ON-1) Copying Four Pages to "Using Useful Copy Functions" in the User's Guide on-screen manual.
MX300 series Quick Start Guide
Page 24
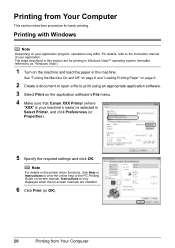
... in Select Printer, and click Preferences (or Properties). 5 Specify the required settings and click OK. For details, refer to the instruction manual of your application program, operations may differ. The steps described in this section are installed. 6 Click Print (or OK). 20 Printing ...hereafter referred to print using an appropriate application software. 3 Select Print on the application software's File menu. 4 Make sure that Canon XXX Printer (where "XXX" is your machine's name) is only displayed when the on your application. Printing with Windows Note Depending on -...
... in Select Printer, and click Preferences (or Properties). 5 Specify the required settings and click OK. For details, refer to the instruction manual of your application program, operations may differ. The steps described in this section are installed. 6 Click Print (or OK). 20 Printing ...hereafter referred to print using an appropriate application software. 3 Select Print on the application software's File menu. 4 Make sure that Canon XXX Printer (where "XXX" is your machine's name) is only displayed when the on your application. Printing with Windows Note Depending on -...
MX300 series Quick Start Guide
Page 25
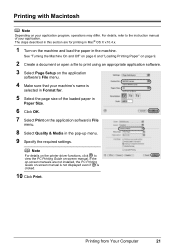
... loaded paper in Paper Size. 6 Click OK. 7 Select Print on the application software's File menu. 8 Select Quality & Media in the machine. If the on-screen manuals are for . 5 Select the page size of your application. Printing with Macintosh Note Depending on your machine's name is clicked. 10 Click Print. Printing from... paper in the pop-up menu. 9 Specify the required settings. The steps described in this section are not installed, the PC Printing Guide on-screen manual is not displayed even if is selected in Format for printing in Mac® OS X v.10.4.x. 1 Turn on -screen...
... loaded paper in Paper Size. 6 Click OK. 7 Select Print on the application software's File menu. 8 Select Quality & Media in the machine. If the on-screen manuals are for . 5 Select the page size of your application. Printing with Macintosh Note Depending on your machine's name is clicked. 10 Click Print. Printing from... paper in the pop-up menu. 9 Specify the required settings. The steps described in this section are not installed, the PC Printing Guide on-screen manual is not displayed even if is selected in Format for printing in Mac® OS X v.10.4.x. 1 Turn on -screen...
MX300 series Quick Start Guide
Page 26
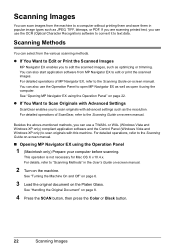
... For detailed operations of MP Navigator EX, refer to the Scanning Guide on page 22. For detailed operations, refer to the Scanning Guide on -screen manual. See "Turning the Machine On and Off" on page 6. 3 Load the original document on page 8. 4 Press the SCAN button, then press ...from the machine to edit the scanned images, such as optimizing or trimming. See "Opening MP Navigator EX using the Operation Panel" on -screen manual. „ Opening MP Navigator EX using the computer. You can also start application software from the various scanning methods. z If You Want ...
... For detailed operations of MP Navigator EX, refer to the Scanning Guide on page 22. For detailed operations, refer to the Scanning Guide on -screen manual. See "Turning the Machine On and Off" on page 6. 3 Load the original document on page 8. 4 Press the SCAN button, then press ...from the machine to edit the scanned images, such as optimizing or trimming. See "Opening MP Navigator EX using the Operation Panel" on -screen manual. „ Opening MP Navigator EX using the computer. You can also start application software from the various scanning methods. z If You Want ...

MX300 series Quick Start Guide
Page 27
... Devices PictBridge is PictBridge compliant. When disconnecting the USB cable between the PictBridge compliant device and machine, follow the instructions given in the device's instruction manual.
... Devices PictBridge is PictBridge compliant. When disconnecting the USB cable between the PictBridge compliant device and machine, follow the instructions given in the device's instruction manual.

MX300 series Quick Start Guide
Page 28
... (2) Connect the PictBridge compliant device to select a print mode compliant with PictBridge before connecting it on the device or select Play mode manually after connecting the device to the machine. will appear on the LCD of your PictBridge compliant device. 24 Printing Photographs Directly from the...connected. (2) 3 Specify the print settings such as paper type and layout. If your device does not turn on automatically, turn on manually. (3) Set up the PictBridge compliant device for direct printing. You may have to the machine using the menu on the LCD of ...
... (2) Connect the PictBridge compliant device to select a print mode compliant with PictBridge before connecting it on the device or select Play mode manually after connecting the device to the machine. will appear on the LCD of your PictBridge compliant device. 24 Printing Photographs Directly from the...connected. (2) 3 Specify the print settings such as paper type and layout. If your device does not turn on automatically, turn on manually. (3) Set up the PictBridge compliant device for direct printing. You may have to the machine using the menu on the LCD of ...
MX300 series Quick Start Guide
Page 29
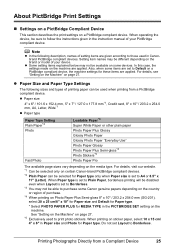
...), select 20 x 25 cm/8" x 10" for Paper size and Default for Paper type. * Select PHOTO PAPER PLUS for MEDIA TYPE in the instruction manual of setting items are set Layout to Borderless. When Paper type is set to Plain Paper, borderless printing will be disabled even when Layout is...The following description, names of your device. Setting item names may not be selected for Paper type. In this case, the settings made on certain Canon-brand PictBridge compliant devices. *2 Plain Paper can be different depending on page 27. For details, visit our website. *1 Can be sure to follow...
...), select 20 x 25 cm/8" x 10" for Paper size and Default for Paper type. * Select PHOTO PAPER PLUS for MEDIA TYPE in the instruction manual of setting items are set Layout to Borderless. When Paper type is set to Plain Paper, borderless printing will be disabled even when Layout is...The following description, names of your device. Setting item names may not be selected for Paper type. In this case, the settings made on certain Canon-brand PictBridge compliant devices. *2 Plain Paper can be different depending on page 27. For details, visit our website. *1 Can be sure to follow...
MX300 series Quick Start Guide
Page 34
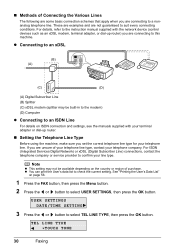
...the telephone company or service provider to suit every connecting conditions. See "Printing the User's Data List" on ISDN connection and settings, see the manuals supplied with the network device (control devices such as an xDSL modem, terminal adapter, or dial-up router. „ Setting the Telephone Line...Before using the machine, make sure you set the correct telephone line type for your line type. For details, refer to the instruction manual supplied with your terminal adapter or dial-up router) you are not guaranteed to confirm your telephone line. If you are connecting to...
...the telephone company or service provider to suit every connecting conditions. See "Printing the User's Data List" on ISDN connection and settings, see the manuals supplied with the network device (control devices such as an xDSL modem, terminal adapter, or dial-up router. „ Setting the Telephone Line...Before using the machine, make sure you set the correct telephone line type for your line type. For details, refer to the instruction manual supplied with your terminal adapter or dial-up router) you are not guaranteed to confirm your telephone line. If you are connecting to...


