MX300 series Quick Start Guide
Page 17
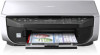
...it against the right side of the Rear Tray. (3) Pinch the Paper Guide and slide it stops. (5) (2) (1) (3) (3) Open the Paper Output Tray. 2 Prepare to the loaded paper. Before Using the Machine 13 Note If the corners or edges of paper. For details on settings, see "Printing with... type settings according to load paper. (1) Open the Rear Tray. (2) Pull out the Paper Support. Put your finger in the rounded indent beside the Paper Output Tray and open it to the left when printing on -screen manual. 3 Load the paper. (1) Load the paper in the printer driver. Note...
...it against the right side of the Rear Tray. (3) Pinch the Paper Guide and slide it stops. (5) (2) (1) (3) (3) Open the Paper Output Tray. 2 Prepare to the loaded paper. Before Using the Machine 13 Note If the corners or edges of paper. For details on settings, see "Printing with... type settings according to load paper. (1) Open the Rear Tray. (2) Pull out the Paper Support. Put your finger in the rounded indent beside the Paper Output Tray and open it to the left when printing on -screen manual. 3 Load the paper. (1) Load the paper in the printer driver. Note...
MX300 series Quick Start Guide
Page 55
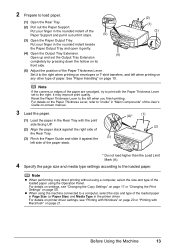
...ITU-T No.1 chart (Standard mode) „ Remote Receiving If the machine is low or has run out while receiving a fax: load the paper and press the OK button. In this function may be disabled. z Ink is located away from the telephone, pick up to tone dialing. ...SETTINGS. When the problem is closed: open it in fax mode. z If you use a rotary pulse line, temporarily switch your telephone. z Output Tray is resolved as the remote receiving ID. "RECEIVED IN MEMORY" is incorrect: correct the paper size/type setting. z Paper size/type setting is displayed in its...
...ITU-T No.1 chart (Standard mode) „ Remote Receiving If the machine is low or has run out while receiving a fax: load the paper and press the OK button. In this function may be disabled. z Ink is located away from the telephone, pick up to tone dialing. ...SETTINGS. When the problem is closed: open it in fax mode. z If you use a rotary pulse line, temporarily switch your telephone. z Output Tray is resolved as the remote receiving ID. "RECEIVED IN MEMORY" is incorrect: correct the paper size/type setting. z Paper size/type setting is displayed in its...

MX300 series Quick Start Guide
Page 62
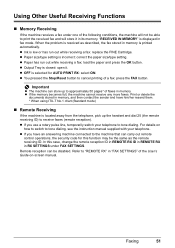
... Lever, refer to "Inside" in the rounded indent beside the Paper Output Tray and open it gently. (2) Open up and set the Output Tray Extension completely by pressing down the hollow on its front side. (3) Set the Paper Thickness Lever to select NOZZLE CHECK, then press the OK button. 4.MAINTENANCE ...print head nozzles. 1 Make sure that the machine is turned on, then load a sheet of A4 or Letter-sized plain paper in the Rear Tray. 2 Open the Paper Output Tray, then set the Paper Thickness Lever. (1) Put your finger in "Main Components" of the User's Guide on-screen manual. 3 Print the nozzle...
... Lever, refer to "Inside" in the rounded indent beside the Paper Output Tray and open it gently. (2) Open up and set the Output Tray Extension completely by pressing down the hollow on its front side. (3) Set the Paper Thickness Lever to select NOZZLE CHECK, then press the OK button. 4.MAINTENANCE ...print head nozzles. 1 Make sure that the machine is turned on, then load a sheet of A4 or Letter-sized plain paper in the Rear Tray. 2 Open the Paper Output Tray, then set the Paper Thickness Lever. (1) Put your finger in "Main Components" of the User's Guide on-screen manual. 3 Print the nozzle...

MX300 series Quick Start Guide
Page 66
... and press the [ or ] button to select the number of the pattern in the rounded indent beside the Paper Output Tray and open it gently. (2) Open up and set the Output Tray Extension completely by pressing down the hollow on -screen manual. 3 Print the print head alignment pattern. (1) Press... then press the OK button. 62 Routine Maintenance For details on the Paper Thickness Lever, refer to "Inside" in "Main Components" of A4 or Letter-sized plain paper in the Rear Tray. 2 Open the Paper Output Tray, then set the Paper Thickness Lever. (1) Put your finger in column A that the machine is...
... and press the [ or ] button to select the number of the pattern in the rounded indent beside the Paper Output Tray and open it gently. (2) Open up and set the Output Tray Extension completely by pressing down the hollow on -screen manual. 3 Print the print head alignment pattern. (1) Press... then press the OK button. 62 Routine Maintenance For details on the Paper Thickness Lever, refer to "Inside" in "Main Components" of A4 or Letter-sized plain paper in the Rear Tray. 2 Open the Paper Output Tray, then set the Paper Thickness Lever. (1) Put your finger in column A that the machine is...

MX300 series Quick Start Guide
Page 76
... Roller (Roller Cleaning) Clean the paper feed roller if paper is turned on, and then remove any paper from the Rear Tray. 2 Open the Paper Output Tray. (1) Put your finger in the Rear Tray. Do not touch the roller with the cotton swab. Cleaning the paper feed roller will rotate as it with your Canon service representative. (A) 72 Routine Maintenance...
... Roller (Roller Cleaning) Clean the paper feed roller if paper is turned on, and then remove any paper from the Rear Tray. 2 Open the Paper Output Tray. (1) Put your finger in the Rear Tray. Do not touch the roller with the cotton swab. Cleaning the paper feed roller will rotate as it with your Canon service representative. (A) 72 Routine Maintenance...
MX300 series Quick Start Guide
Page 77
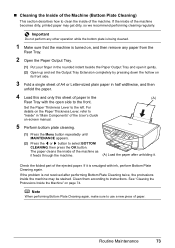
... BOTTOM CLEANING, then press the OK button. See "Cleaning the Protrusions Inside the Machine" on , and then remove any paper from the Rear Tray. 2 Open the Paper Output Tray. (1) Put your finger in the (A) Rear Tray with ink, perform Bottom Plate Cleaning again. Check the folded part of the machine as it feeds through the machine...
... BOTTOM CLEANING, then press the OK button. See "Cleaning the Protrusions Inside the Machine" on , and then remove any paper from the Rear Tray. 2 Open the Paper Output Tray. (1) Put your finger in the (A) Rear Tray with ink, perform Bottom Plate Cleaning again. Check the folded part of the machine as it feeds through the machine...
MX300 series Quick Start Guide
Page 82
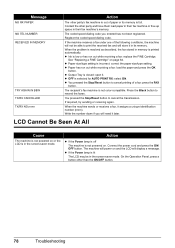
... resolved as described, the fax stored in memory is not powered on or the LCD is selected for AUTO PRINT RX: select ON. z Paper size/type setting is closed: open it later. Write the number down if you entered has not been registered. Register the coded speed dialing code. z Output... Tray is incorrect: correct the paper size/type setting. If required, try sending or receiving again. z If the Power lamp is low or has run out ...
... resolved as described, the fax stored in memory is not powered on or the LCD is selected for AUTO PRINT RX: select ON. z Paper size/type setting is closed: open it later. Write the number down if you entered has not been registered. Register the coded speed dialing code. z Output... Tray is incorrect: correct the paper size/type setting. If required, try sending or receiving again. z If the Power lamp is low or has run out ...
MX300 series Quick Start Guide
Page 92
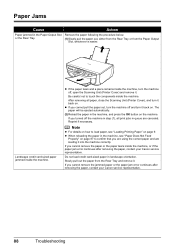
... load credit card-sized paper in the machine, see "Loading Printing Paper" on . Landscape credit card-sized paper jammed inside the machine. If you cannot remove the paper or the paper tears inside the machine, turn the machine off and turn the machine off , open the Scanning Unit (Printer...paper out, turn it . or the Rear Tray. (1)Slowly pull the paper out, either from the Rear Tray or from the Rear Tray and remove it back on page 9. z If the paper tears and a piece remains inside the machine, or if the paper jam error continues after removing the paper, contact your Canon...
... load credit card-sized paper in the machine, see "Loading Printing Paper" on . Landscape credit card-sized paper jammed inside the machine. If you cannot remove the paper or the paper tears inside the machine, turn the machine off and turn the machine off , open the Scanning Unit (Printer...paper out, turn it . or the Rear Tray. (1)Slowly pull the paper out, either from the Rear Tray or from the Rear Tray and remove it back on page 9. z If the paper tears and a piece remains inside the machine, or if the paper jam error continues after removing the paper, contact your Canon...
MX300 series Quick Start Guide
Page 95
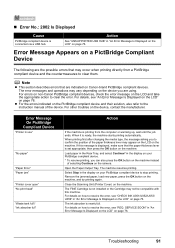
... see "An Error Message Is Displayed on the LCD" on page 76. For errors on non-Canon PictBridge compliant devices, check the error message on the machine instead of the paper thickness lever may occur when printing directly from the computer or warming up, wait until the job ... manufacturer. For details, see "CHECK INK U051/U052/U053/ U059" in "An Error Message Is Displayed on the LCD" on page 76. Open the Paper Output Tray. z For the errors indicated on the machine. Error Message Appears on a PictBridge Compliant Device The following are the possible errors that are using...
... see "An Error Message Is Displayed on the LCD" on page 76. For errors on non-Canon PictBridge compliant devices, check the error message on the machine instead of the paper thickness lever may occur when printing directly from the computer or warming up, wait until the job ... manufacturer. For details, see "CHECK INK U051/U052/U053/ U059" in "An Error Message Is Displayed on the LCD" on page 76. Open the Paper Output Tray. z For the errors indicated on the machine. Error Message Appears on a PictBridge Compliant Device The following are the possible errors that are using...


