MX300 series Quick Start Guide
Page 5
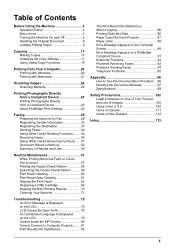
Table of Contents Before Using the Machine 2 Operation Panel 2 Menu Items 4 Turning the Machine On and Off 6 Handling the Original Document 8 Loading Printing Paper 9 Copying 17 Making Copies 17 Changing the Copy Settings 17 Using Useful Copy Functions 19 Printing from Your Computer 20 Printing with Windows ...
Table of Contents Before Using the Machine 2 Operation Panel 2 Menu Items 4 Turning the Machine On and Off 6 Handling the Original Document 8 Loading Printing Paper 9 Copying 17 Making Copies 17 Changing the Copy Settings 17 Using Useful Copy Functions 19 Printing from Your Computer 20 Printing with Windows ...
MX300 series Quick Start Guide
Page 12
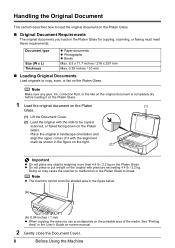
...of the media. Note z The machine cannot scan the shaded area in the figure below. (A) (A) 0.04 inches / 1 mm z When copying, the area you load on the Platen Glass for copying, scanning, or faxing must meet these requirements: Document type Size (W x L) Thickness z Paper documents z Photographs z Books Max. 8.5...on the right. (2) Important z Do not place any glue, ink, correction fluid, or the like on the original document is completely dry before loading it with pressure exceeding 4.4 lb / 2.2 kg. See "Printing Area" in the User's Guide on-screen manual. 2 Gently close the Document ...
...of the media. Note z The machine cannot scan the shaded area in the figure below. (A) (A) 0.04 inches / 1 mm z When copying, the area you load on the Platen Glass for copying, scanning, or faxing must meet these requirements: Document type Size (W x L) Thickness z Paper documents z Photographs z Books Max. 8.5...on the right. (2) Important z Do not place any glue, ink, correction fluid, or the like on the original document is completely dry before loading it with pressure exceeding 4.4 lb / 2.2 kg. See "Printing Area" in the User's Guide on-screen manual. 2 Gently close the Document ...
MX300 series Quick Start Guide
Page 13
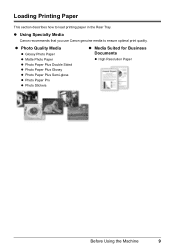
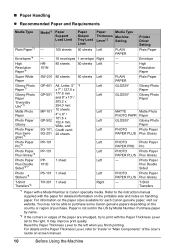
z Photo Quality Media z Glossy Photo Paper z Matte Photo Paper z Photo Paper Plus Double Sided z Photo Paper Plus Glossy z Photo Paper Plus Semi-gloss z Photo Paper Pro z Photo Stickers z Media Suited for Business Documents z High Resolution Paper Before Using the Machine 9 Loading Printing Paper This section describes how to ensure optimal print quality. z Using Specialty Media Canon recommends that you use Canon genuine media to load printing paper in the Rear Tray.
z Photo Quality Media z Glossy Photo Paper z Matte Photo Paper z Photo Paper Plus Double Sided z Photo Paper Plus Glossy z Photo Paper Plus Semi-gloss z Photo Paper Pro z Photo Stickers z Media Suited for Business Documents z High Resolution Paper Before Using the Machine 9 Loading Printing Paper This section describes how to ensure optimal print quality. z Using Specialty Media Canon recommends that you use Canon genuine media to load printing paper in the Rear Tray.
MX300 series Quick Start Guide
Page 14
... on handling paper. „ Paper Handling z Recommended Paper and Requirements Media Type Plain Paper*3 Envelopes*4 Model*1 Paper Support Load Limit Paper Output Tray Load Limit Paper Media Type Thickness Machine Lever*2 Setting - 100 sheets 50 sheets Left PLAIN PAPER - 10 envelopes 1 envelope Right...Number is not sold in "Main Components" of the paper are smudged, try to the left when you finish printing. Paper is Canon specialty media. Purchase paper by Model Number. Printer Driver Setting Plain Paper Envelope High HR- 80 sheets 50 sheets Left - For information...
... on handling paper. „ Paper Handling z Recommended Paper and Requirements Media Type Plain Paper*3 Envelopes*4 Model*1 Paper Support Load Limit Paper Output Tray Load Limit Paper Media Type Thickness Machine Lever*2 Setting - 100 sheets 50 sheets Left PLAIN PAPER - 10 envelopes 1 envelope Right...Number is not sold in "Main Components" of the paper are smudged, try to the left when you finish printing. Paper is Canon specialty media. Purchase paper by Model Number. Printer Driver Setting Plain Paper Envelope High HR- 80 sheets 50 sheets Left - For information...
MX300 series Quick Start Guide
Page 15
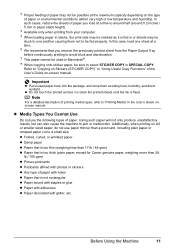
... ink is fed in or sheets may be stuck to one sheet at a time. *6 We recommend that is too thick (plain paper, except for Canon genuine paper, weighing more than a post card, including plain paper or notepad paper cut to be possible at a time to "Printing Media" in ... "Copying on A5 or smaller sized paper, do not use the following types of paper you remove the previously printed sheet from your computer. *5 When loading paper in SPECIAL COPY. Additionally, when printing on Stickers (STICKER COPY)" in the User's Guide onscreen manual. z Folded, curled, or wrinkled paper z ...
... ink is fed in or sheets may be stuck to one sheet at a time. *6 We recommend that is too thick (plain paper, except for Canon genuine paper, weighing more than a post card, including plain paper or notepad paper cut to be possible at a time to "Printing Media" in ... "Copying on A5 or smaller sized paper, do not use the following types of paper you remove the previously printed sheet from your computer. *5 When loading paper in SPECIAL COPY. Additionally, when printing on Stickers (STICKER COPY)" in the User's Guide onscreen manual. z Folded, curled, or wrinkled paper z ...
MX300 series Quick Start Guide
Page 16
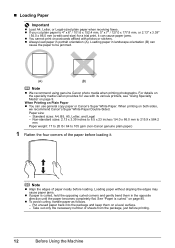
...152.4 mm, 5" x 7" / 127.0 x 177.8 mm, or 2.13" x 3.39" / 54.0 x 86.0 mm (credit card-size) for use general copy paper or Canon's Super White Paper. Note z Align the edges of paper neatly before printing. 12 Before Using the Machine z To avoid curling, handle paper as follows. - See...Media" on a level surface. - z Always load paper in landscape orientation (B) can cause the paper to 105 gsm (non-Canon genuine plain paper) 1 Flatten the four corners of sheets from the package, just before loading. „ Loading Paper Important z Load A4, Letter, or Legal-sized plain paper ...
...152.4 mm, 5" x 7" / 127.0 x 177.8 mm, or 2.13" x 3.39" / 54.0 x 86.0 mm (credit card-size) for use general copy paper or Canon's Super White Paper. Note z Align the edges of paper neatly before printing. 12 Before Using the Machine z To avoid curling, handle paper as follows. - See...Media" on a level surface. - z Always load paper in landscape orientation (B) can cause the paper to 105 gsm (non-Canon genuine plain paper) 1 Flatten the four corners of sheets from the package, just before loading. „ Loading Paper Important z Load A4, Letter, or Legal-sized plain paper ...
MX300 series Quick Start Guide
Page 17
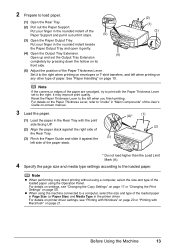
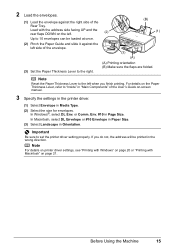
.... Reset the Paper Thickness Lever to the right when printing on envelopes or T-shirt transfers, and left when printing on any other type of the loaded paper in Page Size (or Paper Size) and Media Type in the rounded indent beside the Paper Output Tray and open it stops. (5) (2) (1) ... the hollow on page 10. See "Paper Handling" on its front side. (5) Adjust the position of the paper stack. (A)* (1) (2) * Do not load higher than the Load Limit Mark (A). 4 Specify the page size and media type settings according to "Inside" in "Main Components" of the User's Guide on-screen manual...
.... Reset the Paper Thickness Lever to the right when printing on envelopes or T-shirt transfers, and left when printing on any other type of the loaded paper in Page Size (or Paper Size) and Media Type in the rounded indent beside the Paper Output Tray and open it stops. (5) (2) (1) ... the hollow on page 10. See "Paper Handling" on its front side. (5) Adjust the position of the paper stack. (A)* (1) (2) * Do not load higher than the Load Limit Mark (A). 4 Specify the page size and media type settings according to "Inside" in "Main Components" of the User's Guide on-screen manual...
MX300 series Quick Start Guide
Page 18
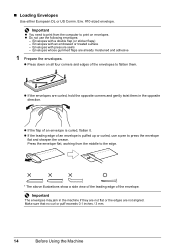
... - Important The envelopes may jam in the opposite direction. Make sure that no curl or puff exceeds 0.1 inches / 3 mm. 14 Before Using the Machine „ Loading Envelopes Use either European DL or US Comm. Env. #10-sized envelope. Important z You need to print from the middle to the edge. * The above...
... - Important The envelopes may jam in the opposite direction. Make sure that no curl or puff exceeds 0.1 inches / 3 mm. 14 Before Using the Machine „ Loading Envelopes Use either European DL or US Comm. Env. #10-sized envelope. Important z You need to print from the middle to the edge. * The above...
MX300 series Quick Start Guide
Page 19
...settings, see "Printing with Windows" on page 20 or "Printing with the address side facing UP and the rear flaps DOWN on page 21. Load with Macintosh" on the left. (2) (B) (1) Up to 10 envelopes can be printed in Page Size. Important Be sure to set the printer... driver setting properly. Env. #10 in the wrong direction. 2 Load the envelopes. (1) Load the envelope against the left side of the envelope. (3) (A) (3) Set the Paper Thickness Lever to the right. (A) Printing orientation (B) Make sure...
...settings, see "Printing with Windows" on page 20 or "Printing with the address side facing UP and the rear flaps DOWN on page 21. Load with Macintosh" on the left. (2) (B) (1) Up to 10 envelopes can be printed in Page Size. Important Be sure to set the printer... driver setting properly. Env. #10 in the wrong direction. 2 Load the envelopes. (1) Load the envelope against the left side of the envelope. (3) (A) (3) Set the Paper Thickness Lever to the right. (A) Printing orientation (B) Make sure...
MX300 series Quick Start Guide
Page 20
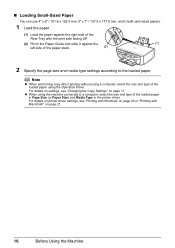
...with Macintosh" on page 17. Note z When performing copy direct printing without using a computer, select the size and type of the loaded paper using the machine connected to the loaded paper. „ Loading Small-Sized Paper You can use 4" x 6" / 101.6 x 152.4 mm, 5" x 7" / 127.0 x 177.8 mm..., and Credit card-sized papers. 1 Load the paper. (1) Load the paper against the (1) left side of the paper stack. (2) 2 Specify the page size and media type settings according to a computer, select the size and type of the loaded paper in Page Size (or Paper Size) and Media Type...
...with Macintosh" on page 17. Note z When performing copy direct printing without using a computer, select the size and type of the loaded paper using the machine connected to the loaded paper. „ Loading Small-Sized Paper You can use 4" x 6" / 101.6 x 152.4 mm, 5" x 7" / 127.0 x 177.8 mm..., and Credit card-sized papers. 1 Load the paper. (1) Load the paper against the (1) left side of the paper stack. (2) 2 Specify the page size and media type settings according to a computer, select the size and type of the loaded paper in Page Size (or Paper Size) and Media Type...

MX300 series Quick Start Guide
Page 21
... Paper" on page 9. 4 Load the original on the machine. Changing the Copy Settings You can change the copy settings such ...size, media type, or image quality. Ex: 1.ENLARGE/REDUCE PRESET RATIO PRESET RATIO / ZOOM / FIT-TO-PAGE Copying 17 See "Loading Original Documents" on page 17. 6 Press the Color button for color copying, or the Black button for black & white copying. z... ENLARGE/REDUCE Select the reduction/enlargement method. Note z The (asterisk) on page 6. 2 Press the COPY button. 3 Load paper. See "Turning the Machine On and Off" on the LCD indicates the current setting.
... Paper" on page 9. 4 Load the original on the machine. Changing the Copy Settings You can change the copy settings such ...size, media type, or image quality. Ex: 1.ENLARGE/REDUCE PRESET RATIO PRESET RATIO / ZOOM / FIT-TO-PAGE Copying 17 See "Loading Original Documents" on page 17. 6 Press the Color button for color copying, or the Black button for black & white copying. z... ENLARGE/REDUCE Select the reduction/enlargement method. Note z The (asterisk) on page 6. 2 Press the COPY button. 3 Load paper. See "Turning the Machine On and Off" on the LCD indicates the current setting.

MX300 series Quick Start Guide
Page 22
... of these are not available depending on the LCD. „ IMAGE QUALITY Adjust print quality according to copy in a range of grays instead of the loaded paper. z Select HIGH to the original. Ex: 5.IMAGE QUALITY STANDARD STANDARD / HIGH / FAST Note z FAST can be selected only when this setting is ... the quality is set to increase it. Ex: 2.PAGE SIZE A4 8.5"x11" / A4 / B5 / A5 / 4"x6" / 5"x7" / CREDIT CARD SIZE Note Some of the loaded paper. „ PAGE SIZE Select the page size of black or white. 18 Copying If you select MANUAL ADJUST, use the [ button to decrease the...
... of these are not available depending on the LCD. „ IMAGE QUALITY Adjust print quality according to copy in a range of grays instead of the loaded paper. z Select HIGH to the original. Ex: 5.IMAGE QUALITY STANDARD STANDARD / HIGH / FAST Note z FAST can be selected only when this setting is ... the quality is set to increase it. Ex: 2.PAGE SIZE A4 8.5"x11" / A4 / B5 / A5 / 4"x6" / 5"x7" / CREDIT CARD SIZE Note Some of the loaded paper. „ PAGE SIZE Select the page size of black or white. 18 Copying If you select MANUAL ADJUST, use the [ button to decrease the...
MX300 series Quick Start Guide
Page 24
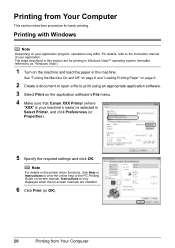
...the on-screen manuals are for basic printing. Instructions is selected in the machine. See "Turning the Machine On and Off" on page 6 and "Loading Printing Paper" on page 9. 2 Create a document or open a file to as "Windows Vista"). 1 Turn on -screen manual. For details,... (or Properties). 5 Specify the required settings and click OK. Note For details on the application software's File menu. 4 Make sure that Canon XXX Printer (where "XXX" is your application program, operations may differ. Printing from Your Computer The steps described in this section are installed....
...the on-screen manuals are for basic printing. Instructions is selected in the machine. See "Turning the Machine On and Off" on page 6 and "Loading Printing Paper" on page 9. 2 Create a document or open a file to as "Windows Vista"). 1 Turn on -screen manual. For details,... (or Properties). 5 Specify the required settings and click OK. Note For details on the application software's File menu. 4 Make sure that Canon XXX Printer (where "XXX" is your application program, operations may differ. Printing from Your Computer The steps described in this section are installed....
MX300 series Quick Start Guide
Page 25
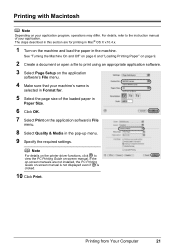
...screen manual is not displayed even if is selected in Format for printing in Mac® OS X v.10.4.x. 1 Turn on the machine and load the paper in the pop-up menu. 9 Specify the required settings. Printing from Your Computer 21 Printing with Macintosh Note Depending on your application.... Note For details on the printer driver functions, click to the instruction manual of the loaded paper in Paper Size. 6 Click OK. 7 Select Print on the application software's File menu. 8 Select Quality & Media in the machine. For ...
...screen manual is not displayed even if is selected in Format for printing in Mac® OS X v.10.4.x. 1 Turn on the machine and load the paper in the pop-up menu. 9 Specify the required settings. Printing from Your Computer 21 Printing with Macintosh Note Depending on your application.... Note For details on the printer driver functions, click to the instruction manual of the loaded paper in Paper Size. 6 Click OK. 7 Select Print on the application software's File menu. 8 Select Quality & Media in the machine. For ...
MX300 series Quick Start Guide
Page 26
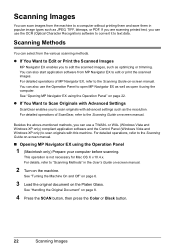
... -screen manual. For details, refer to "Scanning Methods" in popular image types such as the resolution. See "Turning the Machine On and Off" on page 6. 3 Load the original document on page 8. 4 Press the SCAN button, then press the Color or Black button. 22 Scanning Images See "Handling the Original Document" on...
... -screen manual. For details, refer to "Scanning Methods" in popular image types such as the resolution. See "Turning the Machine On and Off" on page 6. 3 Load the original document on page 8. 4 Press the SCAN button, then press the Color or Black button. 22 Scanning Images See "Handling the Original Document" on...

MX300 series Quick Start Guide
Page 27
... result. When disconnecting the USB cable between the PictBridge compliant device and machine, follow the instructions given in the device's instruction manual. See "Loading Printing Paper" on page 6. (2) Load paper. Printing Photographs Directly from a Compliant Device To connect a PictBridge compliant device to as PNG files. Caution Do not connect any equipment other...
... result. When disconnecting the USB cable between the PictBridge compliant device and machine, follow the instructions given in the device's instruction manual. See "Loading Printing Paper" on page 6. (2) Load paper. Printing Photographs Directly from a Compliant Device To connect a PictBridge compliant device to as PNG files. Caution Do not connect any equipment other...

MX300 series Quick Start Guide
Page 28
... is turned off. (2) Connect the PictBridge compliant device to instructions given in the machine. See "About PictBridge Print Settings" on automatically. If your device, you loaded in the device's instruction manual. (1) Make sure that you may also have setting menu, change the setting from the machine. 2 Connect the PictBridge compliant device...
... is turned off. (2) Connect the PictBridge compliant device to instructions given in the machine. See "About PictBridge Print Settings" on automatically. If your device, you loaded in the device's instruction manual. (1) Make sure that you may also have setting menu, change the setting from the machine. 2 Connect the PictBridge compliant device...
MX300 series Quick Start Guide
Page 44
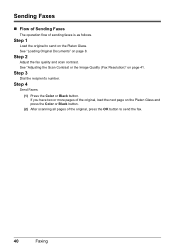
See "Loading Original Documents" on the Platen Glass and press the Color or Black button. (2) After scanning ...Faxes. (1) Press the Color or Black button. Sending Faxes „ Flow of Sending Faxes The operation flow of the original, load the next page on page 8. Step 3 Dial the recipient's number. If you have two or more pages of sending faxes is ...as follows. Step 1 Load the original to send the fax. 40 Faxing Step 2 Adjust the fax quality and scan contrast. See "Adjusting the Scan Contrast...
See "Loading Original Documents" on the Platen Glass and press the Color or Black button. (2) After scanning ...Faxes. (1) Press the Color or Black button. Sending Faxes „ Flow of Sending Faxes The operation flow of the original, load the next page on page 8. Step 3 Dial the recipient's number. If you have two or more pages of sending faxes is ...as follows. Step 1 Load the original to send the fax. 40 Faxing Step 2 Adjust the fax quality and scan contrast. See "Adjusting the Scan Contrast...

MX300 series Quick Start Guide
Page 46
...Repeat steps (3) and (4) to automatically redial the number after a specified interval. Note For details on how to use coded speed dialing, see "Loading Original Documents" on the LCD. Automatic redialing is available only when the recipient's fax machine supports color faxing. To cancel automatic redialing, wait until...Dial" on page 43. (2) Press the Color button for color sending, or the Black button for faxing. (1) Turn on the machine. (2) Load the original on the Platen Glass. Note For details on the types and conditions of the document. (6) Press the OK button. SCAN NEXT [...
...Repeat steps (3) and (4) to automatically redial the number after a specified interval. Note For details on how to use coded speed dialing, see "Loading Original Documents" on the LCD. Automatic redialing is available only when the recipient's fax machine supports color faxing. To cancel automatic redialing, wait until...Dial" on page 43. (2) Press the Color button for color sending, or the Black button for faxing. (1) Turn on the machine. (2) Load the original on the Platen Glass. Note For details on the types and conditions of the document. (6) Press the OK button. SCAN NEXT [...
MX300 series Quick Start Guide
Page 49
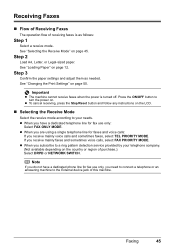
See "Loading Paper" on page 50. See "Changing the Print Settings" on page 12. Important z The machine cannot receive faxes when the power is as needed. If ... adjust them as follows: Step 1 Select a receive mode. Receiving Faxes „ Flow of Receiving Faxes The operation flow of receiving faxes is turned off. Step 2 Load A4, Letter, or Legal-sized paper. Press the ON/OFF button to your telephone company. (Not available depending on page 45. z When you need to...
See "Loading Paper" on page 50. See "Changing the Print Settings" on page 12. Important z The machine cannot receive faxes when the power is as needed. If ... adjust them as follows: Step 1 Select a receive mode. Receiving Faxes „ Flow of Receiving Faxes The operation flow of receiving faxes is turned off. Step 2 Load A4, Letter, or Legal-sized paper. Press the ON/OFF button to your telephone company. (Not available depending on page 45. z When you need to...


