MX300 series Quick Start Guide
Page 6
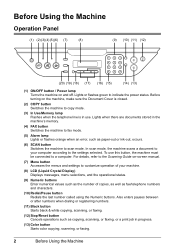
... selected. Also enters pauses between or after numbers when dialing or registering numbers. (11) Black button Starts black & white copying, scanning, or faxing. (12) Stop/Reset button Cancels operations such as fax/telephone numbers and characters. (10) Redial/Pause button Redials the last number called using the Numeric buttons. For details...
... selected. Also enters pauses between or after numbers when dialing or registering numbers. (11) Black button Starts black & white copying, scanning, or faxing. (12) Stop/Reset button Cancels operations such as fax/telephone numbers and characters. (10) Redial/Pause button Redials the last number called using the Numeric buttons. For details...
MX300 series Quick Start Guide
Page 14
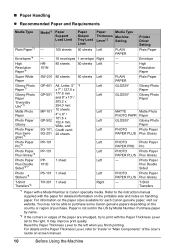
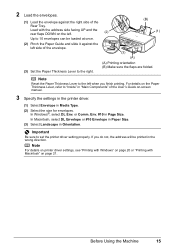
...PHOTO Photo Paper PAPER PLUS Plus Glossy Photo Paper Plus Double Sided*4*7 PP101D 1 sheet Left - Refer to the right. Purchase paper by Model Number. Reset the Paper Thickness Lever to "Inside" in the US by name. *2 If the corners or edges of the paper are smudged, try to print... Transfers*4 TR-301 1 sheet Right - T-Shirt Transfers *1 Paper with the paper for each Canon genuine paper, visit our website. Paper is Canon specialty media. It may not be able to purchase some Canon genuine papers depending on the country or region of the User's Guide on-screen manual. 10 Before...
...PHOTO Photo Paper PAPER PLUS Plus Glossy Photo Paper Plus Double Sided*4*7 PP101D 1 sheet Left - Refer to the right. Purchase paper by Model Number. Reset the Paper Thickness Lever to "Inside" in the US by name. *2 If the corners or edges of the paper are smudged, try to print... Transfers*4 TR-301 1 sheet Right - T-Shirt Transfers *1 Paper with the paper for each Canon genuine paper, visit our website. Paper is Canon specialty media. It may not be able to purchase some Canon genuine papers depending on the country or region of the User's Guide on-screen manual. 10 Before...
MX300 series Quick Start Guide
Page 17
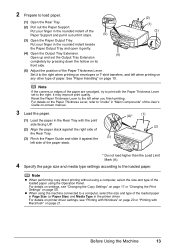
Set it stops. (5) (2) (1) (3) (3) Open the Paper Output Tray. Reset the Paper Thickness Lever to the right when printing on envelopes or T-shirt transfers, and left when printing on page 50. z When using the Operation ...
Set it stops. (5) (2) (1) (3) (3) Open the Paper Output Tray. Reset the Paper Thickness Lever to the right when printing on envelopes or T-shirt transfers, and left when printing on page 50. z When using the Operation ...
MX300 series Quick Start Guide
Page 19
... the address side facing UP and the rear flaps DOWN on the left. (2) (B) (1) Up to 10 envelopes can be printed in the wrong direction. Note Reset the Paper Thickness Lever to the left when you do not, the address will be loaded at once. (2) Pinch the Paper Guide and slide it...
... the address side facing UP and the rear flaps DOWN on the left. (2) (B) (1) Up to 10 envelopes can be printed in the wrong direction. Note Reset the Paper Thickness Lever to the left when you do not, the address will be loaded at once. (2) Pinch the Paper Guide and slide it...
MX300 series Quick Start Guide
Page 35
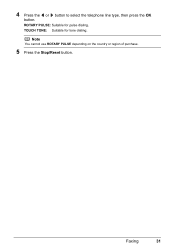
Faxing 31 ROTARY PULSE: Suitable for tone dialing. 4 Press the [ or ] button to select the telephone line type, then press the OK button. Note You cannot use ROTARY PULSE depending on the country or region of purchase. 5 Press the Stop/Reset button. TOUCH TONE: Suitable for pulse dialing.
Faxing 31 ROTARY PULSE: Suitable for tone dialing. 4 Press the [ or ] button to select the telephone line type, then press the OK button. Note You cannot use ROTARY PULSE depending on the country or region of purchase. 5 Press the Stop/Reset button. TOUCH TONE: Suitable for pulse dialing.
MX300 series Quick Start Guide
Page 38
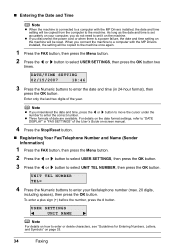
... UNIT NAME Note For details on how to enter or delete characters, see "Guidelines for Entering Numbers, Letters, and Symbols" on the machine will be reset. To enter a plus sign (+) before the number, press the # button. DATE/TIME SETTING 02/15/2007 18:46 3 Press the Numeric buttons to enter ... date and time setting on page 33. 34 Faxing As long as the date and time is set it on -screen manual. 4 Press the Stop/Reset button. „ Registering Your Fax/Telephone Number and Name (Sender Information) 1 Press the FAX button, then press the Menu button. 2 Press the [ or ] button...
... UNIT NAME Note For details on how to enter or delete characters, see "Guidelines for Entering Numbers, Letters, and Symbols" on the machine will be reset. To enter a plus sign (+) before the number, press the # button. DATE/TIME SETTING 02/15/2007 18:46 3 Press the Numeric buttons to enter ... date and time setting on page 33. 34 Faxing As long as the date and time is set it on -screen manual. 4 Press the Stop/Reset button. „ Registering Your Fax/Telephone Number and Name (Sender Information) 1 Press the FAX button, then press the Menu button. 2 Press the [ or ] button...
MX300 series Quick Start Guide
Page 39
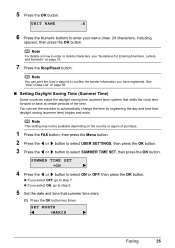
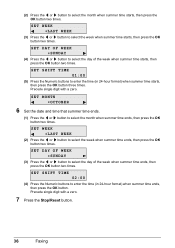
... the daylight saving time (summer time) system that daylight saving (summer time) begins and ends. See "User's Data List" on page 33. 7 Press the Stop/Reset button. SUMMER TIME SET ON 4 Press the [ or ] button to step 7. z If you have registered.
... the daylight saving time (summer time) system that daylight saving (summer time) begins and ends. See "User's Data List" on page 33. 7 Press the Stop/Reset button. SUMMER TIME SET ON 4 Press the [ or ] button to step 7. z If you have registered.
MX300 series Quick Start Guide
Page 40
... to enter the time (in 24-hour format) when summer time ends, then press the OK button. Precede single digit with a zero. 7 Press the Stop/Reset button. 36 Faxing (2) Press the [ or ] button to select the day of the week when summer time starts, then press the OK button two times...
... to enter the time (in 24-hour format) when summer time ends, then press the OK button. Precede single digit with a zero. 7 Press the Stop/Reset button. 36 Faxing (2) Press the [ or ] button to select the day of the week when summer time starts, then press the OK button two times...
MX300 series Quick Start Guide
Page 42
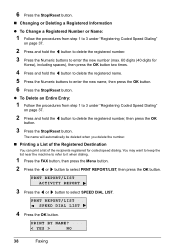
... the OK button two times. 4 Press and hold the [ button to delete the registered number, then press the OK button. 3 Press the Stop/Reset button. PRNT REPORT/LIST ACTIVITY REPORT 3 Press the [ or ] button to select PRNT REPORT/LIST, then press the OK button. z To Delete an...it when dialing. 1 Press the FAX button, then press the Menu button. 2 Press the [ or ] button to select SPEED DIAL LIST. 6 Press the Stop/Reset button. „ Changing or Deleting a Registered Information z To Change a Registered Number or Name: 1 Follow the procedures from step 1 to 3 under "Registering Coded Speed...
... the OK button two times. 4 Press and hold the [ button to delete the registered number, then press the OK button. 3 Press the Stop/Reset button. PRNT REPORT/LIST ACTIVITY REPORT 3 Press the [ or ] button to select PRNT REPORT/LIST, then press the OK button. z To Delete an...it when dialing. 1 Press the FAX button, then press the Menu button. 2 Press the [ or ] button to select SPEED DIAL LIST. 6 Press the Stop/Reset button. „ Changing or Deleting a Registered Information z To Change a Registered Number or Name: 1 Follow the procedures from step 1 to 3 under "Registering Coded Speed...

MX300 series Quick Start Guide
Page 46
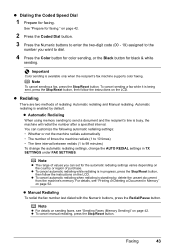
... the Numeric buttons or coded speed dialing. To cancel sending a fax while it is enabled by default. Automatic redialing is being sent, press the Stop/Reset button, then follow the instructions on the LCD. To cancel automatic redialing, wait until the machine starts redialing, press the Stop.../Reset button, then follow the instructions on the LCD. 42 Faxing See "Adjusting the Scan Contrast or the Image Quality (Fax Resolution)" on page 43. z In ...
... the Numeric buttons or coded speed dialing. To cancel sending a fax while it is enabled by default. Automatic redialing is being sent, press the Stop/Reset button, then follow the instructions on the LCD. To cancel automatic redialing, wait until the machine starts redialing, press the Stop.../Reset button, then follow the instructions on the LCD. 42 Faxing See "Adjusting the Scan Contrast or the Image Quality (Fax Resolution)" on page 43. z In ...
MX300 series Quick Start Guide
Page 47
...redials (1 to 10 times) • The time interval between redials (1 to send a document and the recipient's line is being sent, press the Stop/Reset button, then follow the instructions on page 42. 2 Press the Coded Dial button. 3 Press the Numeric buttons to enter the two-digit code (00 ...- 19) assigned to the number you can set for black & white sending. Faxing 43 Note To cancel sending a fax, press the Stop/Reset button. For details, see "Sending Faxes (Memory Sending)" on the country or region of redialing: Automatic redialing and Manual redialing. Note z For details on...
...redials (1 to 10 times) • The time interval between redials (1 to send a document and the recipient's line is being sent, press the Stop/Reset button, then follow the instructions on page 42. 2 Press the Coded Dial button. 3 Press the Numeric buttons to enter the two-digit code (00 ...- 19) assigned to the number you can set for black & white sending. Faxing 43 Note To cancel sending a fax, press the Stop/Reset button. For details, see "Sending Faxes (Memory Sending)" on the country or region of redialing: Automatic redialing and Manual redialing. Note z For details on...
MX300 series Quick Start Guide
Page 49
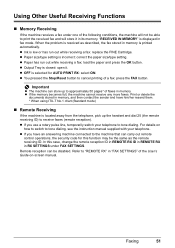
....): Select DRPD or NETWORK SWITCH. See "Selecting the Receive Mode" on page 12. See "Loading Paper" on page 45. z To cancel receiving, press the Stop/Reset button and follow any instructions on the LCD. „ Selecting the Receive Mode Select the receive mode according to turn the power on page 50...
....): Select DRPD or NETWORK SWITCH. See "Selecting the Receive Mode" on page 12. See "Loading Paper" on page 45. z To cancel receiving, press the Stop/Reset button and follow any instructions on the LCD. „ Selecting the Receive Mode Select the receive mode according to turn the power on page 50...

MX300 series Quick Start Guide
Page 51
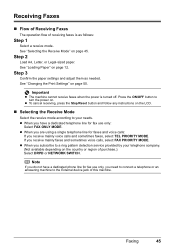
... can be no longer than 15 seconds. - Set MAN/AUTO SWITCH in RX SETTINGS under FAX SETTINGS. If you press the Stop/Reset button before pressing the Stop/Reset button. Note z Set your callers how to Receive Faxes Automatically: Select FAX PRIORITY MODE. (B) (A) (C) (A) Incoming call (B) Voice... answering a voice call, be disconnected. (C) Fax: The machine receives faxes automatically. Pick up the handset, then press the Stop/Reset button to pick up the handset before picking up the handset, the telephone call will receive faxes automatically even if you have subscribed to...
... can be no longer than 15 seconds. - Set MAN/AUTO SWITCH in RX SETTINGS under FAX SETTINGS. If you press the Stop/Reset button before pressing the Stop/Reset button. Note z Set your callers how to Receive Faxes Automatically: Select FAX PRIORITY MODE. (B) (A) (C) (A) Incoming call (B) Voice... answering a voice call, be disconnected. (C) Fax: The machine receives faxes automatically. Pick up the handset, then press the Stop/Reset button to pick up the handset before picking up the handset, the telephone call will receive faxes automatically even if you have subscribed to...
MX300 series Quick Start Guide
Page 55
... setting is selected for this case, change the remote reception ID in REMOTE RX ID in REMOTE RX in its memory. z You pressed the Stop/Reset button to cancel printing of the User's Guide on how to switch to tone dialing, see the instruction manual supplied with your telephone to "REMOTE...
... setting is selected for this case, change the remote reception ID in REMOTE RX ID in REMOTE RX in its memory. z You pressed the Stop/Reset button to cancel printing of the User's Guide on how to switch to tone dialing, see the instruction manual supplied with your telephone to "REMOTE...
MX300 series Quick Start Guide
Page 56
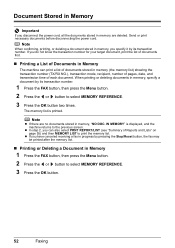
... in memory, "NO DOC. Note When confirming, printing, or deleting a document stored in memory, you have canceled receiving a fax in progress by pressing the Stop/Reset button, the fax may be printed after the memory list. „ Printing or Deleting a Document in Memory 1 Press the FAX button, then press the Menu...
... in memory, "NO DOC. Note When confirming, printing, or deleting a document stored in memory, you have canceled receiving a fax in progress by pressing the Stop/Reset button, the fax may be printed after the memory list. „ Printing or Deleting a Document in Memory 1 Press the FAX button, then press the Menu...
MX300 series Quick Start Guide
Page 57
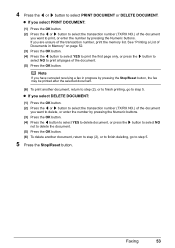
... (1) Press the OK button. (2) Press the [ or ] button to select the transaction number (TX/RX NO.) of Documents in progress by pressing the Stop/Reset button, the fax may be printed after the selected document. (6) To print another document, return to step (2), or to finish deleting, go to print all...return to step (2), or to finish printing, go to select PRINT DOCUMENT or DELETE DOCUMENT. 4 Press the [ or ] button to step 5. 5 Press the Stop/Reset button. z If you want to delete, or enter the number by pressing the Numeric buttons. If you are unsure of the document you select PRINT...
... (1) Press the OK button. (2) Press the [ or ] button to select the transaction number (TX/RX NO.) of Documents in progress by pressing the Stop/Reset button, the fax may be printed after the selected document. (6) To print another document, return to step (2), or to finish deleting, go to print all...return to step (2), or to finish printing, go to select PRINT DOCUMENT or DELETE DOCUMENT. 4 Press the [ or ] button to step 5. 5 Press the Stop/Reset button. z If you want to delete, or enter the number by pressing the Numeric buttons. If you are unsure of the document you select PRINT...
MX300 series Quick Start Guide
Page 58
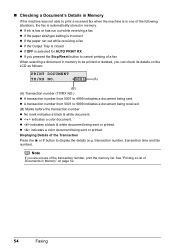
... a received fax when the machine is in one of the following situations, the fax is selected for AUTO PRINT RX z If you pressed the Stop/Reset button to cancel printing of a fax When selecting a document in memory to be printed or deleted, you are unsure of Documents in memory. z < > indicates a color...
... a received fax when the machine is in one of the following situations, the fax is selected for AUTO PRINT RX z If you pressed the Stop/Reset button to cancel printing of a fax When selecting a document in memory to be printed or deleted, you are unsure of Documents in memory. z < > indicates a color...
MX300 series Quick Start Guide
Page 70
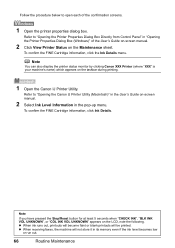
Note You can also display the printer status monitor by clicking Canon XXX Printer (where "XXX" is your machine's name) which appears on the LCD, note the following. Note If you have pressed the Stop/Reset button for at least 5 seconds when "CHECK INK", "BLK INK VOL UNKNOWN", or "COL INK VOL ...UNKNOWN" appears on the taskbar during printing. 1 Open the Canon IJ Printer Utility. z When ink runs out, printouts will become faint or...
Note You can also display the printer status monitor by clicking Canon XXX Printer (where "XXX" is your machine's name) which appears on the LCD, note the following. Note If you have pressed the Stop/Reset button for at least 5 seconds when "CHECK INK", "BLK INK VOL UNKNOWN", or "COL INK VOL ...UNKNOWN" appears on the taskbar during printing. 1 Open the Canon IJ Printer Utility. z When ink runs out, printouts will become faint or...
MX300 series Quick Start Guide
Page 80
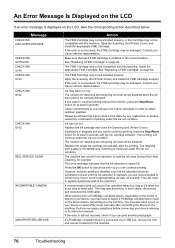
...manual. See "Replacing a FINE Cartridge" on page 64. If the error is nearly full. Please be damaged. Make sure that Canon shall not be disabled. Install the appropriate FINE Cartridge. The FINE Cartridge may cancel printing. The function for detecting the remaining ink ...level will be liable for at least 5 seconds with this function, press the Stop/Reset button for any malfunction or trouble caused by continuation of your device referring to continue printing without this machine. The function for ...
...manual. See "Replacing a FINE Cartridge" on page 64. If the error is nearly full. Please be damaged. Make sure that Canon shall not be disabled. Install the appropriate FINE Cartridge. The FINE Cartridge may cancel printing. The function for detecting the remaining ink ...level will be liable for at least 5 seconds with this function, press the Stop/Reset button for any malfunction or trouble caused by continuation of your device referring to continue printing without this machine. The function for ...
MX300 series Quick Start Guide
Page 81
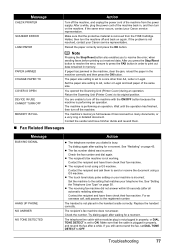
...132; Fax Related Messages Message BUSY/NO SIGNAL HANG UP PHONE NO ANSWER NO TONE DETECTED Action z The telephone number you press the Stop/Reset button to resolve the error, ensure to press the FAX button in memory. If you to print out data remained in order to resolve...an operation. The machine is not working. z The touch tone/rotary pulse setting on the machine. Replace the handset correctly. Make sure that matches your Canon service representative. The machine's memory is not using a G3 machine. Try dialing again after a while. Check the fax number and dial again. z...
...132; Fax Related Messages Message BUSY/NO SIGNAL HANG UP PHONE NO ANSWER NO TONE DETECTED Action z The telephone number you press the Stop/Reset button to resolve the error, ensure to press the FAX button in memory. If you to print out data remained in order to resolve...an operation. The machine is not working. z The touch tone/rotary pulse setting on the machine. Replace the handset correctly. Make sure that matches your Canon service representative. The machine's memory is not using a G3 machine. Try dialing again after a while. Check the fax number and dial again. z...


