MP970 series Quick Start Guide
Page 4
...Stick PRO Duo" are in this manual may differ. Disclaimer Canon U.S.A., Inc. For details, refer to Canon Inc. The steps described in Windows Vista™ operating system Ultimate Edition (hereafter referred to your Canon PIXMA MP970 series Photo All-In-One. z "Windows Vista" is a registered ...z "IrDA Feature Trademark" is copyrighted by the Infrared Data Association and used under license therefrom. One Canon Plaza Lake Success, NY 11042 Canon PIXMA MP970 series Photo All-In-One Quick Start Guide. has reviewed this product meets the ENERGY STAR guidelines for 5 years ...
...Stick PRO Duo" are in this manual may differ. Disclaimer Canon U.S.A., Inc. For details, refer to Canon Inc. The steps described in Windows Vista™ operating system Ultimate Edition (hereafter referred to your Canon PIXMA MP970 series Photo All-In-One. z "Windows Vista" is a registered ...z "IrDA Feature Trademark" is copyrighted by the Infrared Data Association and used under license therefrom. One Canon Plaza Lake Success, NY 11042 Canon PIXMA MP970 series Photo All-In-One Quick Start Guide. has reviewed this product meets the ENERGY STAR guidelines for 5 years ...
MP970 series Quick Start Guide
Page 5
...Memory Card 29 Using Useful Printing Functions 33 Using Useful Display Functions 33 Printing by Using the Photo Index Sheet ......34 Photo Printing from Printed Photo or Film 35 Scanning a Photo 35 Scanning a Film 35 Printing Scanned Photographs 38 Using Useful Printing Functions 39 Using Useful ... Compliant Device 93 Cannot Print Properly through Infrared Communication 94 Cannot Print Properly through Bluetooth Communication 94 Cannot Print Properly from a Photo Index Sheet 94 Cannot Remove a Memory Card 95 Scanning Problems 95 Cannot Scan Films 95 Appendix 97 How to Use the ...
...Memory Card 29 Using Useful Printing Functions 33 Using Useful Display Functions 33 Printing by Using the Photo Index Sheet ......34 Photo Printing from Printed Photo or Film 35 Scanning a Photo 35 Scanning a Film 35 Printing Scanned Photographs 38 Using Useful Printing Functions 39 Using Useful ... Compliant Device 93 Cannot Print Properly through Infrared Communication 94 Cannot Print Properly through Bluetooth Communication 94 Cannot Print Properly from a Photo Index Sheet 94 Cannot Remove a Memory Card 95 Scanning Problems 95 Cannot Scan Films 95 Appendix 97 How to Use the ...

MP970 series Quick Start Guide
Page 7
... a Memory Card" on the HOME screen: Copy: You can perform the maintenance or change the various settings of the machine. See "Printing from Printed Photo or Film" on page 35. See "Copying" on -screen manual. For details, see "When Printing Becomes Faint or Colors Are Incorrect" on page ... sheet: You can save the scanned data to select setting items. Move the icon of a digital camera. Scan: You can easily print the photos from Printed Photo or Film" on page 35. The HOME screen will be displayed. 2 Turn the Easy-Scroll Wheel to navigate menus with the Easy-Scroll Wheel...
... a Memory Card" on the HOME screen: Copy: You can perform the maintenance or change the various settings of the machine. See "Printing from Printed Photo or Film" on page 35. See "Copying" on -screen manual. For details, see "When Printing Becomes Faint or Colors Are Incorrect" on page ... sheet: You can save the scanned data to select setting items. Move the icon of a digital camera. Scan: You can easily print the photos from Printed Photo or Film" on page 35. The HOME screen will be displayed. 2 Turn the Easy-Scroll Wheel to navigate menus with the Easy-Scroll Wheel...
MP970 series Quick Start Guide
Page 11
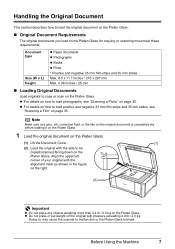
... than 4.4 lb / 2.0 kg on page 35. z For details on how to load positive and negative 35 mm film strips and 35 mm slides, see "Scanning a Photo" on the Platen Glass.
... than 4.4 lb / 2.0 kg on page 35. z For details on how to load positive and negative 35 mm film strips and 35 mm slides, see "Scanning a Photo" on the Platen Glass.

MP970 series Quick Start Guide
Page 13
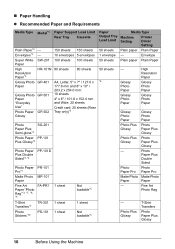
... in the Rear Tray and the Cassette. If you use Canon genuine media to ensure optimal print quality. z Photo Quality Media z Glossy Photo Paper z Photo Paper Plus Semi-gloss z Photo Paper Plus Glossy z Photo Paper Plus Double Sided z Photo Paper Pro z Matte Photo Paper z Fine Art Paper "Photo Rag™" z Photo Stickers z Media Suited for Business Documents z High Resolution Paper...
... in the Rear Tray and the Cassette. If you use Canon genuine media to ensure optimal print quality. z Photo Quality Media z Glossy Photo Paper z Photo Paper Plus Semi-gloss z Photo Paper Plus Glossy z Photo Paper Plus Double Sided z Photo Paper Pro z Matte Photo Paper z Fine Art Paper "Photo Rag™" z Photo Stickers z Media Suited for Business Documents z High Resolution Paper...
MP970 series Quick Start Guide
Page 14
... Printer Driver Setting Plain paper Plain Paper - Glossy Photo Paper Glossy Photo Paper High Resolution Paper Glossy Photo Paper Glossy Photo Paper Glossy Photo Paper Glossy Photo Paper Photo Plus Photo Glossy Paper Plus Glossy Photo Plus Photo Glossy Paper Plus Glossy - Envelopes*3 - Photo Paper Plus Double Sided Photo Photo Paper Pro Paper Pro Matte Photo Matte Photo Paper Paper - „ Paper Handling z Recommended Paper...
... Printer Driver Setting Plain paper Plain Paper - Glossy Photo Paper Glossy Photo Paper High Resolution Paper Glossy Photo Paper Glossy Photo Paper Glossy Photo Paper Glossy Photo Paper Photo Plus Photo Glossy Paper Plus Glossy Photo Plus Photo Glossy Paper Plus Glossy - Envelopes*3 - Photo Paper Plus Double Sided Photo Photo Paper Pro Paper Pro Matte Photo Matte Photo Paper Paper - „ Paper Handling z Recommended Paper...
MP970 series Quick Start Guide
Page 15
...special page size for Fine Art Paper in the memory card mode. We recommend using Canon genuine media. *8 For details on using art paper, refer to get optimum printing quality. When copying photos onto sticker paper from your mobile phone to "Setting Items" in Wireless print settings. ...Refer to sticker paper, select Stickers for each Canon genuine paper, visit our website. Refer to sticker paper, be fed properly...
...special page size for Fine Art Paper in the memory card mode. We recommend using Canon genuine media. *8 For details on using art paper, refer to get optimum printing quality. When copying photos onto sticker paper from your mobile phone to "Setting Items" in Wireless print settings. ...Refer to sticker paper, select Stickers for each Canon genuine paper, visit our website. Refer to sticker paper, be fed properly...
MP970 series Quick Start Guide
Page 16
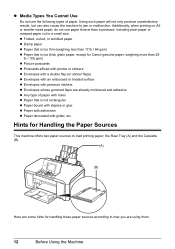
... for handling these paper sources according to jam or malfunction. the Rear Tray (A) and the Cassette (B). (A) (B) Here are some hints for Canon genuine paper, weighing more than a postcard, including plain paper or notepad paper cut to load printing paper; Using such paper will not only... of paper. z Media Types You Cannot Use Do not use paper thinner than 28 lb / 105 gsm) z Picture postcards z Postcards affixed with photos or stickers z Envelopes with a double flap (or sticker flaps) z Envelopes with an embossed or treated surface z Envelopes with pressure stickers z Envelopes ...
... for handling these paper sources according to jam or malfunction. the Rear Tray (A) and the Cassette (B). (A) (B) Here are some hints for Canon genuine paper, weighing more than a postcard, including plain paper or notepad paper cut to load printing paper; Using such paper will not only... of paper. z Media Types You Cannot Use Do not use paper thinner than 28 lb / 105 gsm) z Picture postcards z Postcards affixed with photos or stickers z Envelopes with a double flap (or sticker flaps) z Envelopes with an embossed or treated surface z Envelopes with pressure stickers z Envelopes ...

MP970 series Quick Start Guide
Page 17
...using the printer driver. For details on printer driver settings, refer to the PC Printing Guide on-screen manual. „ If You Print Regularly on Photo Paper as well as plain paper, you can also specify the type and size of paper to the Cassette for this paper. (A) (B) (A) Rear Tray...: Load paper of various types and sizes, including photo paper (B) Cassette: Load paper you can print more efficiently by pressing the Paper Feed Switch. Note z Some types and sizes of paper are not loadable...
...using the printer driver. For details on printer driver settings, refer to the PC Printing Guide on-screen manual. „ If You Print Regularly on Photo Paper as well as plain paper, you can also specify the type and size of paper to the Cassette for this paper. (A) (B) (A) Rear Tray...: Load paper of various types and sizes, including photo paper (B) Cassette: Load paper you can print more efficiently by pressing the Paper Feed Switch. Note z Some types and sizes of paper are not loadable...
MP970 series Quick Start Guide
Page 20
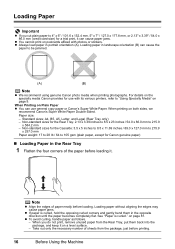
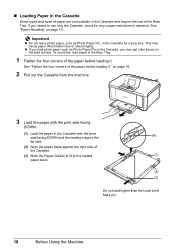
...back into the package, and keep it on both sides, we recommend Canon's Super White Paper Double-Sided. When you cut plain paper to be jammed. (A) (B) Note z We recommend using genuine Canon photo media when printing photographs. Take out only the necessary number of sheets from...Legal (Rear Tray only) - z To avoid curling, handle paper as follows. - For details on the specialty media Canon provides for use with photos or stickers. Non-standard sizes for Canon genuine paper) „ Loading Paper in portrait orientation (A). z Always load paper in the Rear Tray 1 Flatten the ...
...back into the package, and keep it on both sides, we recommend Canon's Super White Paper Double-Sided. When you cut plain paper to be jammed. (A) (B) Note z We recommend using genuine Canon photo media when printing photographs. Take out only the necessary number of sheets from...Legal (Rear Tray only) - z To avoid curling, handle paper as follows. - For details on the specialty media Canon provides for use with photos or stickers. Non-standard sizes for Canon genuine paper) „ Loading Paper in portrait orientation (A). z Always load paper in the Rear Tray 1 Flatten the ...
MP970 series Quick Start Guide
Page 22
... corners of the paper before loading it ." See "Flatten the four corners of the paper before loading it . Important z Do not leave photo paper, such as Photo Paper Pro in the Cassette for any usage restrictions in advance. If you may cause paper discoloration due to the loaded paper stack. (A) (1)... (2) (3) Do not load higher than the Load Limit Mark (A). 18 Before Using the Machine z If you load photo paper such as Photo Paper Pro, in the Cassette, you intend to use of the Cassette. (3) Slide the Paper Guides to fit to natural aging.
... corners of the paper before loading it ." See "Flatten the four corners of the paper before loading it . Important z Do not leave photo paper, such as Photo Paper Pro in the Cassette for any usage restrictions in advance. If you may cause paper discoloration due to the loaded paper stack. (A) (1)... (2) (3) Do not load higher than the Load Limit Mark (A). 18 Before Using the Machine z If you load photo paper such as Photo Paper Pro, in the Cassette, you intend to use of the Cassette. (3) Slide the Paper Guides to fit to natural aging.
MP970 series Quick Start Guide
Page 33
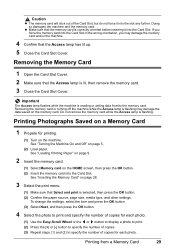
.... 5 Close the Card Slot Cover. Doing so damages the machine and the memory card. Printing Photographs Saved on a Memory Card 1 Prepare for each photo. See "Inserting the Memory Card" on the HOME screen, then press the OK button. (2) Insert the memory card into the Card Slot. Removing the... Slot Cover. To change the settings, select the item and press the OK button. (3) Select Next, and then press the OK button. 4 Select the photo to print and specify the number of copies for printing. (1) Turn on page 5. (2) Load paper. Removing the Memory Card 1 Open the Card Slot Cover...
.... 5 Close the Card Slot Cover. Doing so damages the machine and the memory card. Printing Photographs Saved on a Memory Card 1 Prepare for each photo. See "Inserting the Memory Card" on the HOME screen, then press the OK button. (2) Insert the memory card into the Card Slot. Removing the... Slot Cover. To change the settings, select the item and press the OK button. (3) Select Next, and then press the OK button. 4 Select the photo to print and specify the number of copies for printing. (1) Turn on page 5. (2) Load paper. Removing the Memory Card 1 Open the Card Slot Cover...
MP970 series Quick Start Guide
Page 34
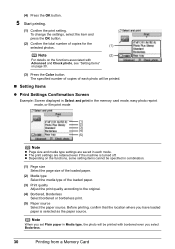
..., Borderless Select bordered or borderless print. (5) Paper source Select the paper source. z The print settings are saved in Media type, the photo will be printed. „ Setting Items z Print Settings Confirmation Screen Example: Screen displayed in Select and print in the memory card mode, easy... photo reprint mode, or film print mode (1) (2) (3) (4) (5) Note z Page size and media type settings are retained even if the machine is selected ...
..., Borderless Select bordered or borderless print. (5) Paper source Select the paper source. z The print settings are saved in Media type, the photo will be printed. „ Setting Items z Print Settings Confirmation Screen Example: Screen displayed in Select and print in the memory card mode, easy... photo reprint mode, or film print mode (1) (2) (3) (4) (5) Note z Page size and media type settings are retained even if the machine is selected ...

MP970 series Quick Start Guide
Page 35
...Screen displayed in Auto image fix as scenery, night scene, person, etc. It also analyzes a scene such as default. z Photos in a memory card are printed in the easy photo reprint mode (13) Printing from a Memory Card 31 z Advanced Print Settings Screen When you press the left Function button in... in the memory card mode. When Auto image fix ON is selected, the scene or person's face of a shot photo is made automatically. If you select Manual correction, you can specify each photo is recognized and the most suitable color, brightness, or contrasts automatically to print.
...Screen displayed in Auto image fix as scenery, night scene, person, etc. It also analyzes a scene such as default. z Photos in a memory card are printed in the easy photo reprint mode (13) Printing from a Memory Card 31 z Advanced Print Settings Screen When you press the left Function button in... in the memory card mode. When Auto image fix ON is selected, the scene or person's face of a shot photo is made automatically. If you select Manual correction, you can specify each photo is recognized and the most suitable color, brightness, or contrasts automatically to print.

MP970 series Quick Start Guide
Page 36
... file no . ON are saved in each mode. Note The advanced print settings are set, only the shooting date will be selected only in easy photo reprint mode or film print mode. 32 Printing from a Memory Card If you can increase red or yellow to adjust the skin tone. (12) Effects... areas like the sky as well as printing in sepia tones or with a sketch illustration like effect. (13) Fade restoration*2 Corrects the color when printing photos that have faded or color cast over time. *1 Can be selected only in memory card mode. *2 Can be printed. The saved settings are retained until...
... file no . ON are saved in each mode. Note The advanced print settings are set, only the shooting date will be selected only in easy photo reprint mode or film print mode. 32 Printing from a Memory Card If you can increase red or yellow to adjust the skin tone. (12) Effects... areas like the sky as well as printing in sepia tones or with a sketch illustration like effect. (13) Fade restoration*2 Corrects the color when printing photos that have faded or color cast over time. *1 Can be selected only in memory card mode. *2 Can be printed. The saved settings are retained until...
MP970 series Quick Start Guide
Page 37
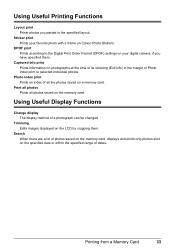
.... Search When there are a lot of dates. Photo index print Prints an index of all photos saved on Canon Photo Stickers. Using Useful Printing Functions Layout print Prints photos you have specified them . Using Useful Display Functions Change display The display method of Photo index print or selected individual photos. Captured info print Prints information on photographs...
.... Search When there are a lot of dates. Photo index print Prints an index of all photos saved on Canon Photo Stickers. Using Useful Printing Functions Layout print Prints photos you have specified them . Using Useful Display Functions Change display The display method of Photo index print or selected individual photos. Captured info print Prints information on photographs...
MP970 series Quick Start Guide
Page 38
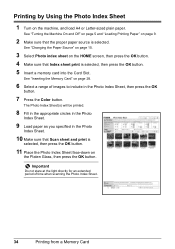
... Sheet, then press the OK button. 7 Press the Color button. See "Changing the Paper Source" on page 15. 3 Select Photo index sheet on the HOME screen, then press the OK button. 4 Make sure that Scan sheet and print is selected, then press the OK button. 5 ... Sheet. 10 Make sure that Index sheet print is selected, then press the OK button. 11 Place the Photo Index Sheet face-down on page 28. 6 Select a range of time when scanning the Photo Index Sheet. 34 Printing from a Memory Card See "Inserting the Memory Card" on the Platen Glass, then press...
... Sheet, then press the OK button. 7 Press the Color button. See "Changing the Paper Source" on page 15. 3 Select Photo index sheet on the HOME screen, then press the OK button. 4 Make sure that Scan sheet and print is selected, then press the OK button. 5 ... Sheet. 10 Make sure that Index sheet print is selected, then press the OK button. 11 Place the Photo Index Sheet face-down on page 28. 6 Select a range of time when scanning the Photo Index Sheet. 34 Printing from a Memory Card See "Inserting the Memory Card" on the Platen Glass, then press...
MP970 series Quick Start Guide
Page 39
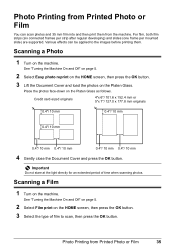
... the Platen Glass. Important Do not stare at the light directly for an extended period of film to the images before printing them from Printed Photo or Film 35 See "Turning the Machine On and Off" on page 5. 2 Select Film print on the HOME screen, then press the OK button. 3 Select... the type of time when scanning photos. Photo Printing from the machine. See "Turning the Machine On and Off" on page 5. 2 Select Easy photo reprint on the HOME screen, then press the OK button. 3 Lift the Document Cover and load the...
... the Platen Glass. Important Do not stare at the light directly for an extended period of film to the images before printing them from Printed Photo or Film 35 See "Turning the Machine On and Off" on page 5. 2 Select Film print on the HOME screen, then press the OK button. 3 Select... the type of time when scanning photos. Photo Printing from the machine. See "Turning the Machine On and Off" on page 5. 2 Select Easy photo reprint on the HOME screen, then press the OK button. 3 Lift the Document Cover and load the...
MP970 series Quick Start Guide
Page 40
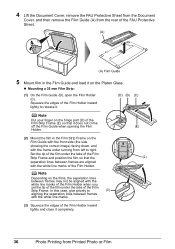
... the correct image) facing down, and with the white line marks. (3) Squeeze the edges of the Film Holder inward lightly and close it completely. 36 Photo Printing from the rear of the Film Holder. Set the tip of the film under the tabs of the Film Strip Frame. Note Depending on... inward lightly to right. 4 Lift the Document Cover, remove the FAU Protective Sheet from the Document Cover, and then remove the Film Guide (A) from Printed Photo or Film z Mounting a 35 mm Film Strip: (1) On the Film Guide (B), open the Film Holder (C).
... the correct image) facing down, and with the white line marks. (3) Squeeze the edges of the Film Holder inward lightly and close it completely. 36 Photo Printing from the rear of the Film Holder. Set the tip of the film under the tabs of the Film Strip Frame. Note Depending on... inward lightly to right. 4 Lift the Document Cover, remove the FAU Protective Sheet from the Document Cover, and then remove the Film Guide (A) from Printed Photo or Film z Mounting a 35 mm Film Strip: (1) On the Film Guide (B), open the Film Holder (C).
MP970 series Quick Start Guide
Page 41
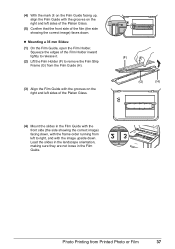
Photo Printing from left to right, and with the image upside down . Squeeze the edges of the Film Holder inward lightly to release it. (2) Lift the ... not loose in the Film Guide with the front side (the side showing the correct image) facing down, with the frame order running from Printed Photo or Film 37 (4) With the mark on the Film Guide facing up, align the Film Guide with the grooves on the right and left sides...
Photo Printing from left to right, and with the image upside down . Squeeze the edges of the Film Holder inward lightly to release it. (2) Lift the ... not loose in the Film Guide with the front side (the side showing the correct image) facing down, with the frame order running from Printed Photo or Film 37 (4) With the mark on the Film Guide facing up, align the Film Guide with the grooves on the right and left sides...


