Service Manual
Page 3
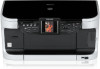
Refer to service the PIXMA MP800: Part 1: Maintenance Information on maintenance and troubleshooting of the PIXMA MP800 Part 2: Technical Reference New technology and technical information such as FAQ's (Frequently Asked Questions) of the PIXMA MP800 Part 3: Appendix Block diagrams and pin layouts of the PIXMA MP800 Reference: This manual does not provide sufficient information for disassembly and reassembly procedures. I. MANUAL OUTLINE This manual consists of the following three parts to provide information necessary to the graphics in the separate Parts Catalog.
Refer to service the PIXMA MP800: Part 1: Maintenance Information on maintenance and troubleshooting of the PIXMA MP800 Part 2: Technical Reference New technology and technical information such as FAQ's (Frequently Asked Questions) of the PIXMA MP800 Part 3: Appendix Block diagrams and pin layouts of the PIXMA MP800 Reference: This manual does not provide sufficient information for disassembly and reassembly procedures. I. MANUAL OUTLINE This manual consists of the following three parts to provide information necessary to the graphics in the separate Parts Catalog.

Service Manual
Page 26
CONNECTOR LOCATION AND PIN LAYOUT]. Improper wiring or connection may cause breakage of a line, leading to the Parts Catalog, and [Part 3, 2. - Remove the cable from the connector, and separate the panel board from the scanner unit. (3) Flexible cable and harness wiring, connection Be cautious of wiring of smoke. For wiring details, refer to ignition or emission of the flexible cables and harness. Rear view with the main case removed: (Logic board side on the left, AC adapter / PF motor side on the right) (I) Logic board ass'y wiring 1-21
CONNECTOR LOCATION AND PIN LAYOUT]. Improper wiring or connection may cause breakage of a line, leading to the Parts Catalog, and [Part 3, 2. - Remove the cable from the connector, and separate the panel board from the scanner unit. (3) Flexible cable and harness wiring, connection Be cautious of wiring of smoke. For wiring details, refer to ignition or emission of the flexible cables and harness. Rear view with the main case removed: (Logic board side on the left, AC adapter / PF motor side on the right) (I) Logic board ass'y wiring 1-21


