PIXMA MP750/780 Quick Start Guide
Page 4
...Drivers, MP Navigator and the Fax driver. This guide contains the following instructions in detail, as well as an HTML file on how to scan data, various printing methods, and function details. The FAX icon indicates items that are only applicable to use . X How To Use The... Easy-WebPrint, including instructions on the Setup CD-ROM, describes each function in the Easy Setup Instructions, read this guide when starting to MP780. 3 This sheet includes instructions for setting up your machine and getting it ready for instructions on printing from your computer, direct photo printing...
...Drivers, MP Navigator and the Fax driver. This guide contains the following instructions in detail, as well as an HTML file on how to scan data, various printing methods, and function details. The FAX icon indicates items that are only applicable to use . X How To Use The... Easy-WebPrint, including instructions on the Setup CD-ROM, describes each function in the Easy Setup Instructions, read this guide when starting to MP780. 3 This sheet includes instructions for setting up your machine and getting it ready for instructions on printing from your computer, direct photo printing...
PIXMA MP750/780 Quick Start Guide
Page 7
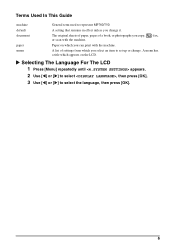
... A list of a book, or photographs you select an item to set up or change it. A menu has a title which you copy, FAX fax, or scan with the machine. document paper The original sheets of paper, pages of settings from which appears on which you change . A setting that remains in effect ...on the LCD. X Selecting The Language For The LCD 1 Press [Menu] repeatedly until appears. 2 Use [W] or [X] to select , then press [OK]. 3 Use [W] or [X] to represent MP780/750. Terms Used In This Guide machine default General term used to select the language, then press [OK]. 6
... A list of a book, or photographs you select an item to set up or change it. A menu has a title which you copy, FAX fax, or scan with the machine. document paper The original sheets of paper, pages of settings from which appears on which you change . A setting that remains in effect ...on the LCD. X Selecting The Language For The LCD 1 Press [Menu] repeatedly until appears. 2 Use [W] or [X] to select , then press [OK]. 3 Use [W] or [X] to represent MP780/750. Terms Used In This Guide machine default General term used to select the language, then press [OK]. 6
PIXMA MP750/780 Quick Start Guide
Page 10
... follows: 110-120V AC, 50/60 Hz or 220-240V AC, 50/60 Hz (depending on the Document Cover when using the Platen Glass to scan thick books. Ink may leak out and stain clothing or the surrounding area. • Never touch the print head. 9 The operating requirement of small children...
... follows: 110-120V AC, 50/60 Hz or 220-240V AC, 50/60 Hz (depending on the Document Cover when using the Platen Glass to scan thick books. Ink may leak out and stain clothing or the surrounding area. • Never touch the print head. 9 The operating requirement of small children...
PIXMA MP750/780 Quick Start Guide
Page 11
...-C modular wall jack is not present, telephone/fax operation is non-exhaustive. See the Appendix for the machine. B. Pre-Installation Requirements For MP780 A. The list provided is not possible. 10 X Legal Limitations On Use Of Your Product And Use Of Images It may be unlawful to... make copies of, scan, print or use reproductions of deposit • Passports • Postage stamps (canceled or uncanceled) • Immigration papers • Identifying badges or...
...-C modular wall jack is not present, telephone/fax operation is non-exhaustive. See the Appendix for the machine. B. Pre-Installation Requirements For MP780 A. The list provided is not possible. 10 X Legal Limitations On Use Of Your Product And Use Of Images It may be unlawful to... make copies of, scan, print or use reproductions of deposit • Passports • Postage stamps (canceled or uncanceled) • Immigration papers • Identifying badges or...
PIXMA MP750/780 Quick Start Guide
Page 20
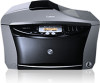
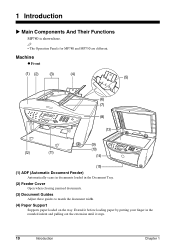
1 Introduction X Main Components And Their Functions MP780 is shown here. • The Operation Panels for MP780 and MP750 are different. Extend it stops. 19 Introduction Chapter 1 Machine z Front (1) (2) (3) (4) (5) (6) (7) (8) (13) (12) (11) (9) (10) (14) (15) (1) ADF (Automatic Document Feeder) Automatically scans in documents loaded in the rounded indent and pulling out the extension until it...
1 Introduction X Main Components And Their Functions MP780 is shown here. • The Operation Panels for MP780 and MP750 are different. Extend it stops. 19 Introduction Chapter 1 Machine z Front (1) (2) (3) (4) (5) (6) (7) (8) (13) (12) (11) (9) (10) (14) (15) (1) ADF (Automatic Document Feeder) Automatically scans in documents loaded in the rounded indent and pulling out the extension until it...
PIXMA MP750/780 Quick Start Guide
Page 21
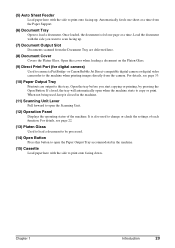
... or printing, by pressing the Open Button. Open the tray before you want to scan facing up . (5) Auto Sheet Feeder Load paper here with the side to print onto facing down. or Canon Bubble Jet Direct-compatible digital camera or digital video camcorder to connect a PictBridge- When...delivered here. (8) Document Cover Covers the Platen Glass. Open this button to open the Paper Output Tray accommodated in the machine. (11) Scanning Unit Lever Pull forward to open when the machine starts to change or check the settings of the machine. Chapter 1 Introduction 20 For details...
... or printing, by pressing the Open Button. Open the tray before you want to scan facing up . (5) Auto Sheet Feeder Load paper here with the side to print onto facing down. or Canon Bubble Jet Direct-compatible digital camera or digital video camcorder to connect a PictBridge- When...delivered here. (8) Document Cover Covers the Platen Glass. Open this button to open the Paper Output Tray accommodated in the machine. (11) Scanning Unit Lever Pull forward to open when the machine starts to change or check the settings of the machine. Chapter 1 Introduction 20 For details...
PIXMA MP750/780 Quick Start Guide
Page 22
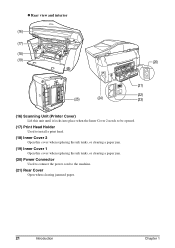
z Rear view and interior (16) (17) (18) (19) (20) (21) (22) (25) (24) (23) (16) Scanning Unit (Printer Cover) Lift this unit until it locks into place when the Inner Cover 2 needs to be opened. (17) Print Head Holder Used to install a print head. (18) Inner Cover 2 Open this cover when replacing the ink tanks, or clearing a paper jam. (19) Inner Cover 1 Open this cover when replacing the ink tanks, or clearing a paper jam. (20) Power Connector Used to connect the power cord to the machine. (21) Rear Cover Open when clearing jammed paper. 21 Introduction Chapter 1
z Rear view and interior (16) (17) (18) (19) (20) (21) (22) (25) (24) (23) (16) Scanning Unit (Printer Cover) Lift this unit until it locks into place when the Inner Cover 2 needs to be opened. (17) Print Head Holder Used to install a print head. (18) Inner Cover 2 Open this cover when replacing the ink tanks, or clearing a paper jam. (19) Inner Cover 1 Open this cover when replacing the ink tanks, or clearing a paper jam. (20) Power Connector Used to connect the power cord to the machine. (21) Rear Cover Open when clearing jammed paper. 21 Introduction Chapter 1
PIXMA MP750/780 Quick Start Guide
Page 23
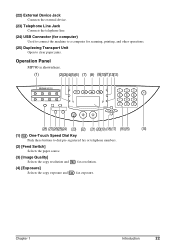
... Jack Connects the telephone line. (24) USB Connector (for computer) Used to connect the machine to a computer for scanning, printing, and other operations. (25) Duplexing Transport Unit Open to clear paper jams. Operation Panel MP780 is shown here. (1) (2)(3)(4)(5)(6) (7) (8) (9)(10)(11)(12)(13) (28) (27)(26)(25)(24) (23) (22) (21) (20)(19...
... Jack Connects the telephone line. (24) USB Connector (for computer) Used to connect the machine to a computer for scanning, printing, and other operations. (25) Duplexing Transport Unit Open to clear paper jams. Operation Panel MP780 is shown here. (1) (2)(3)(4)(5)(6) (7) (8) (9)(10)(11)(12)(13) (28) (27)(26)(25)(24) (23) (22) (21) (20)(19...

PIXMA MP750/780 Quick Start Guide
Page 24
.... Before turning ON the machine, make sure the Scanning Unit is closed. (15) Numeric Keys Enter numerical values such as the number of copies or the image file number. (18) [OK] Selects items in ... if paper jams. Ejects documents remaining in the machine's memory. (6) [COPY] Switches the machine to copy mode. (7) FAX [FAX] Switches the machine to fax mode. (8) [SCAN] Switches the machine to the settings selected. Also changes the mode when entering characters. (17) [W(-)] and [X(+)] Scroll through menu selections, and increase or decrease the...
.... Before turning ON the machine, make sure the Scanning Unit is closed. (15) Numeric Keys Enter numerical values such as the number of copies or the image file number. (18) [OK] Selects items in ... if paper jams. Ejects documents remaining in the machine's memory. (6) [COPY] Switches the machine to copy mode. (7) FAX [FAX] Switches the machine to fax mode. (8) [SCAN] Switches the machine to the settings selected. Also changes the mode when entering characters. (17) [W(-)] and [X(+)] Scroll through menu selections, and increase or decrease the...
PIXMA MP750/780 Quick Start Guide
Page 45
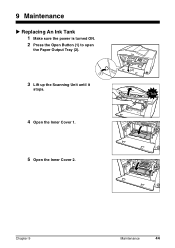
9 Maintenance X Replacing An Ink Tank 1 Make sure the power is turned ON. 2 Press the Open Button (1) to open the Paper Output Tray (2). (1) 3 Lift up the Scanning Unit until it stops. 4 Open the Inner Cover 1. (2) Click 5 Open the Inner Cover 2. Chapter 9 Maintenance 44
9 Maintenance X Replacing An Ink Tank 1 Make sure the power is turned ON. 2 Press the Open Button (1) to open the Paper Output Tray (2). (1) 3 Lift up the Scanning Unit until it stops. 4 Open the Inner Cover 1. (2) Click 5 Open the Inner Cover 2. Chapter 9 Maintenance 44
PIXMA MP750/780 Quick Start Guide
Page 46
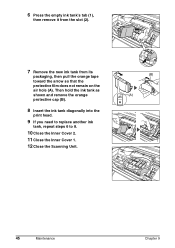
6 Press the empty ink tank's tab (1), then remove it from the slot (2). (2) 7 Remove the new ink tank from its packaging, then pull the orange tape toward the arrow so that the protective film does not remain on the air hole (A). Then hold the ink tank as shown and remove the orange protective cap (B). 8 Insert the ink tank diagonally into the print head. 9 If you need to replace another ink tank, repeat steps 6 to 8. 10 Close the Inner Cover 2. 11 Close the Inner Cover 1. 12 Close the Scanning Unit. (1) (B) (A) 45 Maintenance Chapter 9
6 Press the empty ink tank's tab (1), then remove it from the slot (2). (2) 7 Remove the new ink tank from its packaging, then pull the orange tape toward the arrow so that the protective film does not remain on the air hole (A). Then hold the ink tank as shown and remove the orange protective cap (B). 8 Insert the ink tank diagonally into the print head. 9 If you need to replace another ink tank, repeat steps 6 to 8. 10 Close the Inner Cover 2. 11 Close the Inner Cover 1. 12 Close the Scanning Unit. (1) (B) (A) 45 Maintenance Chapter 9
PIXMA MP750/780 Easy Setup Instructions
Page 1
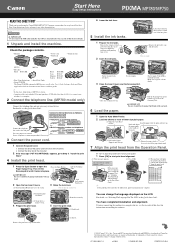
...Scanning Unit firmly with one hand. 2 Open the two Inner Covers. 3 (2) The Print Head Holder moves to press it down firmly. Do not touch! Make sure to the center. IMPORTANT Be sure to a computer for use , please follow these guides. • In this sheet, illustrations of this sheet for purchasing the Canon PIXMA MP780.... 2 Connect the telephone line. (MP780 model only) Connect the telephone line and any other products and brand names are registered trademarks and PIXMA is installed. HT7-0029-000-V.1.0 xx2004A © CANON INC. 2004 PRINTED IN CHINA IMPORTANT ...
...Scanning Unit firmly with one hand. 2 Open the two Inner Covers. 3 (2) The Print Head Holder moves to press it down firmly. Do not touch! Make sure to the center. IMPORTANT Be sure to a computer for use , please follow these guides. • In this sheet, illustrations of this sheet for purchasing the Canon PIXMA MP780.... 2 Connect the telephone line. (MP780 model only) Connect the telephone line and any other products and brand names are registered trademarks and PIXMA is installed. HT7-0029-000-V.1.0 xx2004A © CANON INC. 2004 PRINTED IN CHINA IMPORTANT ...


