PIXMA MP750/780 Quick Start Guide
Page 22
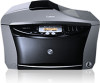
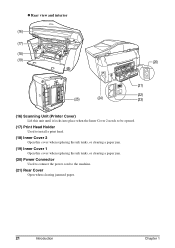
z Rear view and interior (16) (17) (18) (19) (20) (21) (22) (25) (24) (23) (16) Scanning Unit (Printer Cover) Lift this unit until it locks into place when the Inner Cover 2 needs to be opened. (17) Print Head Holder Used to install a print head. (18) Inner Cover 2 Open this cover when replacing the ink tanks, or clearing a paper jam. (19) Inner Cover 1 Open this cover when replacing the ink tanks, or clearing a paper jam. (20) Power Connector Used to connect the power cord to the machine. (21) Rear Cover Open when clearing jammed paper. 21 Introduction Chapter 1
z Rear view and interior (16) (17) (18) (19) (20) (21) (22) (25) (24) (23) (16) Scanning Unit (Printer Cover) Lift this unit until it locks into place when the Inner Cover 2 needs to be opened. (17) Print Head Holder Used to install a print head. (18) Inner Cover 2 Open this cover when replacing the ink tanks, or clearing a paper jam. (19) Inner Cover 1 Open this cover when replacing the ink tanks, or clearing a paper jam. (20) Power Connector Used to connect the power cord to the machine. (21) Rear Cover Open when clearing jammed paper. 21 Introduction Chapter 1
PIXMA MP750/780 Easy Setup Instructions
Page 1
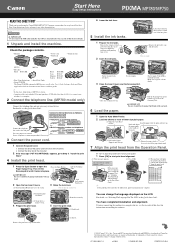
... Then lift the Scanning Unit until it locks into place. Pull the Scanning Unit Lever. Raise this sheet for purchasing the Canon PIXMA MP780/750. Remove the protective cap and discard it . Pull the Scanning Unit Lever towards you for details. 1 Unpack and ..."Install the print head." 4 Install the print head. 1 Press the Open Button to start print head alignment. (1) This message appears. (2) Press [OK]. Specifications subject to change the language displayed on installing the software. © 2004 Canon U.S.A., Inc., Canon and BCI are shown. • A printer cable is not ...
... Then lift the Scanning Unit until it locks into place. Pull the Scanning Unit Lever. Raise this sheet for purchasing the Canon PIXMA MP780/750. Remove the protective cap and discard it . Pull the Scanning Unit Lever towards you for details. 1 Unpack and ..."Install the print head." 4 Install the print head. 1 Press the Open Button to start print head alignment. (1) This message appears. (2) Press [OK]. Specifications subject to change the language displayed on installing the software. © 2004 Canon U.S.A., Inc., Canon and BCI are shown. • A printer cable is not ...


