
Quick Start Guide
Page 5
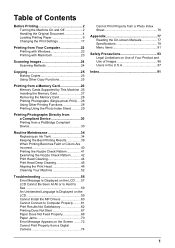
Table of Contents Before Printing 2 Turning the Machine On and Off 2 Handling the Original Document 4 Loading Printing Paper 6 Changing the Print Settings 17 Printing from Your Computer 22 Printing with Windows ...
Table of Contents Before Printing 2 Turning the Machine On and Off 2 Handling the Original Document 4 Loading Printing Paper 6 Changing the Print Settings 17 Printing from Your Computer 22 Printing with Windows ...
Quick Start Guide
Page 6
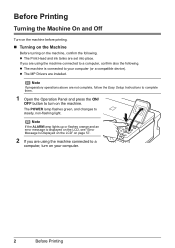
...Before Printing The POWER lamp flashes green, and changes to a computer, turn on the machine. Before Printing Turning the Machine On and Off Turn on the machine before printing. „ Turning on the Machine Before turning on the machine, confirm the following . If you are using the ...machine connected to turn on your computer (or a compatible device). z The Print...
...Before Printing The POWER lamp flashes green, and changes to a computer, turn on the machine. Before Printing Turning the Machine On and Off Turn on the machine before printing. „ Turning on the Machine Before turning on the machine, confirm the following . If you are using the ...machine connected to turn on your computer (or a compatible device). z The Print...

Quick Start Guide
Page 7
..." on page 39. You cannot change the wait time before the LCD goes out. Before Printing 3 When the POWER lamp stops flashing, the machine is turned off the machine, be sure to confirm that the POWER lamp is not lit. Important About the Power Plug When removing the power plug after... is removed from the wall outlet with the POWER lamp still lit or flashing green, the machine may become unable to restore the display. „ Turning off the Machine 1 To turn off the machine, press the ON/OFF button.
..." on page 39. You cannot change the wait time before the LCD goes out. Before Printing 3 When the POWER lamp stops flashing, the machine is turned off the machine, be sure to confirm that the POWER lamp is not lit. Important About the Power Plug When removing the power plug after... is removed from the wall outlet with the POWER lamp still lit or flashing green, the machine may become unable to restore the display. „ Turning off the Machine 1 To turn off the machine, press the ON/OFF button.
Quick Start Guide
Page 12
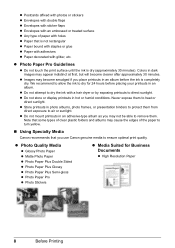
...with double flaps z Envelopes with sticker flaps z Envelopes with an embossed or treated surface z Any type of the paper to turn yellow. „ Using Specialty Media Canon recommends that is dry (approximately 30 minutes). We recommend to allow the ink to dry for Business Documents z High Resolution ...mount printouts in photo albums, photo frames, or presentation binders to protect them . z Store printouts in an adhesive-type album as you use Canon genuine media to ensure optimal print quality. z Do not attempt to dry the ink with glitter, etc. z Photo Paper Pro Guidelines z ...
...with double flaps z Envelopes with sticker flaps z Envelopes with an embossed or treated surface z Any type of the paper to turn yellow. „ Using Specialty Media Canon recommends that is dry (approximately 30 minutes). We recommend to allow the ink to dry for Business Documents z High Resolution ...mount printouts in photo albums, photo frames, or presentation binders to protect them . z Store printouts in an adhesive-type album as you use Canon genuine media to ensure optimal print quality. z Do not attempt to dry the ink with glitter, etc. z Photo Paper Pro Guidelines z ...
Quick Start Guide
Page 26
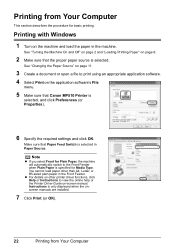
..., click Help or Instructions to view the online help or the Printer Driver Guide on the application software's File menu. 5 Make sure that Canon MP510 Printer is selected, and click Preferences (or Properties). 6 Specify the required settings and click OK. z For details on other than A4, Letter... document or open a file to the Front Feeder when Plain Paper is selected in Paper Source. Printing from Your Computer Printing with Windows 1 Turn on page 6. 2 Make sure that Paper Feed Switch is specified for Plain Paper, the machine will automatically switch to print using an appropriate ...
..., click Help or Instructions to view the online help or the Printer Driver Guide on the application software's File menu. 5 Make sure that Canon MP510 Printer is selected, and click Preferences (or Properties). 6 Specify the required settings and click OK. z For details on other than A4, Letter... document or open a file to the Front Feeder when Plain Paper is selected in Paper Source. Printing from Your Computer Printing with Windows 1 Turn on page 6. 2 Make sure that Paper Feed Switch is specified for Plain Paper, the machine will automatically switch to print using an appropriate ...
Quick Start Guide
Page 27
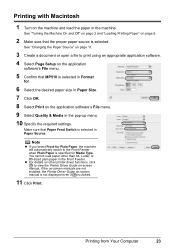
See "Turning the Machine On and Off" on page 2 and "Loading Printing Paper" on page 6. 2 Make sure that the proper paper source is specified for Media Type. Make sure that MP510 is clicked. 11 Click Print. You cannot load paper other printer driver functions, click to the Front Feeder when Plain Paper is... if is selected in Format for Plain Paper, the machine will automatically switch to view the Printer Driver Guide on-screen manual. Printing with Macintosh 1 Turn on the machine and load the paper in the pop-up menu. 10 Specify the required settings.
See "Turning the Machine On and Off" on page 2 and "Loading Printing Paper" on page 6. 2 Make sure that the proper paper source is specified for Media Type. Make sure that MP510 is clicked. 11 Click Print. You cannot load paper other printer driver functions, click to the Front Feeder when Plain Paper is... if is selected in Format for Plain Paper, the machine will automatically switch to view the Printer Driver Guide on-screen manual. Printing with Macintosh 1 Turn on the machine and load the paper in the pop-up menu. 10 Specify the required settings.
Quick Start Guide
Page 28
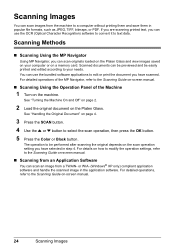
..., refer to select the scan operation, then press the OK button. 5 Press the Color or Black button. For detailed operations of the Machine 1 Turn on the machine. For detailed operations, refer to the Scanning Guide on-screen manual. „ Scanning from an Application Software You can scan an image...on a memory card. For details on how to modify the operation settings, refer to the Scanning Guide on-screen manual. 24 Scanning Images See "Turning the Machine On and Off" on page 2. 2 Load the original document on the Platen Glass. The operation to be easily printed and edited according...
..., refer to select the scan operation, then press the OK button. 5 Press the Color or Black button. For detailed operations of the Machine 1 Turn on the machine. For detailed operations, refer to the Scanning Guide on-screen manual. „ Scanning from an Application Software You can scan an image...on a memory card. For details on how to modify the operation settings, refer to the Scanning Guide on-screen manual. 24 Scanning Images See "Turning the Machine On and Off" on page 2. 2 Load the original document on the Platen Glass. The operation to be easily printed and edited according...

Quick Start Guide
Page 29
.... (1) Page size, media type, image quality, magnification The settings you can select from 4" x 6" / 101.6 x 152.4 mm photos or graphics using Canon sticker paper. Borderless Copy Copies color images so that the proper paper source is displayed. (3) (2) Number of copies Use the { or } button to specify ...screen (2) of copies. (3) Intensity Press the [ button to decrease the intensity and the ] button to make copies. 1 Turn on the machine, and load the printing paper. See "Turning the Machine On and Off" on page 2 and "Loading Printing Paper" on page 4. 5 Press the Color button for...
.... (1) Page size, media type, image quality, magnification The settings you can select from 4" x 6" / 101.6 x 152.4 mm photos or graphics using Canon sticker paper. Borderless Copy Copies color images so that the proper paper source is displayed. (3) (2) Number of copies Use the { or } button to specify ...screen (2) of copies. (3) Intensity Press the [ button to decrease the intensity and the ] button to make copies. 1 Turn on the machine, and load the printing paper. See "Turning the Machine On and Off" on page 2 and "Loading Printing Paper" on page 4. 5 Press the Color button for...

Quick Start Guide
Page 31
Inserting the Memory Card 1 Turn on page 2. 2 Open the Card Slot Cover. 3 Insert one and only one memory card into the Card Slot. z SmartMedia Lights up Insert into the left .... Printing from a Memory Card 27 Card Type z Compact Flash (CF) card z Microdrive z xD-Picture card* Inserting Card Lights up . 5 Close the Card Slot Cover. See "Turning the Machine On and Off" on the machine. z MEMORY STICK z MEMORY STICK PRO z MEMORY STICK Duo* z MEMORY STICK PRO Duo* z SD Secure Digital memory card...
Inserting the Memory Card 1 Turn on page 2. 2 Open the Card Slot Cover. 3 Insert one and only one memory card into the Card Slot. z SmartMedia Lights up Insert into the left .... Printing from a Memory Card 27 Card Type z Compact Flash (CF) card z Microdrive z xD-Picture card* Inserting Card Lights up . 5 Close the Card Slot Cover. See "Turning the Machine On and Off" on the machine. z MEMORY STICK z MEMORY STICK PRO z MEMORY STICK Duo* z MEMORY STICK PRO Duo* z SD Secure Digital memory card...
Quick Start Guide
Page 32
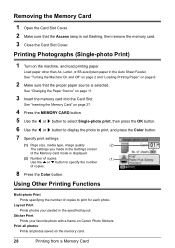
... the number of copies. 8 Press the Color button. See "Inserting the Memory Card" on page 11. 3 Insert the memory card into the Card Slot. See "Turning the Machine On and Off" on page 2 and "Loading Printing Paper" on the memory card. 28 Printing from a Memory Card Layout Print Prints photos your.... 2 Make sure that the proper paper source is not flashing, then remove the memory card. 3 Close the Card Slot Cover. Printing Photographs (Single-photo Print) 1 Turn on Canon Photo Stickers. Sticker Print Prints your pasted in the Auto Sheet Feeder.
... the number of copies. 8 Press the Color button. See "Inserting the Memory Card" on page 11. 3 Insert the memory card into the Card Slot. See "Turning the Machine On and Off" on page 2 and "Loading Printing Paper" on the memory card. 28 Printing from a Memory Card Layout Print Prints photos your.... 2 Make sure that the proper paper source is not flashing, then remove the memory card. 3 Close the Card Slot Cover. Printing Photographs (Single-photo Print) 1 Turn on Canon Photo Stickers. Sticker Print Prints your pasted in the Auto Sheet Feeder.
Quick Start Guide
Page 33
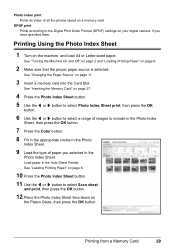
See "Turning the Machine On and Off" on page 2 and "Loading Printing Paper" on page 11. 3 Insert a memory card into the Card Slot. Printing from a Memory Card ... Prints according to the Digital Print Order Format (DPOF) settings on the Platen Glass, then press the OK button. Printing Using the Photo Index Sheet 1 Turn on page 6. 10 Press the Photo Index Sheet button. 11 Use the [ or ] button to include in the Photo Index Sheet, then press the OK...
See "Turning the Machine On and Off" on page 2 and "Loading Printing Paper" on page 11. 3 Insert a memory card into the Card Slot. Printing from a Memory Card ... Prints according to the Digital Print Order Format (DPOF) settings on the Platen Glass, then press the OK button. Printing Using the Photo Index Sheet 1 Turn on page 6. 10 Press the Photo Index Sheet button. 11 Use the [ or ] button to include in the Photo Index Sheet, then press the OK...
Quick Start Guide
Page 34
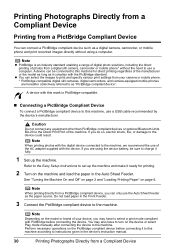
...photos with the digital device connected to the machine, we recommend the use the Auto Sheet Feeder as "PictBridge compliant device". See "Turning the Machine On and Off" on page 2 and "Loading Printing Paper" on the PictBridge compliant device before connecting the device. ... Device Printing from a digital still camera, camcorder or mobile phone* without using the device battery, be connected to this machine for printing. 2 Turn on the machine and load the paper in the Auto Sheet Feeder. Note z PictBridge is PictBridge-compatible. „ Connecting a PictBridge Compliant Device ...
...photos with the digital device connected to the machine, we recommend the use the Auto Sheet Feeder as "PictBridge compliant device". See "Turning the Machine On and Off" on page 2 and "Loading Printing Paper" on the PictBridge compliant device before connecting the device. ... Device Printing from a digital still camera, camcorder or mobile phone* without using the device battery, be connected to this machine for printing. 2 Turn on the machine and load the paper in the Auto Sheet Feeder. Note z PictBridge is PictBridge-compatible. „ Connecting a PictBridge Compliant Device ...

Quick Start Guide
Page 35
... brand or model of the machine are given according to those used in the Memory card mode of your device does not turn on automatically, turn it on automatically. This section describes the page size, media type, layout, image optimization modes, and date printing mode that...When operating the device, be available on the PictBridge compliant device, the Page size and the Media type settings specified in Canon-brand PictBridge compliant devices. The device turns on manually. (3) Set up the PictBridge compliant device for the setting item. * In the following description, names of...
... brand or model of the machine are given according to those used in the Memory card mode of your device does not turn on automatically, turn it on automatically. This section describes the page size, media type, layout, image optimization modes, and date printing mode that...When operating the device, be available on the PictBridge compliant device, the Page size and the Media type settings specified in Canon-brand PictBridge compliant devices. The device turns on manually. (3) Set up the PictBridge compliant device for the setting item. * In the following description, names of...
Quick Start Guide
Page 40
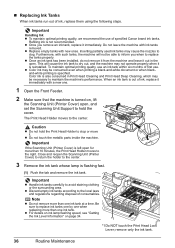
...Getting the Ink Level Information" on , lift the Scanning Unit (Printer Cover) open . „ Replacing Ink Tanks When ink tanks run out of specified Canon brand ink tanks. z Once you when to replace ink tanks one by one when replacing more than one ink tank at a time. Furthermore, with new... not leave the machine with a new one ink tank. Important Handling Ink z To maintain optimal printing quality, we recommend the use . Color ink is turned on page 34. *1 *1 Do NOT touch the Print Head Lock Lever; z Discard empty ink tanks according to the center. Refilling ink is reinstalled. ...
...Getting the Ink Level Information" on , lift the Scanning Unit (Printer Cover) open . „ Replacing Ink Tanks When ink tanks run out of specified Canon brand ink tanks. z Once you when to replace ink tanks one by one when replacing more than one ink tank at a time. Furthermore, with new... not leave the machine with a new one ink tank. Important Handling Ink z To maintain optimal printing quality, we recommend the use . Color ink is turned on page 34. *1 *1 Do NOT touch the Print Head Lock Lever; z Discard empty ink tanks according to the center. Refilling ink is reinstalled. ...
Quick Start Guide
Page 43
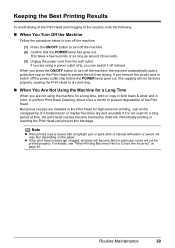
...drying of the Print Head and clogging of the nozzles, note the following. „ When You Turn Off the Machine Follow the procedure below to turn off the machine. (1) Press the ON/OFF button to turn off the power outlet strip before the POWER lamp goes out, this blockage. This takes a ...Print Head for a long time, print or copy in both black & white and in color, or perform Print Head Cleaning, about once a month to turn off instead. Numerous nozzles are not using a power outlet strip, you can prevent this capping will become blocked by dried ink. Routine Maintenance 39 z ...
...drying of the Print Head and clogging of the nozzles, note the following. „ When You Turn Off the Machine Follow the procedure below to turn off the machine. (1) Press the ON/OFF button to turn off the power outlet strip before the POWER lamp goes out, this blockage. This takes a ...Print Head for a long time, print or copy in both black & white and in color, or perform Print Head Cleaning, about once a month to turn off instead. Numerous nozzles are not using a power outlet strip, you can prevent this capping will become blocked by dried ink. Routine Maintenance 39 z ...
Quick Start Guide
Page 45
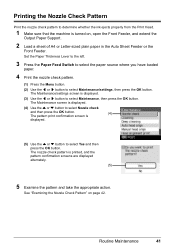
.../settings screen is displayed. (5) Use the { or } button to select Yes and then press the OK button. Routine Maintenance 41 The nozzle check pattern is turned on page 42. Printing the Nozzle Check Pattern Print the nozzle check pattern to determine whether the ink ejects properly from the Print Head. 1 Make...
.../settings screen is displayed. (5) Use the { or } button to select Yes and then press the OK button. Routine Maintenance 41 The nozzle check pattern is turned on page 42. Printing the Nozzle Check Pattern Print the nozzle check pattern to determine whether the ink ejects properly from the Print Head. 1 Make...

Quick Start Guide
Page 48
... button. The nozzle check pattern is displayed. (4) (5) Use the { or } button to select Maintenance/settings, then press the OK button. The Maintenance/settings screen is turned on page 42. 44 Routine Maintenance The confirmation screen is printed. 5 Check the print head condition with the printed nozzle check pattern, and take appropriate...
... button. The nozzle check pattern is displayed. (4) (5) Use the { or } button to select Maintenance/settings, then press the OK button. The Maintenance/settings screen is turned on page 42. 44 Routine Maintenance The confirmation screen is printed. 5 Check the print head condition with the printed nozzle check pattern, and take appropriate...
Quick Start Guide
Page 50
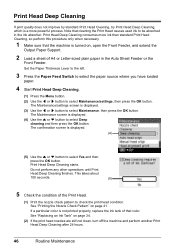
... } button to be absorbed in the Auto Sheet Feeder or the Front Feeder. Print Head Deep Cleaning consumes more powerful process. The Maintenance screen is turned on, open the Front Feeder, and extend the Output Paper Support. 2 Load a sheet of the Print Head. (1) Print the nozzle check pattern to ...plain paper in the ink absorber. See "Printing the Nozzle Check Pattern" on page 34. (2) If the print head nozzles are still not clean, turn off the machine and perform another Print Head Deep Cleaning after 24 hours. 46 Routine Maintenance See "Replacing an Ink Tank" on page 41. Set...
... } button to be absorbed in the Auto Sheet Feeder or the Front Feeder. Print Head Deep Cleaning consumes more powerful process. The Maintenance screen is turned on, open the Front Feeder, and extend the Output Paper Support. 2 Load a sheet of the Print Head. (1) Print the nozzle check pattern to ...plain paper in the ink absorber. See "Printing the Nozzle Check Pattern" on page 34. (2) If the print head nozzles are still not clean, turn off the machine and perform another Print Head Deep Cleaning after 24 hours. 46 Routine Maintenance See "Replacing an Ink Tank" on page 41. Set...
Quick Start Guide
Page 52
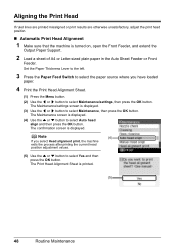
... displayed. The confirmation screen is displayed. (4) Use the { or } button to select Maintenance/settings, then press the OK button. The Print Head Alignment Sheet is turned on, open the Front Feeder, and extend the Output Paper Support. 2 Load a sheet of A4 or Letter-sized plain paper in the Auto Sheet Feeder...
... displayed. The confirmation screen is displayed. (4) Use the { or } button to select Maintenance/settings, then press the OK button. The Print Head Alignment Sheet is turned on, open the Front Feeder, and extend the Output Paper Support. 2 Load a sheet of A4 or Letter-sized plain paper in the Auto Sheet Feeder...
Quick Start Guide
Page 53
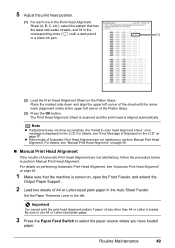
... the procedure below to the left. Important You cannot print the print head alignment pattern if paper of size other than A4 or Letter is turned on the LCD. error message is aligned automatically. The Print Head Alignment Sheet is scanned and the print head is displayed on , open the Front...
... the procedure below to the left. Important You cannot print the print head alignment pattern if paper of size other than A4 or Letter is turned on the LCD. error message is aligned automatically. The Print Head Alignment Sheet is scanned and the print head is displayed on , open the Front...


