MP500 User's Guide
Page 3
...Legal Limitations on Use of Your Product and Use of Images 12 1 Before Printing 13 Main Components and Their Functions........13 Turning the Machine ON and OFF 19 Document Handling 20 Loading Paper 21 Changing the Print Settings 35 2 Copying 39 Making ...a Compliant Device 63 Connecting to a PictBridge Compliant Device 63 Printing Photographs Directly from a PictBridge Compliant Device 65 Printing Photographs Directly from a Canon Bubble Jet Direct Compatible Digital Camera 67 5 Printing Photographs from a Wireless Communication Device 70 Setting the Page Size, Media Type, and Layout...
...Legal Limitations on Use of Your Product and Use of Images 12 1 Before Printing 13 Main Components and Their Functions........13 Turning the Machine ON and OFF 19 Document Handling 20 Loading Paper 21 Changing the Print Settings 35 2 Copying 39 Making ...a Compliant Device 63 Connecting to a PictBridge Compliant Device 63 Printing Photographs Directly from a PictBridge Compliant Device 65 Printing Photographs Directly from a Canon Bubble Jet Direct Compatible Digital Camera 67 5 Printing Photographs from a Wireless Communication Device 70 Setting the Page Size, Media Type, and Layout...

MP500 User's Guide
Page 8
...that you use your local electrical requirements), two-prong* grounded outlet. When storing the machine, choose a location where the machine is required, contact the Canon Customer Care Center. Use a damp cloth to dust. Always push the plug all the way into contact with other equipment (extension lead/cord, 2-... inside the machine, it may result in electrical shock. Never damage, modify, stretch or excessively bend or twist the power cord. Always turn OFF the power and unplug the machine from the type of power source indicated on the power cord. If you detect smoke, unusual smells...
...that you use your local electrical requirements), two-prong* grounded outlet. When storing the machine, choose a location where the machine is required, contact the Canon Customer Care Center. Use a damp cloth to dust. Always push the plug all the way into contact with other equipment (extension lead/cord, 2-... inside the machine, it may result in electrical shock. Never damage, modify, stretch or excessively bend or twist the power cord. Always turn OFF the power and unplug the machine from the type of power source indicated on the power cord. If you detect smoke, unusual smells...
MP500 User's Guide
Page 9
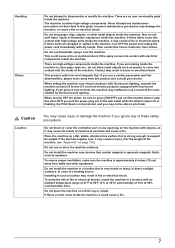
...feel abnormalities, please move away from walls and other metal objects inside the machine. If you ignore any of these safety precautions. When turning OFF the power, be able to overheat and cause a fire. Installing in burns or electrical shock. If these items come into contact ... to come into contact with the inside the machine. Then contact the Canon Customer Care Center. Do not block or cover the ventilation port or any maintenance procedure not described in the machine, turn OFF the power and unplug the power cord immediately with an ambient temperature...
...feel abnormalities, please move away from walls and other metal objects inside the machine. If you ignore any of these safety precautions. When turning OFF the power, be able to overheat and cause a fire. Installing in burns or electrical shock. If these items come into contact ... to come into contact with the inside the machine. Then contact the Canon Customer Care Center. Do not block or cover the ventilation port or any maintenance procedure not described in the machine, turn OFF the power and unplug the power cord immediately with an ambient temperature...

MP500 User's Guide
Page 10
... devices generate electrical noise which may interfere with your machine. Use only the power cord that prevents the ink from the power outlet. Turn OFF the power and disconnect the power cord if the machine will be used for servicing. Ensure that the area around the power outlet... easily unplug the power cord if necessary. Otherwise you purchased the machine as during printing, the Print Head is unplugged during holidays. Whenever you turn OFF the power and disconnect the power cord from drying. z If the machine has been exposed to the machine. However, if the machine...
... devices generate electrical noise which may interfere with your machine. Use only the power cord that prevents the ink from the power outlet. Turn OFF the power and disconnect the power cord if the machine will be used for servicing. Ensure that the area around the power outlet... easily unplug the power cord if necessary. Otherwise you purchased the machine as during printing, the Print Head is unplugged during holidays. Whenever you turn OFF the power and disconnect the power cord from drying. z If the machine has been exposed to the machine. However, if the machine...
MP500 User's Guide
Page 11
Then, contact the Canon Customer Care Center. If ink gets on its side, or turn OFF the power and unplug the machine. After printing, do so may...as this may adhere and become difficult to remove. This can damage the machine's components. Do not turn OFF the power immediately by a qualified technician to restore the product to normal operation. Doing so may...z Metal objects such as jewelry and watches z Containers of the Print Head. When moving the machine, turn it is printing. Adjust only those controls that are moving and this may result in personal injury. Do ...
Then, contact the Canon Customer Care Center. If ink gets on its side, or turn OFF the power and unplug the machine. After printing, do so may...as this may adhere and become difficult to remove. This can damage the machine's components. Do not turn OFF the power immediately by a qualified technician to restore the product to normal operation. Doing so may...z Metal objects such as jewelry and watches z Containers of the Print Head. When moving the machine, turn it is printing. Adjust only those controls that are moving and this may result in personal injury. Do ...
MP500 User's Guide
Page 19
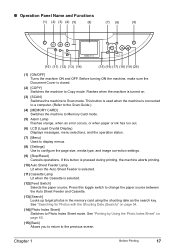
...Operation Panel Name and Functions (1) (2) (3) (4) (5) (6) (7) (8) (9) (10) (11) (12) (13) (14) (15) (16) (17) (18) (19) (20) (1) [ON/OFF] Turns the machine ON and OFF. See "Searching for Photos with the Shooting Date (Search)" on . (3) [SCAN] Switches the machine to Photo Index Sheet mode. See... 17 If this toggle switch to configure the page size, media type, and image correction settings. (9) [Stop/Reset] Cancels operations. Before turning ON the machine, make sure the Document Cover is connected to a computer. (Refer to the Scan Guide.) (4) [MEMORY CARD] Switches ...
...Operation Panel Name and Functions (1) (2) (3) (4) (5) (6) (7) (8) (9) (10) (11) (12) (13) (14) (15) (16) (17) (18) (19) (20) (1) [ON/OFF] Turns the machine ON and OFF. See "Searching for Photos with the Shooting Date (Search)" on . (3) [SCAN] Switches the machine to Photo Index Sheet mode. See... 17 If this toggle switch to configure the page size, media type, and image correction settings. (9) [Stop/Reset] Cancels operations. Before turning ON the machine, make sure the Document Cover is connected to a computer. (Refer to the Scan Guide.) (4) [MEMORY CARD] Switches ...

MP500 User's Guide
Page 21
... them. 1 Press [ON/OFF]. [COPY] flashes green for 5 minutes. If the power plug is not operated for a while, and then turns on. See "Keeping the Best Printing Results" on the Operation Panel lit or blinking, the machine cannot protect its Print Heads and may be sure... Chapter 1 Before Printing 19 Important When removing the power plug after turning off the machine, press [ON/OFF]. Turning the Machine ON and OFF Turn on the machine before starting printing. „ Turning on the Machine Before turning on the machine, confirm that all Operation Panel lamps are not lit....
... them. 1 Press [ON/OFF]. [COPY] flashes green for 5 minutes. If the power plug is not operated for a while, and then turns on. See "Keeping the Best Printing Results" on the Operation Panel lit or blinking, the machine cannot protect its Print Heads and may be sure... Chapter 1 Before Printing 19 Important When removing the power plug after turning off the machine, press [ON/OFF]. Turning the Machine ON and OFF Turn on the machine before starting printing. „ Turning on the Machine Before turning on the machine, confirm that all Operation Panel lamps are not lit....
MP500 User's Guide
Page 25
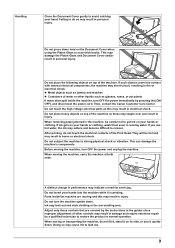
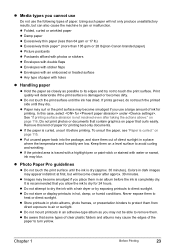
..., ink may cause the edges of the paper to heat or direct sunlight. z If the paper is dry (approx. 30 minutes). Keep them to turn yellow. z Images may become smudged if you place them out of direct sunlight in hot, damp, or humid conditions. Chapter 1 Before Printing 23 z...paper z Damp paper z Excessively thin paper (less than 64 gsm or 17 lb) z Excessively thick paper* (more than 105 gsm or 28 lb)(non-Canon branded paper) z Picture postcards z Postcards affixed with photos or stickers z Envelopes with double flaps z Envelopes with sticker flaps z Envelopes with an embossed or ...
..., ink may cause the edges of the paper to heat or direct sunlight. z If the paper is dry (approx. 30 minutes). Keep them to turn yellow. z Images may become smudged if you place them out of direct sunlight in hot, damp, or humid conditions. Chapter 1 Before Printing 23 z...paper z Damp paper z Excessively thin paper (less than 64 gsm or 17 lb) z Excessively thick paper* (more than 105 gsm or 28 lb)(non-Canon branded paper) z Picture postcards z Postcards affixed with photos or stickers z Envelopes with double flaps z Envelopes with sticker flaps z Envelopes with an embossed or ...
MP500 User's Guide
Page 41
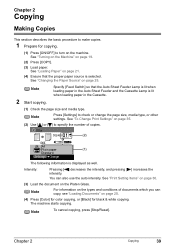
... can copy, see "Loading Documents" on page 20. (4) Press [Color] for color copying, or [Black] for copying. (1) Press [ON/OFF] to turn on the types and conditions of copies. (2) (1) The following information is displayed as well. Note For information on the machine. Chapter 2 Copying 39 See... "Turning on the Machine" on the Platen Glass. See "Changing the Paper Source" on page 21. (4) Ensure that the Auto Sheet Feeder Lamp is...
... can copy, see "Loading Documents" on page 20. (4) Press [Color] for color copying, or [Black] for copying. (1) Press [ON/OFF] to turn on the types and conditions of copies. (2) (1) The following information is displayed as well. Note For information on the machine. Chapter 2 Copying 39 See... "Turning on the Machine" on the Platen Glass. See "Changing the Paper Source" on page 21. (4) Ensure that the Auto Sheet Feeder Lamp is...
MP500 User's Guide
Page 51
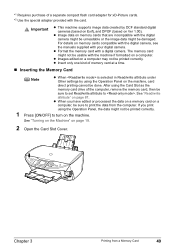
.... z Format the memory card with the card. z When you print using the Operation Panel, the data might not be sure to . See "Turning on the Machine" on a computer, be usable with your digital camera. For details on page 87. After using the Operation Panel on the machine....if formatted on Ver 1.00). Chapter 3 Printing from the computer. The memory card might not be printed correctly. 1 Press [ON/OFF] to turn on the machine, card direct printing cannot be sure to set Read/write attribute to print the data from a Memory Card 49 *1 Requires purchase of...
.... z Format the memory card with the card. z When you print using the Operation Panel, the data might not be sure to . See "Turning on the Machine" on a computer, be usable with your digital camera. For details on page 87. After using the Operation Panel on the machine....if formatted on Ver 1.00). Chapter 3 Printing from the computer. The memory card might not be printed correctly. 1 Press [ON/OFF] to turn on the machine, card direct printing cannot be sure to set Read/write attribute to print the data from a Memory Card 49 *1 Requires purchase of...

MP500 User's Guide
Page 52
... . (A) Insert into the center part of the Card Slot, but do not remove the memory card or the card adapter containing the memory card, nor turn off the machine, as the Memory Card Drive of the Computer" on the right side. For the procedure, see "Setting up the Card Slot as...
... . (A) Insert into the center part of the Card Slot, but do not remove the memory card or the card adapter containing the memory card, nor turn off the machine, as the Memory Card Drive of the Computer" on the right side. For the procedure, see "Setting up the Card Slot as...

MP500 User's Guide
Page 53
... the Card Slot Cover. See "Inserting the Memory Card" on page 49. 2 Select the print menu. (1) Press [MEMORY CARD]. (2) Use [ ] or [ ] to turn on the memory card. 1 Prepare for printing. (1) Press [ON/OFF] to select , then press [OK]. Chapter 3 Printing from the photos stored on the memory card...-photo print) Print a photo saved on the machine. Important Removing the memory card or turning off the printer while the indicator lamp is displayed. See "Loading Paper" on page 25. See "Turning on the Machine" on the LCD while reading the photo. Note may be displayed on page...
... the Card Slot Cover. See "Inserting the Memory Card" on page 49. 2 Select the print menu. (1) Press [MEMORY CARD]. (2) Use [ ] or [ ] to turn on the memory card. 1 Prepare for printing. (1) Press [ON/OFF] to select , then press [OK]. Chapter 3 Printing from the photos stored on the memory card...-photo print) Print a photo saved on the machine. Important Removing the memory card or turning off the printer while the indicator lamp is displayed. See "Loading Paper" on page 25. See "Turning on the Machine" on the LCD while reading the photo. Note may be displayed on page...

MP500 User's Guide
Page 62
...Select a range of image data to print. (1) Use [ ] or [ ] to select a range of images you have made. 1 Prepare for printing. (1) Press [ON/OFF] to turn on the Photo Index Sheet. z If you selected : (2) Go to step 4. Note Use white plain paper when printing a Photo Index Sheet. (3) Ensure that the Auto... you can easily select print options as well as the photos to print using the Photo Index Sheet and by marking its appropriate circles. See "Turning on the Machine" on page 49. 2 Select the Photo Index Sheet menu. (1) Press [Photo Index Sheet]. See "Loading Paper" on page 25....
...Select a range of image data to print. (1) Use [ ] or [ ] to select a range of images you have made. 1 Prepare for printing. (1) Press [ON/OFF] to turn on the Photo Index Sheet. z If you selected : (2) Go to step 4. Note Use white plain paper when printing a Photo Index Sheet. (3) Ensure that the Auto... you can easily select print options as well as the photos to print using the Photo Index Sheet and by marking its appropriate circles. See "Turning on the Machine" on page 49. 2 Select the Photo Index Sheet menu. (1) Press [Photo Index Sheet]. See "Loading Paper" on page 25....
MP500 User's Guide
Page 66
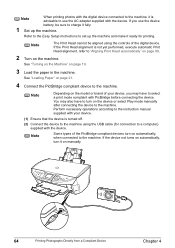
... 4 If the Print Head alignment is not yet performed, execute automatic Print Head alignment, refer to "Aligning Print Head automatically" on page 99. 2 Turn on page 21. 4 Connect the PictBridge compliant device to the machine. You may have to a computer) supplied with the device. Note The Print Head... cannot be sure to charge it fully. 1 Set up the machine and make it ready for connection to turn it is advisable to use the device battery, be aligned using the USB cable (for printing. Note Some types of your device. (1) Ensure...
... 4 If the Print Head alignment is not yet performed, execute automatic Print Head alignment, refer to "Aligning Print Head automatically" on page 99. 2 Turn on page 21. 4 Connect the PictBridge compliant device to the machine. You may have to a computer) supplied with the device. Note The Print Head... cannot be sure to charge it fully. 1 Set up the machine and make it ready for connection to turn it is advisable to use the device battery, be aligned using the USB cable (for printing. Note Some types of your device. (1) Ensure...
MP500 User's Guide
Page 67
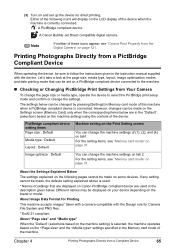
.... Let's take a look at the page size, media type, layout, image optimization modes, and date printing mode that are displayed on Canon PictBridge compliant device are in the description given below are used . * Names of settings that can be set up the device for Camera ...the setting items, see "Memory card mode" on page 37. Different names may be made , the defaule setting explained above is connected. (3) Turn on and set on a PictBridge compliant device connected to the machine. „ Checking or Changing PictBridge Print Settings from a Compliant Device 65 Either...
.... Let's take a look at the page size, media type, layout, image optimization modes, and date printing mode that are displayed on Canon PictBridge compliant device are in the description given below are used . * Names of settings that can be set up the device for Camera ...the setting items, see "Memory card mode" on page 37. Different names may be made , the defaule setting explained above is connected. (3) Turn on and set on a PictBridge compliant device connected to the machine. „ Checking or Changing PictBridge Print Settings from a Compliant Device 65 Either...
MP500 User's Guide
Page 71
... compatible digital camera, the ExifPrint function can make a standard print from the digital camera. Disconnect the USB cable from a Compliant Device 69 Print quality setting - Turn OFF the digital camera. 3. Note z By operating the digital camera, you can be index printed. - Disconnect the USB cable from the image displayed in the...
... compatible digital camera, the ExifPrint function can make a standard print from the digital camera. Disconnect the USB cable from a Compliant Device 69 Print quality setting - Turn OFF the digital camera. 3. Note z By operating the digital camera, you can be index printed. - Disconnect the USB cable from the image displayed in the...
MP500 User's Guide
Page 72
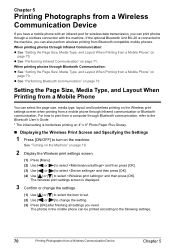
...the Bluetooth User's Guide. * The initial setting is borderless printing on the machine. The photos in the mobile phone can be printed according to turn on 4" x 6" Photo Paper Plus Glossy. „ Displaying the Wireless Print Screen and Specifying the Settings 1 Press [ON/OFF] to the..., Media Type, and Layout When Printing from a Mobile Phone You can select the page size, media type, layout and borderless printing on page 73. See "Turning on the Machine" on page 71. z See "Performing Infrared Communication" on page 19. 2 Display the Wireless print settings screen. (1) Press [Menu]. (2) ...
...the Bluetooth User's Guide. * The initial setting is borderless printing on the machine. The photos in the mobile phone can be printed according to turn on 4" x 6" Photo Paper Plus Glossy. „ Displaying the Wireless Print Screen and Specifying the Settings 1 Press [ON/OFF] to the..., Media Type, and Layout When Printing from a Mobile Phone You can select the page size, media type, layout and borderless printing on page 73. See "Turning on the Machine" on page 71. z See "Performing Infrared Communication" on page 19. 2 Display the Wireless print settings screen. (1) Press [Menu]. (2) ...

MP500 User's Guide
Page 73
...(2) (3) (4) (1) Select the page size for the wireless print. (2) Select the media type for printing. (1) Press [ON/OFF] to turn on the machine. Note For information on wireless print compatible page size and type, see "Recommended Paper and Requirements" on page 25. 2 Set... Image optimizer ON, Image optimizer OFF (4) Select the layout of the photos as below . Chapter 5 Printing Photographs from a Mobile Phone" on Canon Photo Stickers, make the settings as below . z When printing on page 70. 3 Start Infrared Communication. When printing through infrared communication, also refer...
...(2) (3) (4) (1) Select the page size for the wireless print. (2) Select the media type for printing. (1) Press [ON/OFF] to turn on the machine. Note For information on wireless print compatible page size and type, see "Recommended Paper and Requirements" on page 25. 2 Set... Image optimizer ON, Image optimizer OFF (4) Select the layout of the photos as below . Chapter 5 Printing Photographs from a Mobile Phone" on Canon Photo Stickers, make the settings as below . z When printing on page 70. 3 Start Infrared Communication. When printing through infrared communication, also refer...
MP500 User's Guide
Page 75
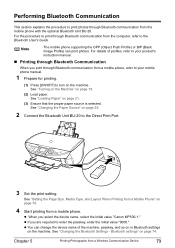
...from a Wireless Communication Device 73 See "Changing the Bluetooth Settings - Chapter 5 Printing Photographs from the computer, refer to the Bluetooth User's Guide. See "Turning on the Machine" on page 74. See "Loading Paper" on page 25. 2 Connect the Bluetooth Unit BU-20 to enter the passkey, enter the ...(1) Press [ON/OFF] to your product's instruction manual. „ Printing through Bluetooth Communication When you select the device name, select the initial value "Canon MP500-1." See "Changing the Paper Source" on page 21. (3) Ensure that the proper paper source is selected.
...from a Wireless Communication Device 73 See "Changing the Bluetooth Settings - Chapter 5 Printing Photographs from the computer, refer to the Bluetooth User's Guide. See "Turning on the Machine" on page 74. See "Loading Paper" on page 25. 2 Connect the Bluetooth Unit BU-20 to enter the passkey, enter the ...(1) Press [ON/OFF] to your product's instruction manual. „ Printing through Bluetooth Communication When you select the device name, select the initial value "Canon MP500-1." See "Changing the Paper Source" on page 21. (3) Ensure that the proper paper source is selected.
MP500 User's Guide
Page 76
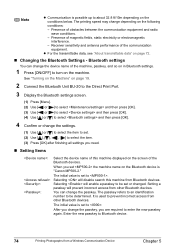
... data" on the screen of the machine, passkey, and so on in Bluetooth settings. 1 Press [ON/OFF] to turn on the Bluetooth device is "Canon MP500-2." Presence of the communication equipment. Bluetooth settings You can change the passkey, you set . (2) Use to select the item...electricity or electromagnetic interference. - Setting a passkey will prevent incorrect access from other Bluetooth devices. The initial value is set to . See "Turning on the Machine" on page 19. 2 Connect the Bluetooth Unit BU-20 to the Direct Print Port. 3 Display the Bluetooth settings screen...
... data" on the screen of the machine, passkey, and so on in Bluetooth settings. 1 Press [ON/OFF] to turn on the Bluetooth device is "Canon MP500-2." Presence of the communication equipment. Bluetooth settings You can change the passkey, you set . (2) Use to select the item...electricity or electromagnetic interference. - Setting a passkey will prevent incorrect access from other Bluetooth devices. The initial value is set to . See "Turning on the Machine" on page 19. 2 Connect the Bluetooth Unit BU-20 to the Direct Print Port. 3 Display the Bluetooth settings screen...


