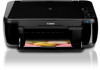

MP495 series Getting Started
Page 66
...PC with Windows 7, Windows Vista or Windows XP pre-installed. • Windows: Uninstall software bundled with the Canon inkjet printer before upgrading from Windows Vista to -page Scan Specifications Scanner driver TWAIN/WIA (for Windows 7/Windows Vista/Windows XP) Maximum scanning size A4/Letter, 8.5'' X 11.7''/216 .... • Macintosh: After upgrading from Mac OS X v.10.5 or lower to Mac OS X v.10.6, install software bundled with the Canon inkjet printer. • Internet Explorer 7 or later is required to change without notice. Interface USB Port: Hi-Speed USB *1 LAN Port: Wireless LAN...
...PC with Windows 7, Windows Vista or Windows XP pre-installed. • Windows: Uninstall software bundled with the Canon inkjet printer before upgrading from Windows Vista to -page Scan Specifications Scanner driver TWAIN/WIA (for Windows 7/Windows Vista/Windows XP) Maximum scanning size A4/Letter, 8.5'' X 11.7''/216 .... • Macintosh: After upgrading from Mac OS X v.10.5 or lower to Mac OS X v.10.6, install software bundled with the Canon inkjet printer. • Internet Explorer 7 or later is required to change without notice. Interface USB Port: Hi-Speed USB *1 LAN Port: Wireless LAN...

Network Guide
Page 9
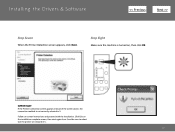
Installing the Drivers & Software > Step Five Select Use the printer on the computer when installing the supplied software. An Internet connection is installed on network, then click Next. Step Six Easy-WebPrint EX is Web print software that is required for installation. Selecting Next will download and install the Easy-WebPrint EX software. 9 Select Next or Skip. Internet Explorer 7 or later is required to use this software.
Installing the Drivers & Software > Step Five Select Use the printer on the computer when installing the supplied software. An Internet connection is installed on network, then click Next. Step Six Easy-WebPrint EX is Web print software that is required for installation. Selecting Next will download and install the Easy-WebPrint EX software. 9 Select Next or Skip. Internet Explorer 7 or later is required to use this software.
Network Guide
Page 10
Step Eight Make sure the machine is not correctly selected in 5. 10 IMPORTANT If the Printer Connection screen appears instead of the screen above, the connection method is turned on -screen instructions and proceed with the installation. Follow on , then click OK. Click Exit on the installation complete screen, then start again from 2 and be sure to select Use the printer on network in 5. Installing the Drivers & Software > Step Seven When the Printer Detection screen appears, click Next.
Step Eight Make sure the machine is not correctly selected in 5. 10 IMPORTANT If the Printer Connection screen appears instead of the screen above, the connection method is turned on -screen instructions and proceed with the installation. Follow on , then click OK. Click Exit on the installation complete screen, then start again from 2 and be sure to select Use the printer on network in 5. Installing the Drivers & Software > Step Seven When the Printer Detection screen appears, click Next.
Network Guide
Page 11
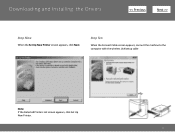
Downloading and Installing the Drivers > Step Nine When the Set Up New Printer screen appears, click Next. Step Ten When the Connect Cable screen appears, connect the machine to the computer with the wireless LAN setup cable Note: If the Detected Printers List screen appears, click Set Up New Printer. 11
Downloading and Installing the Drivers > Step Nine When the Set Up New Printer screen appears, click Next. Step Ten When the Connect Cable screen appears, connect the machine to the computer with the wireless LAN setup cable Note: If the Detected Printers List screen appears, click Set Up New Printer. 11
Network Guide (MAC)
Page 2
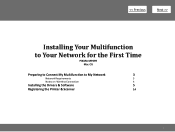
> Installing Your Multifunction to Your Network for the First Time PIXMA MP499 Mac OS Preparing to Connect My Multifunction to My Network 3 Network Requirements 3 Notes on Wireless Connection 4 Installing the Drivers & Software 5 Registering the Printer & Scanner 14 2
> Installing Your Multifunction to Your Network for the First Time PIXMA MP499 Mac OS Preparing to Connect My Multifunction to My Network 3 Network Requirements 3 Notes on Wireless Connection 4 Installing the Drivers & Software 5 Registering the Printer & Scanner 14 2

Network Guide (MAC)
Page 8
Follow on network, then click Next. Step Six When the Printer Detection screen appears, click Next. Click Exit on network in 5. IMPORTANT If the Printer Connection screen appears instead of the screen above, the connection method is not correctly selected in 5. 8 Follow any on-screen instructions to select Use the printer on the installation complete screen, then start again from 2 and be sure to proceed with the installation. Installing the Drivers & Software > Step Five Select Use the printer on -screen instructions and proceed with the software installation.
Follow on network, then click Next. Step Six When the Printer Detection screen appears, click Next. Click Exit on network in 5. IMPORTANT If the Printer Connection screen appears instead of the screen above, the connection method is not correctly selected in 5. 8 Follow any on-screen instructions to select Use the printer on the installation complete screen, then start again from 2 and be sure to proceed with the installation. Installing the Drivers & Software > Step Five Select Use the printer on -screen instructions and proceed with the software installation.
Network Guide (MAC)
Page 9
Note: If the Detected Printers List screen appears, click Set Up New Printer. 9 Step Eight When the Set Up New Printer screen appears, click Next. Installing the Drivers & Software > Step Seven Make sure the machine is turned on, then click OK.
Note: If the Detected Printers List screen appears, click Set Up New Printer. 9 Step Eight When the Set Up New Printer screen appears, click Next. Installing the Drivers & Software > Step Seven Make sure the machine is turned on, then click OK.

Network Installation Guide (MAC)
Page 7
... then follow the on-screen instructions. For most users, Easy Install is highly recommended to function. Click Install. In addition it is recommended. The drivers, application software, and on the desktop. If the CD-ROM folder does not open automatically, double-click the CD-ROM icon on -screen manuals ...are installed. Click OK. When using Custom Install, MP Drivers and IJ Network Tool must be selected in order for the printer to install MP Navigator EX. 7 If you want to select particular items to install, click Custom Install. Step ...
... then follow the on-screen instructions. For most users, Easy Install is highly recommended to function. Click Install. In addition it is recommended. The drivers, application software, and on the desktop. If the CD-ROM folder does not open automatically, double-click the CD-ROM icon on -screen manuals ...are installed. Click OK. When using Custom Install, MP Drivers and IJ Network Tool must be selected in order for the printer to install MP Navigator EX. 7 If you want to select particular items to install, click Custom Install. Step ...
Obtaining Network Key
Page 6
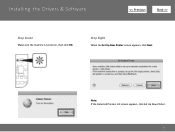
If the Access Points window is closed: 1. If you are installing the latest driver from download, re-run the the driver/network installation by double-clicking the driver file you are installing from the CD-ROM, select Custom Install, printer driver / MP Drivers, and then perform the installation. > 6 If you downloaded previously. 2. Using the Canon PIXMA Wireless Setup Assistant Using the Canon PIXMA Wireless Setup Assistant Step One Open the Access Points window.
If the Access Points window is closed: 1. If you are installing the latest driver from download, re-run the the driver/network installation by double-clicking the driver file you are installing from the CD-ROM, select Custom Install, printer driver / MP Drivers, and then perform the installation. > 6 If you downloaded previously. 2. Using the Canon PIXMA Wireless Setup Assistant Using the Canon PIXMA Wireless Setup Assistant Step One Open the Access Points window.
Obtaining Network Key (MAC)
Page 7
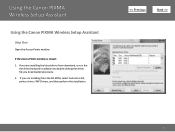
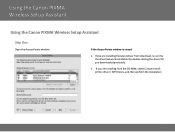
If the Access Points window is closed: 1. If you are installing the latest driver from download, re-run the the driver/network installation by double-clicking the driver file you are installing from the CD-ROM, select Custom Install, printer driver / MP Drivers, and then perform the installation. 7 Using the Canon PIXMA Wireless Setup Assistant Using the Canon PIXMA Wireless Setup Assistant Step One Open the Access Points window. If you downloaded previously. 2.
If the Access Points window is closed: 1. If you are installing the latest driver from download, re-run the the driver/network installation by double-clicking the driver file you are installing from the CD-ROM, select Custom Install, printer driver / MP Drivers, and then perform the installation. 7 Using the Canon PIXMA Wireless Setup Assistant Using the Canon PIXMA Wireless Setup Assistant Step One Open the Access Points window. If you downloaded previously. 2.


