MP150 User's Guide
Page 4
...The Computer...49 5 Printing From Your Computer 51 Printing With Windows 51 Printing With Macintosh 54 6 Scanning Images 57 About Scanning Images 57 Scanning Methods 57 7 Printing Photographs Directly From A Digital Camera 60 Printing Photographs Directly From A PictBridge-Compliant... Device ...........60 Printing Photographs Directly From A Canon "Bubble Jet Direct" Compatible Digital Camera 64 8 Changing The Machine ...
...The Computer...49 5 Printing From Your Computer 51 Printing With Windows 51 Printing With Macintosh 54 6 Scanning Images 57 About Scanning Images 57 Scanning Methods 57 7 Printing Photographs Directly From A Digital Camera 60 Printing Photographs Directly From A PictBridge-Compliant... Device ...........60 Printing Photographs Directly From A Canon "Bubble Jet Direct" Compatible Digital Camera 64 8 Changing The Machine ...
MP150 User's Guide
Page 8
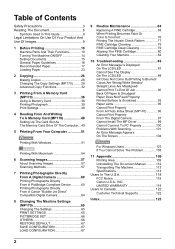
...to leak out. 6 Do not place heavy objects on its side, or turn OFF the power immediately by a qualified technician to restore the product to scan thick books. When moving the machine, turn the machine upside down . Before moving the machine, carry the machine at both ends. Adjust only those ... your hands or clothing. Do not turn OFF the power and unplug the machine. Do not press down hard on your local authorized Canon dealer or the Canon help line. This may damage the Platen Glass and Document Cover, and/or result in performance may leak out and stain clothing or ...
...to leak out. 6 Do not place heavy objects on its side, or turn OFF the power immediately by a qualified technician to restore the product to scan thick books. When moving the machine, turn the machine upside down . Before moving the machine, carry the machine at both ends. Adjust only those ... your hands or clothing. Do not turn OFF the power and unplug the machine. Do not press down hard on your local authorized Canon dealer or the Canon help line. This may damage the Platen Glass and Document Cover, and/or result in performance may leak out and stain clothing or ...

MP150 User's Guide
Page 11
... without permission of the following documents. Legal Limitations On Use Of Your Product And Use Of Images It may be unlawful to make copies of, scan, print or use reproductions of copyright owner 9 The list provided is non-exhaustive. When in doubt, check with a legal representative in your jurisdiction...
... without permission of the following documents. Legal Limitations On Use Of Your Product And Use Of Images It may be unlawful to make copies of, scan, print or use reproductions of copyright owner 9 The list provided is non-exhaustive. When in doubt, check with a legal representative in your jurisdiction...
MP150 User's Guide
Page 13
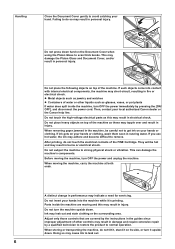
... 11 FINE Cartridges are available in two types, Color (on the right) and Black (on the left). (12) Scanning Unit Used to the computer, or the computer is printing from or scanning to adjust the gap between the FINE Cartridge and surface of Card Slot. (14) Access Lamp (MP170) Lights when... (16) Paper Thickness Lever Used to the computer. This lamp flashes while the machine is reading data from the memory card. (15) Scanning Unit Support Used to hold the Scanning Unit being used. (17) Power Connector Used to connect the power cord to the machine. (18) USB Port Used to connect a computer...
... 11 FINE Cartridges are available in two types, Color (on the right) and Black (on the left). (12) Scanning Unit Used to the computer, or the computer is printing from or scanning to adjust the gap between the FINE Cartridge and surface of Card Slot. (14) Access Lamp (MP170) Lights when... (16) Paper Thickness Lever Used to the computer. This lamp flashes while the machine is reading data from the memory card. (15) Scanning Unit Support Used to hold the Scanning Unit being used. (17) Power Connector Used to connect the power cord to the machine. (18) USB Port Used to connect a computer...
MP150 User's Guide
Page 14
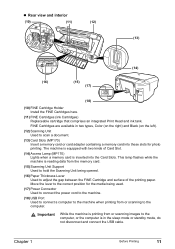
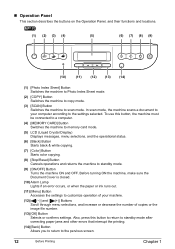
...) (11) (12) (13) (14) (1) [Photo Index Sheet] Button Switches the machine to Photo Index Sheet mode. (2) [COPY] Button Switches the machine to copy mode. (3) [SCAN] Button Switches the machine to customize operation of copies or the image file number. (13) [OK] Button Selects or confirms settings. Before turning ON the...Lights if an error occurs, or when the paper or ink runs out. (11) [Menu] Button Accesses the settings to scan mode. In scan mode, the machine scans a document to your machine. (12) [ (-)] and [ (+)] Buttons Scroll through menu selections, and increase or decrease the...
...) (11) (12) (13) (14) (1) [Photo Index Sheet] Button Switches the machine to Photo Index Sheet mode. (2) [COPY] Button Switches the machine to copy mode. (3) [SCAN] Button Switches the machine to customize operation of copies or the image file number. (13) [OK] Button Selects or confirms settings. Before turning ON the...Lights if an error occurs, or when the paper or ink runs out. (11) [Menu] Button Accesses the settings to scan mode. In scan mode, the machine scans a document to your machine. (12) [ (-)] and [ (+)] Buttons Scroll through menu selections, and increase or decrease the...

MP150 User's Guide
Page 15
... Before turning ON the machine, make sure the Document Cover is closed. (11) Black/Color Ink Lamp Lights when a Black/Color FINE Cartridge is enabled. (4) [SCAN] Button Opens the MP Navigator to scan a document to your computer according to standby mode. (10) [ON/OFF] Button Turns the machine ON and OFF.
... Before turning ON the machine, make sure the Document Cover is closed. (11) Black/Color Ink Lamp Lights when a Black/Color FINE Cartridge is enabled. (4) [SCAN] Button Opens the MP Navigator to scan a document to your computer according to standby mode. (10) [ON/OFF] Button Turns the machine ON and OFF.

MP150 User's Guide
Page 17
...and right edges of the Platen Glass. 3 Gently close the Document Cover. Note The machine cannot scan the area within approximately 1/25 in . (20 mm) „ Loading Documents To copy or scan a document, set it on the Platen Glass. z Make sure any glue, ink, or ... on the lower right corner of the Platen Glass. Setting Documents „ Document Requirements The documents you load on the Platen Glass for copying or scanning must meet these requirements: Document Type Size (W x L) Thickness z All types of paper documents z Photographs z Books, catalogs or magazines z Max. 8 1/2...
...and right edges of the Platen Glass. 3 Gently close the Document Cover. Note The machine cannot scan the area within approximately 1/25 in . (20 mm) „ Loading Documents To copy or scan a document, set it on the Platen Glass. z Make sure any glue, ink, or ... on the lower right corner of the Platen Glass. Setting Documents „ Document Requirements The documents you load on the Platen Glass for copying or scanning must meet these requirements: Document Type Size (W x L) Thickness z All types of paper documents z Photographs z Books, catalogs or magazines z Max. 8 1/2...
MP150 User's Guide
Page 28
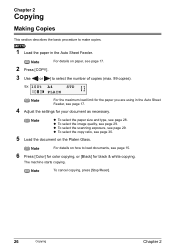
.... The machine starts copying. Note For details on the Platen Glass. Note z To select the paper size and type, see page 29. z To select the scanning exposure, see page 28. Chapter 2 Copying Making Copies This section describes the basic procedure to make copies. 1 Load the paper in the Auto Sheet Feeder...
.... The machine starts copying. Note For details on the Platen Glass. Note z To select the paper size and type, see page 29. z To select the scanning exposure, see page 28. Chapter 2 Copying Making Copies This section describes the basic procedure to make copies. 1 Load the paper in the Auto Sheet Feeder...
MP150 User's Guide
Page 35
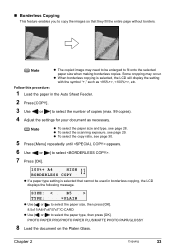
... copying is selected that they fill the entire page without borders. Note z To select the paper size and type, see page 29. z To select the scanning exposure, see page 28. z To select the copy ratio, see page 30. 5 Press [Menu] repeatedly until appears. 6 Use [ ] or [ ] to select . 7 Press [OK]. 0 3 100%+ A4...
... copying is selected that they fill the entire page without borders. Note z To select the paper size and type, see page 29. z To select the scanning exposure, see page 28. z To select the copy ratio, see page 30. 5 Press [Menu] repeatedly until appears. 6 Use [ ] or [ ] to select . 7 Press [OK]. 0 3 100%+ A4...
MP150 User's Guide
Page 36
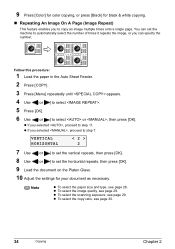
... , then press [OK]. Note z To select the paper size and type, see page 29. z To select the copy ratio, see page 29. z To select the scanning exposure, see page 30. 34 Copying Chapter 2 Follow this procedure: 1 Load the paper in the Auto Sheet Feeder. 2 Press [COPY]. 3 Press [Menu] repeatedly until appears...
... , then press [OK]. Note z To select the paper size and type, see page 29. z To select the copy ratio, see page 29. z To select the scanning exposure, see page 30. 34 Copying Chapter 2 Follow this procedure: 1 Load the paper in the Auto Sheet Feeder. 2 Press [COPY]. 3 Press [Menu] repeatedly until appears...

MP150 User's Guide
Page 41
sized paper in the appropriate circles to print. Use completely white plain paper when printing a Photo Index Sheet. Simply scanning a Photo Index Sheet prints the selected photographs according to the selections you want to select print options and photographs you have made. 1 ... details on paper, see page 23. 2 Insert the memory card into the Card Slot. (See page 37) 3 Press [Photo Index Sheet]. [PHOTO INDEX SHEET] < PRINT > SCAN 4 Use [ ] or [ ] to load paper, see page 17. INDX SHEET PRINT(A4) W PRINT ALL PHOTOS X Chapter 3 Printing From A Memory Card (MP170) 39 ...
sized paper in the appropriate circles to print. Use completely white plain paper when printing a Photo Index Sheet. Simply scanning a Photo Index Sheet prints the selected photographs according to the selections you want to select print options and photographs you have made. 1 ... details on paper, see page 23. 2 Insert the memory card into the Card Slot. (See page 37) 3 Press [Photo Index Sheet]. [PHOTO INDEX SHEET] < PRINT > SCAN 4 Use [ ] or [ ] to load paper, see page 17. INDX SHEET PRINT(A4) W PRINT ALL PHOTOS X Chapter 3 Printing From A Memory Card (MP170) 39 ...
MP150 User's Guide
Page 44
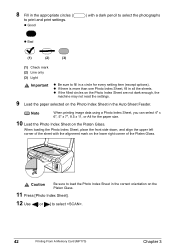
8 Fill in all the sheets. z If there is more than one Photo Index Sheet, fill in the appropriate circles ( to load the Photo Index Sheet in the correct orientation on the Photo Index Sheet in a circle for the paper size. 10 Load the Photo Index Sheet on the Platen Glass. Caution Be sure to print and print settings. z If the filled circles on the Photo Index Sheet are not dark enough, the machine may not read the settings. 9 Load the paper selected on the Platen Glass. 11 Press [Photo Index Sheet]. 12 Use [ ] or [ ] to fill in the Auto Sheet Feeder. Note When printing ...
8 Fill in all the sheets. z If there is more than one Photo Index Sheet, fill in the appropriate circles ( to load the Photo Index Sheet in the correct orientation on the Photo Index Sheet in a circle for the paper size. 10 Load the Photo Index Sheet on the Platen Glass. Caution Be sure to print and print settings. z If the filled circles on the Photo Index Sheet are not dark enough, the machine may not read the settings. 9 Load the paper selected on the Platen Glass. 11 Press [Photo Index Sheet]. 12 Use [ ] or [ ] to fill in the Auto Sheet Feeder. Note When printing ...

MP150 User's Guide
Page 45
z If the Platen Glass is filled in for each setting item. The machine reads the Photo Index Sheet, and prints photographs according to 13. „ Print Index You can print an index of all photos saved in the Auto Sheet Feeder. 2 Insert the memory card into the Card Slot. z If the filled circles on the Photo Index Sheet are not dark enough, the machine may not read the settings. z Do not remove the memory card while the machine is known as necessary, then press [OK]. (See page 48) [INDEX] PHOTO PRO A4 123 X 6 Press [Color]. See "Inserting A Memory Card" on ...
z If the Platen Glass is filled in for each setting item. The machine reads the Photo Index Sheet, and prints photographs according to 13. „ Print Index You can print an index of all photos saved in the Auto Sheet Feeder. 2 Insert the memory card into the Card Slot. z If the filled circles on the Photo Index Sheet are not dark enough, the machine may not read the settings. z Do not remove the memory card while the machine is known as necessary, then press [OK]. (See page 48) [INDEX] PHOTO PRO A4 123 X 6 Press [Color]. See "Inserting A Memory Card" on ...
MP150 User's Guide
Page 59
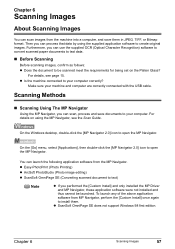
...[Custom Install] and only installed the MP Driver and MP Navigator, these application software were not installed and thus cannot be scanned meet the requirements for being set on using the supplied application software to install them in JPEG, TIFF, or Bitmap format. ...Install] once again to create original images. For details on the Platen Glass? Furthermore, you can scan, process and save them . Chapter 6 Scanning Images About Scanning Images You can scan images from the machine into a computer, and save documents to your machine and computer are correctly connected...
...[Custom Install] and only installed the MP Driver and MP Navigator, these application software were not installed and thus cannot be scanned meet the requirements for being set on using the supplied application software to install them in JPEG, TIFF, or Bitmap format. ...Install] once again to create original images. For details on the Platen Glass? Furthermore, you can scan, process and save them . Chapter 6 Scanning Images About Scanning Images You can scan images from the machine into a computer, and save documents to your machine and computer are correctly connected...

MP150 User's Guide
Page 60
In this case, click [Use TWAIN software whenever possible] to uncheck the option, exit the Image Capture, then start scanning when [Black] / [Color] (MP170) or [SCAN] (MP150) is connected to launch when scanner button is not displayed. If you are using Macintosh OS X v.10.3.x Select [Applications] from ...the next time, MP Navigator is displayed the first time you press [Black] / [Color] (MP170) or [SCAN] (MP150) on the machine. For details, see the Scan Guide. 58 Scanning Images Chapter 6 If you are using Mac OS X For the machine to set MP Navigator as the application software ...
In this case, click [Use TWAIN software whenever possible] to uncheck the option, exit the Image Capture, then start scanning when [Black] / [Color] (MP170) or [SCAN] (MP150) is connected to launch when scanner button is not displayed. If you are using Macintosh OS X v.10.3.x Select [Applications] from ...the next time, MP Navigator is displayed the first time you press [Black] / [Color] (MP170) or [SCAN] (MP150) on the machine. For details, see the Scan Guide. 58 Scanning Images Chapter 6 If you are using Mac OS X For the machine to set MP Navigator as the application software ...

MP150 User's Guide
Page 61
Chapter 6 Scanning Images 59 This procedure varies depending on the application software. „ Scanning From An Application Software You can scan an image from TWAIN- For the detailed procedure, refer to the manual of the application software you are using. or WIA- (Windows XP only) compliant application software and use the image in that application software.
Chapter 6 Scanning Images 59 This procedure varies depending on the application software. „ Scanning From An Application Software You can scan an image from TWAIN- For the detailed procedure, refer to the manual of the application software you are using. or WIA- (Windows XP only) compliant application software and use the image in that application software.
MP150 User's Guide
Page 70
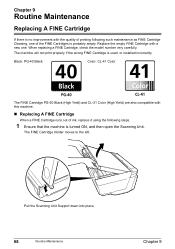
... the quality of printing following steps. 1 Ensure that the machine is turned ON, and then open the Scanning Unit. The machine will not print properly if the wrong FINE Cartridge is probably empty. Pull the Scanning Unit Support down into place. 68 Routine Maintenance Chapter 9 Black: PG-40 Black Color: CL-41...
... the quality of printing following steps. 1 Ensure that the machine is turned ON, and then open the Scanning Unit. The machine will not print properly if the wrong FINE Cartridge is probably empty. Pull the Scanning Unit Support down into place. 68 Routine Maintenance Chapter 9 Black: PG-40 Black Color: CL-41...
MP150 User's Guide
Page 73
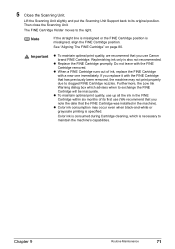
...on page 80. Do not leave with a new one immediately. z When a FINE Cartridge runs out of its original position. Lift the Scanning Unit slightly and put the Scanning Unit Support back to its first use (We recommend that you replace it with the FINE Cartridge that the FINE Cartridge was installed... six months of ink, replace the FINE Cartridge with the FINE Cartridge removed. Chapter 9 Routine Maintenance 71 z To maintain optimal print quality, use Canon brand FINE Cartridge. 5 Close the Scanning Unit. Replenishing ink only is necessary to the right. Then close the...
...on page 80. Do not leave with a new one immediately. z When a FINE Cartridge runs out of its original position. Lift the Scanning Unit slightly and put the Scanning Unit Support back to its first use (We recommend that you replace it with the FINE Cartridge that the FINE Cartridge was installed... six months of ink, replace the FINE Cartridge with the FINE Cartridge removed. Chapter 9 Routine Maintenance 71 z To maintain optimal print quality, use Canon brand FINE Cartridge. 5 Close the Scanning Unit. Replenishing ink only is necessary to the right. Then close the...
MP150 User's Guide
Page 74
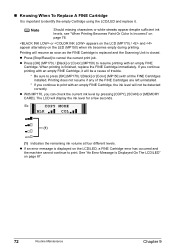
..., the ink level will resume as soon as the FINE Cartridge is replaced and the Scanning Unit is closed. Printing does not resume if any of trouble. * Be sure to press [OK] (MP170) / [Black] or [Color] (MP150) with an empty FINE Cartridge. z If an error message is finished, replace the FINE ... page 76. The LCD will display the ink level for a few seconds. See "An Error Message Is Displayed On The LCD/LED" on the LED (MP150) when ink becomes empty during printing. or appears on the LCD (MP170) / and appear alternately on page 87. 72 Routine Maintenance Chapter 9 Note Should ...
..., the ink level will resume as soon as the FINE Cartridge is replaced and the Scanning Unit is closed. Printing does not resume if any of trouble. * Be sure to press [OK] (MP170) / [Black] or [Color] (MP150) with an empty FINE Cartridge. z If an error message is finished, replace the FINE ... page 76. The LCD will display the ink level for a few seconds. See "An Error Message Is Displayed On The LCD/LED" on the LED (MP150) when ink becomes empty during printing. or appears on the LCD (MP170) / and appear alternately on page 87. 72 Routine Maintenance Chapter 9 Note Should ...

MP150 User's Guide
Page 83
... [Black] or [Color]. Note If you select in step 1, the machine prints the current FINE Cartridge Alignment setting. The machine scans the pattern and aligns the FINE Cartridge automatically. The machine scans the pattern and aligns the FINE Cartridge automatically. When loading the checked sheet, place the front side down , and align...
... [Black] or [Color]. Note If you select in step 1, the machine prints the current FINE Cartridge Alignment setting. The machine scans the pattern and aligns the FINE Cartridge automatically. The machine scans the pattern and aligns the FINE Cartridge automatically. When loading the checked sheet, place the front side down , and align...


