

PIXMA MP130 Quick Start Guide
Page 5
... starting to use the machine. Follow all functions that can be performed from memory cards, and copying. User's Guide (Electronic documentation) This guide is available on the Setup CD-ROM. This sheet includes instructions for setting up your machine and getting it ...ready for full instructions on printing and scanning from a memory card • Troubleshooting • Specifications Software Guide (Electronic documentation) This guide is also included on the Setup CD-ROM. 5 This guide, included as a HTML file, describes the utility software on the Setup CD-ROM, such as Easy-...
... starting to use the machine. Follow all functions that can be performed from memory cards, and copying. User's Guide (Electronic documentation) This guide is available on the Setup CD-ROM. This sheet includes instructions for setting up your machine and getting it ...ready for full instructions on printing and scanning from a memory card • Troubleshooting • Specifications Software Guide (Electronic documentation) This guide is also included on the Setup CD-ROM. 5 This guide, included as a HTML file, describes the utility software on the Setup CD-ROM, such as Easy-...
PIXMA MP130 Quick Start Guide
Page 7
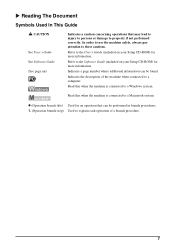
... to persons or damage to a Windows system. Indicates a page number where additional information can be found. Refer to the User's Guide (included on your Setup CD-ROM) for more information. Read this when the machine is connected to explain each operation of.... 7 In order to use the machine safely, always pay attention to a computer. X Reading The Document Symbols Used In This Guide CAUTION See User's Guide See Software Guide (See page nn) PC Indicates a caution concerning operations that can be performed in branch procedures. 1. (Operation branch-step) Used to...
... to persons or damage to a Windows system. Indicates a page number where additional information can be found. Refer to the User's Guide (included on your Setup CD-ROM) for more information. Read this when the machine is connected to explain each operation of.... 7 In order to use the machine safely, always pay attention to a computer. X Reading The Document Symbols Used In This Guide CAUTION See User's Guide See Software Guide (See page nn) PC Indicates a caution concerning operations that can be performed in branch procedures. 1. (Operation branch-step) Used to...
PIXMA MP130 Quick Start Guide
Page 15
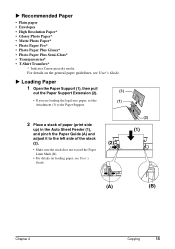
...the Paper Limit Mark (B). • For details on the general paper guidelines, see User's Guide. (2) (1) (A) (B) Chapter 2 Copying 15 For details on loading paper, see User's Guide. X Recommended Paper • Plain paper • Envelopes • High Resolution Paper...* • Glossy Photo Paper* • Matte Photo Paper* • Photo Paper Pro* • Photo Paper Plus Glossy* • Photo Paper Plus Semi-Gloss* • Transparencies* • T-Shirt Transfers* * Indicates Canon...
...the Paper Limit Mark (B). • For details on the general paper guidelines, see User's Guide. (2) (1) (A) (B) Chapter 2 Copying 15 For details on loading paper, see User's Guide. X Recommended Paper • Plain paper • Envelopes • High Resolution Paper...* • Glossy Photo Paper* • Matte Photo Paper* • Photo Paper Pro* • Photo Paper Plus Glossy* • Photo Paper Plus Semi-Gloss* • Transparencies* • T-Shirt Transfers* * Indicates Canon...

PIXMA MP130 Quick Start Guide
Page 16
... [Menu] once until appears, and then press [OK]. 2 Use [W] or [X] to select the image quality, and then press [OK]. For details on Borderless copying, see User's Guide. 16 Copying Chapter 2
... [Menu] once until appears, and then press [OK]. 2 Use [W] or [X] to select the image quality, and then press [OK]. For details on Borderless copying, see User's Guide. 16 Copying Chapter 2
PIXMA MP130 Quick Start Guide
Page 28
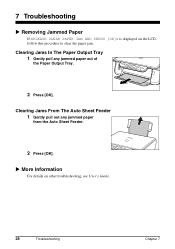
X More Information For details on the LCD, follow this procedure to clear the paper jam. 7 Troubleshooting X Removing Jammed Paper If is displayed on other troubleshooting, see User's Guide. 28 Troubleshooting Chapter 7 Clearing Jams From The Auto Sheet Feeder 1 Gently pull out any jammed paper out of the Paper Output Tray. 2 Press [OK]. Clearing Jams In The Paper Output Tray 1 Gently pull any jammed paper from the Auto Sheet Feeder. 2 Press [OK].
X More Information For details on the LCD, follow this procedure to clear the paper jam. 7 Troubleshooting X Removing Jammed Paper If is displayed on other troubleshooting, see User's Guide. 28 Troubleshooting Chapter 7 Clearing Jams From The Auto Sheet Feeder 1 Gently pull out any jammed paper out of the Paper Output Tray. 2 Press [OK]. Clearing Jams In The Paper Output Tray 1 Gently pull any jammed paper from the Auto Sheet Feeder. 2 Press [OK].

PIXMA MP130 Easy Setup Instructions
Page 1
...Setup CD-ROM contains the MP Drivers, as well as the electronic manuals User's Guide, Software Guide and Photo Application Guide. You must purchase a USB cable (less than 10 ft./3 m) ... the Lock Lever until it locks into the left slot. If you are registered trademarks and PIXMA is a trademark of their respective owners. All other products and brand names are connecting the ...." 4 Install the ink tanks. 1 Remove the orange protective cap. HT7-0095-000-V.1.0 xx2004A © CANON INC. 2004 PRINTED IN CHINA Start Here Easy Setup Instructions 1 Unpack and setup the machine. 1 Carefully ...
...Setup CD-ROM contains the MP Drivers, as well as the electronic manuals User's Guide, Software Guide and Photo Application Guide. You must purchase a USB cable (less than 10 ft./3 m) ... the Lock Lever until it locks into the left slot. If you are registered trademarks and PIXMA is a trademark of their respective owners. All other products and brand names are connecting the ...." 4 Install the ink tanks. 1 Remove the orange protective cap. HT7-0095-000-V.1.0 xx2004A © CANON INC. 2004 PRINTED IN CHINA Start Here Easy Setup Instructions 1 Unpack and setup the machine. 1 Carefully ...

PIXMA MP130 Easy Setup Instructions
Page 2
.... 2 Click [Yes]. • Installation begins. You now have Administrator privileges, and when installing the software in Windows XP, you see the guides for that version of MultiPASS Suite. • When installing the software in Windows 2000, you must log on the back of the printer. The...click [File] menu and then select [Open]. X Step 3 Enter the name and password for an Administrator Account. 1 Enter the name for the advanced users. Follow the on the back of the printer. X Step 3 Connect the USB cable. • Make sure your computer. • When the Registration ...
.... 2 Click [Yes]. • Installation begins. You now have Administrator privileges, and when installing the software in Windows XP, you see the guides for that version of MultiPASS Suite. • When installing the software in Windows 2000, you must log on the back of the printer. The...click [File] menu and then select [Open]. X Step 3 Enter the name and password for an Administrator Account. 1 Enter the name for the advanced users. Follow the on the back of the printer. X Step 3 Connect the USB cable. • Make sure your computer. • When the Registration ...

