User Guide
Page 2
... or in browser settings.) How to Print Use the print function of this guide without prior notice to unavoidable reasons. In addition, Canon may suspend or stop the disclosure of your Web browser to print this guide. Operating Environment The following environment is recommended for any ... Manual (hereinafter referred to as a result of changes in or deletion of information in this guide, or suspension/stoppage of disclosure of this guide. • Although the contents of this guide have been prepared with the product when using a product that is prohibited. • In principle, Canon...
... or in browser settings.) How to Print Use the print function of this guide without prior notice to unavoidable reasons. In addition, Canon may suspend or stop the disclosure of your Web browser to print this guide. Operating Environment The following environment is recommended for any ... Manual (hereinafter referred to as a result of changes in or deletion of information in this guide, or suspension/stoppage of disclosure of this guide. • Although the contents of this guide have been prepared with the product when using a product that is prohibited. • In principle, Canon...

User Guide
Page 6
Example: When you want to browse the page referred to by the following sentence on a scanning procedure page in the Online Manual for MX450 series Refer to print collages with My Image Garden Enter "My Image Garden collage" in the search window and perform a search • Searching... for Reference Pages You can find reference pages more easily by entering your model from Home of the Online Manual for details. Enter "MX45 scan Color Settings Tab" in this guide by entering the function name as well. You can search for reference pages described...
Example: When you want to browse the page referred to by the following sentence on a scanning procedure page in the Online Manual for MX450 series Refer to print collages with My Image Garden Enter "My Image Garden collage" in the search window and perform a search • Searching... for Reference Pages You can find reference pages more easily by entering your model from Home of the Online Manual for details. Enter "MX45 scan Color Settings Tab" in this guide by entering the function name as well. You can search for reference pages described...

User Guide
Page 12
...Image Garden is subject to a platen-size item scanned at 1200 dpi resolution) when scanned. Keep these points in mind. • See the Canon website for products supporting My Image Garden. • Available functions and settings vary depending on your computer. Restrictions on Displaying Images • To display..., you need to be subject to image analysis. • Folders subject to image analysis can download Quick Menu from Home of the Online Manual for the first time or in this guide are described based on disc labels, paper larger than 10208 pixels x 14032 pixels (equivalent to...
...Image Garden is subject to a platen-size item scanned at 1200 dpi resolution) when scanned. Keep these points in mind. • See the Canon website for products supporting My Image Garden. • Available functions and settings vary depending on your computer. Restrictions on Displaying Images • To display..., you need to be subject to image analysis. • Folders subject to image analysis can download Quick Menu from Home of the Online Manual for the first time or in this guide are described based on disc labels, paper larger than 10208 pixels x 14032 pixels (equivalent to...

User Guide
Page 87
Refer to "Scanning with Advanced Settings Using ScanGear (Scanner Driver)" for your model from Home of the Online Manual for details. Refer to "Scanning Items Larger than the platen and combine the scanned images back into one image. easily with Favorite Settings Cropping Scanned ... You can scan the left and right halves of an item larger than the Platen (Image Stitch)" for your model from Home of the Online Manual for details.
Refer to "Scanning with Advanced Settings Using ScanGear (Scanner Driver)" for your model from Home of the Online Manual for details. Refer to "Scanning Items Larger than the platen and combine the scanned images back into one image. easily with Favorite Settings Cropping Scanned ... You can scan the left and right halves of an item larger than the Platen (Image Stitch)" for your model from Home of the Online Manual for details.
User Guide
Page 88
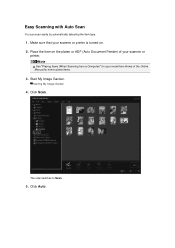
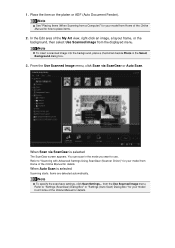
Note See "Placing Items (When Scanning from Home of your scanner or printer. Starting My Image Garden 4. Click Auto. The view switches to place items. 3. Make sure that your model from a Computer)" for your scanner or printer is turned on the platen or ADF (Auto Document Feeder) of the Online Manual for how to Scan. 5. Place the item on . 2. Click Scan. Start My Image Garden. Easy Scanning with Auto Scan You can scan easily by automatically detecting the item type. 1.
Note See "Placing Items (When Scanning from Home of your scanner or printer. Starting My Image Garden 4. Click Auto. The view switches to place items. 3. Make sure that your model from a Computer)" for your scanner or printer is turned on the platen or ADF (Auto Document Feeder) of the Online Manual for how to Scan. 5. Place the item on . 2. Click Scan. Start My Image Garden. Easy Scanning with Auto Scan You can scan easily by automatically detecting the item type. 1.
User Guide
Page 89
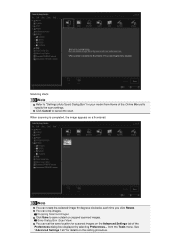
... Scan) Dialog Box" for your model from the Tools menu. See "Advanced Settings Tab" for scanned images on the Advanced Settings tab of the Online Manual to save location for details on the setting procedure. Note Refer to cancel the scan. You can rotate the selected image 90 degrees clockwise each...
... Scan) Dialog Box" for your model from the Tools menu. See "Advanced Settings Tab" for scanned images on the Advanced Settings tab of the Online Manual to save location for details on the setting procedure. Note Refer to cancel the scan. You can rotate the selected image 90 degrees clockwise each...
User Guide
Page 91
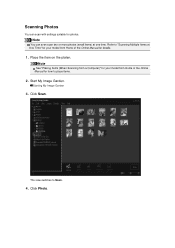
Note You can scan with settings suitable for details. 1. Place the item on the platen. Click Scan. Click Photo. Start My Image Garden. Note See "Placing Items (When Scanning from a Computer)" for your model from Home of the Online Manual for photos. Refer to "Scanning Multiple Items at one time. The view switches to Scan. 4. Starting My Image Garden 3. Scanning Photos You can even scan two or more photos (small items) at One Time" for your model from Home of the Online Manual for how to place items. 2.
Note You can scan with settings suitable for details. 1. Place the item on the platen. Click Scan. Click Photo. Start My Image Garden. Note See "Placing Items (When Scanning from a Computer)" for your model from Home of the Online Manual for photos. Refer to "Scanning Multiple Items at one time. The view switches to Scan. 4. Starting My Image Garden 3. Scanning Photos You can even scan two or more photos (small items) at One Time" for your model from Home of the Online Manual for how to place items. 2.

User Guide
Page 94
Place the item on the platen or ADF (Auto Document Feeder). Start My Image Garden. Click Scan. Note See "Placing Items (When Scanning from a Computer)" for your model from Home of the Online Manual for details. 1. Scanning Documents You can even scan two or more small items at One Time" for your model from Home of the Online Manual for how to "Scanning Multiple Items at one time. Note You can scan with settings suitable for documents. Starting My Image Garden 3. Refer to place items. 2. Click Document. The view switches to Scan. 4.
Place the item on the platen or ADF (Auto Document Feeder). Start My Image Garden. Click Scan. Note See "Placing Items (When Scanning from a Computer)" for your model from Home of the Online Manual for details. 1. Scanning Documents You can even scan two or more small items at One Time" for your model from Home of the Online Manual for how to "Scanning Multiple Items at one time. Note You can scan with settings suitable for documents. Starting My Image Garden 3. Refer to place items. 2. Click Document. The view switches to Scan. 4.
User Guide
Page 97
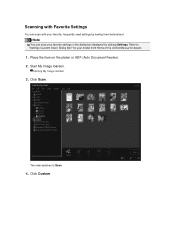
Start My Image Garden. The view switches to "Settings (Custom Scan) Dialog Box" for your model from Home of the Online Manual for details. 1. Note You can scan with your favorite, frequently used settings by clicking Settings. Scanning with Favorite Settings You can save your favorite settings in the dialog box displayed by saving them beforehand. Refer to Scan. 4. Starting My Image Garden 3. Click Scan. Place the item on the platen or ADF (Auto Document Feeder). 2. Click Custom.
Start My Image Garden. The view switches to "Settings (Custom Scan) Dialog Box" for your model from Home of the Online Manual for details. 1. Note You can scan with your favorite, frequently used settings by clicking Settings. Scanning with Favorite Settings You can save your favorite settings in the dialog box displayed by saving them beforehand. Refer to Scan. 4. Starting My Image Garden 3. Click Scan. Place the item on the platen or ADF (Auto Document Feeder). 2. Click Custom.
User Guide
Page 116
...you want to place items. 2. Refer to "Scanning with Advanced Settings Using ScanGear (Scanner Driver)" for your model from Home of the Online Manual for details. Note To specify the scan/save settings, click Scan Settings... When Auto Scan is selected The ScanGear screen appears. Items are ...Settings (ScanGear) Dialog Box" or "Settings (Auto Scan) Dialog Box" for details. from the displayed menu. In the Edit area of the Online Manual for your model from Home of the My Art view, right-click an image, a layout frame, or the background, then select Use Scanned Image ...
...you want to place items. 2. Refer to "Scanning with Advanced Settings Using ScanGear (Scanner Driver)" for your model from Home of the Online Manual for details. Note To specify the scan/save settings, click Scan Settings... When Auto Scan is selected The ScanGear screen appears. Items are ...Settings (ScanGear) Dialog Box" or "Settings (Auto Scan) Dialog Box" for details. from the displayed menu. In the Edit area of the Online Manual for your model from Home of the My Art view, right-click an image, a layout frame, or the background, then select Use Scanned Image ...
User Guide
Page 126
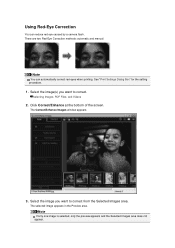
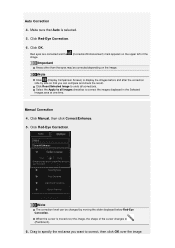
... one image is selected, only the preview appears and the Selected Images area does not appear. There are two Red-Eye Correction methods: automatic and manual. Note You can reduce red eye caused by a camera flash. Select the image(s) you want to correct from the Selected Images area. Selecting Images, PDF...
... one image is selected, only the preview appears and the Selected Images area does not appear. There are two Red-Eye Correction methods: automatic and manual. Note You can reduce red eye caused by a camera flash. Select the image(s) you want to correct from the Selected Images area. Selecting Images, PDF...
User Guide
Page 127
.... Make sure that you want to display the images before and after the correction side by moving the slider displayed below Red-Eye Correction. Manual Correction 4. Click Manual, then click Correct/Enhance. 5. Note Click (Display Comparison Screen) to correct, then click OK over the image, the shape of the Important Areas other...
.... Make sure that you want to display the images before and after the correction side by moving the slider displayed below Red-Eye Correction. Manual Correction 4. Click Manual, then click Correct/Enhance. 5. Note Click (Display Comparison Screen) to correct, then click OK over the image, the shape of the Important Areas other...
User Guide
Page 129
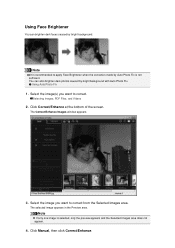
... caused by Auto Photo Fix is not sufficient. Note It is selected, only the preview appears and the Selected Images area does not appear. 4. Click Manual, then click Correct/Enhance.
... caused by Auto Photo Fix is not sufficient. Note It is selected, only the preview appears and the Selected Images area does not appear. 4. Click Manual, then click Correct/Enhance.
User Guide
Page 132
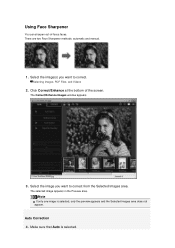
... the preview appears and the Selected Images area does not appear. Selecting Images, PDF Files, and Videos 2. There are two Face Sharpener methods: automatic and manual. 1. Using Face Sharpener You can sharpen out-of the screen. Auto Correction 4. The selected image appears in the Preview area.
... the preview appears and the Selected Images area does not appear. Selecting Images, PDF Files, and Videos 2. There are two Face Sharpener methods: automatic and manual. 1. Using Face Sharpener You can sharpen out-of the screen. Auto Correction 4. The selected image appears in the Preview area.

User Guide
Page 133
... the Apply to all corrections. Note The correction level can be changed by moving the slider displayed below Face Sharpener. 6. Click OK. Manual Correction 4. Drag to specify the area you can be changed by side so that appears over the image, the shape of the Note...the image. Click Reset Selected Image to display the images before and after the correction side by moving the slider displayed below Face Sharpener. Click Manual, then click Correct/Enhance. 5. When the cursor is sharpened and the image. (Correction/Enhancement) mark appears on the upper left of the...
... the Apply to all corrections. Note The correction level can be changed by moving the slider displayed below Face Sharpener. 6. Click OK. Manual Correction 4. Drag to specify the area you can be changed by side so that appears over the image, the shape of the Note...the image. Click Reset Selected Image to display the images before and after the correction side by moving the slider displayed below Face Sharpener. Click Manual, then click Correct/Enhance. 5. When the cursor is sharpened and the image. (Correction/Enhancement) mark appears on the upper left of the...

User Guide
Page 135
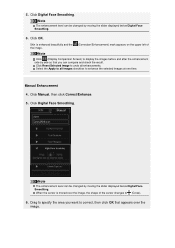
... that Auto is selected, only the preview appears and the Selected Images area does not appear. There are two Digital Face Smoothing methods: automatic and manual. 1. Selecting Images, PDF Files, and Videos 2. Note If only one image is selected.
... that Auto is selected, only the preview appears and the Selected Images area does not appear. There are two Digital Face Smoothing methods: automatic and manual. 1. Selecting Images, PDF Files, and Videos 2. Note If only one image is selected.
User Guide
Page 136
... all enhancements. Select the Apply to display the images before and after the enhancement side by moving the slider displayed below Digital Face Smoothing. 6. Manual Enhancement 4. Click Manual, then click Correct/Enhance. 5. Note The enhancement level can compare and check the result. Click OK. Click Digital Face Smoothing. Click Digital Face Smoothing...
... all enhancements. Select the Apply to display the images before and after the enhancement side by moving the slider displayed below Digital Face Smoothing. 6. Manual Enhancement 4. Click Manual, then click Correct/Enhance. 5. Note The enhancement level can compare and check the result. Click OK. Click Digital Face Smoothing. Click Digital Face Smoothing...
User Guide
Page 138
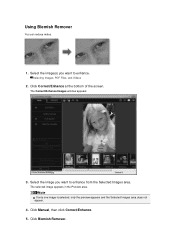
Click Manual, then click Correct/Enhance. 5. Click Correct/Enhance at the bottom of the screen. Note If only one image is selected, only the preview appears and the Selected Images area does not appear. 4. The Correct/Enhance Images window appears. 3. Select the image you want to enhance. Click Blemish Remover. Selecting Images, PDF Files, and Videos 2. The selected image appears in the Preview area. Select the image(s) you want to enhance from the Selected Images area. Using Blemish Remover You can reduce moles. 1.
Click Manual, then click Correct/Enhance. 5. Click Correct/Enhance at the bottom of the screen. Note If only one image is selected, only the preview appears and the Selected Images area does not appear. 4. The Correct/Enhance Images window appears. 3. Select the image you want to enhance. Click Blemish Remover. Selecting Images, PDF Files, and Videos 2. The selected image appears in the Preview area. Select the image(s) you want to enhance from the Selected Images area. Using Blemish Remover You can reduce moles. 1.

User Guide
Page 141
.... 1. The following adjustments are available: Brightness Contrast Adjusting Images You can make fine adjustments to adjust the level. The Correct/Enhance Images window appears. 3. Click Manual, then click Adjust. 5.
.... 1. The following adjustments are available: Brightness Contrast Adjusting Images You can make fine adjustments to adjust the level. The Correct/Enhance Images window appears. 3. Click Manual, then click Adjust. 5.
User Guide
Page 210
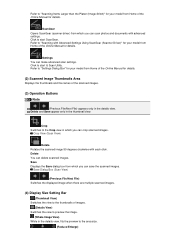
Refer to "Settings Dialog Box" for your model from Home of the Online Manual for details. Delete You can make advanced scan settings. Settings You can delete scanned images. Crop Switches to the area size. (Reduce/Enlarge) Save Dialog ... scanned image 90 degrees clockwise with advanced settings. Save Displays the Save dialog box from Home of the Online Manual for details. ScanGear Opens ScanGear (scanner driver) from Home of the Online Manual for details. (2) Scanned Image Thumbnails Area Displays the thumbnails and file names of images. (Details View) Switches the view...
Refer to "Settings Dialog Box" for your model from Home of the Online Manual for details. Delete You can make advanced scan settings. Settings You can delete scanned images. Crop Switches to the area size. (Reduce/Enlarge) Save Dialog ... scanned image 90 degrees clockwise with advanced settings. Save Displays the Save dialog box from Home of the Online Manual for details. ScanGear Opens ScanGear (scanner driver) from Home of the Online Manual for details. (2) Scanned Image Thumbnails Area Displays the thumbnails and file names of images. (Details View) Switches the view...


