PIXMA MG5220 Wireless All-in-one Printer - Canon
PIXMA MG5220 Wireless All-in-one Printer
View Results Below
Free Canon PIXMA MG5220 manuals!
Problems with Canon PIXMA MG5220?
Ask a Question
Free Canon PIXMA MG5220 manuals!
Problems with Canon PIXMA MG5220?
Ask a Question
Related Manual Pages


Related Videos

Canon PIXMA MG5220 Wireless Inkjet Photo All-In-One (4502B017)
Duration: 2:13
Total Views: 2,531
Duration: 2:13
Total Views: 2,531
Canon PIXMA MG5220 Wireless Inkjet Photo All-In-One Printer
Duration: 3:45
Total Views: 233
Duration: 3:45
Total Views: 233
Awesome quality with Canon PIXMA MG5220 Wireless Inkjet Photo All-In-One printer
Duration: 1:16
Total Views: 362
Duration: 1:16
Total Views: 362
Similar Questions

How Do I Find My Canon Mg5220 Wireless Printer Ip Address
(Posted by singfaus 9 years ago)

How To Setup Canon Wireless Printer Without Cd In Windows 7 32 Bit
(Posted by simoX2 9 years ago)
Setting Up Wireless Printer?
I have been trying to set up the wireless printer and I get to a point that I have to enter a passph...
I have been trying to set up the wireless printer and I get to a point that I have to enter a passph...
(Posted by dawnmoor 10 years ago)

Where Can I Find The Mac Address Of A Canon Mg5220 Wireless Printer
(Posted by yzlBNR 10 years ago)

Wireless Printer Canon Mx459
How do you setup the wireless printers on Cano MX459 multi-functional printers. Also, is the fax wir...
How do you setup the wireless printers on Cano MX459 multi-functional printers. Also, is the fax wir...
(Posted by appraiserlewis 10 years ago)
Related Terms
The following terms were also used when searching for PIXMA MG5220 Wireless All-in-one Printer - Canon:- canon pixma mg5220
- pixma mg5220
- pixma mg5220 wireless
- canon pixmamg5220
- pixma mg5220 ink
- canon pixma mg5220 printer
- pixma mg5220 printer
- pixma mg5220 wireless inkjet photo all-in-one
- canon pixma mg5220 ink
- canon pixma mg5220 wireless inkjet photo all-in-one
- pixma mg5220 review
- pixma mg5220 mac
- canon pixma mg5220 wireless all-in-one printer
- pixma mg5220 driver
- pixma mg5220 wireless all-in-one printer
- canon pixma mg5220 review
- canon pixma mg5220 driver
- pixma mg5220 all in one printer
- pixma mg5220 software
- pixma mg5220 wireless inkjet photo all in one
- canon pixma mg5220 all in one printer
- canon pixma mg5220 wireless inkjet photo all in one
- pixma mg5220 best buy
- pixma mg5220 best price
- pixma mg5220 drivers
- pixma mg5220 fax
- pixma mg5220 sale
- pixma mg5220 serial number
- pixma mg5220 wireless all-in-one printer review
- canon pixma mg5220 printer review
- pixma mg5220 airprint
- pixma mg5220 prices
- pixma mg5220 ratings
- pixma mg5220 setup
- pixma mg5220 usb cable
- pixma mg5220 wireless all in one printer review
- cannon pixma mg5220
- canon pixma mg 5220
- canon pixma mg5220 airprint
- canon pixma mg5220 all in one inkjet printer
- canon pixma mg5220 all-in-one inkjet printer
- canon pixma mg5220 b200
- canon pixma mg5220 b200 error
- canon pixma mg5220 best buy
- canon pixma mg5220 best price
- canon pixma mg5220 cardstock
- canon pixma mg5220 cartridges
- canon pixma mg5220 change ink
- canon pixma mg5220 compatible ink
- canon pixma mg5220 download
- canon pixma mg5220 download software
- canon pixma mg5220 driver download
- canon pixma mg5220 driver download mac
- canon pixma mg5220 driver download windows 7
- canon pixma mg5220 driver downloads
- canon pixma mg5220 driver mac
- canon pixma mg5220 driver windows 8
- canon pixma mg5220 drivers
- canon pixma mg5220 drivers and software
- canon pixma mg5220 drivers download
- canon pixma mg5220 edible ink
- canon pixma mg5220 error 5100
- canon pixma mg5220 error 6000
- canon pixma mg5220 error b200
- canon pixma mg5220 error code 5100
- canon pixma mg5220 error code b200
- canon pixma mg5220 error code c000
- canon pixma mg5220 fax
- canon pixma mg5220 how to replace ink
- canon pixma mg5220 how to scan
- canon pixma mg5220 ink cartridge
- canon pixma mg5220 ink cartridges
- canon pixma mg5220 ink refill
- canon pixma mg5220 ink refill kit
- canon pixma mg5220 ink replacement
- canon pixma mg5220 inkjet cartridges
- canon pixma mg5220 inner cover error
- canon pixma mg5220 install
- canon pixma mg5220 install software
- canon pixma mg5220 installation software
- canon pixma mg5220 instructions
- canon pixma mg5220 ipad printing
- canon pixma mg5220 linux
- canon pixma mg5220 mac driver
- canon pixma mg5220 manual
- canon pixma mg5220 manual download free
- canon pixma mg5220 manual online
- canon pixma mg5220 manual pdf
- canon pixma mg5220 mp navigator
- canon pixma mg5220 online manual
- canon pixma mg5220 owner's manual
- canon pixma mg5220 owners manual
- canon pixma mg5220 paper jam
- canon pixma mg5220 parts
- canon pixma mg5220 power cord
- canon pixma mg5220 price
- canon pixma mg5220 prices
- canon pixma mg5220 print envelopes
- canon pixma mg5220 print head
- canon pixma mg5220 printer download
- canon pixma mg5220 printer driver
- canon pixma mg5220 printer driver download
- canon pixma mg5220 printer error
- canon pixma mg5220 printer head
- canon pixma mg5220 printer ink
- canon pixma mg5220 printer manual
- canon pixma mg5220 printer not responding
- canon pixma mg5220 printer offline
- canon pixma mg5220 printer photos
- canon pixma mg5220 printer setup
- canon pixma mg5220 printer user manual
- canon pixma mg5220 printers
- canon pixma mg5220 printhead
- canon pixma mg5220 printhead replacement
- canon pixma mg5220 ratings
- canon pixma mg5220 repair manual
- canon pixma mg5220 review cnet
- canon pixma mg5220 reviews
- canon pixma mg5220 sale
- canon pixma mg5220 scanner
- canon pixma mg5220 scanner software
- canon pixma mg5220 setup
- canon pixma mg5220 setup software
- canon pixma mg5220 software
- canon pixma mg5220 software download
- canon pixma mg5220 software download free
- canon pixma mg5220 software for mac
- canon pixma mg5220 specs
- canon pixma mg5220 support
- canon pixma mg5220 troubleshooting
- canon pixma mg5220 u052 error
- canon pixma mg5220 usb cable
- canon pixma mg5220 usb cord
- canon pixma mg5220 user guide
- canon pixma mg5220 user manual
- canon pixma mg5220 walmart
- canon pixma mg5220 wifi setup
- canon pixma mg5220 will not power on
- canon pixma mg5220 wireless
- canon pixma mg5220 wireless all in one printer
- canon pixma mg5220 wireless all in one printer review
- canon pixma mg5220 wireless all-in-one printer review
- canon pixma mg5220 wireless inkjet
- canon pixma mg5220 wireless photo all in-one
- canon pixma mg5220 wireless setup
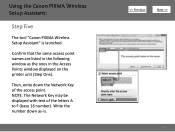
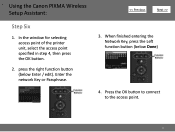
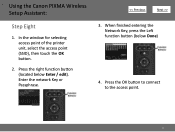
- canon pixma mg5220 wireless setup assistant
- canon pixma mg5220 won't scan
- canon pixma mg5220 won't turn on
- canon pixma mg5220 wont turn on
- ink for pixma mg5220
- pixma mg 5220
- pixma mg5220 all in one inkjet printer
- pixma mg5220 all-in-one inkjet printer
- pixma mg5220 app
- pixma mg5220 b200
- pixma mg5220 b200 error
- pixma mg5220 black
- pixma mg5220 black xl
- pixma mg5220 c000 error
- pixma mg5220 canon
- pixma mg5220 canon printer
- pixma mg5220 cardstock
- pixma mg5220 cartridge
- pixma mg5220 cartridges
- pixma mg5220 change ink
- pixma mg5220 cloud print
- pixma mg5220 compatible ink
- pixma mg5220 diagram
- pixma mg5220 download
- pixma mg5220 download software
- pixma mg5220 driver download
- pixma mg5220 driver download mac
- pixma mg5220 driver download windows 7
- pixma mg5220 driver downloads
- pixma mg5220 driver mac
- pixma mg5220 driver windows 8
- pixma mg5220 drivers and software
- pixma mg5220 drivers download
- pixma mg5220 edible ink
- pixma mg5220 error 5100
- pixma mg5220 error 6000
- pixma mg5220 error b200
- pixma mg5220 error c000
- pixma mg5220 error code 5100
- pixma mg5220 error code b200
- pixma mg5220 error code c000
- pixma mg5220 how do i scan
- pixma mg5220 how to replace ink
- pixma mg5220 how to scan
- pixma mg5220 ink amazon.com
- pixma mg5220 ink cartridge
- pixma mg5220 ink cartridges
- pixma mg5220 ink combo packs
- pixma mg5220 ink lowest price
- pixma mg5220 ink refill
- pixma mg5220 ink refill kit
- pixma mg5220 ink replacement
- pixma mg5220 inkjet
- pixma mg5220 inkjet all in-one printer
- pixma mg5220 inkjet cartridges
- pixma mg5220 inner cover error
- pixma mg5220 install
- pixma mg5220 install software
- pixma mg5220 installation
- pixma mg5220 installation software
- pixma mg5220 instructions
- pixma mg5220 ipad printing
- pixma mg5220 linux
- pixma mg5220 lion
- pixma mg5220 mac driver
- pixma mg5220 manual
- pixma mg5220 manual download free
- pixma mg5220 manual guide
- pixma mg5220 manual online
- pixma mg5220 manual pdf
- pixma mg5220 mp navigator
- pixma mg5220 multifunction printer
- pixma mg5220 network issues
- pixma mg5220 offline
- pixma mg5220 online manual
- pixma mg5220 owner's manual
- pixma mg5220 owners manual
- pixma mg5220 paper
- pixma mg5220 paper jam
- pixma mg5220 paper will not load
- pixma mg5220 parts
- pixma mg5220 power cord
- pixma mg5220 price
- pixma mg5220 print envelopes
- pixma mg5220 print head
- pixma mg5220 printer download
- pixma mg5220 printer driver
- pixma mg5220 printer driver download
- pixma mg5220 printer error
- pixma mg5220 printer head
- pixma mg5220 printer ink
- pixma mg5220 printer manual
- pixma mg5220 printer not responding
- pixma mg5220 printer offline
- pixma mg5220 printer photos
- pixma mg5220 printer review
- pixma mg5220 printer setup
- pixma mg5220 printer user manual
- pixma mg5220 printers
- pixma mg5220 printhead
- pixma mg5220 printhead replacement
- pixma mg5220 problem scanning
- pixma mg5220 refurbished
- pixma mg5220 repair manual
- pixma mg5220 review cnet
- pixma mg5220 reviews
- pixma mg5220 scan
- pixma mg5220 scanner
- pixma mg5220 scanner driver
- pixma mg5220 scanner not working
- pixma mg5220 scanner software
- pixma mg5220 scanning
- pixma mg5220 setup cd-rom
- pixma mg5220 setup software
- pixma mg5220 sleep mode
- pixma mg5220 software download
- pixma mg5220 software download free
- pixma mg5220 software for mac
- pixma mg5220 specs
- pixma mg5220 staples
- pixma mg5220 support
- pixma mg5220 toner
- pixma mg5220 troubleshooting
- pixma mg5220 u052 error
- pixma mg5220 ubuntu
- pixma mg5220 usb cord
- pixma mg5220 user guide
- pixma mg5220 user manual
- pixma mg5220 walmart
- pixma mg5220 where can buy
- pixma mg5220 wifi setup
- pixma mg5220 will not power on
- pixma mg5220 will not scan with empty tank
- pixma mg5220 wireless all in one printer
- pixma mg5220 wireless all in-one printer
- pixma mg5220 wireless driver
- pixma mg5220 wireless ink
- pixma mg5220 wireless inkjet
- pixma mg5220 wireless manual
- pixma mg5220 wireless photo all in-one
- pixma mg5220 wireless photo all-in-one
- pixma mg5220 wireless reviews
- pixma mg5220 wireless setup
- pixma mg5220 wireless setup assistant
- pixma mg5220 wireless software
- pixma mg5220 won't print on dvd
- pixma mg5220 won't scan
- pixma mg5220 won't turn on
- pixma mg5220 wont turn on
- pixmamg5220.com
- reviews pixma mg5220