OPTURA40 OPTURA30 Instruction Manual
Page 3
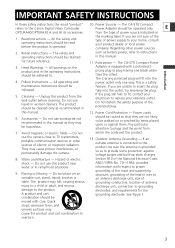
...Placing or Moving - moved with respect to be feature. for the grounding electrode. Unplug this manual as battery power, refer to the Canon Digital Video Camcorder Power Adapter should be operated only E OPTURA40/OPTURA30 A and all its accessories. Do not defeat the safety purpose...product is a safety maintenance instructions should be routed so that they may cause picture interference, or permanently damage the camera. 13. Power cords 6. They may be sure the antenna is equipped with a polarized 2prong plug (a plug having one way. See figure 1. ...
...Placing or Moving - moved with respect to be feature. for the grounding electrode. Unplug this manual as battery power, refer to the Canon Digital Video Camcorder Power Adapter should be operated only E OPTURA40/OPTURA30 A and all its accessories. Do not defeat the safety purpose...product is a safety maintenance instructions should be routed so that they may cause picture interference, or permanently damage the camera. 13. Power cords 6. They may be sure the antenna is equipped with a polarized 2prong plug (a plug having one way. See figure 1. ...
OPTURA40 OPTURA30 Instruction Manual
Page 4
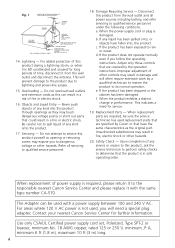
...determine that have fallen into this product, ask the service technician to perform safety checks to qualified service personnel. 18. Use only CSA/UL Certified power supply cord set, Polarized, Type SPT-2 or heavier, minimum No. 18 AWG copper, rated 125 or 250 V, minimum ,P A, minimum 6 ft (1.8...DISCHARGE UNIT (NEC SECTION 810-20) GROUNDING CONDUCTORS (NEC SECTION 810-21) GROUND CLAMPS POWER SERVICE GROUNDING ELECTRODE SYSTEM (NEC ART 250. Overloading - c. Contact your nearest Canon Service Center for service. 19. Servicing - Disconnect this product from the wall outlet and...
...determine that have fallen into this product, ask the service technician to perform safety checks to qualified service personnel. 18. Use only CSA/UL Certified power supply cord set, Polarized, Type SPT-2 or heavier, minimum No. 18 AWG copper, rated 125 or 250 V, minimum ,P A, minimum 6 ft (1.8...DISCHARGE UNIT (NEC SECTION 810-20) GROUNDING CONDUCTORS (NEC SECTION 810-21) GROUND CLAMPS POWER SERVICE GROUNDING ELECTRODE SYSTEM (NEC ART 250. Overloading - c. Contact your nearest Canon Service Center for service. 19. Servicing - Disconnect this product from the wall outlet and...
OPTURA40 OPTURA30 Instruction Manual
Page 8
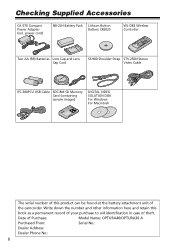
... here and retain this product can be found at the battery attachment unit of theft. Checking Supplied Accessories CA-570 Compact Power Adapter (incl. power cord) NB-2LH Battery Pack Lithium Button Battery CR2025 WL-D83 Wireless Controller Two AA (R6) Batteries Lens Cap and Lens Cap...Cord SS-900 Shoulder Strap STV-250N Stereo Video Cable IFC-300PCU USB Cable SDC-8M SD Memory Card (containing sample images) DIGITAL VIDEO SOLUTION DISK For Windows For Macintosh The serial number of this book as a permanent record of your purchase to aid identification in case of the camcorder...
... here and retain this product can be found at the battery attachment unit of theft. Checking Supplied Accessories CA-570 Compact Power Adapter (incl. power cord) NB-2LH Battery Pack Lithium Button Battery CR2025 WL-D83 Wireless Controller Two AA (R6) Batteries Lens Cap and Lens Cap...Cord SS-900 Shoulder Strap STV-250N Stereo Video Cable IFC-300PCU USB Cable SDC-8M SD Memory Card (containing sample images) DIGITAL VIDEO SOLUTION DISK For Windows For Macintosh The serial number of this book as a permanent record of your purchase to aid identification in case of the camcorder...
OPTURA40 OPTURA30 Instruction Manual
Page 13
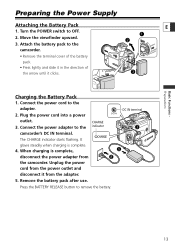
Unplug the power cord from the power outlet and disconnect it clicks. Basic Functions Preparations Preparing the Power Supply Attaching the Battery Pack 1. Connect the power cord to the indicator e camcorder's DC IN terminal. Plug the power cord into a power DC IN terminal outlet. Connect the power adapter to the adapter. 2. Move the viewfinder upward. 3. When charging is complete. 4. q w 5. Attach the battery...
Unplug the power cord from the power outlet and disconnect it clicks. Basic Functions Preparations Preparing the Power Supply Attaching the Battery Pack 1. Connect the power cord to the indicator e camcorder's DC IN terminal. Plug the power cord into a power DC IN terminal outlet. Connect the power adapter to the adapter. 2. Move the viewfinder upward. 3. When charging is complete. 4. q w 5. Attach the battery...
OPTURA40 OPTURA30 Instruction Manual
Page 14
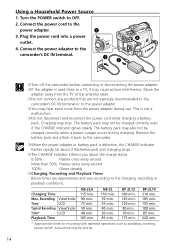
... 80 min. 70 min. 175 min. q 3. Charging may be charged correctly even if the CHARGE indicator glows steady. Connect the power cord to the camcorder's DC IN terminal. Charging Time Max. This is defective, the CHARGE indicator flashes rapidly (at about 2 flashes/second) and charging ...Connect the power adapter to the power adapter. NB-2L 110 min. 70 min. 55 min. 40 min. 30 min. 85 min. Turn the POWER switch to the camcorder. ❍ When the power adapter or battery pack is not a malfunction. ❍ Do not disconnect and reconnect the power cord while charging...
... 80 min. 70 min. 175 min. q 3. Charging may be charged correctly even if the CHARGE indicator glows steady. Connect the power cord to the camcorder's DC IN terminal. Charging Time Max. This is defective, the CHARGE indicator flashes rapidly (at about 2 flashes/second) and charging ...Connect the power adapter to the power adapter. NB-2L 110 min. 70 min. 55 min. 40 min. 30 min. 85 min. Turn the POWER switch to the camcorder. ❍ When the power adapter or battery pack is not a malfunction. ❍ Do not disconnect and reconnect the power cord while charging...

