DV Messenger Ver 1.0 Instruction Manual
Page 5
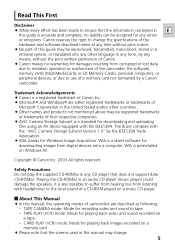
...161; WIA stands for playing back video and sound recorded on a memory card. ¡ Please note that does not support data CD-ROM(s). TAPE PLAY (VCR) mode: Mode for Windows Image Acquisition. Trademark Acknowledgements ¡ Canon is a registered trademark of Canon Inc. ¡ Microsoft® and.... Playing the CD-ROM(s) in E this manual may be accepted for damages resulting from listening with the "AV/C Camera Storage Subunit Version 1.0" by a Canon camcorder. It is accurate and complete, no warranties for any CD player that the screens used in any errors or omissions...
...161; WIA stands for playing back video and sound recorded on a memory card. ¡ Please note that does not support data CD-ROM(s). TAPE PLAY (VCR) mode: Mode for Windows Image Acquisition. Trademark Acknowledgements ¡ Canon is a registered trademark of Canon Inc. ¡ Microsoft® and.... Playing the CD-ROM(s) in E this manual may be accepted for damages resulting from listening with the "AV/C Camera Storage Subunit Version 1.0" by a Canon camcorder. It is accurate and complete, no warranties for any CD player that the screens used in any errors or omissions...
DV Messenger Ver 1.0 Instruction Manual
Page 8
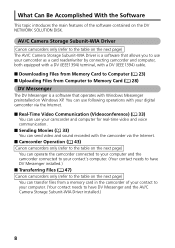
...video and sound recorded with Windows Messenger preinstalled on the next page) You can operate the camcorder connected to your computer and the camcorder connected to your contact's computer. (Your contact needs to have DV Messenger and the AV/C Camera Storage Subunit-WIA Driver installed.) 8 I Camcorder Operation ( 43) Canon camcorders... You can use following operations with a DV (IEEE1394) cable. AV/C Camera Storage Subunit-WIA Driver Canon camcorders only (refer to the table on the next page) The AV/C Camera Storage Subunit-WIA Driver is a software that allows you to use your ...
...video and sound recorded with Windows Messenger preinstalled on the next page) You can operate the camcorder connected to your computer and the camcorder connected to your contact's computer. (Your contact needs to have DV Messenger and the AV/C Camera Storage Subunit-WIA Driver installed.) 8 I Camcorder Operation ( 43) Canon camcorders... You can use following operations with a DV (IEEE1394) cable. AV/C Camera Storage Subunit-WIA Driver Canon camcorders only (refer to the table on the next page) The AV/C Camera Storage Subunit-WIA Driver is a software that allows you to use your ...
DV Messenger Ver 1.0 Instruction Manual
Page 12
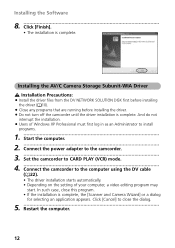
...video editing program may start. Click [Cancel] to the computer using the DV cable ( 22). • The driver installation starts automatically. • Depending on the setting of Windows XP Professional must first log in as an Administrator to install programs. 1 Start the computer. 2 Connect the power adapter to the camcorder. 3 Set the camcorder...programs that are running before installing the driver. ¡ Do not turn off the camcorder until the driver installation is complete, the [Scanner and Camera Wizard] or a dialog for selecting an application appears. In such case, close the...
...video editing program may start. Click [Cancel] to the computer using the DV cable ( 22). • The driver installation starts automatically. • Depending on the setting of Windows XP Professional must first log in as an Administrator to install programs. 1 Start the computer. 2 Connect the power adapter to the camcorder. 3 Set the camcorder...programs that are running before installing the driver. ¡ Do not turn off the camcorder until the driver installation is complete, the [Scanner and Camera Wizard] or a dialog for selecting an application appears. In such case, close the...
DV Messenger Ver 1.0 Instruction Manual
Page 35
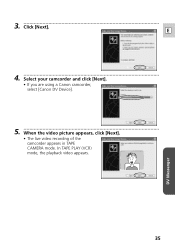
E 4 Select your camcorder and click [Next]. • If you are using a Canon camcorder, select [Canon DV Device]. 5 When the video picture appears, click [Next]. • The live video recording of the camcorder appears in TAPE CAMERA mode. In TAPE PLAY (VCR) mode, the playback video appears. 35 DV Messenger 3 Click [Next].
E 4 Select your camcorder and click [Next]. • If you are using a Canon camcorder, select [Canon DV Device]. 5 When the video picture appears, click [Next]. • The live video recording of the camcorder appears in TAPE CAMERA mode. In TAPE PLAY (VCR) mode, the playback video appears. 35 DV Messenger 3 Click [Next].
DV Messenger Ver 1.0 Instruction Manual
Page 43
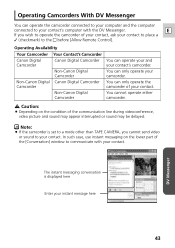
...is set to a mode other than TAPE CAMERA, you wish to operate the camcorder of the [Conversation] window to your ...video picture and sound may appear interrupted or sound may be delayed. You cannot operate either camcorder. Operating Camcorders With DV Messenger You can operate the camcorder connected to your computer and the computer connected to the before [Allow Remote Control]. Operating Availability Your Camcorder Your Contact's Camcorder Canon Digital Camcorder Canon Digital Camcorder Non-Canon Digital Camcorder Non-Canon Digital Canon Digital Camcorder Camcorder Non-Canon...
...is set to a mode other than TAPE CAMERA, you wish to operate the camcorder of the [Conversation] window to your ...video picture and sound may appear interrupted or sound may be delayed. You cannot operate either camcorder. Operating Camcorders With DV Messenger You can operate the camcorder connected to your computer and the computer connected to the before [Allow Remote Control]. Operating Availability Your Camcorder Your Contact's Camcorder Canon Digital Camcorder Canon Digital Camcorder Non-Canon Digital Camcorder Non-Canon Digital Canon Digital Camcorder Camcorder Non-Canon...

DV Messenger Ver 1.0 Instruction Manual
Page 44
...44 You can send live video recording to your contact and perform a videoconference ( 33). To operate your contact's camcorder (when set to TAPE CAMERA mode, you can also adjust the camcorder's zoom and focus from the DVM panel. 1 Set your camcorder to TAPE CAMERA mode. • Unload ...Cannot be used with autofocus.) 5 Focus (Far) Brings the focus point farther. (Cannot be selected if the camcorder is set to TAPE CAMERA mode): Click the [Remote] button on the DVM panel. I The [CAMERA] Operating Buttons 12 3 45 1 Zoom W (wide angle) The subject becomes smaller. 2 Zoom T (...
...44 You can send live video recording to your contact and perform a videoconference ( 33). To operate your contact's camcorder (when set to TAPE CAMERA mode, you can also adjust the camcorder's zoom and focus from the DVM panel. 1 Set your camcorder to TAPE CAMERA mode. • Unload ...Cannot be used with autofocus.) 5 Focus (Far) Brings the focus point farther. (Cannot be selected if the camcorder is set to TAPE CAMERA mode): Click the [Remote] button on the DVM panel. I The [CAMERA] Operating Buttons 12 3 45 1 Zoom W (wide angle) The subject becomes smaller. 2 Zoom T (...
DV Messenger Ver 1.0 Instruction Manual
Page 49
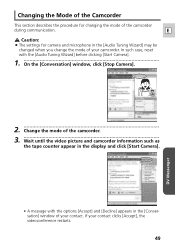
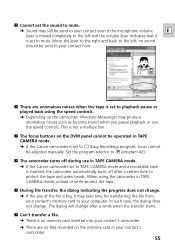
... Tuning Wizard] before clicking [Start Camera]. 1 On the [Conversation] window, click [Stop Camera]. 2 Change the mode of the camcorder during communication. E Caution: ¡ The settings for changing the mode of the camcorder. 3 Wait until the video picture and camcorder information such as the tape counter ...appear in the display and click [Start Camera]. If your contact clicks [Accept], the videoconference restarts. 49 In such...
... Tuning Wizard] before clicking [Start Camera]. 1 On the [Conversation] window, click [Stop Camera]. 2 Change the mode of the camcorder during communication. E Caution: ¡ The settings for changing the mode of the camcorder. 3 Wait until the video picture and camcorder information such as the tape counter ...appear in the display and click [Start Camera]. If your contact clicks [Accept], the videoconference restarts. 49 In such...
DV Messenger Ver 1.0 Instruction Manual
Page 52
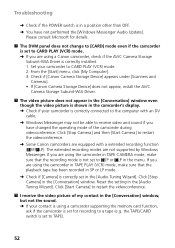
... recording to receive video and sound if you are using a Canon camcorder, check if the AV/C Camera Storage Subunit-WIA Driver is correctly installed. 1. I receive the video picture of the camcorder during videoconference. Set your camcorder to TAPE). 52 Click [Stop Camera] in the [Audio Tuning Wizard]. Click [Start Camera] to restart the videoconference. ➜ Some Canon camcorders are not supported...
... recording to receive video and sound if you are using a Canon camcorder, check if the AV/C Camera Storage Subunit-WIA Driver is correctly installed. 1. I receive the video picture of the camcorder during videoconference. Set your camcorder to TAPE). 52 Click [Stop Camera] in the [Audio Tuning Wizard]. Click [Start Camera] to restart the videoconference. ➜ Some Canon camcorders are not supported...

DV Messenger Ver 1.0 Instruction Manual
Page 54
...; If you are using speakers, depending on the right operates. ➜ If you are using a Canon camcorder, click [Stop Camera] and check whether [Canon DV Device] is selected in the [Audio Tuning Wizard]. Troubleshooting 4. My contact is set to TAPE...). ➜ Check the position of speakers. 54 Change the direction or volume of the speakers. the TAPE/CARD switch is receiving the video picture, but not the sound." We recommend using a camcorder...
...; If you are using speakers, depending on the right operates. ➜ If you are using a Canon camcorder, click [Stop Camera] and check whether [Canon DV Device] is selected in the [Audio Tuning Wizard]. Troubleshooting 4. My contact is set to TAPE...). ➜ Check the position of speakers. 54 Change the direction or volume of the speakers. the TAPE/CARD switch is receiving the video picture, but not the sound." We recommend using a camcorder...
DV Messenger Ver 1.0 Instruction Manual
Page 55
... the sound to mute. ➜ Sound may still be operated in TAPE CAMERA mode. ➜ If the Canon camcorder set to TAPE CAMERA mode and a recordable tape is set to [ (Easy Recording) program, focus cannot be send to protect the tape and video heads. There are no sound should be adjusted manually. Set the program...
... the sound to mute. ➜ Sound may still be operated in TAPE CAMERA mode. ➜ If the Canon camcorder set to TAPE CAMERA mode and a recordable tape is set to [ (Easy Recording) program, focus cannot be send to protect the tape and video heads. There are no sound should be adjusted manually. Set the program...

OPTURA Xi Instruction Manual
Page 3
... and built-up static charges. 8. The CA-570 Compact refers to replace your product dealer or local power company. Do not use the camera close to proper 9. Power Sources - The CA-570 Compact Power Introduction 3. Avoid magnetic or electric fields - Polarization - Adapter is operated.... 70-1984, provides water or in If the plug still fails to fit, contact your electrician to the Canon Digital Video Camcorder Power Adapter should be operated only E OPTURA Xi A and all its accessories. Do not use this product from the wall outlet before the product is equipped ...
... and built-up static charges. 8. The CA-570 Compact refers to replace your product dealer or local power company. Do not use the camera close to proper 9. Power Sources - The CA-570 Compact Power Introduction 3. Avoid magnetic or electric fields - Polarization - Adapter is operated.... 70-1984, provides water or in If the plug still fails to fit, contact your electrician to the Canon Digital Video Camcorder Power Adapter should be operated only E OPTURA Xi A and all its accessories. Do not use this product from the wall outlet before the product is equipped ...

OPTURA Xi Instruction Manual
Page 5
...❍ Windows XP Users Only DV Network Software Instruction Manual This manual explains how to connect the camcorder to a computer and use the following manuals are registered trademarks of Canon Inc. • D is a trademark. • logo is a trademark. • Windows&#... software operates with the camcorder: E ❍ Digital Video Camcorder OPTURA Xi Instruction Manual This manual explains the camcorder operations from basic video recording to the use the camcorder as a card reader/writer. You can add sample images for Card Mix and My Camera settings from the supplied DIGITAL...
...❍ Windows XP Users Only DV Network Software Instruction Manual This manual explains how to connect the camcorder to a computer and use the following manuals are registered trademarks of Canon Inc. • D is a trademark. • logo is a trademark. • Windows&#... software operates with the camcorder: E ❍ Digital Video Camcorder OPTURA Xi Instruction Manual This manual explains the camcorder operations from basic video recording to the use the camcorder as a card reader/writer. You can add sample images for Card Mix and My Camera settings from the supplied DIGITAL...

OPTURA Xi Instruction Manual
Page 23
... from time to time if they may damage the camcorder. ❍ Do not use tapes that cassette, slide the tab back to the right. If you load a protected cassette in the camcorder after use spliced tapes or nonstandard cassettes as video heads may become dirty with use. Do not drop... or subject them upright. ❍ Do not leave the cassette in CAMERA SAVE SAVE mode, the message "THE TAPE IS SET FOR...
... from time to time if they may damage the camcorder. ❍ Do not use tapes that cassette, slide the tab back to the right. If you load a protected cassette in the camcorder after use spliced tapes or nonstandard cassettes as video heads may become dirty with use. Do not drop... or subject them upright. ❍ Do not leave the cassette in CAMERA SAVE SAVE mode, the message "THE TAPE IS SET FOR...

OPTURA Xi Instruction Manual
Page 28
... check if the camcorder operates correctly. w q w Mastering the Basics 3. Press the start/stop button. See Setting the Time Zone, Date and Time ( 25). Recording 1. If you make important recordings, clean the video heads ( 161). To use the LCD screen or the viewfinder when recording...recording. Press the start /stop button again to begin recording. 5. rt e 28 Before You Begin Recording Make a test recording first to CAMERA mode. Load a cassette. Adjust the angle of the lens ( 33). 4. Preparations Connect a power source. Restart recording by pressing the...
... check if the camcorder operates correctly. w q w Mastering the Basics 3. Press the start/stop button. See Setting the Time Zone, Date and Time ( 25). Recording 1. If you make important recordings, clean the video heads ( 161). To use the LCD screen or the viewfinder when recording...recording. Press the start /stop button again to begin recording. 5. rt e 28 Before You Begin Recording Make a test recording first to CAMERA mode. Load a cassette. Adjust the angle of the lens ( 33). 4. Preparations Connect a power source. Restart recording by pressing the...

OPTURA Xi Instruction Manual
Page 29
... the POWER switch to OFF and then back to CAMERA. ❍ When you do not remove the cassette, you can record the next scene without producing any noise or blank sections between the recordings even if you turn the camcorder off. ❍ For extra recording time, see ... are produced with extremely high-precision manufacturing techniques, with more than 10 seconds. ❍ The camcorder will shut off if you start recording, the camcorder counts from 1 second to protect tape and video heads. Mastering the Basics 29 Turn the POWER switch to its original position. Disconnect the power ...
... the POWER switch to OFF and then back to CAMERA. ❍ When you do not remove the cassette, you can record the next scene without producing any noise or blank sections between the recordings even if you turn the camcorder off. ❍ For extra recording time, see ... are produced with extremely high-precision manufacturing techniques, with more than 10 seconds. ❍ The camcorder will shut off if you start recording, the camcorder counts from 1 second to protect tape and video heads. Mastering the Basics 29 Turn the POWER switch to its original position. Disconnect the power ...

OPTURA Xi Instruction Manual
Page 52
...Camera Settings CAMERA PLAY (VCR) CARD CAMERA CARD PLAY (VCR) ( 43) MY CAMERA SEL.S-UP IMG•CANON LOGO S-UP SOUND•••DEFAULT SHTR SOUND•••DEFAULT OPER.SOUND•••DEFAULT SELF-T SOUND•DEFAULT 1. Customizing the Camcorder E You can personalize your camcorder... by customizing the start-up image and the sound it makes for start-up, shutter, operation and self-timer (collectively called the My Camera...mode): [NO IMAGE], [CANON LOGO], [MY IMAGE1]...and select [MY CAMERA]. 2. Using ...
...Camera Settings CAMERA PLAY (VCR) CARD CAMERA CARD PLAY (VCR) ( 43) MY CAMERA SEL.S-UP IMG•CANON LOGO S-UP SOUND•••DEFAULT SHTR SOUND•••DEFAULT OPER.SOUND•••DEFAULT SELF-T SOUND•DEFAULT 1. Customizing the Camcorder E You can personalize your camcorder... by customizing the start-up image and the sound it makes for start-up, shutter, operation and self-timer (collectively called the My Camera...mode): [NO IMAGE], [CANON LOGO], [MY IMAGE1]...and select [MY CAMERA]. 2. Using ...

OPTURA Xi Instruction Manual
Page 55
... a normal TV, the image appears vertically "squashed" (compressed). ❍ If you leave the camcorder turned on without loading a cassette and without inserting a memory card for more than 5 minutes. CAMERA PLAY (VCR) CARD CAMERA CARD PLAY (VCR) ( 43) DISPLAY SET UP DEMO MODE••••ON With ...[OFF] and close the menu. Using the Full Range of Features 55 It starts automatically when you connect the camcorder to a TV with an S1 terminal or Video ID-1 system, recordings made in the 16:9 mode will be automatically played back in the Easy Recording mode. &#...
... a normal TV, the image appears vertically "squashed" (compressed). ❍ If you leave the camcorder turned on without loading a cassette and without inserting a memory card for more than 5 minutes. CAMERA PLAY (VCR) CARD CAMERA CARD PLAY (VCR) ( 43) DISPLAY SET UP DEMO MODE••••ON With ...[OFF] and close the menu. Using the Full Range of Features 55 It starts automatically when you connect the camcorder to a TV with an S1 terminal or Video ID-1 system, recordings made in the 16:9 mode will be automatically played back in the Easy Recording mode. &#...

OPTURA Xi Instruction Manual
Page 60
... AF-assist lamp (White LED) illuminates the subject in the center of Features 60 E - CAMERA PLAY (VCR) CARD CAMERA CARD PLAY (VCR) 1. Using the Full Range of the screen to enable the camcorder to [ON]. Set the flash to a mode other than (flash off after a short time.... ❍ The camcorder may flicker when played back on ) is prohibited. ❍ If you have attached the optional VFL-1 Video...
... AF-assist lamp (White LED) illuminates the subject in the center of Features 60 E - CAMERA PLAY (VCR) CARD CAMERA CARD PLAY (VCR) 1. Using the Full Range of the screen to enable the camcorder to [ON]. Set the flash to a mode other than (flash off after a short time.... ❍ The camcorder may flicker when played back on ) is prohibited. ❍ If you have attached the optional VFL-1 Video...

OPTURA Xi Instruction Manual
Page 78
... video light's power switch to CAMERA or CARD CAMERA mode. 5. This is not a malfunction. ❍ If you attach the video light and set its POWER switch to a position other reflective subjects when the video 78 light is set to AUTO, it clicks. 3. Slide the video light... may turn off repeatedly. q 2. Using the VL-3 Video Light (Optional) This VL-3 Video Light attaches to the camcorder's advanced accessory shoe for E cable-free operation and is securely attached to the camcorder. 4. Refer also to the VL-3 Video Light instruction manual. ❍ Always turn on . &#...
... video light's power switch to CAMERA or CARD CAMERA mode. 5. This is not a malfunction. ❍ If you attach the video light and set its POWER switch to a position other reflective subjects when the video 78 light is set to AUTO, it clicks. 3. Slide the video light... may turn off repeatedly. q 2. Using the VL-3 Video Light (Optional) This VL-3 Video Light attaches to the camcorder's advanced accessory shoe for E cable-free operation and is securely attached to the camcorder. 4. Refer also to the VL-3 Video Light instruction manual. ❍ Always turn on . &#...

OPTURA Xi Instruction Manual
Page 80
... to the subject within 3.3 to 6.6 ft. (1 to 2 m) when recording with your hand. ❍ The practical range of Features 1. Set the camcorder to ON. Set the video flash light's POWER switch to CAMERA or CARD CAMERA mode. 2. " " (Connection) appears. ❍ Do not fire the flash close to 4 m). they become very hot. ❍ Do not look...
... to the subject within 3.3 to 6.6 ft. (1 to 2 m) when recording with your hand. ❍ The practical range of Features 1. Set the camcorder to ON. Set the video flash light's POWER switch to CAMERA or CARD CAMERA mode. 2. " " (Connection) appears. ❍ Do not fire the flash close to 4 m). they become very hot. ❍ Do not look...


