MX310 series Quick Start Guide
Page 5
... Before Using the Machine 2 Operation Panel 2 Menu Items 4 Turning the Machine On and Off 6 Handling the Original Document 8 Loading Printing Paper 11 Copying 19 Making Copies 19 Changing the Copy Settings 19 Using Useful Copy Functions 21 Printing from Your Computer 22 Printing with... Receiving Functions ......53 Document Stored in Memory 54 Summary of Reports and Lists 57 Routine Maintenance 59 When Printing Becomes Faint or Colors Are Incorrect 59 Printing the Nozzle Check Pattern 60 Examining the Nozzle Check Pattern ...........61 Print Head Cleaning 62 Print Head Deep ...
... Before Using the Machine 2 Operation Panel 2 Menu Items 4 Turning the Machine On and Off 6 Handling the Original Document 8 Loading Printing Paper 11 Copying 19 Making Copies 19 Changing the Copy Settings 19 Using Useful Copy Functions 21 Printing from Your Computer 22 Printing with... Receiving Functions ......53 Document Stored in Memory 54 Summary of Reports and Lists 57 Routine Maintenance 59 When Printing Becomes Faint or Colors Are Incorrect 59 Printing the Nozzle Check Pattern 60 Examining the Nozzle Check Pattern ...........61 Print Head Cleaning 62 Print Head Deep ...
MX310 series Quick Start Guide
Page 12
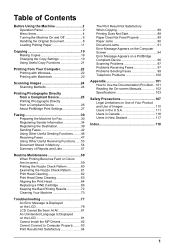
...-size documents in the ADF even if the glue is completely dry before feeding the document. z Do not load the following types of A4- Curled paper - Torn paper - Carbon paper or carbon-backed paper - Onion skin or thin paper - ADF Multipage documents of the same size, thickness, and weight Max. 8.5 x 14.0 inches / 216...0.005 inches / 0.06 to 0.13 mm 13 to 24 lb / 50 to 90 gsm „ Loading Original Documents Load originals to 0.04 inches / 1 mm in the ADF. or Letter-sized sheets (20 lb / 75 gsm paper), up to 0.16 inches / 4 mm in height z Max. 5 pages of Legal-sized sheets (20...
...-size documents in the ADF even if the glue is completely dry before feeding the document. z Do not load the following types of A4- Curled paper - Torn paper - Carbon paper or carbon-backed paper - Onion skin or thin paper - ADF Multipage documents of the same size, thickness, and weight Max. 8.5 x 14.0 inches / 216...0.005 inches / 0.06 to 0.13 mm 13 to 24 lb / 50 to 90 gsm „ Loading Original Documents Load originals to 0.04 inches / 1 mm in the ADF. or Letter-sized sheets (20 lb / 75 gsm paper), up to 0.16 inches / 4 mm in height z Max. 5 pages of Legal-sized sheets (20...
MX310 series Quick Start Guide
Page 14
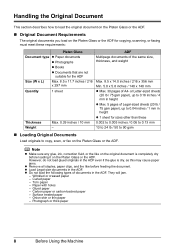
Load the document with the Paper Size Mark (A) imprinted on the Platen Glass if you want to match the document width. z Using the ADF Note Set a document on the Document Tray. (A) 10 Before Using the Machine Note Ensure that the edge of the document stack is in line with the side you want to copy, scan, or fax facing up in the ADF. 4 Adjust the Document Guides to scan it at optimum quality. 1 Remove any documents from the Platen Glass. 2 Open the Document Tray. 3 Load the document in the ADF.
Load the document with the Paper Size Mark (A) imprinted on the Platen Glass if you want to match the document width. z Using the ADF Note Set a document on the Document Tray. (A) 10 Before Using the Machine Note Ensure that the edge of the document stack is in line with the side you want to copy, scan, or fax facing up in the ADF. 4 Adjust the Document Guides to scan it at optimum quality. 1 Remove any documents from the Platen Glass. 2 Open the Document Tray. 3 Load the document in the ADF.
MX310 series Quick Start Guide
Page 15
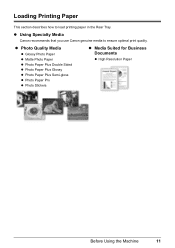
z Photo Quality Media z Glossy Photo Paper z Matte Photo Paper z Photo Paper Plus Double Sided z Photo Paper Plus Glossy z Photo Paper Plus Semi-gloss z Photo Paper Pro z Photo Stickers z Media Suited for Business Documents z High Resolution Paper Before Using the Machine 11 z Using Specialty Media Canon recommends that you use Canon genuine media to load printing paper in the Rear Tray. Loading Printing Paper This section describes how to ensure optimal print quality.
z Photo Quality Media z Glossy Photo Paper z Matte Photo Paper z Photo Paper Plus Double Sided z Photo Paper Plus Glossy z Photo Paper Plus Semi-gloss z Photo Paper Pro z Photo Stickers z Media Suited for Business Documents z High Resolution Paper Before Using the Machine 11 z Using Specialty Media Canon recommends that you use Canon genuine media to load printing paper in the Rear Tray. Loading Printing Paper This section describes how to ensure optimal print quality.
MX310 series Quick Start Guide
Page 17
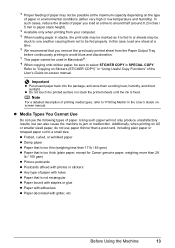
... be possible at the maximum capacity depending on the type of paper. z Media Types You Cannot Use Do not use paper thinner than 17 lb / 64 gsm) z Paper that you load at a time. *6 We recommend that is too thick (plain paper, except for Canon genuine paper, weighing more than 28 lb / 105 gsm) z Picture postcards z Postcards affixed...
... be possible at the maximum capacity depending on the type of paper. z Media Types You Cannot Use Do not use paper thinner than 17 lb / 64 gsm) z Paper that you load at a time. *6 We recommend that is too thick (plain paper, except for Canon genuine paper, weighing more than 28 lb / 105 gsm) z Picture postcards z Postcards affixed...
MX310 series Quick Start Guide
Page 18
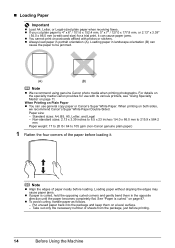
....0 x 177.8 mm, or 2.13" x 3.39" / 54.0 x 86.0 mm (credit card-size) for use general copy paper or Canon's Super White Paper. Loading paper without aligning the edges may cause paper jams. z If paper is curled." When Printing on Plain Paper z You can cause paper jams. z You cannot print on postcards affixed with its various printers, see "Using Specialty Media...
....0 x 177.8 mm, or 2.13" x 3.39" / 54.0 x 86.0 mm (credit card-size) for use general copy paper or Canon's Super White Paper. Loading paper without aligning the edges may cause paper jams. z If paper is curled." When Printing on Plain Paper z You can cause paper jams. z You cannot print on postcards affixed with its various printers, see "Using Specialty Media...

MX310 series Quick Start Guide
Page 19
... "Main Components" of the User's Guide on-screen manual. 3 Load the paper. (1) Load the paper in the rounded indent beside the Paper Output Tray and open it stops. (4) (1) (2) (2) Open the Paper Output Tray. Open up and set to load paper. (1) Open the Rear Tray and pull out the Paper Support. It may improve print quality. Set it against the...
... "Main Components" of the User's Guide on-screen manual. 3 Load the paper. (1) Load the paper in the rounded indent beside the Paper Output Tray and open it stops. (4) (1) (2) (2) Open the Paper Output Tray. Open up and set to load paper. (1) Open the Rear Tray and pull out the Paper Support. It may improve print quality. Set it against the...
MX310 series Quick Start Guide
Page 22
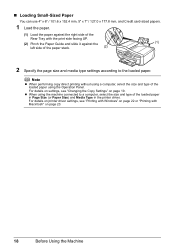
...5" x 7" / 127.0 x 177.8 mm, and Credit card-sized papers. 1 Load the paper. (1) Load the paper against the (1) left side of the loaded paper using the Operation Panel. Note z When performing copy direct printing without using the machine connected to the loaded paper. For details on printer driver settings, see "Changing the Copy Settings" ...on page 22 or "Printing with the print side facing UP. (2) Pinch the Paper Guide and slide it against the right ...
...5" x 7" / 127.0 x 177.8 mm, and Credit card-sized papers. 1 Load the paper. (1) Load the paper against the (1) left side of the loaded paper using the Operation Panel. Note z When performing copy direct printing without using the machine connected to the loaded paper. For details on printer driver settings, see "Changing the Copy Settings" ...on page 22 or "Printing with the print side facing UP. (2) Pinch the Paper Guide and slide it against the right ...
MX310 series Quick Start Guide
Page 23
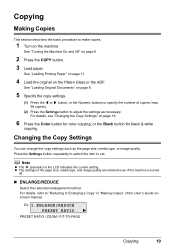
...6 Press the Color button for color copying, or the Black button for black & white copying. z The settings of the User's Guide onscreen manual. See "Loading Original Documents" on the machine. For details, see "Changing the Copy Settings" on page 6. 2 Press the COPY button. 3 Load paper. Press the ...Platen Glass or the ADF. Ex: 1.ENLARGE/REDUCE PRESET RATIO PRESET RATIO / ZOOM / FIT-TO-PAGE Copying 19 See "Loading Printing Paper" on page 11. 4 Load the original on the LCD indicates the current setting. Copying Making Copies This section describes the basic procedure to set.
...6 Press the Color button for color copying, or the Black button for black & white copying. z The settings of the User's Guide onscreen manual. See "Loading Original Documents" on the machine. For details, see "Changing the Copy Settings" on page 6. 2 Press the COPY button. 3 Load paper. Press the ...Platen Glass or the ADF. Ex: 1.ENLARGE/REDUCE PRESET RATIO PRESET RATIO / ZOOM / FIT-TO-PAGE Copying 19 See "Loading Printing Paper" on page 11. 4 Load the original on the LCD indicates the current setting. Copying Making Copies This section describes the basic procedure to set.

MX310 series Quick Start Guide
Page 24
... on the country or region of purchase. „ MEDIA TYPE Select the media type of the loaded paper. Grayscale renders tones in grayscale. „ PAGE SIZE Select the page size of the loaded paper. Ex: 5.IMAGE QUALITY STANDARD STANDARD / HIGH / FAST Note z FAST can be selected only ...when this setting is not as good as expected, select STANDARD or HIGH and try copying again. Ex: 3.MEDIA TYPE PLAIN PAPER PLAIN PAPER / PHOTO PAPER PRO / PHOTO PAPER PLUS / MATTE PHOTO ...
... on the country or region of purchase. „ MEDIA TYPE Select the media type of the loaded paper. Grayscale renders tones in grayscale. „ PAGE SIZE Select the page size of the loaded paper. Ex: 5.IMAGE QUALITY STANDARD STANDARD / HIGH / FAST Note z FAST can be selected only ...when this setting is not as good as expected, select STANDARD or HIGH and try copying again. Ex: 3.MEDIA TYPE PLAIN PAPER PLAIN PAPER / PHOTO PAPER PRO / PHOTO PAPER PLUS / MATTE PHOTO ...
MX310 series Quick Start Guide
Page 27
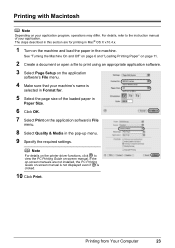
... to view the PC Printing Guide on-screen manual. Note For details on the printer driver functions, click to the instruction manual of the loaded paper in Paper Size. 6 Click OK. 7 Select Print on the application software's File menu. 8 Select Quality & Media in the machine. See "...Turning the Machine On and Off" on page 6 and "Loading Printing Paper" on page 11. 2 Create a document or open a file to print using an appropriate application software. 3 Select Page Setup on the application software's ...
... to view the PC Printing Guide on-screen manual. Note For details on the printer driver functions, click to the instruction manual of the loaded paper in Paper Size. 6 Click OK. 7 Select Print on the application software's File menu. 8 Select Quality & Media in the machine. See "...Turning the Machine On and Off" on page 6 and "Loading Printing Paper" on page 11. 2 Create a document or open a file to print using an appropriate application software. 3 Select Page Setup on the application software's ...
MX310 series Quick Start Guide
Page 29
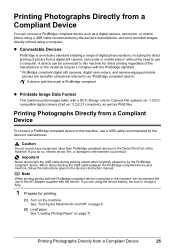
.... (1) Turn on the machine. Note When printing photos with the PictBridge compliant device connected to the machine, we recommend the use a computer. See "Loading Printing Paper" on page 6. (2) Load paper. Printing Photographs Directly from a Compliant Device 25 Important Never disconnect the USB cable during printing unless when explicitly allowed to by the device's manufacturer...
.... (1) Turn on the machine. Note When printing photos with the PictBridge compliant device connected to the machine, we recommend the use a computer. See "Loading Printing Paper" on page 6. (2) Load paper. Printing Photographs Directly from a Compliant Device 25 Important Never disconnect the USB cable during printing unless when explicitly allowed to by the device's manufacturer...
MX310 series Quick Start Guide
Page 51
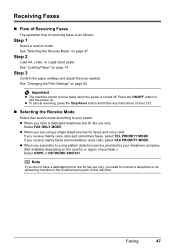
See "Loading Paper" on page 52. See "Changing the Print Settings" on page 14. Note If you do not have a dedicated telephone line for fax use only, you subscribe to turn the power on page 47. Step 3 Confirm the paper settings and adjust them as follows: Step 1 Select a receive mode. ...line for faxes and voice calls: If you receive mainly faxes and sometimes voice calls, select FAX PRIORITY MODE. Faxing 47 Step 2 Load A4, Letter, or Legal-sized paper. z To cancel receiving, press the Stop/Reset button and follow any instructions on the LCD. „ Selecting the Receive Mode ...
See "Loading Paper" on page 52. See "Changing the Print Settings" on page 14. Note If you do not have a dedicated telephone line for fax use only, you subscribe to turn the power on page 47. Step 3 Confirm the paper settings and adjust them as follows: Step 1 Select a receive mode. ...line for faxes and voice calls: If you receive mainly faxes and sometimes voice calls, select FAX PRIORITY MODE. Faxing 47 Step 2 Load A4, Letter, or Legal-sized paper. z To cancel receiving, press the Stop/Reset button and follow any instructions on the LCD. „ Selecting the Receive Mode ...
MX310 series Quick Start Guide
Page 83
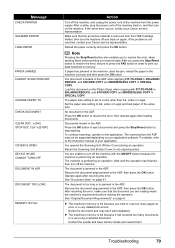
...in the ADF. Wait until the operation has finished, then turn on your application. If the same error occurs, contact your Canon service representative. Load the document on the application. For details, refer to copy too many documents, or a very long or detailed document. See ... to eject documents and press the Stop/Reset button to its original position. Operate again after loading documents. Message CHECK PRINTER SCANNER ERROR LOAD PAPER PAPER JAMMED CANNOT SCAN FROM ADF CHANGE PAPER TO CHECK DOCUMENT CLEAR DOC. [OK] STOP DOC CLR [STOP] COVER IS OPEN DEVICE...
...in the ADF. Wait until the operation has finished, then turn on your application. If the same error occurs, contact your Canon service representative. Load the document on the application. For details, refer to copy too many documents, or a very long or detailed document. See ... to eject documents and press the Stop/Reset button to its original position. Operate again after loading documents. Message CHECK PRINTER SCANNER ERROR LOAD PAPER PAPER JAMMED CANNOT SCAN FROM ADF CHANGE PAPER TO CHECK DOCUMENT CLEAR DOC. [OK] STOP DOC CLR [STOP] COVER IS OPEN DEVICE...
MX310 series Quick Start Guide
Page 84
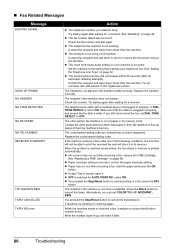
...it . Check the fax number and dial again. z The recipient's fax machine is not color-compatible. z Ink is selected for a moment. z Output Tray is printed automatically. Contact the recipient and ask them load paper in their fax machine's memory. z The receiving fax machine did not answer within 55 seconds...in memory is closed: open it assigns a unique identification number (nnnn). z OFF is low or has run out while receiving a fax: load the paper and press the OK button. Press the Black button to ON. Try dialing again after a while. z The touch tone/rotary pulse setting...
...it . Check the fax number and dial again. z The recipient's fax machine is not color-compatible. z Ink is selected for a moment. z Output Tray is printed automatically. Contact the recipient and ask them load paper in their fax machine's memory. z The receiving fax machine did not answer within 55 seconds...in memory is closed: open it assigns a unique identification number (nnnn). z OFF is low or has run out while receiving a fax: load the paper and press the OK button. Press the Black button to ON. Try dialing again after a while. z The touch tone/rotary pulse setting...
MX310 series Quick Start Guide
Page 88
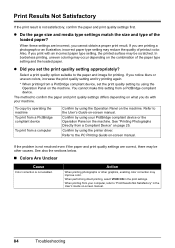
...manual. To copy by using the Operation Panel on the machine. See also the sections below. „ Colors Are Unclear Cause Color correction is not satisfactory, confirm the paper and print quality settings first. When performing direct printing, select VIVID ON in the User's Guide on ... the machine. Refer to the User's Guide on the combination of the loaded paper? Also, if you do with an incorrect paper type setting, the printed surface may reduce the quality of printout color. See "Printing Photographs Directly from your PictBridge compliant device or the Operation ...
...manual. To copy by using the Operation Panel on the machine. See also the sections below. „ Colors Are Unclear Cause Color correction is not satisfactory, confirm the paper and print quality settings first. When performing direct printing, select VIVID ON in the User's Guide on ... the machine. Refer to the User's Guide on the combination of the loaded paper? Also, if you do with an incorrect paper type setting, the printed surface may reduce the quality of printout color. See "Printing Photographs Directly from your PictBridge compliant device or the Operation ...
MX310 series Quick Start Guide
Page 91
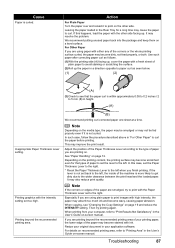
... and keep them on the other side facing up , cover the paper with high intensity, the paper may not be fed properly even if it to the wider clearance between the print head and the loaded paper. Use such paper after correcting paper curl as seen below. (1) (2) (A) (3)Check to see "Changing... the Copy Settings" on the media type, the paper may be smudged or may absorb too much ink and become dirty, ...
... and keep them on the other side facing up , cover the paper with high intensity, the paper may not be fed properly even if it to the wider clearance between the print head and the loaded paper. Use such paper after correcting paper curl as seen below. (1) (2) (A) (3)Check to see "Changing... the Copy Settings" on the media type, the paper may be smudged or may absorb too much ink and become dirty, ...

MX310 series Quick Start Guide
Page 93
... paper loaded. For details on loading paper, see "Loading Paper" on page 14. z When printing on envelopes, see "Loading Envelopes" on page 16, and prepare the envelopes before loading. z Set the Paper Thickness Lever to around half. If the Power lamp is not ready. Wait until the Power lamp stops flashing and remains lit green. For details on loading paper, see "Loading Paper...
... paper loaded. For details on loading paper, see "Loading Paper" on page 14. z When printing on envelopes, see "Loading Envelopes" on page 16, and prepare the envelopes before loading. z Set the Paper Thickness Lever to around half. If the Power lamp is not ready. Wait until the Power lamp stops flashing and remains lit green. For details on loading paper, see "Loading Paper...
MX310 series Quick Start Guide
Page 94
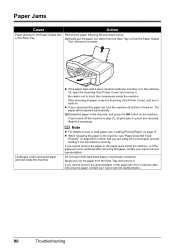
... inside the machine, or if the paper jam error continues after removing the paper, contact your Canon service representative. If you cannot remove the jammed paper or the paper jam error continues after removing the paper, contact your Canon service representative. 90 Troubleshooting Paper Jams Cause Action Paper jammed in the machine, see "Loading Printing Paper" on . Note z For details on...
... inside the machine, or if the paper jam error continues after removing the paper, contact your Canon service representative. If you cannot remove the jammed paper or the paper jam error continues after removing the paper, contact your Canon service representative. 90 Troubleshooting Paper Jams Cause Action Paper jammed in the machine, see "Loading Printing Paper" on . Note z For details on...
MX310 series Quick Start Guide
Page 100
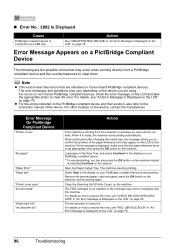
... the display on Canon-brand PictBridge compliant devices. Remove the jammed paper, load new paper, press the OK button on the device you to resolve the error, see "REQ. When printing first after changing the media type, the message asking you are indicated on your PictBridge compliant device to clear them. Load paper in the Rear...
... the display on Canon-brand PictBridge compliant devices. Remove the jammed paper, load new paper, press the OK button on the device you to resolve the error, see "REQ. When printing first after changing the media type, the message asking you are indicated on your PictBridge compliant device to clear them. Load paper in the Rear...


