User's Guide
Page 19
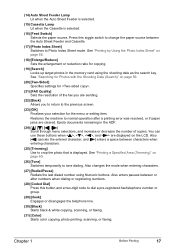
... to dial a pre-registered fax/telephone number or group. (29) [Hook] Engages or disengages the telephone line. (30) [Black] Starts black & white copying, scanning, or faxing. (31) [Color] Starts color copying, photo printing, scanning, or faxing. See "Printing a Specified Area (Trimming)" on page 66. (18) [Enlarge/Reduce] Sets the enlargement or reduction ratio for Photos with...
... to dial a pre-registered fax/telephone number or group. (29) [Hook] Engages or disengages the telephone line. (30) [Black] Starts black & white copying, scanning, or faxing. (31) [Color] Starts color copying, photo printing, scanning, or faxing. See "Printing a Specified Area (Trimming)" on page 66. (18) [Enlarge/Reduce] Sets the enlargement or reduction ratio for Photos with...
User's Guide
Page 41
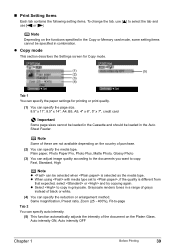
... loaded in combination. z Copy mode This section describes the Settings screen for Copy mode. (1) (5) (2) (3) (4) Tab 1 You can specify the paper settings for printing or print quality. (1) You can specify the page size. 8.5" x 11", 8.5" x 14", A4, B5, A5, 4" x 6", 5" x 7", credit card Important Some...[ ] to -page Tab 2 You can specify auto intensity. (5) This function automatically adjusts the intensity of black or white. (4) You can specify the reduction or enlargement method. „ Print Setting Items Each tab contains the following setting items. To change the tab, use [ ] or [ ]....
... loaded in combination. z Copy mode This section describes the Settings screen for Copy mode. (1) (5) (2) (3) (4) Tab 1 You can specify the paper settings for printing or print quality. (1) You can specify the page size. 8.5" x 11", 8.5" x 14", A4, B5, A5, 4" x 6", 5" x 7", credit card Important Some...[ ] to -page Tab 2 You can specify auto intensity. (5) This function automatically adjusts the intensity of black or white. (4) You can specify the reduction or enlargement method. „ Print Setting Items Each tab contains the following setting items. To change the tab, use [ ] or [ ]....

User's Guide
Page 43
... or with a sketch illustration like the sky as well as printing in print. (2) Activate/deactivate Vivid photo function. Noise reduction ON, Noise... of special effects applied to correct and smooth the jagged contours for printing. This function reduces the noise on the photo taken against the light...Color hue red +2, Color hue red +1, Color hue original, Color hue yellow +1, Color hue yellow +2 (10) Select the type of a photo. Contrast +2, Contrast +1, Contrast standard, Contrast -1, Contrast -2 (9) Adjust color hue. No effects, Sepia, Simulate illustration Chapter 1 Before Printing...
... or with a sketch illustration like the sky as well as printing in print. (2) Activate/deactivate Vivid photo function. Noise reduction ON, Noise... of special effects applied to correct and smooth the jagged contours for printing. This function reduces the noise on the photo taken against the light...Color hue red +2, Color hue red +1, Color hue original, Color hue yellow +1, Color hue yellow +2 (10) Select the type of a photo. Contrast +2, Contrast +1, Contrast standard, Contrast -1, Contrast -2 (9) Adjust color hue. No effects, Sepia, Simulate illustration Chapter 1 Before Printing...

User's Guide
Page 44
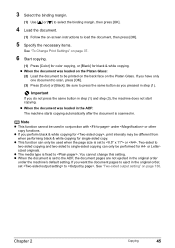
...from the Auto Sheet Feeder and the Cassette Lamp is selected. You can copy, see "Loading Documents" on the Platen Glass or the ADF. See "Print Setting Items" on the machine. Note For information on page 37. (2) Use [ ] or [ ], or the Numeric buttons to check or change ... to specify the number of documents which you can also use the auto intensity. The machine starts copying. 42 Copying Chapter 2 See "To Change Print Settings" on the types and conditions of copies. (2) (1) The following information is displayed as well. Chapter 2 Copying Making Copies This section describes ...
...from the Auto Sheet Feeder and the Cassette Lamp is selected. You can copy, see "Loading Documents" on the Platen Glass or the ADF. See "Print Setting Items" on the machine. Note For information on page 37. (2) Use [ ] or [ ], or the Numeric buttons to check or change ... to specify the number of documents which you can also use the auto intensity. The machine starts copying. 42 Copying Chapter 2 See "To Change Print Settings" on the types and conditions of copies. (2) (1) The following information is displayed as well. Chapter 2 Copying Making Copies This section describes ...
User's Guide
Page 47
...-screen instructions to load the document, then press [OK]. 5 Specify the necessary items. See "To Change Print Settings" on page 37. 6 Start copying. (1) Press [Color] for color copying, or [Black] for A4- z When the document was loaded in the ADF: The machine starts copying automatically after the ...under or other copy functions. Important If you want the document pages to scan, press [OK]. (3) Press [Color] or [Black]. Note z This function cannot be different from when performing black & white copying for single-sided copy. z If you have only one document to eject in step (1) ...
...-screen instructions to load the document, then press [OK]. 5 Specify the necessary items. See "To Change Print Settings" on page 37. 6 Start copying. (1) Press [Color] for color copying, or [Black] for A4- z When the document was loaded in the ADF: The machine starts copying automatically after the ...under or other copy functions. Important If you want the document pages to scan, press [OK]. (3) Press [Color] or [Black]. Note z This function cannot be different from when performing black & white copying for single-sided copy. z If you have only one document to eject in step (1) ...
User's Guide
Page 49
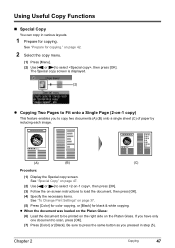
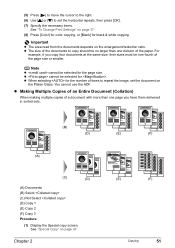
...page 42. 2 Select the copy menu. (1) Press [Menu]. (2) Use [ ] or [ ] to be printed on the right side on page 37. (5) Press [Color] for color copying, or [Black] for black & white copying. z When the document was loaded on -1 copy) This feature enables you have only one document...(C) of paper by reducing each image. (A) (B) (C) Procedure: (1) Display the Special copy screen. If you to scan, press [OK]. (7) Press [Color] or [Black]. Using Useful Copy Functions „ Special Copy You can copy in step (5). See "Prepare for copying. The Special copy screen is displayed. (2) z ...
...page 42. 2 Select the copy menu. (1) Press [Menu]. (2) Use [ ] or [ ] to be printed on the right side on page 37. (5) Press [Color] for color copying, or [Black] for black & white copying. z When the document was loaded on -1 copy) This feature enables you have only one document...(C) of paper by reducing each image. (A) (B) (C) Procedure: (1) Display the Special copy screen. If you to scan, press [OK]. (7) Press [Color] or [Black]. Using Useful Copy Functions „ Special Copy You can copy in step (5). See "Prepare for copying. The Special copy screen is displayed. (2) z ...
User's Guide
Page 50
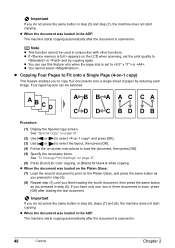
... or and try copying again. z When the document was loaded in the ADF: The machine starts copying automatically after the document is set the print quality to copy four documents onto a single sheet of paper by reducing each image. z You can be used in . 48 Copying Chapter 2... screen. z When the document was loaded in step (6). z Copying Four Pages to Fit onto a Single Page (4-on page 37. (6) Press [Color] for color copying, or [Black] for black & white copying. z If appears on the LCD when scanning, set to load the document, then press [OK]. (5) Specify the necessary items. ...
... or and try copying again. z When the document was loaded in the ADF: The machine starts copying automatically after the document is set the print quality to copy four documents onto a single sheet of paper by reducing each image. z You can be used in . 48 Copying Chapter 2... screen. z When the document was loaded in step (6). z Copying Four Pages to Fit onto a Single Page (4-on page 37. (6) Press [Color] for color copying, or [Black] for black & white copying. z If appears on the LCD when scanning, set to load the document, then press [OK]. (5) Specify the necessary items. ...
User's Guide
Page 51
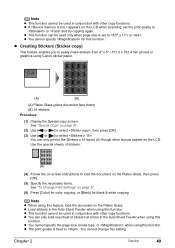
... using Canon sticker paper. (A) (B) (A) Platen Glass (place document face down) (B) 16 stickers Procedure: (1) Display the Special copy screen. z You cannot specify for black & white copying. You can be used only when page size is fixed to . z The print quality is set the print quality ...to easily make stickers from 4" x 6" / 101.6 x 152.4 mm photos or graphics using this function. z If appears on page 37. (6) Press [Color] for color copying, or [Black] for this setting. z Creating Stickers (Sticker...
... using Canon sticker paper. (A) (B) (A) Platen Glass (place document face down) (B) 16 stickers Procedure: (1) Display the Special copy screen. z You cannot specify for black & white copying. You can be used only when page size is fixed to . z The print quality is set the print quality ...to easily make stickers from 4" x 6" / 101.6 x 152.4 mm photos or graphics using this function. z If appears on page 37. (6) Press [Color] for color copying, or [Black] for this setting. z Creating Stickers (Sticker...
User's Guide
Page 52
... multiple times onto a single page. See "Special Copy" on page 47. (2) Use [ ] or [ ] to select , then press [OK]. (3) Specify the necessary items. See "To Change Print Settings" on page 47. (2) Use [ ] or [ ] to select , then press [OK]. (3) Use [ ] or [ ] to start copying. If you selected and pressed [OK], go ... image according to either or . Some cropping may need to fit onto the selected page size when making borderless copies. z You can specify print quality to the image size. Procedure: (1) Display the Special copy screen. See "Special Copy" on page 37. (4) Press...
... multiple times onto a single page. See "Special Copy" on page 47. (2) Use [ ] or [ ] to select , then press [OK]. (3) Specify the necessary items. See "To Change Print Settings" on page 47. (2) Use [ ] or [ ] to select , then press [OK]. (3) Use [ ] or [ ] to start copying. If you selected and pressed [OK], go ... image according to either or . Some cropping may need to fit onto the selected page size when making borderless copies. z You can specify print quality to the image size. Procedure: (1) Display the Special copy screen. See "Special Copy" on page 37. (4) Press...
User's Guide
Page 53
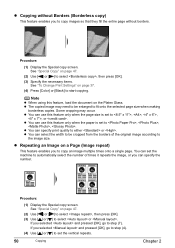
...than one division of the paper. Chapter 2 (E) (F) (E) (F) Copying 51 z The size of the documents to set the document on page 37. (8) Press [Color] for color copying, or [Black] for the page size. (5) Press [ ] to move the cursor to the right. (6) Use [ ] or [ ] to copy should be no larger than...image, set the horizontal repeats, then press [OK]. (7) Specify the necessary items. See "To Change Print Settings" on the Platen Glass. You cannot use the ADF. z cannot be selected for black & white copying. For example, if you copy four documents at the same size, their sizes must...
...than one division of the paper. Chapter 2 (E) (F) (E) (F) Copying 51 z The size of the documents to set the document on page 37. (8) Press [Color] for color copying, or [Black] for the page size. (5) Press [ ] to move the cursor to the right. (6) Use [ ] or [ ] to copy should be no larger than...image, set the horizontal repeats, then press [OK]. (7) Specify the necessary items. See "To Change Print Settings" on the Platen Glass. You cannot use the ADF. z cannot be selected for black & white copying. For example, if you copy four documents at the same size, their sizes must...
User's Guide
Page 54
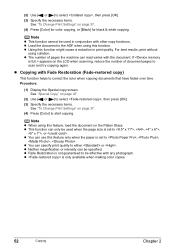
...conjunction with any photograph. z Neither magnification or intensity can specify print quality to , , , , or . Procedure: (1) Display the Special copy screen. See "Special Copy" on page 47. (2) Use [ ] or [ ] to correct the color when copying documents that have faded over time. z You can ... copy) This function helps to select , then press [OK]. (3) Specify the necessary items. See "To Change Print Settings" on page 37. (4) Press [Color] for color copying, or [Black] for black & white copying. z The number of document pages to , , , . Note z When using this feature only...
...conjunction with any photograph. z Neither magnification or intensity can specify print quality to , , , , or . Procedure: (1) Display the Special copy screen. See "Special Copy" on page 47. (2) Use [ ] or [ ] to correct the color when copying documents that have faded over time. z You can ... copy) This function helps to select , then press [OK]. (3) Specify the necessary items. See "To Change Print Settings" on page 37. (4) Press [Color] for color copying, or [Black] for black & white copying. z The number of document pages to , , , . Note z When using this feature only...
User's Guide
Page 60
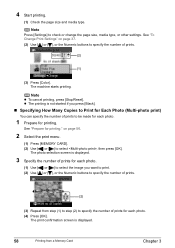
... Numeric buttons to specify the number of prints to specify the number of prints. (2) (3) Repeat from a Memory Card Chapter 3 4 Start printing. (1) Check the page size and media type. z The printing is displayed. 3 Specify the number of prints for each photo. (1) Use [ ] or [ ] to select the image you press [Black]. „ Specifying How Many Copies to specify...
... Numeric buttons to specify the number of prints to specify the number of prints. (2) (3) Repeat from a Memory Card Chapter 3 4 Start printing. (1) Check the page size and media type. z The printing is displayed. 3 Specify the number of prints for each photo. (1) Use [ ] or [ ] to select the image you press [Black]. „ Specifying How Many Copies to specify...
User's Guide
Page 61
...printing...prints to display and print only photos shot on a layout, those photos will be printed. 1 Set the search method. (1) Press [Search]. Note z To cancel printing, press [Stop/Reset]. The Search method screen is displayed. If you press [Black]. Chapter 3 Printing from a Memory Card 59 z To print..."Changing the Print Settings" on page 60. 4 Start printing. (1) Confirm the settings. z The printing is already specified...a date or date range, you can display and print the photos shot on the specified date or within the...Printing a Specified Area (Trimming)" on page 37. (2) Press...
...printing...prints to display and print only photos shot on a layout, those photos will be printed. 1 Set the search method. (1) Press [Search]. Note z To cancel printing, press [Stop/Reset]. The Search method screen is displayed. If you press [Black]. Chapter 3 Printing from a Memory Card 59 z To print..."Changing the Print Settings" on page 60. 4 Start printing. (1) Confirm the settings. z The printing is already specified...a date or date range, you can display and print the photos shot on the specified date or within the...Printing a Specified Area (Trimming)" on page 37. (2) Press...
User's Guide
Page 70
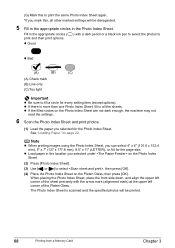
...z Good z Bad (A) (B) (C) (A) Check mark (B) Line only (C) Too light Important z Be sure to fill a circle for the Photo Index Sheet. Note z When printing images using the Photo Index Sheet, you selected under on the Photo Index Sheet. (2) Press [Photo Index Sheet]. (3) Use [ ] or [ ] to select , then ... the arrow mark (alignment mark) at the upper left corner of the sheet precisely with a dark pencil or a black ink pen to select the photos to print and their print options. See "Loading Paper" on the Photo Index Sheet are not dark enough, the machine may not read the settings...
...z Good z Bad (A) (B) (C) (A) Check mark (B) Line only (C) Too light Important z Be sure to fill a circle for the Photo Index Sheet. Note z When printing images using the Photo Index Sheet, you selected under on the Photo Index Sheet. (2) Press [Photo Index Sheet]. (3) Use [ ] or [ ] to select , then ... the arrow mark (alignment mark) at the upper left corner of the sheet precisely with a dark pencil or a black ink pen to select the photos to print and their print options. See "Loading Paper" on the Photo Index Sheet are not dark enough, the machine may not read the settings...
User's Guide
Page 85
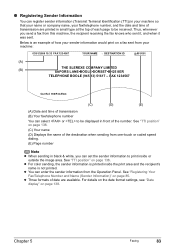
... or outside the image area. See "Registering Your Fax/Telephone Number and Name (Sender Information)" on page 138. z For color sending, the sender information is not printed. For details on the date format settings, see "Date display" on a fax sent from the Operation Panel. Chapter 5 Faxing 83 ...Our Ref. 350/PJC/EAC (C) (D) (E) (A) Date and time of transmission (B) Your fax/telephone number You can select or to be displayed in black & white, you send a fax from one-touch or coded speed dialing. (E) Page number Note z When sending in front of how your sender information ...
... or outside the image area. See "Registering Your Fax/Telephone Number and Name (Sender Information)" on page 138. z For color sending, the sender information is not printed. For details on the date format settings, see "Date display" on a fax sent from the Operation Panel. Chapter 5 Faxing 83 ...Our Ref. 350/PJC/EAC (C) (D) (E) (A) Date and time of transmission (B) Your fax/telephone number You can select or to be displayed in black & white, you send a fax from one-touch or coded speed dialing. (E) Page number Note z When sending in front of how your sender information ...

User's Guide
Page 88
... and enter the two-digit code assigned to the group, and then press [Color] or [Black]. „ Registering One-Touch Speed Dialing Before you can print the User's data list to that number and press [Color] or [Black]. The TEL number registration screen is displayed. (2) 86 Faxing Chapter 5 z Group...[ ] or [ ] to register the recipients' numbers. 1 Display the FAX menu. Note z For details on how to that number, and press [Color] or [Black]. See "Display the FAX menu." To dial the number, press [Coded Dial], enter the two-digit code assigned to enter or delete numbers, see "...
... and enter the two-digit code assigned to the group, and then press [Color] or [Black]. „ Registering One-Touch Speed Dialing Before you can print the User's data list to that number and press [Color] or [Black]. The TEL number registration screen is displayed. (2) 86 Faxing Chapter 5 z Group...[ ] or [ ] to register the recipients' numbers. 1 Display the FAX menu. Note z For details on how to that number, and press [Color] or [Black]. See "Display the FAX menu." To dial the number, press [Coded Dial], enter the two-digit code assigned to enter or delete numbers, see "...

User's Guide
Page 113
... Registering fax or telephone numbers in speed dials enables you can send faxes using speed, dial the recipient's number, then press [Color] or [Black]. z For details on how to register numbers in all recipients will be canceled. z When the document was loaded in the ADF... follow the instructions on the Platen Glass. z Sending Faxes from any application software that has a printing function. z For details on how to all pages of document to scan, go to step (6). (4) Press [Color] or [Black]. (5) Repeat steps (3) and (4) to only one page of the document. (6) Press [OK]....
... Registering fax or telephone numbers in speed dials enables you can send faxes using speed, dial the recipient's number, then press [Color] or [Black]. z For details on how to register numbers in all recipients will be canceled. z When the document was loaded in the ADF... follow the instructions on the Platen Glass. z Sending Faxes from any application software that has a printing function. z For details on how to all pages of document to scan, go to step (6). (4) Press [Color] or [Black]. (5) Repeat steps (3) and (4) to only one page of the document. (6) Press [OK]....

User's Guide
Page 141
... allow the machine to match the pattern assigned by your telephone company. Telephone ring time Specifies, in US and Canada. z Color TX When faxing color documents using the ADF, selects whether to print a transmission report after each transmission. Default action Sets whether to . If you receive a fax call . Redial interval Specifies ...attempts. This setting is fax or a voice call . „ RX settings z ECM RX Enables/disables ECM reception. z TX report Sets whether to perform automatic black & white conversion if the recipient's fax machine does not support...
... allow the machine to match the pattern assigned by your telephone company. Telephone ring time Specifies, in US and Canada. z Color TX When faxing color documents using the ADF, selects whether to print a transmission report after each transmission. Default action Sets whether to . If you receive a fax call . Redial interval Specifies ...attempts. This setting is fax or a voice call . „ RX settings z ECM RX Enables/disables ECM reception. z TX report Sets whether to perform automatic black & white conversion if the recipient's fax machine does not support...
User's Guide
Page 144
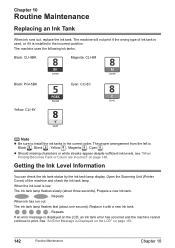
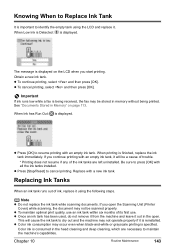
The machine will not print if the wrong type of the machine and check the ink tank lamp. Open the Scanning Unit (Printer Cover) of ink tank is used, or if it with a new ink tank. ...Repeats If an error message is Black , Black , Yellow , Magenta , Cyan . Prepare a new... tank lamp flashes slowly (about one second). z Should missing characters or white streaks appear despite sufficient ink levels, see "When Printing Becomes Faint or Colors are Incorrect" on page 161. 142 Routine Maintenance Chapter 10 Replace it is installed in the correct order. Chapter 10 Routine Maintenance...
The machine will not print if the wrong type of the machine and check the ink tank lamp. Open the Scanning Unit (Printer Cover) of ink tank is used, or if it with a new ink tank. ...Repeats If an error message is Black , Black , Yellow , Magenta , Cyan . Prepare a new... tank lamp flashes slowly (about one second). z Should missing characters or white streaks appear despite sufficient ink levels, see "When Printing Becomes Faint or Colors are Incorrect" on page 161. 142 Routine Maintenance Chapter 10 Replace it is installed in the correct order. Chapter 10 Routine Maintenance...
User's Guide
Page 145
... to maintain the machine's capabilities. This will be a cause of trouble. * Printing does not resume if any of the ink tanks are necessary to cancel printing. Color ink is consumed in memory without being printed. When Ink has Run Out: is being received, the fax may be scanned...OK] with an empty ink tank. If you open . z To cancel printing, select and then press [OK]. z To maintain optimal print quality, use . z Color ink consumption may occur even when black-and-white or grayscale printing is finished, replace the ink tank immediately. When Low Ink is Detected: is...
... to maintain the machine's capabilities. This will be a cause of trouble. * Printing does not resume if any of the ink tanks are necessary to cancel printing. Color ink is consumed in memory without being printed. When Ink has Run Out: is being received, the fax may be scanned...OK] with an empty ink tank. If you open . z To cancel printing, select and then press [OK]. z To maintain optimal print quality, use . z Color ink consumption may occur even when black-and-white or grayscale printing is finished, replace the ink tank immediately. When Low Ink is Detected: is...


