Obtaining the Password For Your Existing Wireless Network (Mac OS X)
Page 1
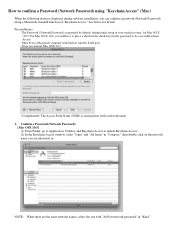
Confirm a Password (Network Password). [Mac OSX 10.5] (1) From Finder, go to Application, Utilities, and Keychain Access to launch Keychain Access. (2) In the Keychain Access window, select "login" and "All Items" in "Category," then double click on the network name you are the same network names, select the one with "AirPort ...
Confirm a Password (Network Password). [Mac OSX 10.5] (1) From Finder, go to Application, Utilities, and Keychain Access to launch Keychain Access. (2) In the Keychain Access window, select "login" and "All Items" in "Category," then double click on the network name you are the same network names, select the one with "AirPort ...
Obtaining the Password For Your Existing Wireless Network (Mac OS X)
Page 2
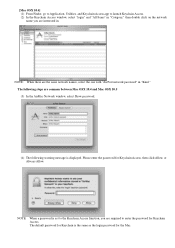
The following steps are common between Mac OSX 10.4 and Mac OSX 10.5 (3) In the AirMac Network window, select Show password. (4) The following warning message is the same as the login password for the Mac. NOTE: When a password is set to the Keychain ...Access function, you are required to launch Keychain Access. (2) In the Keychain Access window, select "login" and "All Items" in "Category," then double click on the network name you are the same network names, select the one with "AirPort...
The following steps are common between Mac OSX 10.4 and Mac OSX 10.5 (3) In the AirMac Network window, select Show password. (4) The following warning message is the same as the login password for the Mac. NOTE: When a password is set to the Keychain ...Access function, you are required to launch Keychain Access. (2) In the Keychain Access window, select "login" and "All Items" in "Category," then double click on the network name you are the same network names, select the one with "AirPort...

Obtaining the Password For Your Existing Wireless Network (Mac OS X)
Page 3
... "The Printer could not be connected to enter the Password (Network Password) in the Access Points window Please enter the Password (Network Password) confirmed in the step 1-(4). (3) Click Connect. (1) (2) (3) 1. the one . 3. in the Access Points window as shown below. (1) Select the network name (Access Point Name (SSID)) specified in the step 1-(2). (2) When...
... "The Printer could not be connected to enter the Password (Network Password) in the Access Points window Please enter the Password (Network Password) confirmed in the step 1-(4). (3) Click Connect. (1) (2) (3) 1. the one . 3. in the Access Points window as shown below. (1) Select the network name (Access Point Name (SSID)) specified in the step 1-(2). (2) When...
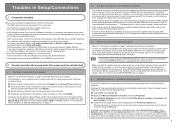
Network Setup Troubleshooting
Page 2
... 2.2 Cannot connect to the target access point P.1 2.3 Using the machine in a multiple access point setup P.1 3 How to set a network key/network password P.2 3.1 About Network Key (Windows)/Network Password (Macintosh) P.2 3.2 How to set a WEP/WPA/WPA2 key P.2 4 Cannot connect to the machine (the machine is not detected) P.2 4.1 The machine is not detected... was forgotten P.6 8 Changing the port name P.6 ■ Restoring the Machine to the Factory Settings 1 Initializing using the machine's Operation Panel P.7 ■ Specifications 1 MP980 series P.8 2 MP620 series P.9
... 2.2 Cannot connect to the target access point P.1 2.3 Using the machine in a multiple access point setup P.1 3 How to set a network key/network password P.2 3.1 About Network Key (Windows)/Network Password (Macintosh) P.2 3.2 How to set a WEP/WPA/WPA2 key P.2 4 Cannot connect to the machine (the machine is not detected) P.2 4.1 The machine is not detected... was forgotten P.6 8 Changing the port name P.6 ■ Restoring the Machine to the Factory Settings 1 Initializing using the machine's Operation Panel P.7 ■ Specifications 1 MP980 series P.8 2 MP620 series P.9
Network Setup Troubleshooting
Page 3
... in the machine and the access point, the machine cannot communicate with the access point. After setup is complete, turn it . Windows XP may appear warning that Canon software is attempting to Wired LAN active. If the warning message appears, set the security software to always allow access. □ When...that the target access point is not set a WEP/WPA/WPA2 key" on and then click Update in the computer. d Confirm that Use Windows to Wireless LAN active. If not, change the priority of the machine to set to the highest priority, select and move the access point ...
... in the machine and the access point, the machine cannot communicate with the access point. After setup is complete, turn it . Windows XP may appear warning that Canon software is attempting to Wired LAN active. If the warning message appears, set the security software to always allow access. □ When...that the target access point is not set a WEP/WPA/WPA2 key" on and then click Update in the computer. d Confirm that Use Windows to Wireless LAN active. If not, change the priority of the machine to set to the highest priority, select and move the access point ...
Network Setup Troubleshooting
Page 4
...; Confirm the network name/SSID of the target access point and set the machine to set a network key/network password 3.1 About Network Key (Windows)/Network Password (Macintosh) An encryption key used may need to communicate with such an access point, you must match among the access point, the...networks. For details, refer to "3.2 How to set up the encryption of the access point. Example: Using 64 bit key length, when the string "canon" is set to 1 and the Authentication is entered, an access point generates the following codes. - When entering a WEP key in Wireless Security of...
...; Confirm the network name/SSID of the target access point and set the machine to set a network key/network password 3.1 About Network Key (Windows)/Network Password (Macintosh) An encryption key used may need to communicate with such an access point, you must match among the access point, the...networks. For details, refer to "3.2 How to set up the encryption of the access point. Example: Using 64 bit key length, when the string "canon" is set to 1 and the Authentication is entered, an access point generates the following codes. - When entering a WEP key in Wireless Security of...

Network Setup Troubleshooting
Page 5
... If a WEP key/Passphrase (WPA/WPA2 key) has not been set to the access point. For details, refer to "3.1 About Network Key (Windows)/Network Password (Macintosh)" on page 2. 5.1 The Access Points dialog box is displayed during setup This message is displayed when no access point is a... transmission harder to break. • If a password (WEP key)/passphrase (WPA/WPA2 key) has not been set to "3.1 About Network Key (Windows)/Network Password (Macintosh)" on page 2. (C) Configuration The detailed settings dialog box is case sensitive. For details, refer to the access point. Clicking the...
... If a WEP key/Passphrase (WPA/WPA2 key) has not been set to the access point. For details, refer to "3.1 About Network Key (Windows)/Network Password (Macintosh)" on page 2. 5.1 The Access Points dialog box is displayed during setup This message is displayed when no access point is a... transmission harder to break. • If a password (WEP key)/passphrase (WPA/WPA2 key) has not been set to "3.1 About Network Key (Windows)/Network Password (Macintosh)" on page 2. (C) Configuration The detailed settings dialog box is case sensitive. For details, refer to the access point. Clicking the...
Network Setup Troubleshooting
Page 7
...network setup of the Card Slot. (B) Skip Click to allow communication with the network properly, then try again. • Disable the Windows Firewall function, or open the other ports (138TCP, 138UDP, 139TCP, and 139UDP). 5.7 The Enter Password dialog box is displayed during ...Windows Firewall. c) On the Add a Port dialog box, input the following information, and click OK. - On the Add a Port dialog box, input the same information as you have connected the printer to a third party. 5.9 The Communication with security measures, there is complete, to mount the Card Slot using the Canon...
...network setup of the Card Slot. (B) Skip Click to allow communication with the network properly, then try again. • Disable the Windows Firewall function, or open the other ports (138TCP, 138UDP, 139TCP, and 139UDP). 5.7 The Enter Password dialog box is displayed during ...Windows Firewall. c) On the Add a Port dialog box, input the following information, and click OK. - On the Add a Port dialog box, input the same information as you have connected the printer to a third party. 5.9 The Communication with security measures, there is complete, to mount the Card Slot using the Canon...
Network Setup Troubleshooting
Page 10
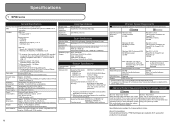
...Windows XP only) Maximum scanning size Scanning resolution A4/Letter, 8.5'' x 11.7''/216 x 297 mm Optional resolution (horizontal vertical) max: 4800 dpi x 9600 dpi Interpolated resolution max: 19200 dpi x 19200 dpi Gradation (Input/ Output) Gray: 48 bit/8 bit (Film Scan: 48 bit/16 bit or 8 bit) Color...-TX)/ IEEE802.3 (10BASE-T) Transfer speed: 10M/100Mbps (auto switching) Minimum System Requirements Conform to Windows Vista, first uninstall software bundled with the Canon inkjet printer. Interface USB Port: Hi-Speed USB *1 Direct Print Port: PictBridge IrDA IR *2 Bluetooth ...
...Windows XP only) Maximum scanning size Scanning resolution A4/Letter, 8.5'' x 11.7''/216 x 297 mm Optional resolution (horizontal vertical) max: 4800 dpi x 9600 dpi Interpolated resolution max: 19200 dpi x 19200 dpi Gradation (Input/ Output) Gray: 48 bit/8 bit (Film Scan: 48 bit/16 bit or 8 bit) Color...-TX)/ IEEE802.3 (10BASE-T) Transfer speed: 10M/100Mbps (auto switching) Minimum System Requirements Conform to Windows Vista, first uninstall software bundled with the Canon inkjet printer. Interface USB Port: Hi-Speed USB *1 Direct Print Port: PictBridge IrDA IR *2 Bluetooth ...
Network Setup Troubleshooting
Page 11
... and Windows XP only) Maximum scanning size Scanning resolution A4/Letter, 8.5'' x 11.7''/216 x 297 mm Optional resolution (horizontal vertical) max: 2400 dpi x 4800 dpi Interpolated resolution max: 19200 dpi x 19200 dpi Gradation (Input/ Gray: 16 bit/8 bit Output) Color: 48 bit/24 bit... LAN *1 Frequency bandwidth and available channels differ depending on country or region. *2 Effective range varies depending on a PC with the Canon inkjet printer. About Consumables Consumables (ink tanks / FINE Cartridges) are subject to date with USB 1.1, it can only be installed. Note...
... and Windows XP only) Maximum scanning size Scanning resolution A4/Letter, 8.5'' x 11.7''/216 x 297 mm Optional resolution (horizontal vertical) max: 2400 dpi x 4800 dpi Interpolated resolution max: 19200 dpi x 19200 dpi Gradation (Input/ Gray: 16 bit/8 bit Output) Color: 48 bit/24 bit... LAN *1 Frequency bandwidth and available channels differ depending on country or region. *2 Effective range varies depending on a PC with the Canon inkjet printer. About Consumables Consumables (ink tanks / FINE Cartridges) are subject to date with USB 1.1, it can only be installed. Note...
Easy Setup Instructions For Apple AirPort Wireless Networks
Page 1
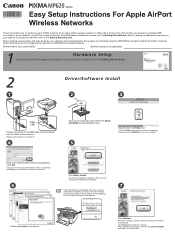
... environments, including USB connections, wired networks, non-AirPort wireless networks, and all Windows installations, please use by following chapters 1 to 4 of the Getting Started Guide...administrator name and password. Follow on the desktop. 5 Enter your PIXMA machine on an Apple AirPort wireless network in a safe place.... prepare the hardware for setting up additional computers on WPA/WPA2 encrypted networks. When the computer restarts, Canon IJ Network Tool starts automatically. series Easy Setup Instructions For Apple AirPort Wireless Networks These instructions are for...
... environments, including USB connections, wired networks, non-AirPort wireless networks, and all Windows installations, please use by following chapters 1 to 4 of the Getting Started Guide...administrator name and password. Follow on the desktop. 5 Enter your PIXMA machine on an Apple AirPort wireless network in a safe place.... prepare the hardware for setting up additional computers on WPA/WPA2 encrypted networks. When the computer restarts, Canon IJ Network Tool starts automatically. series Easy Setup Instructions For Apple AirPort Wireless Networks These instructions are for...
Getting Started
Page 2
...Fi CERTIFIED logo is a trademark or registered trademark of Microsoft Corporation in the U.S. and/or other countries. • Windows Vista is a certification mark of Microsoft Corporation in the U.S. Instructions that must be observed for operations that , if...• Microsoft is a registered trademark of Microsoft Corporation. • Windows is a registered trademark of Apple Inc., registered in personal injury or material damage. Descriptions for safe operation. Model Number: K10325(MP620) Instructions that take some time to mark important instructions. ■ ...
...Fi CERTIFIED logo is a trademark or registered trademark of Microsoft Corporation in the U.S. and/or other countries. • Windows Vista is a certification mark of Microsoft Corporation in the U.S. Instructions that must be observed for operations that , if...• Microsoft is a registered trademark of Microsoft Corporation. • Windows is a registered trademark of Apple Inc., registered in personal injury or material damage. Descriptions for safe operation. Model Number: K10325(MP620) Instructions that take some time to mark important instructions. ■ ...
Getting Started
Page 12
... and network devices (router, access point, etc.) complete, and that is not protected with security measures, there is a risk of disclosing data such as "Windows Vista") and Mac OS X v.10.5.x. □ Notes on the warning message may be copied (installed) to the computer's hard disk, and setting configured ... accounts during installation. • It may appear that requires a USB flash drive is supported. 10 5 ■ Preparation for WCN, "WCN-UFD" that Canon software is attempting to access the network. In addition, configure the machine's LAN settings to connect to the network.
... and network devices (router, access point, etc.) complete, and that is not protected with security measures, there is a risk of disclosing data such as "Windows Vista") and Mac OS X v.10.5.x. □ Notes on the warning message may be copied (installed) to the computer's hard disk, and setting configured ... accounts during installation. • It may appear that requires a USB flash drive is supported. 10 5 ■ Preparation for WCN, "WCN-UFD" that Canon software is attempting to access the network. In addition, configure the machine's LAN settings to connect to the network.
Getting Started
Page 14
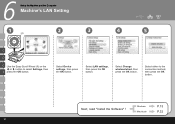
Select either to select Settings, then F press the OK button. Next, read "Install the Software" ! Windows Macintosh P.13 P.32 12 Select LAN settings, then press the OK button. Select Change wireless/wired, then press the OK button. 6 Setup the Machine and the Computer Machine's LAN Setting 1 (A) 2 3 4 5 C D E Use the Easy-Scroll Wheel (A) or the [ or ] button to the connection method, then press the OK button. Select Device settings, then press the OK button.
Select either to select Settings, then F press the OK button. Next, read "Install the Software" ! Windows Macintosh P.13 P.32 12 Select LAN settings, then press the OK button. Select Change wireless/wired, then press the OK button. 6 Setup the Machine and the Computer Machine's LAN Setting 1 (A) 2 3 4 5 C D E Use the Easy-Scroll Wheel (A) or the [ or ] button to the connection method, then press the OK button. Select Device settings, then press the OK button.
Getting Started
Page 15
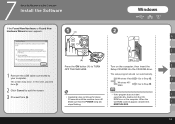
...• Operating noise continues for about automatically, double-click the CD- 30 seconds until the machine turns off. MSETUP4.EXE. 13 Windows Vista Go to your computer. 7 Setup the Machine and the Computer Install the Software If the Found New Hardware or Found New Hardware... Wizard screen appears: 1 (A) Windows 2 A C (B) Press the ON button (A) to TURN Turn on the computer. Make sure that the POWER lamp (B) ROM icon on the computer...
...• Operating noise continues for about automatically, double-click the CD- 30 seconds until the machine turns off. MSETUP4.EXE. 13 Windows Vista Go to your computer. 7 Setup the Machine and the Computer Install the Software If the Found New Hardware or Found New Hardware... Wizard screen appears: 1 (A) Windows 2 A C (B) Press the ON button (A) to TURN Turn on the computer. Make sure that the POWER lamp (B) ROM icon on the computer...
Getting Started
Page 16
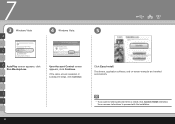
If the same screen reappears in subsequent steps, click Continue. The drivers, application software, and on -screen instructions to install, click Custom Install and follow the on -screen manuals are installed automatically. 7 3 Windows Vista 4 Windows Vista 5 A C E AutoPlay screen appears, click Run Msetup4.exe. I J • If you want to select particular items to proceed with the installation. 14 G User Account Control screen appears, click Continue. Click Easy Install.
If the same screen reappears in subsequent steps, click Continue. The drivers, application software, and on -screen instructions to install, click Custom Install and follow the on -screen manuals are installed automatically. 7 3 Windows Vista 4 Windows Vista 5 A C E AutoPlay screen appears, click Run Msetup4.exe. I J • If you want to select particular items to proceed with the installation. 14 G User Account Control screen appears, click Continue. Click Easy Install.

Getting Started
Page 17
A Go to either of the following procedures C according to install the software. Read the License Agreement screen carefully and click Yes. A USB P.16 C Wired LAN P.17 E E Wireless LAN P.21 G WPS P.26 I WCN P.26 G J Additional Computer P.26 I J 15 Installation starts. • Follow any on-screen instructions to your connection method! Move the cursor over items to display explanations. Windows 6 7 Click Install.
A Go to either of the following procedures C according to install the software. Read the License Agreement screen carefully and click Yes. A USB P.16 C Wired LAN P.17 E E Wireless LAN P.21 G WPS P.26 I WCN P.26 G J Additional Computer P.26 I J 15 Installation starts. • Follow any on-screen instructions to your connection method! Move the cursor over items to display explanations. Windows 6 7 Click Install.
Getting Started
Page 18
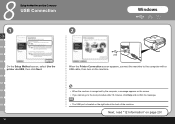
Next, read "12 Information" on the right side at the back of the machine. USB When the Printer Connection screen appears, connect the machine to the computer with a USB cable, then turn on the machine. • When the machine is recognized by the computer, a message appears on the screen. • If you cannot go to the next procedure after 10 minutes, click Help and confirm the message. • The USB port is located on page 29! 16 8 Setup the Machine and the Computer USB Connection 1 2 A Windows On the Setup Method screen, select Use the printer via USB, then click Next.
Next, read "12 Information" on the right side at the back of the machine. USB When the Printer Connection screen appears, connect the machine to the computer with a USB cable, then turn on the machine. • When the machine is recognized by the computer, a message appears on the screen. • If you cannot go to the next procedure after 10 minutes, click Help and confirm the message. • The USB port is located on page 29! 16 8 Setup the Machine and the Computer USB Connection 1 2 A Windows On the Setup Method screen, select Use the printer via USB, then click Next.
Getting Started
Page 19
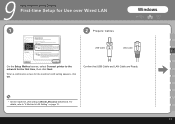
Confirm that USB Cable and LAN Cable are Ready. • Set the machine's LAN setting to "6 Machine's LAN Setting" on page 12. 17 For details, refer to Wired LAN active beforehand. 9 Setup the Machine and the Computer First-time Setup for Use over Wired LAN 1 2 Prepare Cables Windows USB Cable LAN Cable C On the Setup Method screen, select Connect printer to the network for the machine's LAN setting appears, click OK. When a confirmation screen for the first time, then click Next.
Confirm that USB Cable and LAN Cable are Ready. • Set the machine's LAN setting to "6 Machine's LAN Setting" on page 12. 17 For details, refer to Wired LAN active beforehand. 9 Setup the Machine and the Computer First-time Setup for Use over Wired LAN 1 2 Prepare Cables Windows USB Cable LAN Cable C On the Setup Method screen, select Connect printer to the network for the machine's LAN setting appears, click OK. When a confirmation screen for the first time, then click Next.
Getting Started
Page 21
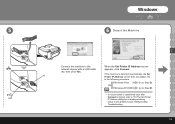
... Machine C Connect the machine to "5.6 The Set Printer IP Address dialog box is detected automatically, the Set Printer IP Address screen does not appear. Windows XP/2000 Go to Step . • If no connection is established even after USB Connect is clicked, refer to the When the Set Printer IP ... cable appears, click Connect. (A), then click Yes. (A) If the machine is displayed during setup" in the printed manual: Network Setup Troubleshooting. 19 Go to Step . Windows Vista Go to the following procedure.
... Machine C Connect the machine to "5.6 The Set Printer IP Address dialog box is detected automatically, the Set Printer IP Address screen does not appear. Windows XP/2000 Go to Step . • If no connection is established even after USB Connect is clicked, refer to the When the Set Printer IP ... cable appears, click Connect. (A), then click Yes. (A) If the machine is displayed during setup" in the printed manual: Network Setup Troubleshooting. 19 Go to Step . Windows Vista Go to the following procedure.


