User's Guide
Page 3
... Photographs Directly from a PictBridge Compliant Device 55 Printing Photographs Directly from a Canon Bubble Jet Direct Compatible Digital Camera 58 4 Faxing 60 Preparing Your Machine... with Windows 84 Printing with Macintosh 86 6 Scanning Images 89 About Scanning Images 89 Scanning Methods 89 7 Changing the Machine Settings............91 ...See the Display on the LCD........... 119 Ink Does Not Come Out/Printing is Blurred/ Colors are Wrong/White Streaks/ Straight Lines are... Canada 166 Pre-Installation Requirements for MP530... 160 Connection of the Equipment 160 In Case of Equipment...
... Photographs Directly from a PictBridge Compliant Device 55 Printing Photographs Directly from a Canon Bubble Jet Direct Compatible Digital Camera 58 4 Faxing 60 Preparing Your Machine... with Windows 84 Printing with Macintosh 86 6 Scanning Images 89 About Scanning Images 89 Scanning Methods 89 7 Changing the Machine Settings............91 ...See the Display on the LCD........... 119 Ink Does Not Come Out/Printing is Blurred/ Colors are Wrong/White Streaks/ Straight Lines are... Canada 166 Pre-Installation Requirements for MP530... 160 Connection of the Equipment 160 In Case of Equipment...
User's Guide
Page 10
... servicing. If such objects come into the machine while it is printing. Do not insert your hand. Doing so may cause ink to remove. Then, contact the Canon Customer Care Center. Failing to do not touch the electrical contacts of water or other controls may result in injury. Do not... place heavy objects on the Document Cover when using the Platen Glass to scan thick books. Do not subject the machine to ...
... servicing. If such objects come into the machine while it is printing. Do not insert your hand. Doing so may cause ink to remove. Then, contact the Canon Customer Care Center. Failing to do not touch the electrical contacts of water or other controls may result in injury. Do not... place heavy objects on the Document Cover when using the Platen Glass to scan thick books. Do not subject the machine to ...
User's Guide
Page 16
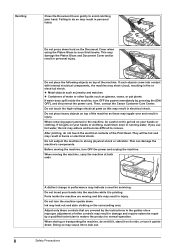
... Cover Open this lever after installing the Print Head. (18) Ink Lamp Lights or flashes red to indicate the status of each ink tank according to the way its lamp flashes. Important Do not pull up this cover when replacing the ink tanks, or clearing jammed paper. 14 Before Printing Chapter 1 &#...22) (27) (26) (25) (24) (23) (17) Print Head Lock Lever Used to scan documents. You can check the status of the ink tank. See "Ink Lamps" on page 15. (19) Print Head Holder Used to install a Print Head. (20) Scanning Unit (Printer Cover) This is the unit used to fix the Print Head.
... Cover Open this lever after installing the Print Head. (18) Ink Lamp Lights or flashes red to indicate the status of each ink tank according to the way its lamp flashes. Important Do not pull up this cover when replacing the ink tanks, or clearing jammed paper. 14 Before Printing Chapter 1 &#...22) (27) (26) (25) (24) (23) (17) Print Head Lock Lever Used to scan documents. You can check the status of the ink tank. See "Ink Lamps" on page 15. (19) Print Head Holder Used to install a Print Head. (20) Scanning Unit (Printer Cover) This is the unit used to fix the Print Head.
User's Guide
Page 17
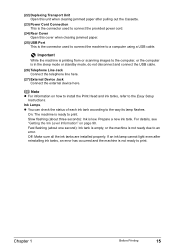
...external device here. Note z For information on page 98. Prepare a new ink tank. Important While the machine is printing from or scanning images to a computer using a USB cable. Off: Make sure all the ink tanks are installed properly. (22) Duplexing Transport Unit Open this unit when ...clearing jammed paper after reinstalling ink tanks, an error has occurred and the machine...
...external device here. Note z For information on page 98. Prepare a new ink tank. Important While the machine is printing from or scanning images to a computer using a USB cable. Off: Make sure all the ink tanks are installed properly. (22) Duplexing Transport Unit Open this unit when ...clearing jammed paper after reinstalling ink tanks, an error has occurred and the machine...
User's Guide
Page 18
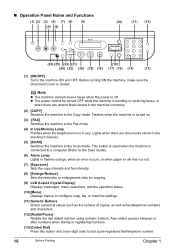
... Use/Memory Lamp Flashes when the telephone line is connected to a computer (Refer to the Scan Guide). (6) Alarm Lamp Lights or flashes orange, when an error occurs, or when paper or ink has run out. (7) [Exposure] Sets the copy intensity and fax intensity. (8) [Enlarge/... fax/telephone number. 16 Before Printing Chapter 1 This button is used when the machine is in the machine's memory. (2) [COPY] Switches the machine to the Scan mode. „ Operation Panel Name and Functions (1) (2) (3) (5) (7) (8) (9) (4) (6) (10) (11) (12) (26) (25) (23) (21) (16) (24) (22) (20) (19) (18) (...
... Use/Memory Lamp Flashes when the telephone line is connected to a computer (Refer to the Scan Guide). (6) Alarm Lamp Lights or flashes orange, when an error occurs, or when paper or ink has run out. (7) [Exposure] Sets the copy intensity and fax intensity. (8) [Enlarge/... fax/telephone number. 16 Before Printing Chapter 1 This button is used when the machine is in the machine's memory. (2) [COPY] Switches the machine to the Scan mode. „ Operation Panel Name and Functions (1) (2) (3) (5) (7) (8) (9) (4) (6) (10) (11) (12) (26) (25) (23) (21) (16) (24) (22) (20) (19) (18) (...
User's Guide
Page 22
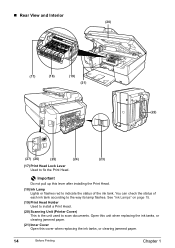
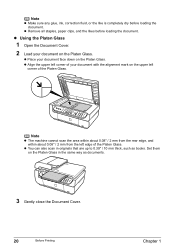
... Open the Document Cover. 2 Load your document with the alignment mark on the Platen Glass. z You can also scan in the same way as books. z Align the upper left edge of your document on the upper left corner of... the Platen Glass. Note z The machine cannot scan the area within about 0.08" / 2 mm from the rear edge, and within about 0.08" / 2 mm ... close the Document Cover. 20 Before Printing Chapter 1 Note z Make sure any glue, ink, correction fluid, or the like is completely dry before loading the document.
... Open the Document Cover. 2 Load your document with the alignment mark on the Platen Glass. z You can also scan in the same way as books. z Align the upper left edge of your document on the upper left corner of... the Platen Glass. Note z The machine cannot scan the area within about 0.08" / 2 mm from the rear edge, and within about 0.08" / 2 mm ... close the Document Cover. 20 Before Printing Chapter 1 Note z Make sure any glue, ink, correction fluid, or the like is completely dry before loading the document.
User's Guide
Page 100
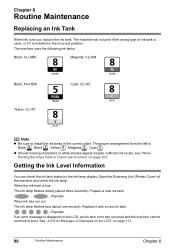
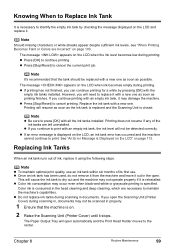
... print. z Should missing characters or white streaks appear despite sufficient ink levels, see "When Printing Becomes Faint or Colors are Incorrect" on page 113. 98 Routine Maintenance Chapter 8 Open the Scanning Unit (Printer Cover) of ink tank is used, or if it with a new ink tank. ...Repeats If an error message is Displayed on the...
... print. z Should missing characters or white streaks appear despite sufficient ink levels, see "When Printing Becomes Faint or Colors are Incorrect" on page 113. 98 Routine Maintenance Chapter 8 Open the Scanning Unit (Printer Cover) of ink tank is used, or if it with a new ink tank. ...Repeats If an error message is Displayed on the...
User's Guide
Page 101
... that the tank should be scanned in the open automatically and the Print Head Holder moves to cancel the current print job. z Press [Stop/Reset] to continue printing. Replace the ink tank with an empty ink tank, the ink level will open . Color ink is consumed in documents. Chapter...z Press [Stop/Reset] to the center. z If printing has not finished, you open the Scanning Unit (Printer Cover) during printing. See "An Error Message is on page 113. z Color ink consumption may damage the machine. Note It's recommended that the machine is Displayed on the LCD" on...
... that the tank should be scanned in the open automatically and the Print Head Holder moves to cancel the current print job. z Press [Stop/Reset] to continue printing. Replace the ink tank with an empty ink tank, the ink level will open . Color ink is consumed in documents. Chapter...z Press [Stop/Reset] to the center. z If printing has not finished, you open the Scanning Unit (Printer Cover) during printing. See "An Error Message is on page 113. z Color ink consumption may damage the machine. Note It's recommended that the machine is Displayed on the LCD" on...
User's Guide
Page 102
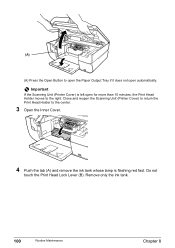
Important If the Scanning Unit (Printer Cover) is flashing red fast. Do not touch the Print Head Lock Lever (B). Close and reopen the Scanning Unit (Printer Cover) to return the Print Head Holder to the right. Remove only the ink tank. 100 Routine Maintenance Chapter 8 (A) (A) Press the Open Button to open the Paper Output Tray if it does not open for more than 10 minutes, the Print Head Holder moves to the center. 3 Open the Inner Cover. 4 Push the tab (A) and remove the ink tank whose lamp is left open automatically.
Important If the Scanning Unit (Printer Cover) is flashing red fast. Do not touch the Print Head Lock Lever (B). Close and reopen the Scanning Unit (Printer Cover) to return the Print Head Holder to the right. Remove only the ink tank. 100 Routine Maintenance Chapter 8 (A) (A) Press the Open Button to open the Paper Output Tray if it does not open for more than 10 minutes, the Print Head Holder moves to the center. 3 Open the Inner Cover. 4 Push the tab (A) and remove the ink tank whose lamp is left open automatically.
User's Guide
Page 105
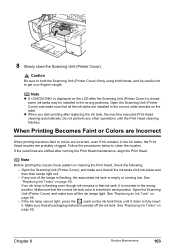
... firmly until the Print Head cleaning finishes. Open the Scanning Unit (Printer Cover) and make sure that ink tank, it . When Printing Becomes Faint or Colors are Incorrect When printing becomes faint or colors are incorrect, even if ink remains in each position. If the ink lamp cannot light, press the mark on page 99. Follow...
... firmly until the Print Head cleaning finishes. Open the Scanning Unit (Printer Cover) and make sure that ink tank, it . When Printing Becomes Faint or Colors are Incorrect When printing becomes faint or colors are incorrect, even if ink remains in each position. If the ink lamp cannot light, press the mark on page 99. Follow...
User's Guide
Page 113
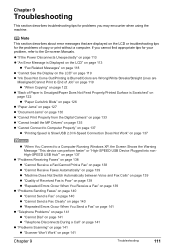
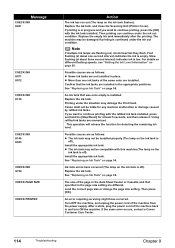
... 113 z "Fax Related Messages" on page 118 z "Cannot See the Display on the LCD" on page 119 z "Ink Does Not Come Out/Printing is Blurred/Colors are Wrong/White Streaks/Straight Lines are displayed on the LCD or troubleshooting tips for your problem, refer to a Computer Running ..." on page 141 z "Telephone Problems" on page 141 z "Cannot Dial" on page 141 z "Telephone Disconnects During a Call" on page 141 z "Problems Scanning" on page 141 z "Scanner Won't Work" on page 141 Chapter 9 Troubleshooting 111 Note This section describes about error messages that are Misaligned/Cannot Print to...
... 113 z "Fax Related Messages" on page 118 z "Cannot See the Display on the LCD" on page 119 z "Ink Does Not Come Out/Printing is Blurred/Colors are Wrong/White Streaks/Straight Lines are displayed on the LCD or troubleshooting tips for your problem, refer to a Computer Running ..." on page 141 z "Telephone Problems" on page 141 z "Cannot Dial" on page 141 z "Telephone Disconnects During a Call" on page 141 z "Problems Scanning" on page 141 z "Scanner Won't Work" on page 141 Chapter 9 Troubleshooting 111 Note This section describes about error messages that are Misaligned/Cannot Print to...
User's Guide
Page 116
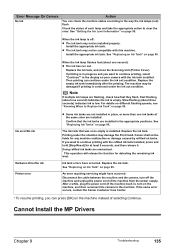
... the remaining ink level. Replace the ink tank. Turn OFF the machine, and unplug the power cord of the same color are different....) indicates ink is empty. z More than one second interval) indicates the ink is low. If the same error occurs, contact a Canon Customer Care...INK U041 CHECK INK U071 U072 CHECK INK U130 CHECK INK U140 U043 CHECK INK U150 CHECK PAGE SIZE CHECK PRINTER Action The ink has run out (The lamp on page 98. Replace the ink tank, and close the Scanning Unit (Printer Cover). See "Replacing an Ink Tank" on the ink tank flashes). See "Replacing an Ink...
... the remaining ink level. Replace the ink tank. Turn OFF the machine, and unplug the power cord of the same color are different....) indicates ink is empty. z More than one second interval) indicates the ink is low. If the same error occurs, contact a Canon Customer Care...INK U041 CHECK INK U071 U072 CHECK INK U130 CHECK INK U140 U043 CHECK INK U150 CHECK PAGE SIZE CHECK PRINTER Action The ink has run out (The lamp on page 98. Replace the ink tank, and close the Scanning Unit (Printer Cover). See "Replacing an Ink Tank" on the ink tank flashes). See "Replacing an Ink...
User's Guide
Page 121
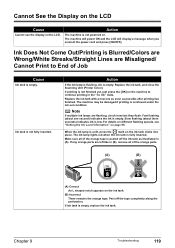
... ink lamp is flashing, ink is fully inserted. Replace the ink tank with a new one second) indicates the ink is Blurred/Colors are Wrong/White Streaks/Straight Lines are Misaligned/ Cannot Print to continue printing in the "no ink" state. The ink lamp lights red when the ink tank is empty. If ink ...the power cord and press [ON/OFF]. Cannot See the Display on the LCD Cause Cannot see "Getting the Ink Level Information" on page 98. Replace the ink tank, and close the Scanning Unit (Printer Cover). Make sure all of the orange parts. (A) (B) (A) Correct An L shaped notch ...
... ink lamp is flashing, ink is fully inserted. Replace the ink tank with a new one second) indicates the ink is Blurred/Colors are Wrong/White Streaks/Straight Lines are Misaligned/ Cannot Print to continue printing in the "no ink" state. The ink lamp lights red when the ink tank is empty. If ink ...the power cord and press [ON/OFF]. Cannot See the Display on the LCD Cause Cannot see "Getting the Ink Level Information" on page 98. Replace the ink tank, and close the Scanning Unit (Printer Cover). Make sure all of the orange parts. (A) (B) (A) Correct An L shaped notch ...

User's Guide
Page 122
...In the [Print] dialog box of the printer driver, select [Quality & Media] from the pop-up menu and then click [Detailed Setting]. 3. z Ink supply is some foreign matter in Macintosh. 1. See "Print Head Deep Cleaning" on page 106. See "Aligning the Print Head Automatically" on page 106. ... Requirements" on the machine. 120 Troubleshooting Chapter 9 There is uneven. Press the Open Button to set properly. Open the Scanning Unit (Printer Cover) and check if all ink lamps light red. Be sure to open . Close Inner Cover then press [OK] on page 22. Print the nozzle ...
...In the [Print] dialog box of the printer driver, select [Quality & Media] from the pop-up menu and then click [Detailed Setting]. 3. z Ink supply is some foreign matter in Macintosh. 1. See "Print Head Deep Cleaning" on page 106. See "Aligning the Print Head Automatically" on page 106. ... Requirements" on the machine. 120 Troubleshooting Chapter 9 There is uneven. Press the Open Button to set properly. Open the Scanning Unit (Printer Cover) and check if all ink lamps light red. Be sure to open . Close Inner Cover then press [OK] on page 22. Print the nozzle ...

User's Guide
Page 136
... or not installed. Prepare a new ink tank. Select "Stop" in the display on your camera. You can continue printing by the camera. Check the print settings and select the page size that is selected on this tank is open Close the Scanning Unit (Printer Cover) on the machine.... z The camera does not support the page size that is nearly full. Install a Print Head according to resume printing. Contact the Canon Customer Care Center. Low ink level Slow flashing (about three seconds in...
... or not installed. Prepare a new ink tank. Select "Stop" in the display on your camera. You can continue printing by the camera. Check the print settings and select the page size that is selected on this tank is open Close the Scanning Unit (Printer Cover) on the machine.... z The camera does not support the page size that is nearly full. Install a Print Head according to resume printing. Contact the Canon Customer Care Center. Low ink level Slow flashing (about three seconds in...
User's Guide
Page 137
... instead of the same color are installed in , turn off : z The ink tank may not be installed properly. Check the status of the machine from the power supply. Install the appropriate ink tank. Replace the ink tank, and close the Scanning Unit (Printer Cover). See "Replacing an Ink Tank" on page 98. Canon shall not be damaged...
... instead of the same color are installed in , turn off : z The ink tank may not be installed properly. Check the status of the machine from the power supply. Install the appropriate ink tank. Replace the ink tank, and close the Scanning Unit (Printer Cover). See "Replacing an Ink Tank" on page 98. Canon shall not be damaged...
User's Guide
Page 172
... Lever 14 Printing Area 151 Printing from Your Computer 84 Macintosh 86 Windows 84 Printing Photographs Directly from a Compliant Device 53 Canon Bubble Jet Direct 58 Connecting 53 PictBridge 55 R Rear Cover 15 Receiving Faxes 78 canceling receiving 83 memory receiving 83 paper... Registering Speed Dials coded speed dialing 65 Replacing Ink Tanks 99 Reports and Lists 70 Routine Maintenance 98 Replacing Ink Tanks 99 RX (Reception) REPORT 70 printing 71 S Safety Precautions 5 SCAN button 16 Scan contrast adjusting 73 Scanning Images 89 Scanning Unit (Printer Cover) 14 Sender information registering...
... Lever 14 Printing Area 151 Printing from Your Computer 84 Macintosh 86 Windows 84 Printing Photographs Directly from a Compliant Device 53 Canon Bubble Jet Direct 58 Connecting 53 PictBridge 55 R Rear Cover 15 Receiving Faxes 78 canceling receiving 83 memory receiving 83 paper... Registering Speed Dials coded speed dialing 65 Replacing Ink Tanks 99 Reports and Lists 70 Routine Maintenance 98 Replacing Ink Tanks 99 RX (Reception) REPORT 70 printing 71 S Safety Precautions 5 SCAN button 16 Scan contrast adjusting 73 Scanning Images 89 Scanning Unit (Printer Cover) 14 Sender information registering...
Easy Setup Instructions
Page 1
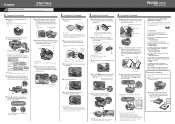
IMPORTANT Make sure to remove the protective film from the ink tank. Press [ON/OFF]. 4 Use [ ] or [ ] on the bottom of the ink tank. If the orange-colored protective film is not removed completely, problems with your answering machine, and receive faxes automatically: → ANS...want to receive faxes manually: → MANUAL MODE You want to the right. Close and reopen the Scanning Unit (Printer Cover) to return the Holder to 5 . Write down . 3 Install the ink tanks 1 Peel back the orange tab completely and remove the plastic wrapper from the Feeder Cover. 5...
IMPORTANT Make sure to remove the protective film from the ink tank. Press [ON/OFF]. 4 Use [ ] or [ ] on the bottom of the ink tank. If the orange-colored protective film is not removed completely, problems with your answering machine, and receive faxes automatically: → ANS...want to receive faxes manually: → MANUAL MODE You want to the right. Close and reopen the Scanning Unit (Printer Cover) to return the Holder to 5 . Write down . 3 Install the ink tanks 1 Peel back the orange tab completely and remove the plastic wrapper from the Feeder Cover. 5...


