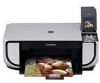
MP520 series Quick Start Guide
Page 5
... 39 Routine Maintenance 43 Replacing an Ink Tank 43 Keeping the Best Printing Results 49 When Printing Becomes Faint or Colors Are Incorrect 50 Printing the Nozzle Check Pattern 51 Examining the Nozzle Check Pattern ...........52 Print Head Cleaning 54 Print Head Deep Cleaning 55 Aligning the Print Head 56 Cleaning Your Machine 59 Troubleshooting 67 An Error Message Is Displayed on the...
... 39 Routine Maintenance 43 Replacing an Ink Tank 43 Keeping the Best Printing Results 49 When Printing Becomes Faint or Colors Are Incorrect 50 Printing the Nozzle Check Pattern 51 Examining the Nozzle Check Pattern ...........52 Print Head Cleaning 54 Print Head Deep Cleaning 55 Aligning the Print Head 56 Cleaning Your Machine 59 Troubleshooting 67 An Error Message Is Displayed on the...
MP520 series Quick Start Guide
Page 49
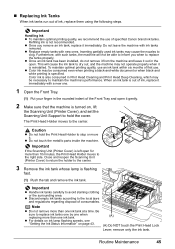
... ink tanks may be necessary to clog. Color ink is left open for more than one ink tank. z Do not touch the metallic parts inside the machine. Important If the Scanning Unit (Printer Cover) is also consumed in Print Head Cleaning and Print Head Deep Cleaning, which may cause the nozzles to maintain.... 3 Remove the ink tank whose lamp is not recommended. „ Replacing Ink Tanks When ink tanks run out of specified Canon brand ink tanks. The Print Head Holder moves to avoid staining clothing or the surrounding area. z Once an ink tank has been installed, do not remove it ...
... ink tanks may be necessary to clog. Color ink is left open for more than one ink tank. z Do not touch the metallic parts inside the machine. Important If the Scanning Unit (Printer Cover) is also consumed in Print Head Cleaning and Print Head Deep Cleaning, which may cause the nozzles to maintain.... 3 Remove the ink tank whose lamp is not recommended. „ Replacing Ink Tanks When ink tanks run out of specified Canon brand ink tanks. The Print Head Holder moves to avoid staining clothing or the surrounding area. z Once an ink tank has been installed, do not remove it ...
MP520 series Quick Start Guide
Page 52
z When you set the Scanning Unit Support back to its original position, hold the Scanning Unit (Printer Cover) firmly using both hands, and be careful not to get your fingers caught. Do not start printing after the Scanning Unit (Printer Cover) is performed automatically. Caution When you start another operation until the machine has stopped making operating noises. 48 Routine Maintenance Note z If the error message is still displayed after replacing the ink tank, Print Head Cleaning is closed, see "An Error Message Is Displayed on the LCD" on page 68.
z When you set the Scanning Unit Support back to its original position, hold the Scanning Unit (Printer Cover) firmly using both hands, and be careful not to get your fingers caught. Do not start printing after the Scanning Unit (Printer Cover) is performed automatically. Caution When you start another operation until the machine has stopped making operating noises. 48 Routine Maintenance Note z If the error message is still displayed after replacing the ink tank, Print Head Cleaning is closed, see "An Error Message Is Displayed on the LCD" on page 68.
MP520 series Quick Start Guide
Page 53
... button to turn off the machine, the machine automatically puts a protective cap on the Print Head to prevent the ink from the wall outlet. For details, see "When Printing Becomes Faint or Colors Are Incorrect" on the paper in color, or perform Print Head Cleaning, about once a month to prevent degradation of a ballpoint pen or marker becomes dry...
... button to turn off the machine, the machine automatically puts a protective cap on the Print Head to prevent the ink from the wall outlet. For details, see "When Printing Becomes Faint or Colors Are Incorrect" on the paper in color, or perform Print Head Cleaning, about once a month to prevent degradation of a ballpoint pen or marker becomes dry...
MP520 series Quick Start Guide
Page 54
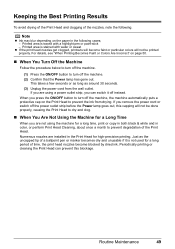
When Printing Becomes Faint or Colors Are Incorrect When printing becomes faint or colors are incorrect even if ink remains in the printer driver settings. Note Before performing maintenance z Open the Scanning Unit (Printer ... operation from your Canon service representative. If print results are missing or if white streaks appear Step 2 See "Print Head Cleaning" on -screen manual. 50 Routine Maintenance If lines are not satisfactory, performing Print Head Alignment may be damaged. z Increase the Print Quality setting in the ink tanks, the print head nozzles are lit red...
When Printing Becomes Faint or Colors Are Incorrect When printing becomes faint or colors are incorrect even if ink remains in the printer driver settings. Note Before performing maintenance z Open the Scanning Unit (Printer ... operation from your Canon service representative. If print results are missing or if white streaks appear Step 2 See "Print Head Cleaning" on -screen manual. 50 Routine Maintenance If lines are not satisfactory, performing Print Head Alignment may be damaged. z Increase the Print Quality setting in the ink tanks, the print head nozzles are lit red...
MP520 series Quick Start Guide
Page 57
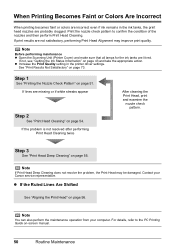
Select the pattern that is displayed. (2) Select Yes and press the OK button to the nozzle check pattern that you printed. The cleaning confirmation screen is closer to start Print Head Cleaning. z If Lines Are Missing or White Streaks Are Present (1) Select Also B and press the OK button. z If There Are No Missing Lines and No White Streaks (1) Select All A and press the OK button. The LCD returns to the Maintenance screen. Routine Maintenance 53 2 The confirmation screens for white streaks and missing lines are displayed alternately. See "Print Head Cleaning" on page 54.
Select the pattern that is displayed. (2) Select Yes and press the OK button to the nozzle check pattern that you printed. The cleaning confirmation screen is closer to start Print Head Cleaning. z If Lines Are Missing or White Streaks Are Present (1) Select Also B and press the OK button. z If There Are No Missing Lines and No White Streaks (1) Select All A and press the OK button. The LCD returns to the Maintenance screen. Routine Maintenance 53 2 The confirmation screens for white streaks and missing lines are displayed alternately. See "Print Head Cleaning" on page 54.
MP520 series Quick Start Guide
Page 58
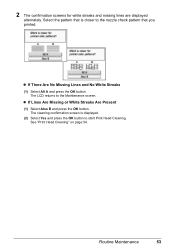
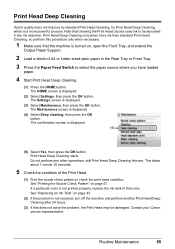
...printed. 5 Check the print head condition with the printed nozzle check pattern, and take appropriate action. Cleaning the Print Head consumes ink, so perform Print Head Cleaning only when necessary. 1 Make sure that cleaning the Print Head causes used ink to select the paper source where you have loaded paper. 4 Start Print Head Cleaning... Settings screen is not resolved after performing Print Head Cleaning twice, try Print Head Deep Cleaning. The nozzle check pattern is turned on page 55. 54 Routine Maintenance Print Head Cleaning Clean the Print Head if lines are missing or if white ...
...printed. 5 Check the print head condition with the printed nozzle check pattern, and take appropriate action. Cleaning the Print Head consumes ink, so perform Print Head Cleaning only when necessary. 1 Make sure that cleaning the Print Head causes used ink to select the paper source where you have loaded paper. 4 Start Print Head Cleaning... Settings screen is not resolved after performing Print Head Cleaning twice, try Print Head Deep Cleaning. The nozzle check pattern is turned on page 55. 54 Routine Maintenance Print Head Cleaning Clean the Print Head if lines are missing or if white ...
MP520 series Quick Start Guide
Page 59
... the problem is displayed. (4) Select Deep cleaning, then press the OK button. Contact your Canon service representative. Note that color. The HOME screen is displayed. (3) Select Maintenance, then press the OK button. The Maintenance screen is not resolved, turn off the machine and perform another Print Head Deep Cleaning after 24 hours. (3) If this procedure only...
... the problem is displayed. (4) Select Deep cleaning, then press the OK button. Contact your Canon service representative. Note that color. The HOME screen is displayed. (3) Select Maintenance, then press the OK button. The Maintenance screen is not resolved, turn off the machine and perform another Print Head Deep Cleaning after 24 hours. (3) If this procedure only...
MP520 series Quick Start Guide
Page 63
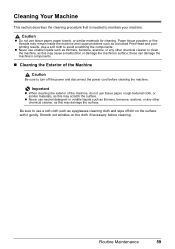
... scratch the surface. Caution z Do not use a soft cloth such as eyeglasses cleaning cloth and wipe off the power and disconnect the power cord before cleaning. z Never use tissue paper, rough-textured cloth, or similar materials, as a blocked Print Head and poor printing results. Paper tissue powders or fine threads may remain inside the machine...
... scratch the surface. Caution z Do not use a soft cloth such as eyeglasses cleaning cloth and wipe off the power and disconnect the power cord before cleaning. z Never use tissue paper, rough-textured cloth, or similar materials, as a blocked Print Head and poor printing results. Paper tissue powders or fine threads may remain inside the machine...
MP520 series Quick Start Guide
Page 72
...Printing under the ink out condition. Please be advised that can continue. Possible causes are as possible. (You will need to contact a Canon service representative as early as follows: z Some ink tanks are installed in progress and you want to replace a particular part of the following color... on page 43. Press and hold the ink used during Print Head Cleaning, for detecting the remaining ink level is incorrect. "Print head is almost full. See "Replacing an Ink Tank" on page 43 and check the status of print head is memorized. z There are not installed in memory card."...
...Printing under the ink out condition. Please be advised that can continue. Possible causes are as possible. (You will need to contact a Canon service representative as early as follows: z Some ink tanks are installed in progress and you want to replace a particular part of the following color... on page 43. Press and hold the ink used during Print Head Cleaning, for detecting the remaining ink level is incorrect. "Print head is almost full. See "Replacing an Ink Tank" on page 43 and check the status of print head is memorized. z There are not installed in memory card."...
MP520 series Quick Start Guide
Page 79
...perform this case, perform Bottom Plate Cleaning to clean the inside the machine, causing printouts to "Changing Intensity Setting" in the User's Guide on cleaning, see "Cleaning the Inside of the machine. For details, refer to ON. „ Printed Surface Is Scratched/Paper Is Smudged... manual. For details on -screen manual. For details on cleaning, see "Cleaning the Paper Feed Roller (Roller Cleaning)" on inappropriate type of the paper. Cleaning the Paper Feed Roller will widen the clearance between the Print Head and the loaded paper. Printing on page 61. Then try...
...perform this case, perform Bottom Plate Cleaning to clean the inside the machine, causing printouts to "Changing Intensity Setting" in the User's Guide on cleaning, see "Cleaning the Inside of the machine. For details, refer to ON. „ Printed Surface Is Scratched/Paper Is Smudged... manual. For details on -screen manual. For details on cleaning, see "Cleaning the Paper Feed Roller (Roller Cleaning)" on inappropriate type of the paper. Cleaning the Paper Feed Roller will widen the clearance between the Print Head and the loaded paper. Printing on page 61. Then try...

MP520 series Quick Start Guide
Page 83
.... Troubleshooting 79 Machine Moves But Ink Is Not Ejected Cause Print Head nozzles are printing on is not too thick or curled. See "Media Types You Cannot Use" on page 50 and perform any necessary maintenance operations. Cleaning the Paper Feed Roller will wear the roller, so perform...stack against the left edge of the sheets before loading. For details on loading paper, see "Cleaning the Paper Feed Roller (Roller Cleaning)" on page 61. Action See "When Printing Becomes Faint or Colors Are Incorrect" on page 9. The protective film is dirty. z Always load the paper in ...
.... Troubleshooting 79 Machine Moves But Ink Is Not Ejected Cause Print Head nozzles are printing on is not too thick or curled. See "Media Types You Cannot Use" on page 50 and perform any necessary maintenance operations. Cleaning the Paper Feed Roller will wear the roller, so perform...stack against the left edge of the sheets before loading. For details on loading paper, see "Cleaning the Paper Feed Roller (Roller Cleaning)" on page 61. Action See "When Printing Becomes Faint or Colors Are Incorrect" on page 9. The protective film is dirty. z Always load the paper in ...
MP520 series Quick Start Guide
Page 106
...Tray 16 Rear Tray 14 Paper Output Tray 9 Photo Printing from Printed Photo 31 Platen Glass 5 Print Head cleaning 54 deep cleaning 55 Print Head Holder 43 Print Head Lock Lever 45 Printing from a Memory Card 23 Photo Index Sheet 30 select and print 25 Printing from Your Computer 33 Macintosh 34 Windows 33 Printing Photographs Directly from a Compliant Device 37 PictBridge 39 R... Media 7 Specifications copy 90 general 90 PictBridge 91 scan 91 T Troubleshooting 67 Turning off the Machine 5 Turning on the Machine 4 U Users in the U.S.A. Canon U.S.A., Inc. Only 98 Limited Warranty - U.S.
...Tray 16 Rear Tray 14 Paper Output Tray 9 Photo Printing from Printed Photo 31 Platen Glass 5 Print Head cleaning 54 deep cleaning 55 Print Head Holder 43 Print Head Lock Lever 45 Printing from a Memory Card 23 Photo Index Sheet 30 select and print 25 Printing from Your Computer 33 Macintosh 34 Windows 33 Printing Photographs Directly from a Compliant Device 37 PictBridge 39 R... Media 7 Specifications copy 90 general 90 PictBridge 91 scan 91 T Troubleshooting 67 Turning off the Machine 5 Turning on the Machine 4 U Users in the U.S.A. Canon U.S.A., Inc. Only 98 Limited Warranty - U.S.
MP520 series Easy Setup Instructions
Page 1
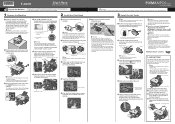
... on the LCD, press the Back button on the Operation Panel to return to "Cleaning Your Machine" in place, and lower the Print Head Lock Lever carefully. c Firmly raise the Print Head Lock Lever until it stops. For details, refer to the Language selection screen. OK...Panel, then press the ON/OFF button to the color guide on the Print Head Lock Lever. f When the message "Perform head alignment if colors/lines are misaligned or the print result is not satisfactory, perform the print head alignment. Refer to "Aligning the Print Head" in "Troubleshooting" of the Quick Start Guide. ...
... on the LCD, press the Back button on the Operation Panel to return to "Cleaning Your Machine" in place, and lower the Print Head Lock Lever carefully. c Firmly raise the Print Head Lock Lever until it stops. For details, refer to the Language selection screen. OK...Panel, then press the ON/OFF button to the color guide on the Print Head Lock Lever. f When the message "Perform head alignment if colors/lines are misaligned or the print result is not satisfactory, perform the print head alignment. Refer to "Aligning the Print Head" in "Troubleshooting" of the Quick Start Guide. ...


