MP470 series Quick Start Guide
Page 5
... Photo Index Sheet ......28 Printing from Your Computer 29 Printing with Windows 29 Printing with Macintosh 30 Scanning Images 31 Scanning Methods 31 Printing Photographs Directly from a Compliant Device 32 Printing Photographs Directly from a Compliant Device 32 About PictBridge Print Settings 34 Routine Maintenance 38 When Printing Becomes Faint or Colors Are Incorrect 38 Printing the Nozzle Check Pattern...
... Photo Index Sheet ......28 Printing from Your Computer 29 Printing with Windows 29 Printing with Macintosh 30 Scanning Images 31 Scanning Methods 31 Printing Photographs Directly from a Compliant Device 32 Printing Photographs Directly from a Compliant Device 32 About PictBridge Print Settings 34 Routine Maintenance 38 When Printing Becomes Faint or Colors Are Incorrect 38 Printing the Nozzle Check Pattern...
MP470 series Quick Start Guide
Page 6
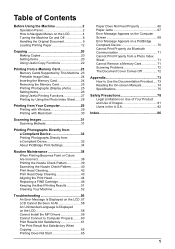
... orange when an error, such as paper-out or ink-out, occurs. (7) Power lamp Lights or flashes green to indicate the power status. (8) Color button Starts color copying, photo printing, or scanning. (9) Black button Starts black & white copying or scanning. (10) Back button Returns the LCD to configure the page size, media type...
... orange when an error, such as paper-out or ink-out, occurs. (7) Power lamp Lights or flashes green to indicate the power status. (8) Color button Starts color copying, photo printing, or scanning. (9) Black button Starts black & white copying or scanning. (10) Back button Returns the LCD to configure the page size, media type...
MP470 series Quick Start Guide
Page 8
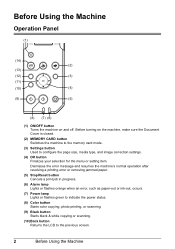
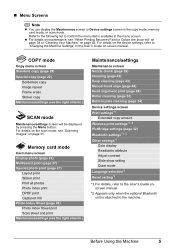
... „ Basic Operation on the Menu Screen You can make good use the {, }, [, and ] buttons to Navigate Menus on the LCD You can perform various printing functions and machine maintenance by pressing the Back button. z For details on each mode. This section describes how to the previous screen by selecting the...
... „ Basic Operation on the Menu Screen You can make good use the {, }, [, and ] buttons to Navigate Menus on the LCD You can perform various printing functions and machine maintenance by pressing the Back button. z For details on each mode. This section describes how to the previous screen by selecting the...
MP470 series Quick Start Guide
Page 9
... User's Guide on page 31. z For details on maintenance, see "Scanning Images" on -screen manual. For details on the scan mode, see "When Printing Becomes Faint or Colors Are Incorrect" on page 38 or "Cleaning Your Machine" on the device settings, refer to confirm the menu items available in the copy mode...
... User's Guide on page 31. z For details on maintenance, see "Scanning Images" on -screen manual. For details on the scan mode, see "When Printing Becomes Faint or Colors Are Incorrect" on page 38 or "Cleaning Your Machine" on the device settings, refer to confirm the menu items available in the copy mode...
MP470 series Quick Start Guide
Page 10
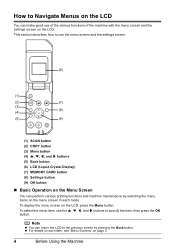
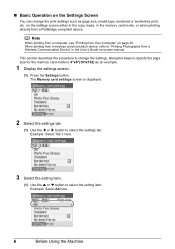
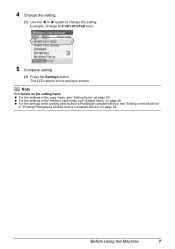
... specify the page size for the memory card mode to 4"x6"(101x152) as page size, media type, bordered or borderless print, etc. This section describes the procedure to "Printing Photographs from a PictBridge compliant device. Example: Select Tab 1 here. 3 Select the setting item. (1) Use the {...2 Select the settings tab. (1) Use the [ or ] button to select the setting item. on page 29. When printing from a wireless communication device, refer to change the print settings such as an example. 1 Display the settings screen. (1) Press the Settings button. Example: Select A4 here. 6...
... specify the page size for the memory card mode to 4"x6"(101x152) as page size, media type, bordered or borderless print, etc. This section describes the procedure to "Printing Photographs from a PictBridge compliant device. Example: Select Tab 1 here. 3 Select the setting item. (1) Use the {...2 Select the settings tab. (1) Use the [ or ] button to select the setting item. on page 29. When printing from a wireless communication device, refer to change the print settings such as an example. 1 Display the settings screen. (1) Press the Settings button. Example: Select A4 here. 6...
MP470 series Quick Start Guide
Page 11
..." in the copy mode, see "Setting Items" on page 20. 4 Change the setting. (1) Use the [ or ] button to the previous screen. z For the settings when printing directly from a Compliant Device" on page 32. Before Using the Machine 7 z For the settings in the memory card mode, see "Setting Items" on page 26...
..." in the copy mode, see "Setting Items" on page 20. 4 Change the setting. (1) Use the [ or ] button to the previous screen. z For the settings when printing directly from a Compliant Device" on page 32. Before Using the Machine 7 z For the settings in the memory card mode, see "Setting Items" on page 26...
MP470 series Quick Start Guide
Page 12
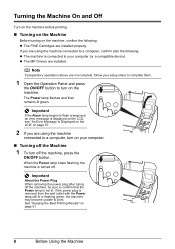
... flashing, the machine is turned off the machine, be sure to a computer, turn on page 51. 8 Before Using the Machine See "Keeping the Best Printing Results" on your computer. „ Turning off the Machine 1 To turn on the machine, confirm the following . z The FINE Cartridges are not complete,...connected to your setup sheet to complete them. 1 Open the Operation Panel and press the ON/OFF button to print. Turning the Machine On and Off Turn on the machine before printing. „ Turning on the Machine Before turning on the machine. z The machine is removed from the wall...
... flashing, the machine is turned off the machine, be sure to a computer, turn on page 51. 8 Before Using the Machine See "Keeping the Best Printing Results" on your computer. „ Turning off the Machine 1 To turn on the machine, confirm the following . z The FINE Cartridges are not complete,...connected to your setup sheet to complete them. 1 Open the Operation Panel and press the ON/OFF button to print. Turning the Machine On and Off Turn on the machine before printing. „ Turning on the Machine Before turning on the machine. z The machine is removed from the wall...
MP470 series Quick Start Guide
Page 13
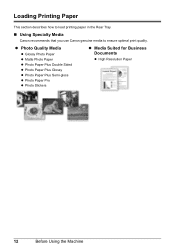
... z Paper documents z Photographs z Books Max. 8.5 x 11.7 inches / 216 x 297 mm Max. 0.6 inches / 15 mm „ Loading Original Documents Load originals to restore the display, perform a print operation or press any glue, ink, correction fluid, or the like on the original document is not operated for the ON/OFF button. When you...
... z Paper documents z Photographs z Books Max. 8.5 x 11.7 inches / 216 x 297 mm Max. 0.6 inches / 15 mm „ Loading Original Documents Load originals to restore the display, perform a print operation or press any glue, ink, correction fluid, or the like on the original document is not operated for the ON/OFF button. When you...
MP470 series Quick Start Guide
Page 16
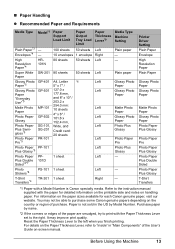
z Photo Quality Media z Glossy Photo Paper z Matte Photo Paper z Photo Paper Plus Double Sided z Photo Paper Plus Glossy z Photo Paper Plus Semi-gloss z Photo Paper Pro z Photo Stickers z Media Suited for Business Documents z High Resolution Paper 12 Before Using the Machine Loading Printing Paper This section describes how to load printing paper in the Rear Tray. „ Using Specialty Media Canon recommends that you use Canon genuine media to ensure optimal print quality.
z Photo Quality Media z Glossy Photo Paper z Matte Photo Paper z Photo Paper Plus Double Sided z Photo Paper Plus Glossy z Photo Paper Plus Semi-gloss z Photo Paper Pro z Photo Stickers z Media Suited for Business Documents z High Resolution Paper 12 Before Using the Machine Loading Printing Paper This section describes how to load printing paper in the Rear Tray. „ Using Specialty Media Canon recommends that you use Canon genuine media to ensure optimal print quality.
MP470 series Quick Start Guide
Page 17
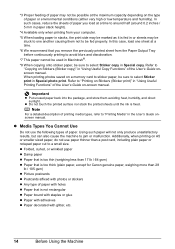
... available for detailed information on the printable side and notes on the country or region of the paper are smudged, try to print with the paper for each Canon genuine paper, visit our website. For information on -screen manual. Envelopes*4 - 100 sheets 50 sheets Left 10 envelopes 1 ...Thickness Lever*9 Media Type Machine Setting Plain Paper*3 - It may not be able to the left when you finish printing. Reset the Paper Thickness Lever to purchase some Canon genuine papers depending on handling paper. Before Using the Machine 13 High HR- 80 sheets 50 sheets Left - T-Shirt...
... available for detailed information on the printable side and notes on the country or region of the paper are smudged, try to print with the paper for each Canon genuine paper, visit our website. For information on -screen manual. Envelopes*4 - 100 sheets 50 sheets Left 10 envelopes 1 ...Thickness Lever*9 Media Type Machine Setting Plain Paper*3 - It may not be able to the left when you finish printing. Reset the Paper Thickness Lever to purchase some Canon genuine papers depending on handling paper. Before Using the Machine 13 High HR- 80 sheets 50 sheets Left - T-Shirt...
MP470 series Quick Start Guide
Page 18
... z Damp paper z Paper that is too thin (weighing less than 17 lb / 64 gsm) z Paper that is too thick (plain paper, except for Canon genuine paper, weighing more than a post card, including plain paper or notepad paper cut to one sheet at a time. *6 We recommend that is fixed.... Using such paper will not only produce unsatisfactory results, but can also cause the machine to "Printing Media" in "Using Useful Printing Functions" of the User's Guide on A5 or smaller sized paper, do not use the following types of paper you remove the previously...
... z Damp paper z Paper that is too thin (weighing less than 17 lb / 64 gsm) z Paper that is too thick (plain paper, except for Canon genuine paper, weighing more than a post card, including plain paper or notepad paper cut to one sheet at a time. *6 We recommend that is fixed.... Using such paper will not only produce unsatisfactory results, but can also cause the machine to "Printing Media" in "Using Useful Printing Functions" of the User's Guide on A5 or smaller sized paper, do not use the following types of paper you remove the previously...
MP470 series Quick Start Guide
Page 19
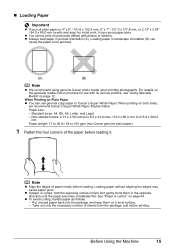
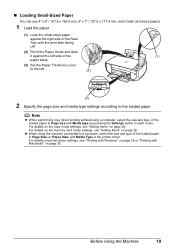
... x 152.4 mm, 5" x 7" / 127.0 x 177.8 mm, or 2.13" x 3.39" / 54.0 x 86.0 mm (credit card-size) for use general copy paper or Canon's Super White Paper. When Printing on page 64. Paper size: - Non-standard sizes: 2.13 x 3.39 inches to 8.5 x 23 inches / 54.0 x 86.0 mm to 215.9 x 584.2 mm Paper weight... 17 to 28 lb / 64 to be jammed. (A) (B) Note z We recommend using genuine Canon photo media when printing photographs. on Plain Paper z You can cause the paper to 105 gsm (non-Canon genuine plain paper) 1 Flatten the four corners of sheets from the package, just before loading. ...
... x 152.4 mm, 5" x 7" / 127.0 x 177.8 mm, or 2.13" x 3.39" / 54.0 x 86.0 mm (credit card-size) for use general copy paper or Canon's Super White Paper. When Printing on page 64. Paper size: - Non-standard sizes: 2.13 x 3.39 inches to 8.5 x 23 inches / 54.0 x 86.0 mm to 215.9 x 584.2 mm Paper weight... 17 to 28 lb / 64 to be jammed. (A) (B) Note z We recommend using genuine Canon photo media when printing photographs. on Plain Paper z You can cause the paper to 105 gsm (non-Canon genuine plain paper) 1 Flatten the four corners of sheets from the package, just before loading. ...
MP470 series Quick Start Guide
Page 20
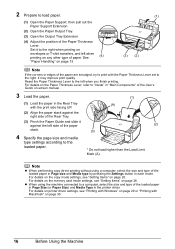
... position of the loaded paper in Page size and Media type by pressing the Settings button in the printer driver. Note z When performing copy direct printing without using the machine connected to a computer, select the size and type of the paper (2) stack. (3) 4 Specify the page size and media type ... "Inside" in "Main Components" of the User's Guide on-screen manual. 3 Load the paper. (1) (1) Load the paper in the Rear Tray (A) with the print side facing UP. (2) Align the paper stack against the right side of the Rear Tray. (3) Pinch the Paper Guide and slide it to the right...
... position of the loaded paper in Page size and Media type by pressing the Settings button in the printer driver. Note z When performing copy direct printing without using the machine connected to a computer, select the size and type of the paper (2) stack. (3) 4 Specify the page size and media type ... "Inside" in "Main Components" of the User's Guide on-screen manual. 3 Load the paper. (1) (1) Load the paper in the Rear Tray (A) with the print side facing UP. (2) Align the paper stack against the right side of the Rear Tray. (3) Pinch the Paper Guide and slide it to the right...

MP470 series Quick Start Guide
Page 21
Envelopes with an embossed or treated surface - z Press down on envelopes. Press the envelope flat, working from the computer to print on all four corners and edges of an envelope is curled, flatten it. Important The envelopes may jam in the opposite direction. Envelopes whose gummed .... „ Loading Envelopes Use either European DL or US Comm. Envelopes with a double flap (or sticker flaps) - Env. #10-sized envelope. Important z You need to print from the middle to press the envelope flat and sharpen the crease. z If the flap of the envelope.
Envelopes with an embossed or treated surface - z Press down on envelopes. Press the envelope flat, working from the computer to print on all four corners and edges of an envelope is curled, flatten it. Important The envelopes may jam in the opposite direction. Envelopes whose gummed .... „ Loading Envelopes Use either European DL or US Comm. Envelopes with a double flap (or sticker flaps) - Env. #10-sized envelope. Important z You need to print from the middle to press the envelope flat and sharpen the crease. z If the flap of the envelope.
MP470 series Quick Start Guide
Page 22
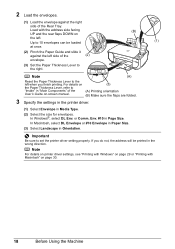
...address will be loaded at once. (2) Pinch the Paper Guide and slide it against the right side of the Rear Tray. If you finish printing. Load with Macintosh" on page 30. 18 Before Using the Machine In Macintosh, select DL Envelope or #10 Envelope in Paper Size. (3)...the printer driver setting properly. 2 Load the envelopes. (1) Load the envelope against the left side of the User's Guide on-screen manual. (3) (A) Printing orientation (B) Make sure the flaps are folded. 3 Specify the settings in the printer driver. (1) Select Envelope in Media Type. (2) Select the size for ...
...address will be loaded at once. (2) Pinch the Paper Guide and slide it against the right side of the Rear Tray. If you finish printing. Load with Macintosh" on page 30. 18 Before Using the Machine In Macintosh, select DL Envelope or #10 Envelope in Paper Size. (3)...the printer driver setting properly. 2 Load the envelopes. (1) Load the envelope against the left side of the User's Guide on-screen manual. (3) (A) Printing orientation (B) Make sure the flaps are folded. 3 Specify the settings in the printer driver. (1) Select Envelope in Media Type. (2) Select the size for ...
MP470 series Quick Start Guide
Page 23
... Page size and Media type by pressing the Settings button in the printer driver. For details on printer driver settings, see "Printing with Windows" on page 29 or "Printing with the print side facing UP. (2) Pinch the Paper Guide and slide it against the left side of the (1) paper stack. (3) Set ... loaded paper in Page Size (or Paper Size) and Media Type in each mode. Before Using the Machine 19 Note z When performing copy direct printing without using the machine connected to the loaded paper. For details on the copy mode settings, see "Setting Items" on page 20. For details ...
... Page size and Media type by pressing the Settings button in the printer driver. For details on printer driver settings, see "Printing with Windows" on page 29 or "Printing with the print side facing UP. (2) Pinch the Paper Guide and slide it against the left side of the (1) paper stack. (3) Set ... loaded paper in Page Size (or Paper Size) and Media Type in each mode. Before Using the Machine 19 Note z When performing copy direct printing without using the machine connected to the loaded paper. For details on the copy mode settings, see "Setting Items" on page 20. For details ...
MP470 series Quick Start Guide
Page 24
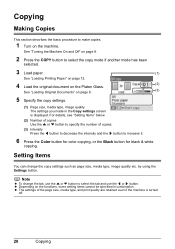
...etc. z The settings of copies. (3) Intensity Press the [ button to decrease the intensity and the ] button to increase it. 6 Press the Color button for color copying, or the Black button for black & white copying. Setting Items You can change the tab, use the { or } button to select the ...copy mode if another mode has been selected. 3 Load paper. (1) See "Loading Printing Paper" on page 12. 4 Load the original document on the Platen ...
...etc. z The settings of copies. (3) Intensity Press the [ button to decrease the intensity and the ] button to increase it. 6 Press the Color button for color copying, or the Black button for black & white copying. Setting Items You can change the tab, use the { or } button to select the ...copy mode if another mode has been selected. 3 Load paper. (1) See "Loading Printing Paper" on page 12. 4 Load the original document on the Platen ...

MP470 series Quick Start Guide
Page 25
... you used Fast with media type set to copy in the intensity slide bar on the LCD. Tab 2 You can specify the paper settings for printing or image quality. (1) (2) (3) (4) (1) Page size Select the page size of the loaded paper. (2) Media type Select the media type of the original ...is not as good as expected, select Standard or High and try copying again. This function automatically adjusts the intensity of the loaded paper. (3) Print quality Adjust print quality according to "Reducing or Enlarging a Copy" in a range of grays instead of the User's Guide on the Platen Glass. For details...
... you used Fast with media type set to copy in the intensity slide bar on the LCD. Tab 2 You can specify the paper settings for printing or image quality. (1) (2) (3) (4) (1) Page size Select the page size of the loaded paper. (2) Media type Select the media type of the original ...is not as good as expected, select Standard or High and try copying again. This function automatically adjusts the intensity of the loaded paper. (3) Print quality Adjust print quality according to "Reducing or Enlarging a Copy" in a range of grays instead of the User's Guide on the Platen Glass. For details...
MP470 series Quick Start Guide
Page 27
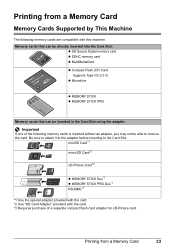
... Card 23 Printing from a Memory Card Memory Cards Supported by This Machine The following memory cards is inserted without an adapter, you may not be inserted in the ...
... Card 23 Printing from a Memory Card Memory Cards Supported by This Machine The following memory cards is inserted without an adapter, you may not be inserted in the ...

MP470 series Quick Start Guide
Page 28
...z MEMORY STICK PRO Duo z MultiMediaCard z RS-MMC 4 Confirm that the Access lamp (A) has lit up Lights up . 5 Close the Card Slot Cover. 24 Printing from a Memory Card (A) Insert into the right Card Slot. Important Compatible image types are limited to the right. Lights up Insert into the left Card.... Insert a memory card with the labeled side facing to JPEG and TIFF only. Other image or movie types such as RAW images cannot be printed. See "Turning the Machine On and Off" on the machine. Printable Image Data This machine supports JPEG and TIFF images created by DCF ver....
...z MEMORY STICK PRO Duo z MultiMediaCard z RS-MMC 4 Confirm that the Access lamp (A) has lit up Lights up . 5 Close the Card Slot Cover. 24 Printing from a Memory Card (A) Insert into the right Card Slot. Important Compatible image types are limited to the right. Lights up Insert into the left Card.... Insert a memory card with the labeled side facing to JPEG and TIFF only. Other image or movie types such as RAW images cannot be printed. See "Turning the Machine On and Off" on the machine. Printable Image Data This machine supports JPEG and TIFF images created by DCF ver....


