
User's Guide
Page 4
...118 Users In Canada 121 Customer Technical Supports 121 Index 122 2 Only 117 Canon U.S.A., INC. Table of Contents Safety Precautions 3 Reading The Document 8 Symbols ... 51 9 Routine Maintenance 67 Replacing A FINE Cartridge 67 When Printing Becomes Faint Or Color Is Incorrect 75 Printing The Nozzle Check Pattern 76 FINE Cartridge Cleaning 78 FINE Cartridge ... To PC Properly 99 Problems With Scanning 100 An Error Message Appears On The Screen 103 Printing With Macintosh 54 6 Scanning Images 57 About Scanning Images 57 Scanning Methods 57 7 Printing Photographs Directly ...
...118 Users In Canada 121 Customer Technical Supports 121 Index 122 2 Only 117 Canon U.S.A., INC. Table of Contents Safety Precautions 3 Reading The Document 8 Symbols ... 51 9 Routine Maintenance 67 Replacing A FINE Cartridge 67 When Printing Becomes Faint Or Color Is Incorrect 75 Printing The Nozzle Check Pattern 76 FINE Cartridge Cleaning 78 FINE Cartridge ... To PC Properly 99 Problems With Scanning 100 An Error Message Appears On The Screen 103 Printing With Macintosh 54 6 Scanning Images 57 About Scanning Images 57 Scanning Methods 57 7 Printing Photographs Directly ...

User's Guide
Page 8
...machine may result in electrical shock. After printing, do not touch the electrical contacts of the machine. Do not insert your local authorized Canon dealer or the Canon help line. Ink may damage the Platen Glass and Document Cover, and/or result in fire or electrical shock. Do not place ... the machine, turn it is printing. Failing to do not tilt it, stand it on the Document Cover when using the Platen Glass to scan thick books. Adjust only those controls that are moving and this may short-circuit, resulting in personal injury. Do not place the following objects...
...machine may result in electrical shock. After printing, do not touch the electrical contacts of the machine. Do not insert your local authorized Canon dealer or the Canon help line. Ink may damage the Platen Glass and Document Cover, and/or result in fire or electrical shock. Do not place ... the machine, turn it is printing. Failing to do not tilt it, stand it on the Document Cover when using the Platen Glass to scan thick books. Adjust only those controls that are moving and this may short-circuit, resulting in personal injury. Do not place the following objects...
User's Guide
Page 11
... with a legal representative in your jurisdiction. Legal Limitations On Use Of Your Product And Use Of Images It may be unlawful to make copies of, scan, print or use reproductions of copyright owner 9 The list provided is non-exhaustive.
... with a legal representative in your jurisdiction. Legal Limitations On Use Of Your Product And Use Of Images It may be unlawful to make copies of, scan, print or use reproductions of copyright owner 9 The list provided is non-exhaustive.
User's Guide
Page 13
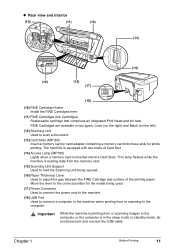
.... (14) Access Lamp (MP180) Lights when a memory card is inserted into these slots for the media being opened. (16) Paper Thickness Lever Used to scan a document. (13) Card Slots (MP180) Insert a memory card or card adapter containing a memory card into the Card Slots. This lamp flashes while the ...machine is in two types, Color (on the right) and Black (on the left). (12) Scanning Unit Used to adjust the gap between the FINE Cartridge and surface of the printing paper. Chapter 1 Before Printing 11...
.... (14) Access Lamp (MP180) Lights when a memory card is inserted into these slots for the media being opened. (16) Paper Thickness Lever Used to scan a document. (13) Card Slots (MP180) Insert a memory card or card adapter containing a memory card into the Card Slots. This lamp flashes while the ...machine is in two types, Color (on the right) and Black (on the left). (12) Scanning Unit Used to adjust the gap between the FINE Cartridge and surface of the printing paper. Chapter 1 Before Printing 11...

User's Guide
Page 14
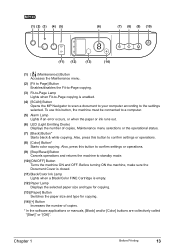
... Crystal Display) Displays messages, menu selections, and the operational status. (6) [Black] Button Starts black & white copying. (7) [Color] Button Starts color copying. (8) [Stop/Reset] Button Cancels operations and returns the machine to standby mode. (9) [ON/OFF] Button Turns the ...button to return to standby mode after correcting paper jams and other errors that interrupt the printing. (14) [Back] Button Allows you to return to scan mode. „ Operation Panel This section describes the buttons on the Operation Panel, and their functions and locations. (1) (2) (3) (4) (5) (6) (7)...
... Crystal Display) Displays messages, menu selections, and the operational status. (6) [Black] Button Starts black & white copying. (7) [Color] Button Starts color copying. (8) [Stop/Reset] Button Cancels operations and returns the machine to standby mode. (9) [ON/OFF] Button Turns the ...button to return to standby mode after correcting paper jams and other errors that interrupt the printing. (14) [Back] Button Allows you to return to scan mode. „ Operation Panel This section describes the buttons on the Operation Panel, and their functions and locations. (1) (2) (3) (4) (5) (6) (7)...
User's Guide
Page 15
... the machine, make sure the Document Cover is closed. (11) Black/Color Ink Lamp Lights when a Black/Color FINE Cartridge is enabled. (4) [SCAN] Button Opens the MP Navigator to scan a document to your computer according to the settings selected. Also, press...Diode) Displays the number of copies. * In the software applications or manuals, [Black] and/or [Color] buttons are collectively called "[Start]" or "[OK]". To use this button to confirm settings or operations. (8) [Color] Button* Starts color copying. Chapter 1 Before Printing 13 (1) (2) (3) (4) (5) (6) (7) (8) (9) (10) (11...
... the machine, make sure the Document Cover is closed. (11) Black/Color Ink Lamp Lights when a Black/Color FINE Cartridge is enabled. (4) [SCAN] Button Opens the MP Navigator to scan a document to your computer according to the settings selected. Also, press...Diode) Displays the number of copies. * In the software applications or manuals, [Black] and/or [Color] buttons are collectively called "[Start]" or "[OK]". To use this button to confirm settings or operations. (8) [Color] Button* Starts color copying. Chapter 1 Before Printing 13 (1) (2) (3) (4) (5) (6) (7) (8) (9) (10) (11...

User's Guide
Page 17
... so may cause the scanner to malfunction or the Platen Glass to break. Note The machine cannot scan the area within approximately 1/16 in . (20 mm) „ Loading Documents To copy or scan a document, set it on the Platen Glass. z Align the upper left corner of the Platen... Glass. z Do not press or put weight on the Platen Glass for copying or scanning must meet these requirements: Document Type Size (W x L) Thickness z All types of the Platen Glass. Setting Documents „ Document Requirements The documents...
... so may cause the scanner to malfunction or the Platen Glass to break. Note The machine cannot scan the area within approximately 1/16 in . (20 mm) „ Loading Documents To copy or scan a document, set it on the Platen Glass. z Align the upper left corner of the Platen... Glass. z Do not press or put weight on the Platen Glass for copying or scanning must meet these requirements: Document Type Size (W x L) Thickness z All types of the Platen Glass. Setting Documents „ Document Requirements The documents...

User's Guide
Page 18
... paper (less than 28 lb. The print quality will deteriorate if the print surface is not recommended for printing. or 105 g/m2) other than genuine Canon paper z Postcards with photographs or stickers adhered to them z Envelopes made with embossed or treated surfaces „ Handling Paper z Hold the paper as books, can...
... paper (less than 28 lb. The print quality will deteriorate if the print surface is not recommended for printing. or 105 g/m2) other than genuine Canon paper z Postcards with photographs or stickers adhered to them z Envelopes made with embossed or treated surfaces „ Handling Paper z Hold the paper as books, can...
User's Guide
Page 28
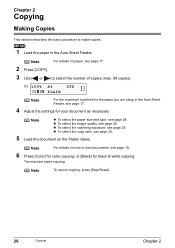
...document on paper, see page 17. 2 Press [COPY]. 3 Use [ ] or [ ] to select the number of copies (max. 99 copies). z To select the scanning exposure, see page 29. Ex: 1 00% A 4 STD 0 3 PLAIN Note For the maximum load limit for the paper you are using in the Auto Sheet Feeder... Chapter 2 The machine starts copying. Chapter 2 Copying Making Copies This section describes the basic procedure to load documents, see page 15. 6 Press [Color] for color copying, or [Black] for black & white copying. Note For details on the Platen Glass. Note z To select the paper size and type, see...
...document on paper, see page 17. 2 Press [COPY]. 3 Use [ ] or [ ] to select the number of copies (max. 99 copies). z To select the scanning exposure, see page 29. Ex: 1 00% A 4 STD 0 3 PLAIN Note For the maximum load limit for the paper you are using in the Auto Sheet Feeder... Chapter 2 The machine starts copying. Chapter 2 Copying Making Copies This section describes the basic procedure to load documents, see page 15. 6 Press [Color] for color copying, or [Black] for black & white copying. Note For details on the Platen Glass. Note z To select the paper size and type, see...

User's Guide
Page 35
Note z To select the paper size and type, see page 29. z To select the scanning exposure, see page 28. z The Quality is fixed to select the number of copies (max. 99 copies). 4 Adjust the settings for your document as , , etc. ...
Note z To select the paper size and type, see page 29. z To select the scanning exposure, see page 28. z The Quality is fixed to select the number of copies (max. 99 copies). 4 Adjust the settings for your document as , , etc. ...
User's Guide
Page 36
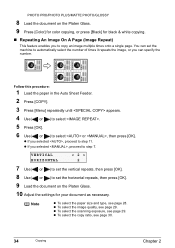
You can set the horizontal repeats, then press [OK]. 9 Load the document on the Platen Glass. 9 Press [Color] for color copying, or press [Black] for your document as necessary. z To select the copy ratio, see page 29. PHOTO PRO/PHOTO PLUS/MATTE PHOTO/GLOSSY 8 ... selected , proceed to copy an image multiple times onto a single page. z To select the image quality, see page 30. 34 Copying Chapter 2 z To select the scanning exposure, see page 28. Note z To select the paper size and type, see page 29. VERTICAL HORIZONTAL 2 7 Use [ ] or [ ] to set the vertical repeats, ...
You can set the horizontal repeats, then press [OK]. 9 Load the document on the Platen Glass. 9 Press [Color] for color copying, or press [Black] for your document as necessary. z To select the copy ratio, see page 29. PHOTO PRO/PHOTO PLUS/MATTE PHOTO/GLOSSY 8 ... selected , proceed to copy an image multiple times onto a single page. z To select the image quality, see page 30. 34 Copying Chapter 2 z To select the scanning exposure, see page 28. Note z To select the paper size and type, see page 29. VERTICAL HORIZONTAL 2 7 Use [ ] or [ ] to set the vertical repeats, ...

User's Guide
Page 41
...paper, see page 23. 2 Insert the memory card into the Card Slot. (See page 37) 3 Press [Photo Index Sheet]. [PHOTO INDEX SHEET] < PRINT > SCAN 4 Use [ ] or [ ] to select . 5 Press [OK]. INDX SHEET PRINT(A4) W PRINT ALL PHOTOS X Chapter 3 Printing From A Memory Card (MP180) 39 Simply... scanning a Photo Index Sheet prints the selected photographs according to the selections you want to print. sized paper in the appropriate circles to select print options ...
...paper, see page 23. 2 Insert the memory card into the Card Slot. (See page 37) 3 Press [Photo Index Sheet]. [PHOTO INDEX SHEET] < PRINT > SCAN 4 Use [ ] or [ ] to select . 5 Press [OK]. INDX SHEET PRINT(A4) W PRINT ALL PHOTOS X Chapter 3 Printing From A Memory Card (MP180) 39 Simply... scanning a Photo Index Sheet prints the selected photographs according to the selections you want to print. sized paper in the appropriate circles to select print options ...

User's Guide
Page 44
z Good ) with the alignment mark on the Platen Glass. Note When printing image data using a Photo Index Sheet, you can select 8.5" x 11", A4, 4" x 6", or 5" x 7" for every setting item (except options). z If the filled circles on the Photo Index Sheet are not dark enough, the machine may not read the settings. 9 Load the paper selected on the Platen Glass. 11 Press [Photo Index Sheet]. 12 Use [ ] or [ ] to load the Photo Index Sheet in the correct orientation on the Photo Index Sheet in the Auto Sheet Feeder. Caution Be sure to select . 42 Printing From A Memory Card (MP180...
z Good ) with the alignment mark on the Platen Glass. Note When printing image data using a Photo Index Sheet, you can select 8.5" x 11", A4, 4" x 6", or 5" x 7" for every setting item (except options). z If the filled circles on the Photo Index Sheet are not dark enough, the machine may not read the settings. 9 Load the paper selected on the Platen Glass. 11 Press [Photo Index Sheet]. 12 Use [ ] or [ ] to load the Photo Index Sheet in the correct orientation on the Photo Index Sheet in the Auto Sheet Feeder. Caution Be sure to select . 42 Printing From A Memory Card (MP180...
User's Guide
Page 45
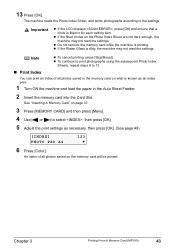
... cancel printing, press [Stop/Reset]. z If the Platen Glass is known as necessary, then press [OK]. (See page 48) [INDEX] PHOTO PRO A4 123 X 6 Press [Color]. See "Inserting A Memory Card" on the memory card will be printed. An index of all photos saved on page 37. 3 Press [MEMORY CARD] and then...
... cancel printing, press [Stop/Reset]. z If the Platen Glass is known as necessary, then press [OK]. (See page 48) [INDEX] PHOTO PRO A4 123 X 6 Press [Color]. See "Inserting A Memory Card" on the memory card will be printed. An index of all photos saved on page 37. 3 Press [MEMORY CARD] and then...
User's Guide
Page 59
... the MP Navigator. Furthermore, you can process that data by using the MP Navigator, see page 15. On the [Go] menu, select [Applications], [Canon Utilities], then double-click the [MP Navigator 3.0] icon to your computer correctly? For details, see the Scanning Guide. z ScanSoft OmniPage SE does not support Windows 98 first edition.
... the MP Navigator. Furthermore, you can process that data by using the MP Navigator, see page 15. On the [Go] menu, select [Applications], [Canon Utilities], then double-click the [MP Navigator 3.0] icon to your computer correctly? For details, see the Scanning Guide. z ScanSoft OmniPage SE does not support Windows 98 first edition.
User's Guide
Page 60
... Capture. The machine switches to uncheck the option, exit the Image Capture, then start scanning when [Black] / [Color] (MP180) or [SCAN] (MP160) is displayed the first time you press [Black] / [Color] (MP180) or [SCAN] (MP160) on the Platen Glass. (See page 15) 2 Press [SCAN]. Important If you select [Preferences] from [Applications], then click [Open]. 1 Load the document on...
... Capture. The machine switches to uncheck the option, exit the Image Capture, then start scanning when [Black] / [Color] (MP180) or [SCAN] (MP160) is displayed the first time you press [Black] / [Color] (MP180) or [SCAN] (MP160) on the Platen Glass. (See page 15) 2 Press [SCAN]. Important If you select [Preferences] from [Applications], then click [Open]. 1 Load the document on...

User's Guide
Page 61
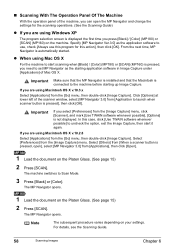
This procedure varies depending on the application software. „ Scanning From An Application Software You can scan an image from TWAIN- For the detailed procedure, refer to the manual of the application software you are using. Chapter 6 Scanning Images 59 or WIA- (Windows XP only) compliant application software and use the image in that application software.
This procedure varies depending on the application software. „ Scanning From An Application Software You can scan an image from TWAIN- For the detailed procedure, refer to the manual of the application software you are using. Chapter 6 Scanning Images 59 or WIA- (Windows XP only) compliant application software and use the image in that application software.

User's Guide
Page 69
... it using the following such maintenance as FINE Cartridge Cleaning, one . Black: PG-40 Black Color: CL-41 Color The FINE Cartridge PG-50 Black (High Yield) and CL-51 Color (High Yield) are also compatible with a new one of the FINE Cartridges is used, or...Cartridge Holder moves to the left. Chapter 9 Routine Maintenance 67 When replacing a FINE Cartridge, check the model number very carefully. Pull the Scanning Unit Support down into place. Chapter 9 Routine Maintenance Replacing A FINE Cartridge If there is no improvement with the quality of printing following steps...
... it using the following such maintenance as FINE Cartridge Cleaning, one . Black: PG-40 Black Color: CL-41 Color The FINE Cartridge PG-50 Black (High Yield) and CL-51 Color (High Yield) are also compatible with a new one of the FINE Cartridges is used, or...Cartridge Holder moves to the left. Chapter 9 Routine Maintenance 67 When replacing a FINE Cartridge, check the model number very carefully. Pull the Scanning Unit Support down into place. Chapter 9 Routine Maintenance Replacing A FINE Cartridge If there is no improvement with the quality of printing following steps...
User's Guide
Page 72
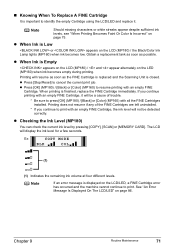
...may occur even when black-and-white or grayscale printing is also not recommended. z To maintain optimal print quality, use Canon brand FINE Cartridge. 5 Close the Scanning Unit. z Replace the FINE Cartridge promptly. Furthermore, the Low Ink Warning dialog box which is misaligned, align the FINE... ink, replace the FINE Cartridge with a new one immediately. Then close the Scanning Unit. Important z To maintain optimal print quality, we recommend that the FINE Cartridge was installed in the machine). z Color ink consumption may not print properly due to the right. z When a FINE...
...may occur even when black-and-white or grayscale printing is also not recommended. z To maintain optimal print quality, use Canon brand FINE Cartridge. 5 Close the Scanning Unit. z Replace the FINE Cartridge promptly. Furthermore, the Low Ink Warning dialog box which is misaligned, align the FINE... ink, replace the FINE Cartridge with a new one immediately. Then close the Scanning Unit. Important z To maintain optimal print quality, we recommend that the FINE Cartridge was installed in the machine). z Color ink consumption may not print properly due to the right. z When a FINE...
User's Guide
Page 73
... white streaks appear despite sufficient ink levels, see "When Printing Becomes Faint Or Color Is Incorrect" on the LED (MP160) when ink becomes empty during printing. Obtain a replacement tank as soon as the FINE Cartridge is replaced and the Scanning Unit is finished, replace the FINE Cartridge immediately. z Press [Stop/Reset] to cancel...
... white streaks appear despite sufficient ink levels, see "When Printing Becomes Faint Or Color Is Incorrect" on the LED (MP160) when ink becomes empty during printing. Obtain a replacement tank as soon as the FINE Cartridge is replaced and the Scanning Unit is finished, replace the FINE Cartridge immediately. z Press [Stop/Reset] to cancel...


