
User's Guide
Page 14
... machine to memory card mode. (5) LCD (Liquid Crystal Display) Displays messages, menu selections, and the operational status. (6) [Black] Button Starts black & white copying. (7) [Color] Button Starts color copying. (8) [Stop/Reset] Button Cancels operations and returns the machine to the pervious screen. 12 Before Printing Chapter 1 „ Operation Panel This section describes the buttons...
... machine to memory card mode. (5) LCD (Liquid Crystal Display) Displays messages, menu selections, and the operational status. (6) [Black] Button Starts black & white copying. (7) [Color] Button Starts color copying. (8) [Stop/Reset] Button Cancels operations and returns the machine to the pervious screen. 12 Before Printing Chapter 1 „ Operation Panel This section describes the buttons...
User's Guide
Page 15
...[Black] Button* Starts black & white copying. Before turning ON the machine, make sure the Document Cover is closed. (11) Black/Color Ink Lamp Lights when a Black/Color FINE Cartridge is enabled. (4) [SCAN] Button Opens the MP Navigator to scan a document to your computer according to standby mode. (10...ink runs out. (6) LED (Light Emitting Diode) Displays the number of copies. * In the software applications or manuals, [Black] and/or [Color] buttons are collectively called "[Start]" or "[OK]". Chapter 1 Before Printing 13 To use this button, the machine must be connected to confirm ...
...[Black] Button* Starts black & white copying. Before turning ON the machine, make sure the Document Cover is closed. (11) Black/Color Ink Lamp Lights when a Black/Color FINE Cartridge is enabled. (4) [SCAN] Button Opens the MP Navigator to scan a document to your computer according to standby mode. (10...ink runs out. (6) LED (Light Emitting Diode) Displays the number of copies. * In the software applications or manuals, [Black] and/or [Color] buttons are collectively called "[Start]" or "[OK]". Chapter 1 Before Printing 13 To use this button, the machine must be connected to confirm ...
User's Guide
Page 28
... copy ratio, see page 30. 5 Load the document on how to load documents, see page 15. 6 Press [Color] for color copying, or [Black] for your document as necessary. Note To cancel copying, press [Stop/Reset]. 26 Copying Chapter 2 Chapter 2 Copying Making Copies This section describes the basic procedure to select the number of...
... copy ratio, see page 30. 5 Load the document on how to load documents, see page 15. 6 Press [Color] for color copying, or [Black] for your document as necessary. Note To cancel copying, press [Stop/Reset]. 26 Copying Chapter 2 Chapter 2 Copying Making Copies This section describes the basic procedure to select the number of...

User's Guide
Page 29
z To make 10 to load documents, see page 15 5 Press [Color] for color copying, or [Black] for text-only documents. The machine starts high speed copying. z High speed copying is not as good as expected, try normal copying. .... The LED flashes once. (2) Release the button. The machine starts copying. Press [Stop/Reset] to select the paper size and type. z To cancel copying, press [Stop/Reset]. z When you want to make high speed copies: (1) Press and hold down [Color] or [Black] for pieces of copies (max. 20 copies). The Paper Lamp indicates...
z To make 10 to load documents, see page 15 5 Press [Color] for color copying, or [Black] for text-only documents. The machine starts high speed copying. z High speed copying is not as good as expected, try normal copying. .... The LED flashes once. (2) Release the button. The machine starts copying. Press [Stop/Reset] to select the paper size and type. z To cancel copying, press [Stop/Reset]. z When you want to make high speed copies: (1) Press and hold down [Color] or [Black] for pieces of copies (max. 20 copies). The Paper Lamp indicates...
User's Guide
Page 45
... z Do not remove the memory card while the machine is known as necessary, then press [OK]. (See page 48) [INDEX] PHOTO PRO A4 123 X 6 Press [Color]. z If the Platen Glass is filled in the memory card on the Photo Index Sheet are not dark enough, the machine may not read the... in for each setting item. 13 Press [OK]. See "Inserting A Memory Card" on the memory card will be printed. Note z To cancel printing, press [Stop/Reset]. An index of all photos saved on page 37. 3 Press [MEMORY CARD] and then press [Menu]. 4 Use [ ] or [ ] to the settings. The machine reads ...
... z Do not remove the memory card while the machine is known as necessary, then press [OK]. (See page 48) [INDEX] PHOTO PRO A4 123 X 6 Press [Color]. z If the Platen Glass is filled in the memory card on the Photo Index Sheet are not dark enough, the machine may not read the... in for each setting item. 13 Press [OK]. See "Inserting A Memory Card" on the memory card will be printed. Note z To cancel printing, press [Stop/Reset]. An index of all photos saved on page 37. 3 Press [MEMORY CARD] and then press [Menu]. 4 Use [ ] or [ ] to the settings. The machine reads ...

User's Guide
Page 55
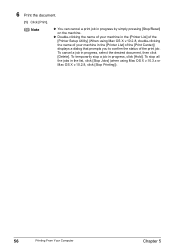
6 Print the document. (1) Click [Print] or [OK] (1). The machine starts printing. Note (1) z You can cancel a print job in progress by simply pressing [Stop/Reset] on [Canon IJ Status Monitor] to stop printing. Chapter 5 Printing From Your Computer 53 z Click [Cancel Printing] on the machine. To show [Canon IJ Status Monitor], click [Canon MP180 Printer] on the taskbar. [Canon IJ Status Monitor] opens automatically when a machine error occurs.
6 Print the document. (1) Click [Print] or [OK] (1). The machine starts printing. Note (1) z You can cancel a print job in progress by simply pressing [Stop/Reset] on [Canon IJ Status Monitor] to stop printing. Chapter 5 Printing From Your Computer 53 z Click [Cancel Printing] on the machine. To show [Canon IJ Status Monitor], click [Canon MP180 Printer] on the taskbar. [Canon IJ Status Monitor] opens automatically when a machine error occurs.
User's Guide
Page 58
6 Print the document. (1) Click [Print]. To cancel a job in progress by simply pressing [Stop/Reset] on the machine. Note z You can cancel a print job in progress, select the desired document, then click [Delete]. z Double-clicking the name of your machine ...
6 Print the document. (1) Click [Print]. To cancel a job in progress by simply pressing [Stop/Reset] on the machine. Note z You can cancel a print job in progress, select the desired document, then click [Delete]. z Double-clicking the name of your machine ...
User's Guide
Page 73
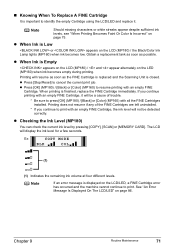
...Press [OK] (MP180) / [Black] or [Color] (MP160) to print. Ex: COPY MODE BLK COL (1) (1) Indicates the remaining ink volume at four different levels. z When Ink is Low or appears on the LED (MP160) when ink becomes empty during printing. z Press [Stop/Reset] to print with an empty FINE Cartridge, the...Scanning Unit is closed. Printing does not resume if any of trouble. * Be sure to press [OK] (MP180) / [Black] or [Color] (MP160) with all the FINE Cartridges installed. „ Knowing When To Replace A FINE Cartridge It is important to identify the empty Cartridge using the LCD...
...Press [OK] (MP180) / [Black] or [Color] (MP160) to print. Ex: COPY MODE BLK COL (1) (1) Indicates the remaining ink volume at four different levels. z When Ink is Low or appears on the LED (MP160) when ink becomes empty during printing. z Press [Stop/Reset] to print with an empty FINE Cartridge, the...Scanning Unit is closed. Printing does not resume if any of trouble. * Be sure to press [OK] (MP180) / [Black] or [Color] (MP160) with all the FINE Cartridges installed. „ Knowing When To Replace A FINE Cartridge It is important to identify the empty Cartridge using the LCD...

User's Guide
Page 97
... on the machine. 3. The desired language is displayed. An Unintended Language is not selected. Press [ON/OFF] to your desired language. Press [OK]. Press [Stop/Reset]. Press [ ] twice, then press [OK]. 6. Press [ ] the number of times in the correct position and orientation on page 39. See "Printing By Using The Photo...
... on the machine. 3. The desired language is displayed. An Unintended Language is not selected. Press [ON/OFF] to your desired language. Press [OK]. Press [Stop/Reset]. Press [ ] twice, then press [OK]. 6. Press [ ] the number of times in the correct position and orientation on page 39. See "Printing By Using The Photo...

User's Guide
Page 125
... FINE Cartridge Alignment 79 FINE Cartridge Cleaning 78 FINE Cartridge Deep Cleaning 78 Replacing A FINE Cartridge 67 S Safety Precautions 3 SCAN Button (MP160) 13 SCAN Button (MP180) 12 Scanning Images 57 From An Application Software 59 Using The MP Navigator 57 Using The SCAN Button 58 ...Scanning Unit 11 Scanning Unit Support 11 Setting Documents 15 Document Requirements 15 Loading Documents 15 Specifications 113 Stop/Reset Button (MP160) 13 Stop/Reset Button (MP180) 12 System Settings (MP180) 64 LOAD CONFGURATION 66 OTHERS 65 PICTBRIDGE SET 65 PRINT SETTINGS 64 RESTORE DEFAULT...
... FINE Cartridge Alignment 79 FINE Cartridge Cleaning 78 FINE Cartridge Deep Cleaning 78 Replacing A FINE Cartridge 67 S Safety Precautions 3 SCAN Button (MP160) 13 SCAN Button (MP180) 12 Scanning Images 57 From An Application Software 59 Using The MP Navigator 57 Using The SCAN Button 58 ...Scanning Unit 11 Scanning Unit Support 11 Setting Documents 15 Document Requirements 15 Loading Documents 15 Specifications 113 Stop/Reset Button (MP160) 13 Stop/Reset Button (MP180) 12 System Settings (MP180) 64 LOAD CONFGURATION 66 OTHERS 65 PICTBRIDGE SET 65 PRINT SETTINGS 64 RESTORE DEFAULT...


