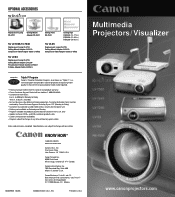
Full Line - Projectors Brochure
Page 1
... Pipe RS-CL03 (14.17 in.) RS-CL04 (21.65 in.) RS-CL05 (29.92 in.) For LV-X5 Replacement Lamp LV-LP25 Ceiling Mount Adapter LV-CL10 Component Video Adapter Cable LV-CA32 TRIPLE P Triple P Program Canon's Projector Protection Program, also known as security for products purchased and utilized in the event that your projector...
... Pipe RS-CL03 (14.17 in.) RS-CL04 (21.65 in.) RS-CL05 (29.92 in.) For LV-X5 Replacement Lamp LV-LP25 Ceiling Mount Adapter LV-CL10 Component Video Adapter Cable LV-CA32 TRIPLE P Triple P Program Canon's Projector Protection Program, also known as security for products purchased and utilized in the event that your projector...
Full Line - Projectors Brochure
Page 2
...8226; Size (W x D x H): 11.2 x 11.3 x 3.8 in. (284 x 286 x 96mm) • 3 Year Parts and Labor Warranty -120 Day Lamp Life Warranty KIT CONTENTS • Projector • Wireless Remote Control (AA Batteries Included) • Computer Cable (DVI-VGA) • Component Video Adapter Cable •... Card • User's Manual * Please see back cover for optional accessories, "Triple P" program and other information. 2 GENUINE CANON OPTICS Nearly 70 years of expertise in designing and crafting precision lenses for Aspectual Illumination System - EXCLUSIVE AISYS TECHNOLOGY AISYS stands for ...
...8226; Size (W x D x H): 11.2 x 11.3 x 3.8 in. (284 x 286 x 96mm) • 3 Year Parts and Labor Warranty -120 Day Lamp Life Warranty KIT CONTENTS • Projector • Wireless Remote Control (AA Batteries Included) • Computer Cable (DVI-VGA) • Component Video Adapter Cable •... Card • User's Manual * Please see back cover for optional accessories, "Triple P" program and other information. 2 GENUINE CANON OPTICS Nearly 70 years of expertise in designing and crafting precision lenses for Aspectual Illumination System - EXCLUSIVE AISYS TECHNOLOGY AISYS stands for ...
Full Line - Projectors Brochure
Page 3
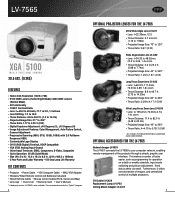
...it offers remote transfer of images, and centralized control of the projector through a simple, graphic user interface. DVI Cable LV-CA29 Replacement Lamp LV-LP22 Ceiling Mount Adapter LV-CL07 5 LV-7565 XGA 5100 1024 X 768 ANSI LUMENS 20.5 LBS. (9.3KG) FEATURES • Native XGA Resolution (1024 x ... 31" to 400" • Throw Ratio 1.77 to 5.78:1 (D:W) Lens changes must be performed by an authorized Canon representative. OPTIONAL ACCESSORIES FOR THE LV-7565 Network Imager LV-NI01 The LV-NI01 connects the LV-7565 to your computer network, enabling remote management of multiple projectors.
...it offers remote transfer of images, and centralized control of the projector through a simple, graphic user interface. DVI Cable LV-CA29 Replacement Lamp LV-LP22 Ceiling Mount Adapter LV-CL07 5 LV-7565 XGA 5100 1024 X 768 ANSI LUMENS 20.5 LBS. (9.3KG) FEATURES • Native XGA Resolution (1024 x ... 31" to 400" • Throw Ratio 1.77 to 5.78:1 (D:W) Lens changes must be performed by an authorized Canon representative. OPTIONAL ACCESSORIES FOR THE LV-7565 Network Imager LV-NI01 The LV-NI01 connects the LV-7565 to your computer network, enabling remote management of multiple projectors.
Full Line - Projectors Brochure
Page 4
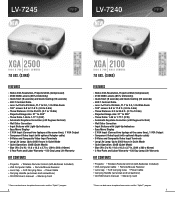
LV-7245 LV-7240 XGA 2500 1024 X 768 ANSI LUMENS 7.0 LBS. (3.0KG) ...D x H): 11.6 x 10.2 x 3.7 in. (294 x 260 x 93mm) • 3 Year Parts and Labor Warranty -120 Day Lamp Life Warranty KIT CONTENTS • Projector • Wireless Remote Control (AAA Batteries Included) • VGA Computer Cable • Remote Mouse Receiver &#...D x H): 11.6 x 10.2 x 3.7 in. (294 x 260 x 93mm) • 3 Year Parts and Labor Warranty -120 Day Lamp Life Warranty KIT CONTENTS • Projector • Wireless Remote Control (AAA Batteries Included) • VGA Computer Cable • Remote Mouse Receiver ...
LV-7245 LV-7240 XGA 2500 1024 X 768 ANSI LUMENS 7.0 LBS. (3.0KG) ...D x H): 11.6 x 10.2 x 3.7 in. (294 x 260 x 93mm) • 3 Year Parts and Labor Warranty -120 Day Lamp Life Warranty KIT CONTENTS • Projector • Wireless Remote Control (AAA Batteries Included) • VGA Computer Cable • Remote Mouse Receiver &#...D x H): 11.6 x 10.2 x 3.7 in. (294 x 260 x 93mm) • 3 Year Parts and Labor Warranty -120 Day Lamp Life Warranty KIT CONTENTS • Projector • Wireless Remote Control (AAA Batteries Included) • VGA Computer Cable • Remote Mouse Receiver ...
Full Line - Projectors Brochure
Page 5
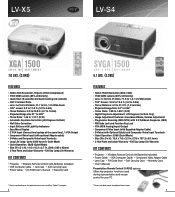
... Mode) • Size (W x D x H): 10.6 x 7.8 x 3.3 in. (270 x 197.2 x 83.1mm) • 3 Year Parts and Labor Warranty -120 Day Lamp Life Warranty KIT CONTENTS • Projector • Wireless Remote Control (AA Batteries Included) • Power Cable • VGA Computer Cable • Component Video Adapter Cable... Cap • PIN Code Seal • Soft Carrying Case • Warranty Card • User's Manual Presentation Remote Control LV-RC02 (Optional) Offers key projector functions used during a presentation and mouse control for your PC. * Please see back cover for optional accessories....
... Mode) • Size (W x D x H): 10.6 x 7.8 x 3.3 in. (270 x 197.2 x 83.1mm) • 3 Year Parts and Labor Warranty -120 Day Lamp Life Warranty KIT CONTENTS • Projector • Wireless Remote Control (AA Batteries Included) • Power Cable • VGA Computer Cable • Component Video Adapter Cable... Cap • PIN Code Seal • Soft Carrying Case • Warranty Card • User's Manual Presentation Remote Control LV-RC02 (Optional) Offers key projector functions used during a presentation and mouse control for your PC. * Please see back cover for optional accessories....
Full Line - Projectors Brochure
Page 6
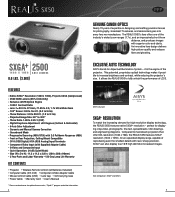
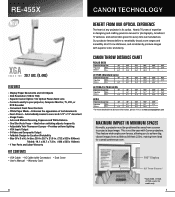
... switching objects frequently • Adjustable Twin Fluorescent Lamps - CANON THROW DISTANCE CHART REALiS SX50 Projection Image Size Projection Wide Distance Tele 40" 100" 150" 182" 200" 300" 3.9' 9.8' 14.8' 18.0' 19.7' 29.9' 6.6' 16.4' 24.6' 29.9' - - LV-7565 (Standard Lens) Projection Image Size 31" Projection Wide - LV-7245/LV-7240/LV-X5 Projection Image Size 21" Projection Wide - Enhances...
... switching objects frequently • Adjustable Twin Fluorescent Lamps - CANON THROW DISTANCE CHART REALiS SX50 Projection Image Size Projection Wide Distance Tele 40" 100" 150" 182" 200" 300" 3.9' 9.8' 14.8' 18.0' 19.7' 29.9' 6.6' 16.4' 24.6' 29.9' - - LV-7565 (Standard Lens) Projection Image Size 31" Projection Wide - LV-7245/LV-7240/LV-X5 Projection Image Size 21" Projection Wide - Enhances...
Owners Manual
Page 2
... you purchased the projector or the service center. Improper operation may result in a proper position. NO USER-SERVICEABLE PARTS INSIDE EXCEPT LAMP REPLACEMENT. THIS SYMBOL INDICATES THAT THERE ARE IMPORTANT OPERATING AND MAINTENANCE INSTRUCTIONS IN THE OWNER'S MANUAL WITH THIS UNIT. This projector produces intense... stare directly into the lens as defined in the end of Electronic Computer/Data Processing Equipment NOTE FOR CUSTOMERS IN THE US Hg LAMP(S) INSIDE THIS PRODUCT CONTAIN MERCURY AND MUST BE RECYCLED OR DISPOSED OF ACCORDING TO LOCAL, STATE OR FEDERAL LAWS. Do not look...
... you purchased the projector or the service center. Improper operation may result in a proper position. NO USER-SERVICEABLE PARTS INSIDE EXCEPT LAMP REPLACEMENT. THIS SYMBOL INDICATES THAT THERE ARE IMPORTANT OPERATING AND MAINTENANCE INSTRUCTIONS IN THE OWNER'S MANUAL WITH THIS UNIT. This projector produces intense... stare directly into the lens as defined in the end of Electronic Computer/Data Processing Equipment NOTE FOR CUSTOMERS IN THE US Hg LAMP(S) INSIDE THIS PRODUCT CONTAIN MERCURY AND MUST BE RECYCLED OR DISPOSED OF ACCORDING TO LOCAL, STATE OR FEDERAL LAWS. Do not look...
Owners Manual
Page 5
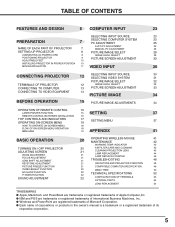
INDICATOR 42 20 AIR FILTER CARE AND CLEANING 43 21 CLEANING PROJECTION LENS LAMP REPLACEMENT 43 44 21 LAMP REPLACE COUNTER 45 21 21 TROUBLESHOOTING 46 21 INDICATORS AND PROJECTOR CONDITION 48 21 COMPATIBLE COMPUTER SPECIFICATION 49 22 MENU TREE 50 22 TECHNICAL SPECIFICATIONS ...
INDICATOR 42 20 AIR FILTER CARE AND CLEANING 43 21 CLEANING PROJECTION LENS LAMP REPLACEMENT 43 44 21 LAMP REPLACE COUNTER 45 21 21 TROUBLESHOOTING 46 21 INDICATORS AND PROJECTOR CONDITION 48 21 COMPATIBLE COMPUTER SPECIFICATION 49 22 MENU TREE 50 22 TECHNICAL SPECIFICATIONS ...
Owners Manual
Page 6
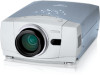
... technology for portability, durability, and ease of installation methods including ceiling mount, stand alone and rear projection. N High Resolution Image LV-7565/7565F allows great compatibility with up and down to the position you can be wired if necessary. Supports a wide range of use... system. N A wide variety of functions to make your presentation more smoothly. This projector utilizes built-in amplifier for increasing lamp life and reducing power consumption. Auto PC Adjustment for automatically adjusting the optimum setting for playing DVD and HDTV with a component...
... technology for portability, durability, and ease of installation methods including ceiling mount, stand alone and rear projection. N High Resolution Image LV-7565/7565F allows great compatibility with up and down to the position you can be wired if necessary. Supports a wide range of use... system. N A wide variety of functions to make your presentation more smoothly. This projector utilizes built-in amplifier for increasing lamp life and reducing power consumption. Auto PC Adjustment for automatically adjusting the optimum setting for playing DVD and HDTV with a component...

Owners Manual
Page 7
... ! When using or installing projector, following to following precautions should be taken. Pay attention to ensure proper ventilation and avoid a possible risk of any objects. LAMP COVER BOTTOM OF CABINET When attached the Network Imager (optional part) to the owner's manual in the optional Network Imager. G Do not cover vent slots...
... ! When using or installing projector, following to following precautions should be taken. Pay attention to ensure proper ventilation and avoid a possible risk of any objects. LAMP COVER BOTTOM OF CABINET When attached the Network Imager (optional part) to the owner's manual in the optional Network Imager. G Do not cover vent slots...

Owners Manual
Page 10
... LOCK LATCHES INSTALLING PROJECTOR IN PROPER POSITION Install the projector properly. Projection angle can be adjusted by rotating ADJUSTABLE FEET. Improper installation may reduce the lamp lifetime and cause a fire hazard. 10˚ Do not tilt the projector more than 10 degrees above and below. 10˚ NO UPWARD Do not...
... LOCK LATCHES INSTALLING PROJECTOR IN PROPER POSITION Install the projector properly. Projection angle can be adjusted by rotating ADJUSTABLE FEET. Improper installation may reduce the lamp lifetime and cause a fire hazard. 10˚ Do not tilt the projector more than 10 degrees above and below. 10˚ NO UPWARD Do not...

Owners Manual
Page 17
... Turns to yellow when life of projection lamp draws to adjust focus. (P21) AUTO PC ADJ. INDICATOR Flashes red when internal projector temperature is too high. (P42) READY INDICATOR Lights green when a projector ... TEMP. BUTTON Used to operate AUTO PC Adjustment function. (P25) SET BUTTON Used to select an item or adjust value in Power Management mode. (P39) LAMP INDICATOR Becomes dim when a projector is ready to be turned on its top. It is in stand-by mode. And it flashes green in ON...
... Turns to yellow when life of projection lamp draws to adjust focus. (P21) AUTO PC ADJ. INDICATOR Flashes red when internal projector temperature is too high. (P42) READY INDICATOR Lights green when a projector ... TEMP. BUTTON Used to operate AUTO PC Adjustment function. (P25) SET BUTTON Used to select an item or adjust value in Power Management mode. (P39) LAMP INDICATOR Becomes dim when a projector is ready to be turned on its top. It is in stand-by mode. And it flashes green in ON...

Owners Manual
Page 19
... image. [Normal / True / Wide / Digital zoom +/-] (Refer to P29) SETTING MENU Used to VIDEO input source. GUIDE WINDOW Shows selected item of projector or reset Lamp Replace Counter. (Refer to P37-40) INPUT MENU Used to select input source (Input 1, Input 2 or Input 3). (Refer to P23) PC ADJUST MENU Used to...
... image. [Normal / True / Wide / Digital zoom +/-] (Refer to P29) SETTING MENU Used to VIDEO input source. GUIDE WINDOW Shows selected item of projector or reset Lamp Replace Counter. (Refer to P37-40) INPUT MENU Used to select input source (Input 1, Input 2 or Input 3). (Refer to P23) PC ADJUST MENU Used to...

Owners Manual
Page 20
...seconds. 3 When projector has cooled down , projector detects signal interruption and turns off and leave it can turn it off the Projection Lamp automatically. Refer to the section "MAINTENANCE" on page 42. and READY Indicator flashing, refer to "Power management" on page 39. Current ...Input position and Lamp mode status are also displayed on screen for connecting that equipment.) 2 Connect a projector's AC Power Cord into an AC outlet. BASIC ...
...seconds. 3 When projector has cooled down , projector detects signal interruption and turns off and leave it can turn it off the Projection Lamp automatically. Refer to the section "MAINTENANCE" on page 42. and READY Indicator flashing, refer to "Power management" on page 39. Current ...Input position and Lamp mode status are also displayed on screen for connecting that equipment.) 2 Connect a projector's AC Power Cord into an AC outlet. BASIC ...

Owners Manual
Page 37
... the adjustment data, perform keystone adjustment first, and then adjust the Aspect H/V. Refer to item and then press POINT LEFT/RIGHT button(s). 37 Lamp mode When selecting the Lamp mode, the projector reduce the brightness and set and then press SET button. Normal mode Auto mode The brightness is adjusted automatically to...
... the adjustment data, perform keystone adjustment first, and then adjust the Aspect H/V. Refer to item and then press POINT LEFT/RIGHT button(s). 37 Lamp mode When selecting the Lamp mode, the projector reduce the brightness and set and then press SET button. Normal mode Auto mode The brightness is adjusted automatically to...

Owners Manual
Page 39
... of Projector; When the input signal is interrupted and any button is completed, the READY indicator starts flashing to reduce power consumption and conserve lamp operating time. If "Ready" is selected 2) When the set time is completed, the power switches off properly (refer to a wall outlet... change the code of the projector used in "Code 2," both projector and Remote Control Unit must be operated during this condition, the lamp will be projected if a signal starts being set. After changing the code, make sure Remote Control operates properly. Use the POINT DOWN...
... of Projector; When the input signal is interrupted and any button is completed, the READY indicator starts flashing to reduce power consumption and conserve lamp operating time. If "Ready" is selected 2) When the set time is completed, the power switches off properly (refer to a wall outlet... change the code of the projector used in "Code 2," both projector and Remote Control Unit must be operated during this condition, the lamp will be projected if a signal starts being set. After changing the code, make sure Remote Control operates properly. Use the POINT DOWN...

Owners Manual
Page 40
.... This cancels the Key lock function. Another confirmation dialog box appears and select [Yes] and then press SET button. When replacing Projection Lamp, reset Lamp Replace Counter by using this projector. The message "Return to turn off the power, and then while pressing a SET button, reinsert the... AC cord, This will cancel the projector's control panel lock. Refer to page 45 for the lamp counter to Factory default. 40 Set mode following steps below. If the projector's control panel accidentally becomes locked and you do not have ...
.... This cancels the Key lock function. Another confirmation dialog box appears and select [Yes] and then press SET button. When replacing Projection Lamp, reset Lamp Replace Counter by using this projector. The message "Return to turn off the power, and then while pressing a SET button, reinsert the... AC cord, This will cancel the projector's control panel lock. Refer to page 45 for the lamp counter to Factory default. 40 Set mode following steps below. If the projector's control panel accidentally becomes locked and you do not have ...
Owners Manual
Page 44
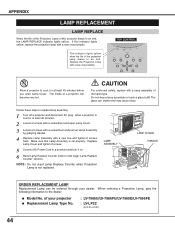
...5 Connect AC Power Cord to a projector and turn it on. 6 Reset Lamp Replace Counter (refer to cool for at least 45 minutes. 2 Loosen 2 screws with a screwdriver and open Lamp Cover. LAMP ASSEMBLY LAMP COVER HANDLE ORDER REPLACEMENT LAMP Replacement Lamp can become very hot. Follow these steps to the dealer. NOTE : Do... lights yellow when the life of the same type. The inside of a projector can be ordered through your projector G Replacement Lamp Type No. : LV-7565U/LV-7565FU/LV-7565E/LV-7565FE : LV-LP22 (610 314 9127) 44 The glass can shatter and may cause injury. Make sure that...
...5 Connect AC Power Cord to a projector and turn it on. 6 Reset Lamp Replace Counter (refer to cool for at least 45 minutes. 2 Loosen 2 screws with a screwdriver and open Lamp Cover. LAMP ASSEMBLY LAMP COVER HANDLE ORDER REPLACEMENT LAMP Replacement Lamp can become very hot. Follow these steps to the dealer. NOTE : Do... lights yellow when the life of the same type. The inside of a projector can be ordered through your projector G Replacement Lamp Type No. : LV-7565U/LV-7565FU/LV-7565E/LV-7565FE : LV-LP22 (610 314 9127) 44 The glass can shatter and may cause injury. Make sure that...

Owners Manual
Page 45
... button to move a red frame pointer to the environment of time than other similar lamps. is replaced. LAMP HANDLING PRECAUTIONS This projector uses a high-pressure lamp which the projector and lamp are no guarantee of glass around the projector or coming out from the AC outlet ...projector indicates that there are being used. Additionally, check carefully to reset the Lamp Replace Counter after the Projection Lamp is displayed. APPENDIX LAMP REPLACE COUNTER Be sure to ensure that the lamp should check the inside of vibration, shock or degradation as its lifetime draws to...
... button to move a red frame pointer to the environment of time than other similar lamps. is replaced. LAMP HANDLING PRECAUTIONS This projector uses a high-pressure lamp which the projector and lamp are no guarantee of glass around the projector or coming out from the AC outlet ...projector indicates that there are being used. Additionally, check carefully to reset the Lamp Replace Counter after the Projection Lamp is displayed. APPENDIX LAMP REPLACE COUNTER Be sure to ensure that the lamp should check the inside of vibration, shock or degradation as its lifetime draws to...

Owners Manual
Page 46
...38.) G Check Ceiling feature. (See "SETTING" section on page 38.) G Check Display feature.(See "SETTING" section on page 20.) G Check Projection Lamp. (Refer to page 44.) G Adjust focus of Operating Temperature (5°C ~ 35°C). G When turning a projector on Projection Lens. G Adjust ...calling your AC outlet. G Wait 90 seconds after a projector is corresponding with a projector. (When you power up a projector. LAMP indicator lights bright and READY indicator turns off before you reconnect a projector, be with your graphics controller rather than with your computer ...
...38.) G Check Ceiling feature. (See "SETTING" section on page 38.) G Check Display feature.(See "SETTING" section on page 20.) G Check Projection Lamp. (Refer to page 44.) G Adjust focus of Operating Temperature (5°C ~ 35°C). G When turning a projector on Projection Lens. G Adjust ...calling your AC outlet. G Wait 90 seconds after a projector is corresponding with a projector. (When you power up a projector. LAMP indicator lights bright and READY indicator turns off before you reconnect a projector, be with your graphics controller rather than with your computer ...


