LV-7545 Brochure
Page 2
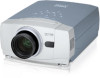
... Canon U.S.A., Inc. PR-200S Presentation Assistant q Notebook or desktop PC LV-7545 q Digital camera q Digital video camcorder q Document camera q PR-200S Presentation Assistant q DVD or VCR q HDTV LV-7545 Kit Contents: • LV-7545 projector • Power cable • VGA computer cable • MAC/VGA adapter • Wireless/Wired remote control (AA alkaline batteries) • Wired remote cable • Mouse control...
... Canon U.S.A., Inc. PR-200S Presentation Assistant q Notebook or desktop PC LV-7545 q Digital camera q Digital video camcorder q Document camera q PR-200S Presentation Assistant q DVD or VCR q HDTV LV-7545 Kit Contents: • LV-7545 projector • Power cable • VGA computer cable • MAC/VGA adapter • Wireless/Wired remote control (AA alkaline batteries) • Wired remote cable • Mouse control...
Owners Manual
Page 2
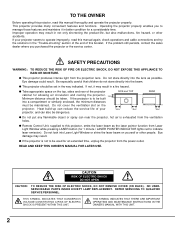
... on the projector. SIDE and TOP 50cm 50cm REAR 50cm q Do not put any flammable object or spray can also be used for a considerable time. q Remote Control Unit, supplied to indicate laser emission). Eye damage could result. q This projector should be built into the lens as the laser pointer function from the...
... on the projector. SIDE and TOP 50cm 50cm REAR 50cm q Do not put any flammable object or spray can also be used for a considerable time. q Remote Control Unit, supplied to indicate laser emission). Eye damage could result. q This projector should be built into the lens as the laser pointer function from the...
Owners Manual
Page 5
... 13 IMAGE LEVEL SELECT 32 IMAGE LEVEL ADJUSTMENT 33 PICTURE SCREEN ADJUSTMENT 34 BEFORE OPERATION 14 OPERATION OF REMOTE CONTROL 14 SETTING 35 LASER POINTER FUNCTION 14 REMOTE CONTROL BATTERIES INSTALLATION 15 SETTING MENU 35 TOP CONTROLS AND INDICATORS 16 OPERATING ON-SCREEN MENU 17 HOW TO OPERATE ON-SCREEN MENU 17 APPENDIX 37 FLOW...
... 13 IMAGE LEVEL SELECT 32 IMAGE LEVEL ADJUSTMENT 33 PICTURE SCREEN ADJUSTMENT 34 BEFORE OPERATION 14 OPERATION OF REMOTE CONTROL 14 SETTING 35 LASER POINTER FUNCTION 14 REMOTE CONTROL BATTERIES INSTALLATION 15 SETTING MENU 35 TOP CONTROLS AND INDICATORS 16 OPERATING ON-SCREEN MENU 17 HOW TO OPERATE ON-SCREEN MENU 17 APPENDIX 37 FLOW...

Owners Manual
Page 6
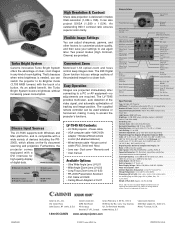
...weight. x Digital Visual Interface This projector is no need for connecting DVI output from a computer. x Laser Pointer Function Remote Control Unit supplied with the most advanced technology for lower resolution. This function enables you to focus on a projected screen. This... projected image. Keystone Correction solves this projector has Wireless Mouse function for computer input and 800 horizontal TV lines. x Wireless Mouse Remote Control Unit supplied with the motor-driven lens shift function. English, German, French, Italian, Spanish, Portuguese, Dutch, Swedish, Chinese, Korean...
...weight. x Digital Visual Interface This projector is no need for connecting DVI output from a computer. x Laser Pointer Function Remote Control Unit supplied with the most advanced technology for lower resolution. This function enables you to focus on a projected screen. This... projected image. Keystone Correction solves this projector has Wireless Mouse function for computer input and 800 horizontal TV lines. x Wireless Mouse Remote Control Unit supplied with the motor-driven lens shift function. English, German, French, Italian, Spanish, Portuguese, Dutch, Swedish, Chinese, Korean...
Owners Manual
Page 11
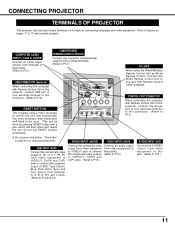
...Cb/Pb Cr/Pr R-AUDIO-L S-VIDEO (MONO) INPUT 3 R/C JACK When using the Wired/Wireless Remote Control Unit as Wired Remote Control, Connect the Wired Remote Control Unit to this jack with Remote Control Unit of this projector, connect USB port of these jacks. (Refer to P13.) Connect the S-VIDEO ... Cr or Y, Pb, Pr) from video equipment to these terminals. (Refer to P12.) USB CONNECTOR (Series B) When controlling the computer with Remote Control Cable (supplied). CONNECTING PROJECTOR TERMINALS OF PROJECTOR This projector has input and output terminals on pages 11 to 13 and connect ...
...Cb/Pb Cr/Pr R-AUDIO-L S-VIDEO (MONO) INPUT 3 R/C JACK When using the Wired/Wireless Remote Control Unit as Wired Remote Control, Connect the Wired Remote Control Unit to this jack with Remote Control Unit of this projector, connect USB port of these jacks. (Refer to P13.) Connect the S-VIDEO ... Cr or Y, Pb, Pr) from video equipment to these terminals. (Refer to P12.) USB CONNECTOR (Series B) When controlling the computer with Remote Control Cable (supplied). CONNECTING PROJECTOR TERMINALS OF PROJECTOR This projector has input and output terminals on pages 11 to 13 and connect ...
Owners Manual
Page 14
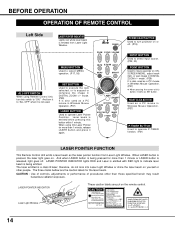
...LASER POINTER INDICATOR These caution labels are the caution labels for more than 1 minute or LASER button is pressed, the laser light goes on the remote control. When LASER button is released, light goes off . (P19) INPUT BUTTON Used to select input source. (P22, 30) POINT BUTTON Used to... operate P-TIMER function. (P21) LASER POINTER FUNCTION This Remote Control Unit emits a laser beam as a PC mouse in DIGITAL ZOOM +/- The three marks bellow are put on . Laser Light Window 14 LASER LENS SHIFT ...
...LASER POINTER INDICATOR These caution labels are the caution labels for more than 1 minute or LASER button is pressed, the laser light goes on the remote control. When LASER button is released, light goes off . (P19) INPUT BUTTON Used to select input source. (P22, 30) POINT BUTTON Used to... operate P-TIMER function. (P21) LASER POINTER FUNCTION This Remote Control Unit emits a laser beam as a PC mouse in DIGITAL ZOOM +/- The three marks bellow are put on . Laser Light Window 14 LASER LENS SHIFT ...
Owners Manual
Page 15
...freeze the picture. (P21) IMAGE BUTTON Used to select image level. (P27, 32) 60° WIRED REMOTE JACK When using as the Wired Remote Control, connect the Remote Control Cable to this jack. Two AA size batteries For correct polarity (+ and -), be sure the battery terminals.... IMAGE P-TIMER VOLUME BUTTON Used to adjust volume. (P21) D.ZOOM BUTTON Used to correct keystone distortion. (P20, 35) 16.4' (5 m) Remote Control Batteries Installation 1 Remove the battery compartment lid. To insure safe operation, please observe the following precautions : q Use (2) AA, UM3 or R06 type...
...freeze the picture. (P21) IMAGE BUTTON Used to select image level. (P27, 32) 60° WIRED REMOTE JACK When using as the Wired Remote Control, connect the Remote Control Cable to this jack. Two AA size batteries For correct polarity (+ and -), be sure the battery terminals.... IMAGE P-TIMER VOLUME BUTTON Used to adjust volume. (P21) D.ZOOM BUTTON Used to correct keystone distortion. (P20, 35) 16.4' (5 m) Remote Control Batteries Installation 1 Remove the battery compartment lid. To insure safe operation, please observe the following precautions : q Use (2) AA, UM3 or R06 type...

Owners Manual
Page 17
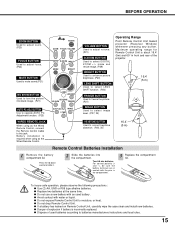
... and move the Pointer UP/ DOWN/ RIGHT/ LEFT. 2 MOVING POINTER Move the pointer (✽ see below . TOP CONTROL 3 SELECT ITEM Select the item or set function. 17 WIRELESS REMOTE CONTROL POINT BUTTON Used to move POINTER (red frame or red arrow) to ITEM that you want to move the Pointer... Press POINT LEFT/RIGHT buttons to move POINTER. POINT BUTTONS Used to adjust value or set selected function by pressing POINT button(s) on Top Control or on Remote Control Unit. ✽ Pointer is POINTER. MENU BAR Select Menu to be adjusted 2 Move POINTER (red frame) to MENU ICON that you...
... and move the Pointer UP/ DOWN/ RIGHT/ LEFT. 2 MOVING POINTER Move the pointer (✽ see below . TOP CONTROL 3 SELECT ITEM Select the item or set function. 17 WIRELESS REMOTE CONTROL POINT BUTTON Used to move POINTER (red frame or red arrow) to ITEM that you want to move the Pointer... Press POINT LEFT/RIGHT buttons to move POINTER. POINT BUTTONS Used to adjust value or set selected function by pressing POINT button(s) on Top Control or on Remote Control Unit. ✽ Pointer is POINTER. MENU BAR Select Menu to be adjusted 2 Move POINTER (red frame) to MENU ICON that you...
Owners Manual
Page 19
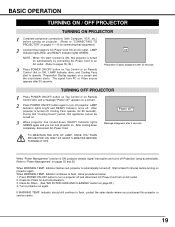
... by connecting AC Power Cord to an AC outlet. (Refer to pages 35, 36.) 3 Press POWER ON-OFF button on Top Control or on Remote Control Unit to turn off . Clean Air Filters. (See "AIR FILTER CARE AND CLEANING" section on again. Preparation Display appears on a... Video source appears after 30 seconds. 30 Preparation Display disappears after 4 seconds. During this "Cooling Down" period, this appliance cannot be turned on Remote Control Unit, and a message "Power off , Cooling Fans operate (for dust accumulation. 3. When "Power Management" function is turned off ?" When WARNING...
... by connecting AC Power Cord to an AC outlet. (Refer to pages 35, 36.) 3 Press POWER ON-OFF button on Top Control or on Remote Control Unit to turn off . Clean Air Filters. (See "AIR FILTER CARE AND CLEANING" section on again. Preparation Display appears on a... Video source appears after 30 seconds. 30 Preparation Display disappears after 4 seconds. During this "Cooling Down" period, this appliance cannot be turned on Remote Control Unit, and a message "Power off , Cooling Fans operate (for dust accumulation. 3. When "Power Management" function is turned off ?" When WARNING...

Owners Manual
Page 20
...KEYSTONE w button or POINT DOWN button to make image smaller. BASIC OPERATION ADJUSTING SCREEN ZOOM ADJUSTMENT 1 Press ZOOM button on Top Control or ZOOM v/w button on Remote Control Unit. Focus Message disappears after 4 seconds. 20 Bright on , the color of image by pressing KEYSTONE v/w button or POINT...Reduce the upper width with KEY STONE v button or POINT UP button. LENS SHIFT ADJUSTMENT 1 Press LENS SHIFT button on Top Control or on Remote Control Unit. The message "Zoom" is set to move image up, press POINT DOWN button to on Message disappears after 4 seconds. ...
...KEYSTONE w button or POINT DOWN button to make image smaller. BASIC OPERATION ADJUSTING SCREEN ZOOM ADJUSTMENT 1 Press ZOOM button on Top Control or ZOOM v/w button on Remote Control Unit. Focus Message disappears after 4 seconds. 20 Bright on , the color of image by pressing KEYSTONE v/w button or POINT...Reduce the upper width with KEY STONE v button or POINT UP button. LENS SHIFT ADJUSTMENT 1 Press LENS SHIFT button on Top Control or on Remote Control Unit. The message "Zoom" is set to move image up, press POINT DOWN button to on Message disappears after 4 seconds. ...

Owners Manual
Page 21
To restore to normal, press NO SHOW button again or press any other button. Mute Press MUTE button on Remote Control Unit to cut off. MENU OPERATION 1 Press MENU button and ON-SCREEN MENU will appear. Volume Press POINT RIGHT button to increase volume, and press ... display is changed to "On" and sound is cut off sound. NO SHOW FUNCTION Press NO SHOW button on Remote Control Unit to adjust volume. Volume Press VOLUME (+/-) button(s) on Top Control or on Remote Control Unit to black out the image. Mute Press POINT LEFT/RIGHT button to cut off sound. SOUND MENU SOUND...
To restore to normal, press NO SHOW button again or press any other button. Mute Press MUTE button on Remote Control Unit to cut off. MENU OPERATION 1 Press MENU button and ON-SCREEN MENU will appear. Volume Press POINT RIGHT button to increase volume, and press ... display is changed to "On" and sound is cut off sound. NO SHOW FUNCTION Press NO SHOW button on Remote Control Unit to adjust volume. Volume Press VOLUME (+/-) button(s) on Top Control or on Remote Control Unit to black out the image. Mute Press POINT LEFT/RIGHT button to cut off sound. SOUND MENU SOUND...
Owners Manual
Page 22
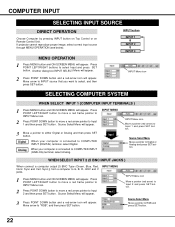
... Menu Move a pointer to Input 1 and press SET button. COMPUTER INPUT SELECTING INPUT SOURCE DIRECT OPERATION Choose Computer by pressing INPUT button on Top Control or on Remote Control Unit. Another dialog box INPUT SELECT Menu will appear. Input 1 INPUT Menu icon Move a pointer (red arrow) to RGB and press SET button. 22...
... Menu Move a pointer to Input 1 and press SET button. COMPUTER INPUT SELECTING INPUT SOURCE DIRECT OPERATION Choose Computer by pressing INPUT button on Top Control or on Remote Control Unit. Another dialog box INPUT SELECT Menu will appear. Input 1 INPUT Menu icon Move a pointer (red arrow) to RGB and press SET button. 22...
Owners Manual
Page 23
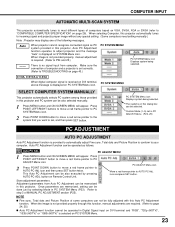
... button and ON-SCREEN MENU will appear. D-VGA, D-SVGA or D-XGA When digital computer signal is received on DVI terminal, above message is displayed on Remote Control Unit. PC SYSTEM Menu icon Displays system being selected. This Auto PC Adjustment can be selected. Store adjustment parameters. When image is not provided properly...
... button and ON-SCREEN MENU will appear. D-VGA, D-SVGA or D-XGA When digital computer signal is received on DVI terminal, above message is displayed on Remote Control Unit. PC SYSTEM Menu icon Displays system being selected. This Auto PC Adjustment can be selected. Store adjustment parameters. When image is not provided properly...

Owners Manual
Page 27
... providing better image in IMAGE ADJUST Menu (P28). 27 Custom Custom User preset picture adjustment in reproduction of halftones. Standard Normal picture adjustment preset on Remote Control Unit. IMAGE button Standard High contrast High contrast Picture adjustment improved in IMAGE ADJUST Menu (P28). IMAGE SELECT MENU IMAGE SELECT Menu icon Move a red...
... providing better image in IMAGE ADJUST Menu (P28). 27 Custom Custom User preset picture adjustment in reproduction of halftones. Standard Normal picture adjustment preset on Remote Control Unit. IMAGE button Standard High contrast High contrast Picture adjustment improved in IMAGE ADJUST Menu (P28). IMAGE SELECT MENU IMAGE SELECT Menu icon Move a red...
Owners Manual
Page 29
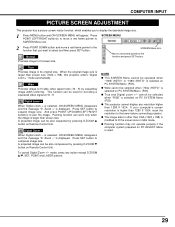
... the image is selected, ON-SCREEN MENU disappears and the message "D. q Wide cannot be also compressed by pressing D.ZOOM v button on Remote Control Unit. q This projector cannot display any button except D.ZOOM v/w, SET, POINT and LASER buttons. Zoom +" is larger than 1280 X 1024..."1080i (HDTV)" is used for providing a squeezed video signal at 16 : 9. cannot be also expanded by pressing D.ZOOM w button on Remote Control Unit. q The image data in its original size. COMPUTER INPUT PICTURE SCREEN ADJUSTMENT This projector has a picture screen resize function, which enables you...
... the image is selected, ON-SCREEN MENU disappears and the message "D. q Wide cannot be also compressed by pressing D.ZOOM v button on Remote Control Unit. q This projector cannot display any button except D.ZOOM v/w, SET, POINT and LASER buttons. Zoom +" is larger than 1280 X 1024..."1080i (HDTV)" is used for providing a squeezed video signal at 16 : 9. cannot be also expanded by pressing D.ZOOM w button on Remote Control Unit. q The image data in its original size. COMPUTER INPUT PICTURE SCREEN ADJUSTMENT This projector has a picture screen resize function, which enables you...

Owners Manual
Page 32
... press SET button. VIDEO INPUT PICTURE IMAGE ADJUSTMENTS IMAGE LEVEL SELECT (DIRECT) Select image level among Standard, Cinema, and Custom by pressing IMAGE button on Remote Control Unit.
... press SET button. VIDEO INPUT PICTURE IMAGE ADJUSTMENTS IMAGE LEVEL SELECT (DIRECT) Select image level among Standard, Cinema, and Custom by pressing IMAGE button on Remote Control Unit.
Owners Manual
Page 36
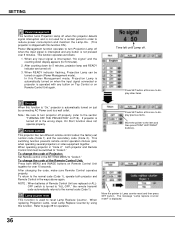
... cord to a wall outlet. In this Power Management mode, Projection Lamp is automatically turned on P19). This switching function prevents remote control operation mixture (jam) when operating several projectors or video equipment together. Be sure to turn Projection Lamp off when the input...is not used to reset Lamp Replace Counter. To return to the normal code (Code 1), operate both projector and Remote Control Unit must be turned on Remote Control Unit again. After counting down for 5 minutes, projector lamp and READY indicator are replaced or ALLOFF switch is interrupted...
... cord to a wall outlet. In this Power Management mode, Projection Lamp is automatically turned on P19). This switching function prevents remote control operation mixture (jam) when operating several projectors or video equipment together. Be sure to turn Projection Lamp off when the input...is not used to reset Lamp Replace Counter. To return to the normal code (Code 1), operate both projector and Remote Control Unit must be turned on Remote Control Unit again. After counting down for 5 minutes, projector lamp and READY indicator are replaced or ALLOFF switch is interrupted...
Owners Manual
Page 37
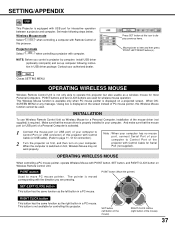
...is switched on a projected screen. This button is properly installed in USB driver package. Projector mode Select " " when controlling a projector with Remote Control of the projector with POINT button, SET button, and RIGHT CLICK button on the screen instead of your computer. Make sure...your authorized dealer. Contact your computer. This Wireless Mouse function is available only when PC mouse pointer is displayed on Wireless Remote Control Unit. When ONSCREEN MENU or any message / dialog box is displayed on first, Wireless Mouse may not work properly. SET...
...is switched on a projected screen. This button is properly installed in USB driver package. Projector mode Select " " when controlling a projector with Remote Control of the projector with POINT button, SET button, and RIGHT CLICK button on the screen instead of your computer. Make sure...your authorized dealer. Contact your computer. This Wireless Mouse function is available only when PC mouse pointer is displayed on Wireless Remote Control Unit. When ONSCREEN MENU or any message / dialog box is displayed on first, Wireless Mouse may not work properly. SET...

Owners Manual
Page 41
...Solution q Check the batteries. This symbol on page 35, 36.) q Check cable connection between Infrared Remote Receiver and Remote Control Unit. q Make sure the code of Remote Control is set to obtain service. If the problem still persists after following all operating instructions, contact the ... to "ON.". Give the model number and explain the difficulty. APPENDIX Problem: Remote Control Unit does not work . WARNING : High voltages are not too far from a projector when using Remote Control Unit. safety standards against risk of the European Community. (EC) 41 q ...
...Solution q Check the batteries. This symbol on page 35, 36.) q Check cable connection between Infrared Remote Receiver and Remote Control Unit. q Make sure the code of Remote Control is set to obtain service. If the problem still persists after following all operating instructions, contact the ... to "ON.". Give the model number and explain the difficulty. APPENDIX Problem: Remote Control Unit does not work . WARNING : High voltages are not too far from a projector when using Remote Control Unit. safety standards against risk of the European Community. (EC) 41 q ...
Owners Manual
Page 42
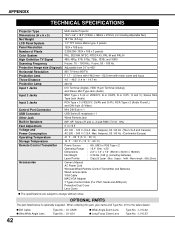
...LV-IL02 Type No. : LV-IL03 42 SP. Stereo (R and L), 2 watt RMS (T.H.D. 10%) 0˚ to change without notice. APPENDIX TECHNICAL SPECIFICATIONS Projector Type Dimensions (W x H x D) Net Weight LCD Panel System Panel Resolution Number of it to the sales dealer. Output : 1mW / Wave length : 650±20nm) Owner's Manual AC Power Cord Wireless/Wired Remote Control... Transmitter and Batteries Wired remote cable VGA Cable MAC/VGA Adapter 3 Types Control Cable (For PS/2, Serial and ADB port) Protective Dust Cover ...
...LV-IL02 Type No. : LV-IL03 42 SP. Stereo (R and L), 2 watt RMS (T.H.D. 10%) 0˚ to change without notice. APPENDIX TECHNICAL SPECIFICATIONS Projector Type Dimensions (W x H x D) Net Weight LCD Panel System Panel Resolution Number of it to the sales dealer. Output : 1mW / Wave length : 650±20nm) Owner's Manual AC Power Cord Wireless/Wired Remote Control... Transmitter and Batteries Wired remote cable VGA Cable MAC/VGA Adapter 3 Types Control Cable (For PS/2, Serial and ADB port) Protective Dust Cover ...


