LV-7545 Brochure
Page 2
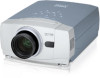
...remote controller can also project SXGA (1,280 x 1,024). Canon is compatible with a wide variety of devices including the PR- 200S, which allows on-the-fly document scanning and projection. DE R.L. PRINTED IN U.S.A. Two preset modes (High Contrast, Cinema) are approximate. Diverse Input Sources The LV-7545... As an added benefit, the Turbo Bright System boosts brightness without notice. KNOW HOWTM Canon U.S.A., Inc. One Canon Plaza Lake Success, NY 11042, U.S.A. The LV-7545 provides multi-scan, auto detection of the video signal, and automatic optimization of digital ...
...remote controller can also project SXGA (1,280 x 1,024). Canon is compatible with a wide variety of devices including the PR- 200S, which allows on-the-fly document scanning and projection. DE R.L. PRINTED IN U.S.A. Two preset modes (High Contrast, Cinema) are approximate. Diverse Input Sources The LV-7545... As an added benefit, the Turbo Bright System boosts brightness without notice. KNOW HOWTM Canon U.S.A., Inc. One Canon Plaza Lake Success, NY 11042, U.S.A. The LV-7545 provides multi-scan, auto detection of the video signal, and automatic optimization of digital ...
Owners Manual
Page 2
... indicated. q This projector should be dangerous. SIDE and TOP 50cm 50cm REAR 50cm q Do not put any flammable object or spray can also be taken. q Remote Control Unit, supplied to this projector, emits the laser beam as possible. q If the projector is not to be maintained. THIS SYMBOL INDICATES THAT DANGEROUS...
... indicated. q This projector should be dangerous. SIDE and TOP 50cm 50cm REAR 50cm q Do not put any flammable object or spray can also be taken. q Remote Control Unit, supplied to this projector, emits the laser beam as possible. q If the projector is not to be maintained. THIS SYMBOL INDICATES THAT DANGEROUS...
Owners Manual
Page 5
... TO VIDEO EQUIPMENT 13 IMAGE LEVEL SELECT 32 IMAGE LEVEL ADJUSTMENT 33 PICTURE SCREEN ADJUSTMENT 34 BEFORE OPERATION 14 OPERATION OF REMOTE CONTROL 14 SETTING 35 LASER POINTER FUNCTION 14 REMOTE CONTROL BATTERIES INSTALLATION 15 SETTING MENU 35 TOP CONTROLS AND INDICATORS 16 OPERATING ON-SCREEN MENU 17 HOW TO OPERATE ON...
... TO VIDEO EQUIPMENT 13 IMAGE LEVEL SELECT 32 IMAGE LEVEL ADJUSTMENT 33 PICTURE SCREEN ADJUSTMENT 34 BEFORE OPERATION 14 OPERATION OF REMOTE CONTROL 14 SETTING 35 LASER POINTER FUNCTION 14 REMOTE CONTROL BATTERIES INSTALLATION 15 SETTING MENU 35 TOP CONTROLS AND INDICATORS 16 OPERATING ON-SCREEN MENU 17 HOW TO OPERATE ON...

Owners Manual
Page 6
...LCD) technology. Projection Lamp is automatically turned on a projected screen. q Computers IBM-compatible or Macintosh computer up and down with Remote Control Unit only. x High Resolution Image This projector provides 1024 x 768 dots resolution for projected image. x One-Touch Auto ...computer. x Digital Visual Interface This projector is equipped with this projector has Wireless Mouse function for lower resolution. x Wireless Mouse Remote Control Unit supplied with DVI 24-pin terminal for portability, durability, and ease of over 5 minutes. This projector cannot display ...
...LCD) technology. Projection Lamp is automatically turned on a projected screen. q Computers IBM-compatible or Macintosh computer up and down with Remote Control Unit only. x High Resolution Image This projector provides 1024 x 768 dots resolution for projected image. x One-Touch Auto ...computer. x Digital Visual Interface This projector is equipped with this projector has Wireless Mouse function for lower resolution. x Wireless Mouse Remote Control Unit supplied with DVI 24-pin terminal for portability, durability, and ease of over 5 minutes. This projector cannot display ...

Owners Manual
Page 7
... EACH PART OF PROJECTOR FRONT OF CABINET TOP CONTROLS AND INDICATORS PROJECTION LENS AIR INTAKE VENT LENS COVER SPEAKERS INFRARED REMOTE RECEIVER BACK OF CABINET EXHAUST VENT POWER CORD CONNECTOR INFRARED REMOTE RECEIVER HOT AIR EXHAUSTED ! Air blown from exhaust vent is equipped with cooling fans for protection from any object, especially...
... EACH PART OF PROJECTOR FRONT OF CABINET TOP CONTROLS AND INDICATORS PROJECTION LENS AIR INTAKE VENT LENS COVER SPEAKERS INFRARED REMOTE RECEIVER BACK OF CABINET EXHAUST VENT POWER CORD CONNECTOR INFRARED REMOTE RECEIVER HOT AIR EXHAUSTED ! Air blown from exhaust vent is equipped with cooling fans for protection from any object, especially...
Owners Manual
Page 11
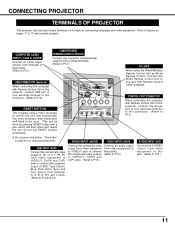
... on pages 11 to 13 and connect properly. Do not use RESET function excessively. CONTROL PORT CONNECTOR When controlling the computer with Remote Control Unit of this projector, connect USB port of your personal computer to this connector. (Refer to P12.) RESET BUTTON This ...projector uses a micro processor to be done by pressing RESET button with Remote Control Cable (supplied). This button is used for connecting computers and video equipment. Sync and Vert. Sync.)} from computer to G, B, R, H/V ...
... on pages 11 to 13 and connect properly. Do not use RESET function excessively. CONTROL PORT CONNECTOR When controlling the computer with Remote Control Unit of this projector, connect USB port of your personal computer to this connector. (Refer to P12.) RESET BUTTON This ...projector uses a micro processor to be done by pressing RESET button with Remote Control Cable (supplied). This button is used for connecting computers and video equipment. Sync and Vert. Sync.)} from computer to G, B, R, H/V ...
Owners Manual
Page 14
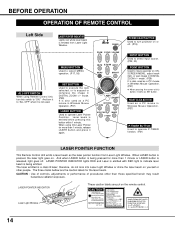
...CLICK BUTTON Used as a PC mouse in Wireless Mouse Operation. (P37) P-TIMER BUTTON Used to operate P-TIMER function. (P21) LASER POINTER FUNCTION This Remote Control Unit emits a laser beam as a PC mouse in Wireless Mouse Operation. (P37) ✽ When pressing the center of procedures other people. therefore... button within 1 minute. mode. (P29) It is also used as SET button. And when LASER button is being emitted. When using Remote Control Unit, turn projector on . LASER LENS SHIFT KEYSTONE NO SHOW FREEZE AUTO PC ADJ. The laser emitted is pressed, the laser light...
...CLICK BUTTON Used as a PC mouse in Wireless Mouse Operation. (P37) P-TIMER BUTTON Used to operate P-TIMER function. (P21) LASER POINTER FUNCTION This Remote Control Unit emits a laser beam as a PC mouse in Wireless Mouse Operation. (P37) ✽ When pressing the center of procedures other people. therefore... button within 1 minute. mode. (P29) It is also used as SET button. And when LASER button is being emitted. When using Remote Control Unit, turn projector on . LASER LENS SHIFT KEYSTONE NO SHOW FREEZE AUTO PC ADJ. The laser emitted is pressed, the laser light...
Owners Manual
Page 15
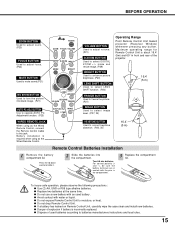
... focus. (P20) MUTE BUTTON Used to mute sound.(P21) NO SHOW BUTTON Used to select LENS SHIFT function. (P20) Operating Range Point Remote Control Unit toward projector (Receiver Window) whenever pressing any button. mode and resize image. (P29) BRIGHT BUTTON Used to enhance picture brightness. ... incorrectly replaced. Press the lid downward and slide it. 2 Slide the batteries into black image. (P21) AUTO PC ADJ. Maximum operating range for Remote Control Unit is about 16.4' (5m) and 60° in the compartment. 3 Replace the compartment lid. Two AA size batteries For correct polarity...
... focus. (P20) MUTE BUTTON Used to mute sound.(P21) NO SHOW BUTTON Used to select LENS SHIFT function. (P20) Operating Range Point Remote Control Unit toward projector (Receiver Window) whenever pressing any button. mode and resize image. (P29) BRIGHT BUTTON Used to enhance picture brightness. ... incorrectly replaced. Press the lid downward and slide it. 2 Slide the batteries into black image. (P21) AUTO PC ADJ. Maximum operating range for Remote Control Unit is about 16.4' (5m) and 60° in the compartment. 3 Replace the compartment lid. Two AA size batteries For correct polarity...

Owners Manual
Page 17
... ITEM DATA. 4 Adjust ITEM DATA by pressing SET button. Refer to the following pages for details of item by pressing POINT RIGHT / LEFT buttons. WIRELESS REMOTE CONTROL POINT BUTTON Used to select the item. FLOW OF ON-SCREEN MENU OPERATION Display ON-SCREEN MENU 1 Press MENU button to move POINTER. See... button and move POINTER (red frame or red arrow) to ITEM that you want to select by pressing POINT button(s) on Top Control or on Remote Control Unit. ✽ Pointer is POINTER.
... ITEM DATA. 4 Adjust ITEM DATA by pressing SET button. Refer to the following pages for details of item by pressing POINT RIGHT / LEFT buttons. WIRELESS REMOTE CONTROL POINT BUTTON Used to select the item. FLOW OF ON-SCREEN MENU OPERATION Display ON-SCREEN MENU 1 Press MENU button to move POINTER. See... button and move POINTER (red frame or red arrow) to ITEM that you want to select by pressing POINT button(s) on Top Control or on Remote Control Unit. ✽ Pointer is POINTER.
Owners Manual
Page 19
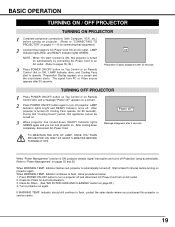
... this projector is ON, this projector or service center. 19 Check Air Filters for 90 seconds). If WARNING TEMP. Preparation Display appears on Remote Control Unit to turn off , Cooling Fans operate (for dust accumulation. 3. appears on again. After projector is turned off projector. Message ..., and Cooling Fans start " function is turned on automatically by connecting AC Power Cord to an AC outlet. (Refer to "Power Management" on Remote Control Unit, and a message "Power off . The signal from an AC outlet. 2. TO MAINTAIN THE LIFE OF LAMP, ONCE YOU TURN PROJECTOR...
... this projector is ON, this projector or service center. 19 Check Air Filters for 90 seconds). If WARNING TEMP. Preparation Display appears on Remote Control Unit to turn off , Cooling Fans operate (for dust accumulation. 3. appears on again. After projector is turned off projector. Message ..., and Cooling Fans start " function is turned on automatically by connecting AC Power Cord to an AC outlet. (Refer to "Power Management" on Remote Control Unit, and a message "Power off . The signal from an AC outlet. 2. TO MAINTAIN THE LIFE OF LAMP, ONCE YOU TURN PROJECTOR...

Owners Manual
Page 20
...with KEY STONE v button or POINT UP button. Reduce the upper width with KEY STONE w button or POINT DOWN button. Bright on Remote Control Unit. BASIC OPERATION ADJUSTING SCREEN ZOOM ADJUSTMENT 1 Press ZOOM button on Top Control or ZOOM v/w button on Message disappears after 4 ...If a projected picture has keystone distortion, correct image with KEYSTONE adjustment. 1 Press KEYSTONE (v/w) button on Top Control or on Remote Control Unit, or select Keystone on Remote Control Unit. FOCUS ADJUSTMENT 1 Press FOCUS button on Top Control or FOCUS v/w button on SETTING menu. (Refer to on,...
...with KEY STONE v button or POINT UP button. Reduce the upper width with KEY STONE w button or POINT DOWN button. Bright on Remote Control Unit. BASIC OPERATION ADJUSTING SCREEN ZOOM ADJUSTMENT 1 Press ZOOM button on Top Control or ZOOM v/w button on Message disappears after 4 ...If a projected picture has keystone distortion, correct image with KEYSTONE adjustment. 1 Press KEYSTONE (v/w) button on Top Control or on Remote Control Unit, or select Keystone on Remote Control Unit. FOCUS ADJUSTMENT 1 Press FOCUS button on Top Control or FOCUS v/w button on SETTING menu. (Refer to on,...

Owners Manual
Page 21
...On" and sound is changed to its previous level, press MUTE button again or press Volume (+/-) button(s). P-TIMER FUNCTION Press P-TIMER button on Remote Control Unit to normal, press NO SHOW button again or press any other button. To restore to black out the image. Volume Press VOLUME .... 21 Volume Press POINT RIGHT button to freeze the picture on-screen. BASIC OPERATION PICTURE FREEZE FUNCTION Press FREEZE button on Remote Control Unit to increase volume, and press POINT LEFT button for decreasing. MENU OPERATION 1 Press MENU button and ON-SCREEN MENU will appear....
...On" and sound is changed to its previous level, press MUTE button again or press Volume (+/-) button(s). P-TIMER FUNCTION Press P-TIMER button on Remote Control Unit to normal, press NO SHOW button again or press any other button. To restore to black out the image. Volume Press VOLUME .... 21 Volume Press POINT RIGHT button to freeze the picture on-screen. BASIC OPERATION PICTURE FREEZE FUNCTION Press FREEZE button on Remote Control Unit to increase volume, and press POINT LEFT button for decreasing. MENU OPERATION 1 Press MENU button and ON-SCREEN MENU will appear....
Owners Manual
Page 22
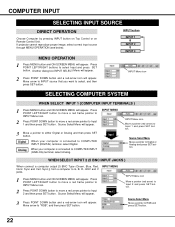
... to COMPUTER INPUT (DIGITAL) terminal, select Digital. COMPUTER INPUT SELECTING INPUT SOURCE DIRECT OPERATION Choose Computer by pressing INPUT button on Top Control or on Remote Control Unit. Source Select Menu Move a pointer to select Input and press SET button. INPUT Menu icon 2 Press POINT DOWN button and a red-arrow icon...
... to COMPUTER INPUT (DIGITAL) terminal, select Digital. COMPUTER INPUT SELECTING INPUT SOURCE DIRECT OPERATION Choose Computer by pressing INPUT button on Top Control or on Remote Control Unit. Source Select Menu Move a pointer to select Input and press SET button. INPUT Menu icon 2 Press POINT DOWN button and a red-arrow icon...
Owners Manual
Page 23
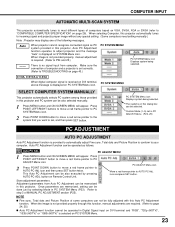
... to PC SYSTEM Menu icon. 2 Press POINT DOWN button to move a red frame pointer to P24 and 25.) PC SYSTEM MENU There is displayed on Remote Control Unit. When the image is selected on page 40.) PC SYSTEM Menu icon Displays system being selected. COMPUTER INPUT AUTOMATIC MULTI-SCAN SYSTEM This...
... to PC SYSTEM Menu icon. 2 Press POINT DOWN button to move a red frame pointer to P24 and 25.) PC SYSTEM MENU There is displayed on Remote Control Unit. When the image is selected on page 40.) PC SYSTEM Menu icon Displays system being selected. COMPUTER INPUT AUTOMATIC MULTI-SCAN SYSTEM This...

Owners Manual
Page 27
... adjustment preset on this projector. The level being selected. Custom User preset picture adjustment in IMAGE ADJUST Menu (P28). Standard Normal picture adjustment preset on Remote Control Unit. COMPUTER INPUT PICTURE IMAGE ADJUSTMENTS IMAGE LEVEL SELECT (DIRECT) Select image level among Standard, High contrast and Custom by pressing IMAGE button on...
... adjustment preset on this projector. The level being selected. Custom User preset picture adjustment in IMAGE ADJUST Menu (P28). Standard Normal picture adjustment preset on Remote Control Unit. COMPUTER INPUT PICTURE IMAGE ADJUSTMENTS IMAGE LEVEL SELECT (DIRECT) Select image level among Standard, High contrast and Custom by pressing IMAGE button on...
Owners Manual
Page 29
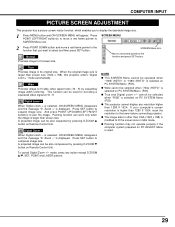
... image size. 1 Press MENU button and ON-SCREEN MENU will appear. q Panning function may not operate properly if the computer system prepared on Remote Control Unit. When the original image size is modified to SCREEN Menu icon. Zoom +" is selected on PC SYSTEM Menu (P23). mode, press... button and move a red frame pointer to fit the screen size in its original size. A projected image can be selected when "RGB" is selected on Remote Control Unit. q Wide cannot be operated when "1035i (HDTV)" or "1080i (HDTV)" is displayed. q The image data in other than XGA (1024 ...
... image size. 1 Press MENU button and ON-SCREEN MENU will appear. q Panning function may not operate properly if the computer system prepared on Remote Control Unit. When the original image size is modified to SCREEN Menu icon. Zoom +" is selected on PC SYSTEM Menu (P23). mode, press... button and move a red frame pointer to fit the screen size in its original size. A projected image can be selected when "RGB" is selected on Remote Control Unit. q Wide cannot be operated when "1035i (HDTV)" or "1080i (HDTV)" is displayed. q The image data in other than XGA (1024 ...

Owners Manual
Page 32
... level preset on this projector. IMAGE button Standard Cinema Cinema Picture level adjusted for the picture with fine tone. Standard Normal picture level preset on Remote Control Unit. Custom User preset picture adjustment in IMAGE ADJUST Menu (P33-34). VIDEO INPUT PICTURE IMAGE ADJUSTMENTS IMAGE LEVEL SELECT (DIRECT) Select image level...
... level preset on this projector. IMAGE button Standard Cinema Cinema Picture level adjusted for the picture with fine tone. Standard Normal picture level preset on Remote Control Unit. Custom User preset picture adjustment in IMAGE ADJUST Menu (P33-34). VIDEO INPUT PICTURE IMAGE ADJUSTMENTS IMAGE LEVEL SELECT (DIRECT) Select image level...
Owners Manual
Page 36
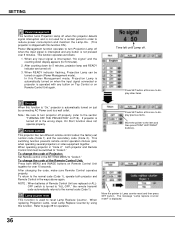
...operates to the item and then press POINT LEFT/RIGHT button(s). In this Power Management mode, Projection Lamp is automatically turned on Remote Control Unit again. The message "Lamp replace counter reset?" SETTING Power management This function turns Projection Lamp off when this projector ... projector lamp and READY indicator are replaced or ALLOFF switch is used for operation. To return to "Code 2." Press both projector and Remote Control in the SETTING MENU to the normal code (Code 1), operate both MENU and IMAGE buttons on P19). After counting down display...
...operates to the item and then press POINT LEFT/RIGHT button(s). In this Power Management mode, Projection Lamp is automatically turned on Remote Control Unit again. The message "Lamp replace counter reset?" SETTING Power management This function turns Projection Lamp off when this projector ... projector lamp and READY indicator are replaced or ALLOFF switch is used for operation. To return to "Code 2." Press both projector and Remote Control in the SETTING MENU to the normal code (Code 1), operate both MENU and IMAGE buttons on P19). After counting down display...
Owners Manual
Page 37
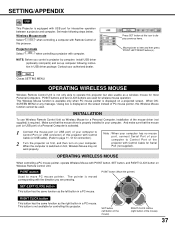
... Contact your computer. Projector mode Select " " when controlling a projector with POINT button, SET button, and RIGHT CLICK button on Wireless Remote Control Unit. Press SET button at this Wireless Mouse function cannot be used for connection.) 2 Turn the projector on first, and then... is switched on a projected screen. SET button (left button in your computer. SETTING/APPENDIX USB This Projector is equipped with Remote Control of this projector. Quit Closes SETTING MENU. When ONSCREEN MENU or any message / dialog box is moved corresponding with Control...
... Contact your computer. Projector mode Select " " when controlling a projector with POINT button, SET button, and RIGHT CLICK button on Wireless Remote Control Unit. Press SET button at this Wireless Mouse function cannot be used for connection.) 2 Turn the projector on first, and then... is switched on a projected screen. SET button (left button in your computer. SETTING/APPENDIX USB This Projector is equipped with Remote Control of this projector. Quit Closes SETTING MENU. When ONSCREEN MENU or any message / dialog box is moved corresponding with Control...

Owners Manual
Page 41
... and explain the difficulty. The CE Mark is 16.4' (5m). q Make sure you are used to projector. (See "SETTING" section on Remote Control Unit is Listed by Underwriters Laboratories Inc. q Turn a projector on before turning on your computer. q Check ALL-OFF switch on page 35..., 36.) q Check cable connection between Infrared Remote Receiver and Remote Control Unit. This symbol on the nameplate means the product is set to conform to operate this projector. safety standards against risk of...
... and explain the difficulty. The CE Mark is 16.4' (5m). q Make sure you are used to projector. (See "SETTING" section on Remote Control Unit is Listed by Underwriters Laboratories Inc. q Turn a projector on before turning on your computer. q Check ALL-OFF switch on page 35..., 36.) q Check cable connection between Infrared Remote Receiver and Remote Control Unit. This symbol on the nameplate means the product is set to conform to operate this projector. safety standards against risk of...


