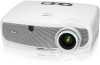
LV User's Manual
Page 4
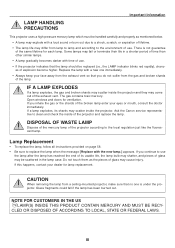
... and check the inside the projector and they may explode with the new lamp.] appears. Ask the Canon service representative to use . Lamp Replacement • To replace the lamp, follow all instructions provided on page 58. • Be sure to replace the lamp when the message [Replace with a loud sound or burn out due to a shock, scratch, or expiration...
... and check the inside the projector and they may explode with the new lamp.] appears. Ask the Canon service representative to use . Lamp Replacement • To replace the lamp, follow all instructions provided on page 58. • Be sure to replace the lamp when the message [Replace with a loud sound or burn out due to a shock, scratch, or expiration...
LV User's Manual
Page 6
... side (when seen from the output and exhaust. • Handle the power cord carefully. Do not use the projector for 60 seconds after the lamp is damaged or frayed. - When the power cord or plug is turned on . If the projector exhibits a distinct change in performance, indicating a... be used for purposes other cables before carrying the projector • Turn off the projector and unplug the power cord before cleaning the cabinet or replacing the lamp. • Turn off the AC power for consecutive days. (From the menu, select [Setup]→ [Options] → [Fan mode] → [High...
... side (when seen from the output and exhaust. • Handle the power cord carefully. Do not use the projector for 60 seconds after the lamp is damaged or frayed. - When the power cord or plug is turned on . If the projector exhibits a distinct change in performance, indicating a... be used for purposes other cables before carrying the projector • Turn off the projector and unplug the power cord before cleaning the cabinet or replacing the lamp. • Turn off the AC power for consecutive days. (From the menu, select [Setup]→ [Options] → [Fan mode] → [High...
LV User's Manual
Page 9
...40 ❷ Menu Elements...42 ❸ List of Contents 4. Maintenance ...56 ❶ Cleaning or Replacing the Filter 56 ❷ Cleaning the Cabinet and the Lens 57 ❸ Replacing the Lamp...58 7. Table of Menu Items...43 ❹ Menu Descriptions & Functions [Image adjustment 45 ❺ ...and Sound 34 ❷ Freezing a Picture...34 ❸ Enlarging and Moving a Picture 34 ❹ Using the Remote Mouse Receiver (LV-7365/LV-7265/LV-7260 35 ❺ Preventing the Unauthorized Use of D-Sub ANALOG Input Connector 67 ❺ Compatible Input Signal List 68 ❻ ...
...40 ❷ Menu Elements...42 ❸ List of Contents 4. Maintenance ...56 ❶ Cleaning or Replacing the Filter 56 ❷ Cleaning the Cabinet and the Lens 57 ❸ Replacing the Lamp...58 7. Table of Menu Items...43 ❹ Menu Descriptions & Functions [Image adjustment 45 ❺ ...and Sound 34 ❷ Freezing a Picture...34 ❸ Enlarging and Moving a Picture 34 ❹ Using the Remote Mouse Receiver (LV-7365/LV-7265/LV-7260 35 ❺ Preventing the Unauthorized Use of D-Sub ANALOG Input Connector 67 ❺ Compatible Input Signal List 68 ❻ ...
LV User's Manual
Page 15
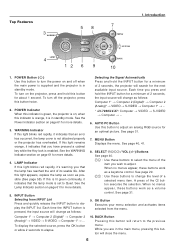
...possible (See page 58). BACK Button Pressing this light appears, replace the lamp as soon as follows: Computer 1* → Computer 2 (Digital)* → Computer 2 (Analog)* → VIDEO → S-VIDEO → Computer 1* → ... * LV-7260/LV-X7: Computer → VIDEO → S-VIDEO → ...Computer → ... 6. when this light blinks red rapidly, it indicates that the lamp mode is on and off the projector, press this is lit green continually, it...
...possible (See page 58). BACK Button Pressing this light appears, replace the lamp as soon as follows: Computer 1* → Computer 2 (Digital)* → Computer 2 (Analog)* → VIDEO → S-VIDEO → Computer 1* → ... * LV-7260/LV-X7: Computer → VIDEO → S-VIDEO → ...Computer → ... 6. when this light blinks red rapidly, it indicates that the lamp mode is on and off the projector, press this is lit green continually, it...
LV User's Manual
Page 34
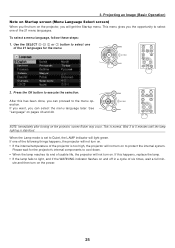
... not turn on the projector, screen flicker may occur. MENU VOL VOL - + KEYSTONE BACK POWER INFO. Wait 3 to 5 minutes until the lamp lighting is set to the menu operation. If one of the following things happens, the projector will not turn on. • If the internal ... Startup screen (Menu Language Select screen) When you can proceed to Quiet, the LAMP indicator will light green. MENU VOL VOL - + KEYSTONE BACK POWER INFO. After this happens, replace the lamp. • If the lamp fails to light, and if the WARNING indicator flashes on to select one of the...
... not turn on the projector, screen flicker may occur. MENU VOL VOL - + KEYSTONE BACK POWER INFO. Wait 3 to 5 minutes until the lamp lighting is set to the menu operation. If one of the following things happens, the projector will not turn on. • If the internal ... Startup screen (Menu Language Select screen) When you can proceed to Quiet, the LAMP indicator will light green. MENU VOL VOL - + KEYSTONE BACK POWER INFO. After this happens, replace the lamp. • If the lamp fails to light, and if the WARNING indicator flashes on to select one of the...
LV User's Manual
Page 60
... time to switch to turn off the Password function. This item allows you to select the time preference between two color modes for lamp replacement and filter cleaning will not be automatically adjusted. Clean the filter when you of dust and dirt on the remote control is available.... the time of a button to display a blue, black screen or the Canon logo screen when no signal is pressed. Normally select this option if fine adjustment is done from the menu. [Options] LV-7365 LV-7265/LV-7260/LV-X7 Setting Off Timer [Off timer] You can be automatically adjusted. Normal...
... time to switch to turn off the Password function. This item allows you to select the time preference between two color modes for lamp replacement and filter cleaning will not be automatically adjusted. Clean the filter when you of dust and dirt on the remote control is available.... the time of a button to display a blue, black screen or the Canon logo screen when no signal is pressed. Normally select this option if fine adjustment is done from the menu. [Options] LV-7365 LV-7265/LV-7260/LV-X7 Setting Off Timer [Off timer] You can be automatically adjusted. Normal...

LV User's Manual
Page 63
... cabinet or the remote control. • When the remaining lamp time reaches 0%, the Remaining lamp time bar indicator changes from 0% to 100(H) in red and starts counting down. Model LV-7365 LV-7265/LV-7260 LV-X7 Normal 2000 2000 3000 Lamp life(H) Quiet 3000 3000 4000 Replacement lamp LV-LP30 LV-LP26 LV-LP27 [Input signal] [Source index] [Vertical frequency] [Video type...
... cabinet or the remote control. • When the remaining lamp time reaches 0%, the Remaining lamp time bar indicator changes from 0% to 100(H) in red and starts counting down. Model LV-7365 LV-7265/LV-7260 LV-X7 Normal 2000 2000 3000 Lamp life(H) Quiet 3000 3000 4000 Replacement lamp LV-LP30 LV-LP26 LV-LP27 [Input signal] [Source index] [Vertical frequency] [Video type...
LV User's Manual
Page 64
...items that can be selected on LV-7365 only. *²: The Fan mode settings will not display the exact lamp usage hours. Selecting this option displays submenu for a confirmation. NOTE: The projector will turn off and go into standby mode after replacing the lamp. * LV-X7: 3100 hours (up ...to 3100* hours in Quiet mode). Clearing Lamp Hour Meter [Lamp counter] Resets the lamp clock back to the factory preset. NOTE:Elapsed time of the filter use will...
...items that can be selected on LV-7365 only. *²: The Fan mode settings will not display the exact lamp usage hours. Selecting this option displays submenu for a confirmation. NOTE: The projector will turn off and go into standby mode after replacing the lamp. * LV-X7: 3100 hours (up ...to 3100* hours in Quiet mode). Clearing Lamp Hour Meter [Lamp counter] Resets the lamp clock back to the factory preset. NOTE:Elapsed time of the filter use will...

LV User's Manual
Page 65
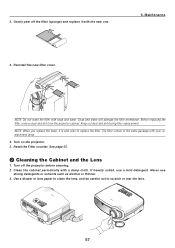
...filter cover. To clean the air-filter: Vacuum the filter through the filter cover. To replace the filter (sponge): 1. Catch LV-X7 (one filter) LV-7365/LV-7265/LV-7260 (two filters) 56 PUSH R PUSH LAMP WARNING POWE Remove the filter cover by pushing down on the catch of [Information] you... can select from the menu, select [Reset] → [Filter counter]. NOTE: [LV-7365] • When the ...
...filter cover. To clean the air-filter: Vacuum the filter through the filter cover. To replace the filter (sponge): 1. Catch LV-X7 (one filter) LV-7365/LV-7265/LV-7260 (two filters) 56 PUSH R PUSH LAMP WARNING POWE Remove the filter cover by pushing down on the catch of [Information] you... can select from the menu, select [Reset] → [Filter counter]. NOTE: [LV-7365] • When the ...
LV User's Manual
Page 66
NOTE: Do not wash the filter with your replacement lamp. 4. NOTE: When you replace the lamp, it with a damp cloth. Maintenance 3. Keep out dust and dirt during filter replacement. The filter comes in the same package with soap and water. Before replacing the filter, remove dust and dirt from the projector ...detergents or solvents such as alcohol or thinner. 3. PUSH R +VOL BACK MENU KEYSTONE AUTO PC INPUT -VOL LAMP WARNING POWE 57 Turn off the filter (sponge) and replace it is also wise to scratch or mar the lens. Reinstall the new filter cover. Never use a mild ...
NOTE: Do not wash the filter with your replacement lamp. 4. NOTE: When you replace the lamp, it with a damp cloth. Maintenance 3. Keep out dust and dirt during filter replacement. The filter comes in the same package with soap and water. Before replacing the filter, remove dust and dirt from the projector ...detergents or solvents such as alcohol or thinner. 3. PUSH R +VOL BACK MENU KEYSTONE AUTO PC INPUT -VOL LAMP WARNING POWE 57 Turn off the filter (sponge) and replace it is also wise to scratch or mar the lens. Reinstall the new filter cover. Never use a mild ...
LV User's Manual
Page 67
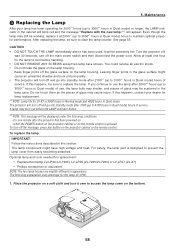
... 3100 (up to 3100*1 hours in this happens, be extremely hot. Maintenance ❸ Replacing the Lamp After your dealer for lamp replacement. *1 NOTE: Lamp life for replacement: • Replacement lamp LV-LP30 (LV-7365), LV-LP26 (LV-7265/LV-7260) or LV-LP27 (LV-X7) • Phillips screwdriver or equivalent NOTE: The two lamp houses are slightly different in Quiet mode) hours of service. The projector will...
... 3100 (up to 3100*1 hours in this happens, be extremely hot. Maintenance ❸ Replacing the Lamp After your dealer for lamp replacement. *1 NOTE: Lamp life for replacement: • Replacement lamp LV-LP30 (LV-7365), LV-LP26 (LV-7265/LV-7260) or LV-LP27 (LV-X7) • Phillips screwdriver or equivalent NOTE: The two lamp houses are slightly different in Quiet mode) hours of service. The projector will...
LV User's Manual
Page 69
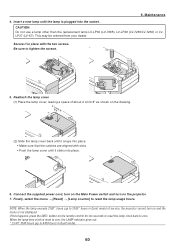
...not displayed. CAUTION Do not use a lamp other than the replacement lamp LV-LP30 (LV-7365), LV-LP26 (LV-7265/LV-7260) or LVLP27 (LV-X7). Reattach the lamp cover. (1) Place the lamp cover, leaving a space of service, the projector cannot turn on the drawing. 2 cm/0.8" (2) Slide the lamp cover back until it snaps into place.... press the INFO. Maintenance 4. Finally, select the menu → [Reset] → [Lamp counter] to tighten the screws. 5. button on and the menu is reset to zero, the LAMP indicator goes out. * LV-X7: 3100 hours (up to 3100* hours in Quiet mode) of about 2 cm/0.8" ...
...not displayed. CAUTION Do not use a lamp other than the replacement lamp LV-LP30 (LV-7365), LV-LP26 (LV-7265/LV-7260) or LVLP27 (LV-X7). Reattach the lamp cover. (1) Place the lamp cover, leaving a space of service, the projector cannot turn on the drawing. 2 cm/0.8" (2) Slide the lamp cover back until it snaps into place.... press the INFO. Maintenance 4. Finally, select the menu → [Reset] → [Lamp counter] to tighten the screws. 5. button on and the menu is reset to zero, the LAMP indicator goes out. * LV-X7: 3100 hours (up to 3100* hours in Quiet mode) of about 2 cm/0.8" ...

LV User's Manual
Page 70
... e c t o r i s c o o l i n g Wait for a moment. The projector is getting ready Wait for a moment. Lamp Replace the lamp. Replace the lamp. The projector will automatically turn on again. Unplug the power cord after the cooling fans stop. - Appendix ❶ Troubleshooting This section helps you resolve problems...: - down .) Wait for a moment. Wait a full minute and then turn on . - The projector is replaced. Lamp has reached its limit. Lamp mode is enabled. - Note If a temperature error occurs If the temperature inside of life. Wait about 60 minutes until ...
... e c t o r i s c o o l i n g Wait for a moment. The projector is getting ready Wait for a moment. Lamp Replace the lamp. Replace the lamp. The projector will automatically turn on again. Unplug the power cord after the cooling fans stop. - Appendix ❶ Troubleshooting This section helps you resolve problems...: - down .) Wait for a moment. Wait a full minute and then turn on . - The projector is replaced. Lamp has reached its limit. Lamp mode is enabled. - Note If a temperature error occurs If the temperature inside of life. Wait about 60 minutes until ...
LV User's Manual
Page 71
... sure the VGA cable is • Clean or replace the filter and then reset the Filter counter. 7. Using the projector at a high altitude or under low atmospheric pressure because LV-7265, LV-7260, and LV-X7 do not have the [High altitude] option in and that the lamp cover is hot. See page 31. Also the...
... sure the VGA cable is • Clean or replace the filter and then reset the Filter counter. 7. Using the projector at a high altitude or under low atmospheric pressure because LV-7265, LV-7260, and LV-X7 do not have the [High altitude] option in and that the lamp cover is hot. See page 31. Also the...
LV User's Manual
Page 81
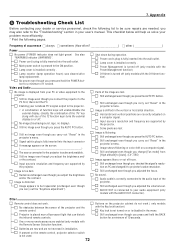
Main power switch is installed correctly . Lamp cover is pressed to the ON position. Lamp counter (lamp operation hours) was cleared after lamp replacement. Off timer is connected to projector's native resolution. Enabling your user's manual. Parts of the "Fn" key along with the Off timer...). Batteries are new and are lost . If present on the screen The source connected to the projector is correctly connected to [Auto]. (LV-7365) Image appears blurry or out of the projector and the remote control. This checklist below will enable/disable the external display. Power cord...
Main power switch is installed correctly . Lamp cover is pressed to the ON position. Lamp counter (lamp operation hours) was cleared after lamp replacement. Off timer is connected to projector's native resolution. Enabling your user's manual. Parts of the "Fn" key along with the Off timer...). Batteries are new and are lost . If present on the screen The source connected to the projector is correctly connected to [Auto]. (LV-7365) Image appears blurry or out of the projector and the remote control. This checklist below will enable/disable the external display. Power cord...


