User Manual
Page 2
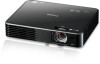
... manual Indicates operational instructions and limitations. 2 Explanation of the symbols used in this Canon product. Features and design The projector provides the following describes the meaning of symbols ... performance LED optics engine and a variety of features for increased usability. The Power Projector LE-5W (from here on . Thank you very much for purchasing this manual The following main ... carry The compact, light-weight design allows you to -use On-screen Display (OSD) menu. • Wide variety of functions The projector supports document viewers (P51), internal memory (...
... manual Indicates operational instructions and limitations. 2 Explanation of the symbols used in this Canon product. Features and design The projector provides the following describes the meaning of symbols ... performance LED optics engine and a variety of features for increased usability. The Power Projector LE-5W (from here on . Thank you very much for purchasing this manual The following main ... carry The compact, light-weight design allows you to -use On-screen Display (OSD) menu. • Wide variety of functions The projector supports document viewers (P51), internal memory (...

User Manual
Page 3
...40 Connecting an external speaker ....41 Connecting an external memory . 42 Inserting an SD card 42 Connecting to a USB storage device 43 Menu function settings 44 About the menus 45 Home screen 46 Projecting files on Internal Memory, USB Drive, and SD Card 48 Projecting photos 50...54 USB Display 54 USB File Transfer 56 Using the Setup menu 58 Using the Setup menu 58 Setup menu configuration 58 Basic menu 59 Advanced menu 62 Videos Settings menu 65 Photos Settings menu 67 Music Settings menu 69 Information menu 70 Language menu 73 Key Lock 74 Using the On-Screen Display (OSD...
...40 Connecting an external speaker ....41 Connecting an external memory . 42 Inserting an SD card 42 Connecting to a USB storage device 43 Menu function settings 44 About the menus 45 Home screen 46 Projecting files on Internal Memory, USB Drive, and SD Card 48 Projecting photos 50...54 USB Display 54 USB File Transfer 56 Using the Setup menu 58 Using the Setup menu 58 Setup menu configuration 58 Basic menu 59 Advanced menu 62 Videos Settings menu 65 Photos Settings menu 67 Music Settings menu 69 Information menu 70 Language menu 73 Key Lock 74 Using the On-Screen Display (OSD...

User Manual
Page 4
Appendix 87 LED Indicators 88 Troubleshooting 89 The projector does not turn on......89 No image 90 No sound 91 Blurred image 91 The image does not display properly 92 Power shuts down 92 Remote control does not work ......93 Care and Cleaning 94 Cleaning the lens 94 Cleaning the projector 94 Timing chart 95 Projector specifications 98 Copyright information 100 Notes on copyrights 100 Trademarks 100 On-screen menu tree 101 Setup menu configuration .......... 102 4
Appendix 87 LED Indicators 88 Troubleshooting 89 The projector does not turn on......89 No image 90 No sound 91 Blurred image 91 The image does not display properly 92 Power shuts down 92 Remote control does not work ......93 Care and Cleaning 94 Cleaning the lens 94 Cleaning the projector 94 Timing chart 95 Projector specifications 98 Copyright information 100 Notes on copyrights 100 Trademarks 100 On-screen menu tree 101 Setup menu configuration .......... 102 4

User Manual
Page 21
... or disable the key lock. (P74) Temporarily hides the image. (P30) 3. MUTE button Temporarily mutes the audio. (P29) 21 Introduction OK button Confirms the selected menu item. 2. AUTO PC button Allows you to document viewer, etc. VOL+ button Increases the volume. (P29) 3 5 9. BACK button 11 Returns to the upper level .... (P28) 5. PC button Switches to Video input. (P28) 6. the optimum status depending on or off. (P27, P30) 15. VOL- Closes the pop-up setting menu of the OSD. II POWER button the OSD. VIDEO button Switches to PC/Component input. (P28) 4.
... or disable the key lock. (P74) Temporarily hides the image. (P30) 3. MUTE button Temporarily mutes the audio. (P29) 21 Introduction OK button Confirms the selected menu item. 2. AUTO PC button Allows you to document viewer, etc. VOL+ button Increases the volume. (P29) 3 5 9. BACK button 11 Returns to the upper level .... (P28) 5. PC button Switches to Video input. (P28) 6. the optimum status depending on or off. (P27, P30) 15. VOL- Closes the pop-up setting menu of the OSD. II POWER button the OSD. VIDEO button Switches to PC/Component input. (P28) 4.
User Manual
Page 28
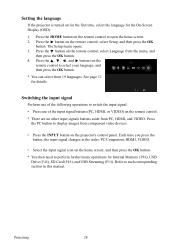
... the , , , and buttons on the remote control to display images from 19 languages. The Setup menu opens. 3. Press the PC button to select your language, and then press the OK button. *... icon on the remote control. * There are no other input signals buttons aside from the menu, and then press the OK button. 4. See page 52 for the On-Screen Display (OSD). 1. Refer to perform further... menu operations for Internal Memory (P48), USB Drive (P48), SD Card (P48), and USB Streaming (P54). ...
... the , , , and buttons on the remote control to display images from 19 languages. The Setup menu opens. 3. Press the PC button to select your language, and then press the OK button. *... icon on the remote control. * There are no other input signals buttons aside from the menu, and then press the OK button. 4. See page 52 for the On-Screen Display (OSD). 1. Refer to perform further... menu operations for Internal Memory (P48), USB Drive (P48), SD Card (P48), and USB Streaming (P54). ...

User Manual
Page 29
... situation, you need to temporarily mute the audio. When PC/Component, HDMI, or VIDEO is selected, the last used input signal is 16:10. VOL+ MENU BACK Audio is not output when no image is connected to adjust the volume. PC HDMI VIDEO MUTE VOL- VOL...+ MENU BACK Muting Press the MUTE button on the remote control to the projector correctly. * When an external speaker is connected, audio is output for details. ...
... situation, you need to temporarily mute the audio. When PC/Component, HDMI, or VIDEO is selected, the last used input signal is 16:10. VOL+ MENU BACK Audio is not output when no image is connected to adjust the volume. PC HDMI VIDEO MUTE VOL- VOL...+ MENU BACK Muting Press the MUTE button on the remote control to the projector correctly. * When an external speaker is connected, audio is output for details. ...

User Manual
Page 30
The lamp turns off the projector 1. Press the BLANK button again on the remote control to restore the image. MENU BACK Caution Do not place any objects in front of the lens while the projector is performed within a few seconds, the message disappears. 2. OK HOME ...
The lamp turns off the projector 1. Press the BLANK button again on the remote control to restore the image. MENU BACK Caution Do not place any objects in front of the lens while the projector is performed within a few seconds, the message disappears. 2. OK HOME ...

User Manual
Page 44
Menu function settings Menu function settings 44
Menu function settings Menu function settings 44

User Manual
Page 45
Also, when projecting images, the On-Screen Display menu (OSD) allows you can perform a variety of settings such as selecting an input signal, projecting files from a variety of storage devices, and performing projector setup. About the menus From the projector's home screen you to make adjustments and change settings for the image. (P75) Home screen On-Screen Display menu 45 Menu function settings
Also, when projecting images, the On-Screen Display menu (OSD) allows you can perform a variety of settings such as selecting an input signal, projecting files from a variety of storage devices, and performing projector setup. About the menus From the projector's home screen you to make adjustments and change settings for the image. (P75) Home screen On-Screen Display menu 45 Menu function settings

User Manual
Page 46
USB Streaming (P54) 3. Setup (P58) Icon explanations 1. Menu function settings 46 PC/Component (P28) 6. HDMI (P28) 7. USB Drive: Displays files on the internal memory. 2. USB Streaming: When a computer is comprised of the following ...
USB Streaming (P54) 3. Setup (P58) Icon explanations 1. Menu function settings 46 PC/Component (P28) 6. HDMI (P28) 7. USB Drive: Displays files on the internal memory. 2. USB Streaming: When a computer is comprised of the following ...

User Manual
Page 47
... the icon for detailed explanations of each function. • Internal Memory, USB Drive, and SD Card (P48) • USB Streaming (P54) • Setup (P58) 47 Menu function settings See the following pages for the input signal you want to project, and then press the OK button (The projector automatically detects the...
... the icon for detailed explanations of each function. • Internal Memory, USB Drive, and SD Card (P48) • USB Streaming (P54) • Setup (P58) 47 Menu function settings See the following pages for the input signal you want to project, and then press the OK button (The projector automatically detects the...

User Manual
Page 48
.... Press the / buttons to select the type of file you want to select the memory type, and then press the OK button or the button. 2. Menu function settings 48 Photos: Projects photos (P50) Music: Plays audio files (P50) Video: Plays videos (P51) Documents: Projects Microsoft Office files (Word, Excel, PowerPoint), Adobe...
.... Press the / buttons to select the type of file you want to select the memory type, and then press the OK button or the button. 2. Menu function settings 48 Photos: Projects photos (P50) Music: Plays audio files (P50) Video: Plays videos (P51) Documents: Projects Microsoft Office files (Word, Excel, PowerPoint), Adobe...

User Manual
Page 49
... closes and you want to project/play , and then press the OK button. 7. Press the BACK button to return to the file browser display. 49 Menu function settings Explanation for photos. Press the / buttons to select the file you will return to the previous folder level. 9. Selected file type File list...
... closes and you want to project/play , and then press the OK button. 7. Press the BACK button to return to the file browser display. 49 Menu function settings Explanation for photos. Press the / buttons to select the file you will return to the previous folder level. 9. Selected file type File list...
User Manual
Page 50
... back up to 6,400 pixels. * The projector may not be able to play all supported image files. Playing music The following file formats are supported. Menu function settings 50 File extension: OGG, AAC, WAV WAV files: PCM and AD-PCM supported * The projector may not be able to display all supported...
... back up to 6,400 pixels. * The projector may not be able to play all supported image files. Playing music The following file formats are supported. Menu function settings 50 File extension: OGG, AAC, WAV WAV files: PCM and AD-PCM supported * The projector may not be able to display all supported...

User Manual
Page 51
.../2010 (ppt, pptx) 95/97/2000/XP/2003/2007/2010 (xls, xlsx) 95/97/2000/XP/2003/2007/2010 (doc, docx) Text data (txt) 51 Menu function settings Type PDF Microsoft PowerPoint Microsoft Excel Microsoft Word Text Format 1.0 to project Microsoft Office files, Adobe PDF files, and text files. If the...
.../2010 (ppt, pptx) 95/97/2000/XP/2003/2007/2010 (xls, xlsx) 95/97/2000/XP/2003/2007/2010 (doc, docx) Text data (txt) 51 Menu function settings Type PDF Microsoft PowerPoint Microsoft Excel Microsoft Word Text Format 1.0 to project Microsoft Office files, Adobe PDF files, and text files. If the...

User Manual
Page 52
... is projected satisfactorily beforehand. English German French Italian Spanish Portuguese Swedish Russian Dutch Finnish Norwegian Turkish Polish Hungarian Czech Danish Chinese (Simplified) Chinese (Traditional) Japanese Menu function settings 52 When giving a presentation using a different font to the computer, it may take some text may not be displayed correctly. • Some functions...
... is projected satisfactorily beforehand. English German French Italian Spanish Portuguese Swedish Russian Dutch Finnish Norwegian Turkish Polish Hungarian Czech Danish Chinese (Simplified) Chinese (Traditional) Japanese Menu function settings 52 When giving a presentation using a different font to the computer, it may take some text may not be displayed correctly. • Some functions...

User Manual
Page 53
... button when the image is displayed to magnify the display. Press when the bottom of the page is displayed to move to a normal display. 53 Menu function settings Press when the top of the page is at maximum magnification, it returns to the previous page.
... button when the image is displayed to magnify the display. Press when the bottom of the page is displayed to move to a normal display. 53 Menu function settings Press when the top of the page is at maximum magnification, it returns to the previous page.

User Manual
Page 54
...jack and the computer (P36). 2. By using USB streaming, you can project the computer's screen (USB Display) and transfer files from the menu displayed on your computer. Using USB Streaming By connecting the projector to a computer with a USB cable and using a USB cable you can ..." which expands and projects the computer's screen area. The default is displayed, and after a few moments the computer recognizes the projector. 3. Menu function settings 54 If the autorun function of your computer is only available for the first time on -screen instructions to Starting EZ USB. ...
...jack and the computer (P36). 2. By using USB streaming, you can project the computer's screen (USB Display) and transfer files from the menu displayed on your computer. Using USB Streaming By connecting the projector to a computer with a USB cable and using a USB cable you can ..." which expands and projects the computer's screen area. The default is displayed, and after a few moments the computer recognizes the projector. 3. Menu function settings 54 If the autorun function of your computer is only available for the first time on -screen instructions to Starting EZ USB. ...

User Manual
Page 56
Open the projector's drive icon, and then copy and paste or drag and drop your files. 4. Menu function settings 56 From the home screen, select USB Streaming > USB File Transfer, and then press the OK button. For Windows: Click the Safely remove ... BACK or HOME button on the desktop, and then copy and paste or drag and drop your files. Transferring files For Windows: From the start menu, open Computer (My Computer for Windows XP). Disconnecting When you have finished transferring files, follow the steps below to the projector's internal memory. USB File...
Open the projector's drive icon, and then copy and paste or drag and drop your files. 4. Menu function settings 56 From the home screen, select USB Streaming > USB File Transfer, and then press the OK button. For Windows: Click the Safely remove ... BACK or HOME button on the desktop, and then copy and paste or drag and drop your files. Transferring files For Windows: From the start menu, open Computer (My Computer for Windows XP). Disconnecting When you have finished transferring files, follow the steps below to the projector's internal memory. USB File...

User Manual
Page 57
Do not disconnect the USB cable while the files are open on the computer. Close all files on the remote control to leave the USB File Transfer screen. For Mac: Drag and drop the projector's icon to the projector. Press the BACK or HOME button on the projector, and then disconnect. 57 Menu function settings The connection does not end if files on the projector are being copied, as this could result in loss of data or damage to the trash. Check that the connection has been disconnected.
Do not disconnect the USB cable while the files are open on the computer. Close all files on the remote control to leave the USB File Transfer screen. For Mac: Drag and drop the projector's icon to the projector. Press the BACK or HOME button on the projector, and then disconnect. 57 Menu function settings The connection does not end if files on the projector are being copied, as this could result in loss of data or damage to the trash. Check that the connection has been disconnected.