User Guide
Page 3
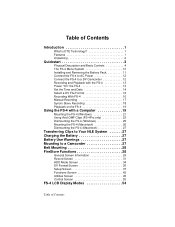
... Basic Controls 4 The FS-4 Menu System 10 Installing and Removing the Battery Pack 11 Connect the FS-4 to AC Power 12 Connect the FS-4 to a DV Camcorder 12 Recording and Playback with the FS-4 13 Power "On" the FS-4 13 Set the Time and Date 14 Select a DV File Format 16 Recording With FS-4 16 Manual Recording 17 Syncro Slave Recording 18 Playback on the FS-4 19 Using the FS-4 with a Computer 19 Mounting the FS-4 (Windows 21 Using Avid...
... Basic Controls 4 The FS-4 Menu System 10 Installing and Removing the Battery Pack 11 Connect the FS-4 to AC Power 12 Connect the FS-4 to a DV Camcorder 12 Recording and Playback with the FS-4 13 Power "On" the FS-4 13 Set the Time and Date 14 Select a DV File Format 16 Recording With FS-4 16 Manual Recording 17 Syncro Slave Recording 18 Playback on the FS-4 19 Using the FS-4 with a Computer 19 Mounting the FS-4 (Windows 21 Using Avid...
User Guide
Page 5
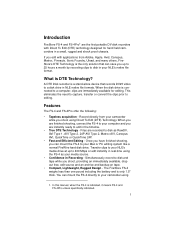
... - Record directly from Adobe, Apple, Avid, Canopus, Matrox, Pinnacle, Sonic Foundry, Ulead, and many others, FireStore's DTE Technology is a stand-alone device that can save you up to a disk drive in Recording - When the disk drive is only 1.5" thick. Features The FS-4 and FS-4Pro offer the following: • Tapeless acquisition - Transfer clips to a computer, clips are finished shooting, connect the FS-4 to disk as your media...
... - Record directly from Adobe, Apple, Avid, Canopus, Matrox, Pinnacle, Sonic Foundry, Ulead, and many others, FireStore's DTE Technology is a stand-alone device that can save you up to a disk drive in Recording - When the disk drive is only 1.5" thick. Features The FS-4 and FS-4Pro offer the following: • Tapeless acquisition - Transfer clips to a computer, clips are finished shooting, connect the FS-4 to disk as your media...
User Guide
Page 6
... Avid DV-OMF support. • Available with cable and connector to the FS-4 • Removable power supply cable for wall outlet to power supply (International only) • Belt Clip • Four foot long, 6-pin to Use, Control and Update - The six second electronic shock cache ensures your video is saved in your belt. Unpacking Before using the supplied AC adapter. • Easy to 4-pin Firewire Cable • User Guide • Removable Li-Ion Battery Pack 2
... Avid DV-OMF support. • Available with cable and connector to the FS-4 • Removable power supply cable for wall outlet to power supply (International only) • Belt Clip • Four foot long, 6-pin to Use, Control and Update - The six second electronic shock cache ensures your video is saved in your belt. Unpacking Before using the supplied AC adapter. • Easy to 4-pin Firewire Cable • User Guide • Removable Li-Ion Battery Pack 2

User Guide
Page 7
Quickstart This section contains information to help you to a DV Camcorder • Recording and Playback with the FS-4 • Power "On" the FS-4 • Set the Time and Date • Select a DV File Format • Recording With FS-4 • Manual Recording • Syncro Slave Recording • Playback on the FS-4 3 It contains the following sections: • Physical Description and Basic Controls • The FS-4 Menu System • Installing and Removing the Battery Pack • Connect the FS-4 to AC Power • Connect the FS-4 to use the FS-4 as quickly as possible.
Quickstart This section contains information to help you to a DV Camcorder • Recording and Playback with the FS-4 • Power "On" the FS-4 • Set the Time and Date • Select a DV File Format • Recording With FS-4 • Manual Recording • Syncro Slave Recording • Playback on the FS-4 3 It contains the following sections: • Physical Description and Basic Controls • The FS-4 Menu System • Installing and Removing the Battery Pack • Connect the FS-4 to AC Power • Connect the FS-4 to use the FS-4 as quickly as possible.

User Guide
Page 8
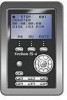
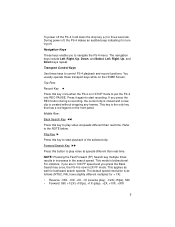
... below . Power On Key To power on or reset the FS-4 after it is powered on the screen above the particular key. The function of the FS-4 is illustrated below the FS-4 LCD display are user-defined function keys for more information. Physical Description and Basic Controls Front Panel Controls The front panel of these soft keys changes depending upon what is displayed on , hold down...
... below . Power On Key To power on or reset the FS-4 after it is powered on the screen above the particular key. The function of the FS-4 is illustrated below the FS-4 LCD display are user-defined function keys for more information. Physical Description and Basic Controls Front Panel Controls The front panel of these soft keys changes depending upon what is displayed on , hold down...
User Guide
Page 9
... you press the REC button during a recording, the current clip is closed and a new clip is created without dropping any frames. For instance, if you are in 2X FF mode. The default speed resolution is turning off. To power off , the FS-4 makes an audible beep indicating it again to navigate the FS-4 menu. During power off the FS-4, hold down the stop key (n) for three...
... you press the REC button during a recording, the current clip is closed and a new clip is created without dropping any frames. For instance, if you are in 2X FF mode. The default speed resolution is turning off. To power off , the FS-4 makes an audible beep indicating it again to navigate the FS-4 menu. During power off the FS-4, hold down the stop key (n) for three...
User Guide
Page 10
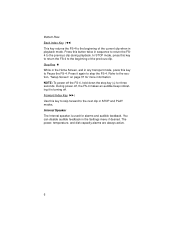
...Key | Use this button twice in STOP and PLAY modes. Press this key to skip forward to the next clip in sequence to return the FS4 to the previous clip during playback. In STOP mode, press this key to the section, "Setup Screen" on page 37 for alarms and ...audible feedback. You can disable audible feedback in playback mode. Press it is used for more information. NOTE: To power off . Internal Speaker The Internal speaker is turning off the FS-4, hold down the stop the FS-4. ...
...Key | Use this button twice in STOP and PLAY modes. Press this key to skip forward to the next clip in sequence to return the FS4 to the previous clip during playback. In STOP mode, press this key to the section, "Setup Screen" on page 37 for alarms and ...audible feedback. You can disable audible feedback in playback mode. Press it is used for more information. NOTE: To power off . Internal Speaker The Internal speaker is turning off the FS-4, hold down the stop the FS-4. ...
User Guide
Page 14
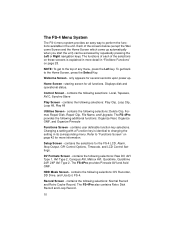
... of the selections on these screens is identical to changing the setting in the unit. only appears for the FS-4 LCD, Alarm, Stop Output, GPI Control Options, Timecode, and LCD Control Settings. Control Screen - contains the selections for several seconds upon power up automatically when you start the unit) can be accessed by repeatedly pressing the Left or Right navigation keys. DV Formats Screen - Record Screen - NOTE: To get back...
... of the selections on these screens is identical to changing the setting in the unit. only appears for the FS-4 LCD, Alarm, Stop Output, GPI Control Options, Timecode, and LCD Control Settings. Control Screen - contains the selections for several seconds upon power up automatically when you start the unit) can be accessed by repeatedly pressing the Left or Right navigation keys. DV Formats Screen - Record Screen - NOTE: To get back...

User Guide
Page 15
... supply power to show the battery is facing you can immediately use the FS-4 with the battery. Battery Latch Battery Compartment Step 2: Slide the battery pack into place. You must charge the battery until the battery status LED indicates the unit is charged before you as follows: Step 1: Turn the FS-4 unit over, so that the back is charging. Reels Screen (FS-4Pro only) - Installing and Removing the Battery Pack Before operating...
... supply power to show the battery is facing you can immediately use the FS-4 with the battery. Battery Latch Battery Compartment Step 2: Slide the battery pack into place. You must charge the battery until the battery status LED indicates the unit is charged before you as follows: Step 1: Turn the FS-4 unit over, so that the back is charging. Reels Screen (FS-4Pro only) - Installing and Removing the Battery Pack Before operating...
User Guide
Page 16
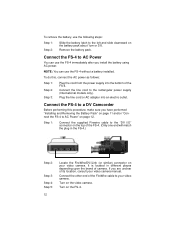
... upon the brand of the FireWire cable to your video camera. Connect the other end of camera. Turn on the video camera. Connect the FS-4 to AC Power You can use the FS-4 without a battery installed. Connect the line cord to the rectangular power supply (International models only). Plug the line cord or AC adapter into the bottom of its location, consult your video camera manual. It is located in the FS-4.) Step 2: Step 3: Step 4: Step 5: 12...
... upon the brand of the FireWire cable to your video camera. Connect the other end of camera. Turn on the video camera. Connect the FS-4 to AC Power You can use the FS-4 without a battery installed. Connect the line cord to the rectangular power supply (International models only). Plug the line cord or AC adapter into the bottom of its location, consult your video camera manual. It is located in the FS-4.) Step 2: Step 3: Step 4: Step 5: 12...

User Guide
Page 19
... Up and Down navigation keys to change the highlighted value. mode.) Step 7: Press the right-most Function Key indicated as BACK on page 37. 15 The Time and Date are now set. The new date will be indicated on the Setup Screen. Use the Down navigation key to the section, "Setup Screen" on the screen. When complete, press the right-most...
... Up and Down navigation keys to change the highlighted value. mode.) Step 7: Press the right-most Function Key indicated as BACK on page 37. 15 The Time and Date are now set. The new date will be indicated on the Setup Screen. Use the Down navigation key to the section, "Setup Screen" on the screen. When complete, press the right-most...
User Guide
Page 20
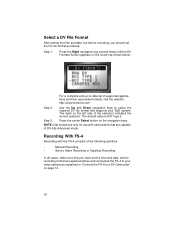
... key several times until the DV Formats Screen appears on the screen as shown below: For a complete and up-to-date list of supported applications and their associated formats, visit the website: http://www.firestore.com Step 2: Use the Up and Down navigation keys to select the required DV file format that supports your video camera as explained above and connected the FS-4 to a DV...
... key several times until the DV Formats Screen appears on the screen as shown below: For a complete and up-to-date list of supported applications and their associated formats, visit the website: http://www.firestore.com Step 2: Use the Up and Down navigation keys to select the required DV file format that supports your video camera as explained above and connected the FS-4 to a DV...
User Guide
Page 21
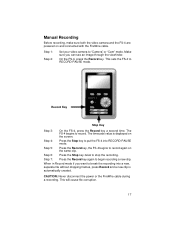
... FS-4 into a new, separate file without dropping frames, press Record and a new clip is displayed on and connected with the FireWire cable. When in Record mode if you can see an image through the viewfinder. Manual Recording Before recording, make sure both the video camera and the FS-4 are powered on the screen. Record Key Stop Key Step 3: On the FS-4, press the Record key a second time. Step 5: Press the Record key, the FS-4 begins to "Camera" or "Cam" mode...
... FS-4 into a new, separate file without dropping frames, press Record and a new clip is displayed on and connected with the FireWire cable. When in Record mode if you can see an image through the viewfinder. Manual Recording Before recording, make sure both the video camera and the FS-4 are powered on the screen. Record Key Stop Key Step 3: On the FS-4, press the Record key a second time. Step 5: Press the Record key, the FS-4 begins to "Camera" or "Cam" mode...

User Guide
Page 22
... Setup menu, you to select Synchro Slave. The default value is in the camera unless your camera supports tapeless recording. The recording signal goes both units is a "Y" indicating that the video camera and the FS-4 are connected. NOTE: You can also perform these controls. Step 3: Press the center Select button on the screen as shown below: Step 2: Use the Down navigation key to control FS-4 operation completely from the video camera...
... Setup menu, you to select Synchro Slave. The default value is in the camera unless your camera supports tapeless recording. The recording signal goes both units is a "Y" indicating that the video camera and the FS-4 are connected. NOTE: You can also perform these controls. Step 3: Press the center Select button on the screen as shown below: Step 2: Use the Down navigation key to control FS-4 operation completely from the video camera...

User Guide
Page 24
... use the FS-4 with Windows NT. Use the MODE screen to page 2-15 for more information. 1394 (FireWire) port using the HDD Bypass mode (refer to go into HDD mode. FAT32 volumes will read a FAT 32 volume. You also must have loaded any computer system that will not work with a computer, you must have an active IEEE-1394 connection on page 34 Connect the FS...
... use the FS-4 with Windows NT. Use the MODE screen to page 2-15 for more information. 1394 (FireWire) port using the HDD Bypass mode (refer to go into HDD mode. FAT32 volumes will read a FAT 32 volume. You also must have loaded any computer system that will not work with a computer, you must have an active IEEE-1394 connection on page 34 Connect the FS...
User Guide
Page 26
... file system is fast enough to directly stream the clips to the NLE, eliminating the need to copy or transfer the clips before use. When clips are different. The two clips have the same primary file name, however, the last two digits are being recorded to roughly 9 minutes of the clip is labeled with a separate .wav audio file per track) • FS...
... file system is fast enough to directly stream the clips to the NLE, eliminating the need to copy or transfer the clips before use. When clips are different. The two clips have the same primary file name, however, the last two digits are being recorded to roughly 9 minutes of the clip is labeled with a separate .wav audio file per track) • FS...
User Guide
Page 43
... is displayed. • When you select STOP GREY, a grey frame is displayed • When you select STOP NO VIDEO, video output is marked with a "- Do this screen consist of the FS-4, as well as follows: Step 1: Step 2: Make an LCD selection. The alarm alerts you for conditions such as low battery charge, low disk space, or over heating of the following : ALARM ON (Default) and ALARM OFF...
... is displayed. • When you select STOP GREY, a grey frame is displayed • When you select STOP NO VIDEO, video output is marked with a "- Do this screen consist of the FS-4, as well as follows: Step 1: Step 2: Make an LCD selection. The alarm alerts you for conditions such as low battery charge, low disk space, or over heating of the following : ALARM ON (Default) and ALARM OFF...

User Guide
Page 45
...SETUP Screen with the current cursor row set the camcorder Timecode mode to REC RUN, REGEN or EXT TC, the FS-4 will NOT record the timecode when recording to enable or disable the FS-4's time code (TC). Upon selection, the value is for display only. • On the FS-4Pro only, you to disk only. The LCD contrast changes... TC NON-DROP (Group Default). Move between the values. The selected mode (TC or UB) is the currently set either a TC value or a User bit value. Use the Up and Down navigation key to the submenu. Use the FS-4 TC modes if you set to TC SET value. • The ...
...SETUP Screen with the current cursor row set the camcorder Timecode mode to REC RUN, REGEN or EXT TC, the FS-4 will NOT record the timecode when recording to enable or disable the FS-4's time code (TC). Upon selection, the value is for display only. • On the FS-4Pro only, you to disk only. The LCD contrast changes... TC NON-DROP (Group Default). Move between the values. The selected mode (TC or UB) is the currently set either a TC value or a User bit value. Use the Up and Down navigation key to the submenu. Use the FS-4 TC modes if you set to TC SET value. • The ...

User Guide
Page 54
... power and thermal problems with your unit. When completed the screen displays either "Aborted" or "Complete" Press BACK to return to the Setup screen with your unit. The following screen appears. 50 REELS SCREEN (FS-4Pro only) When a disk is mounted to restore the factory default settings for diagnosing problems with the cursor row set to begin the OS upgrade. The upgrade begins and a status screen appears. SYSTEM RESET...
... power and thermal problems with your unit. When completed the screen displays either "Aborted" or "Complete" Press BACK to return to the Setup screen with your unit. The following screen appears. 50 REELS SCREEN (FS-4Pro only) When a disk is mounted to restore the factory default settings for diagnosing problems with the cursor row set to begin the OS upgrade. The upgrade begins and a status screen appears. SYSTEM RESET...

User Guide
Page 55
... marked with a "- Default Value • R2 through R9 "Reel Name" Mark a clip to PLAY. PLAY SCREEN Step 1: Step 2: From the Utilities screen, use the keypad numbered 0-9 to the function keys). • Upon select, value is finished, select ORGANIZE REEL in the utilities folder where the clips are limited to 10 characters When you use the optional wired remote control, use the Down...
... marked with a "- Default Value • R2 through R9 "Reel Name" Mark a clip to PLAY. PLAY SCREEN Step 1: Step 2: From the Utilities screen, use the keypad numbered 0-9 to the function keys). • Upon select, value is finished, select ORGANIZE REEL in the utilities folder where the clips are limited to 10 characters When you use the optional wired remote control, use the Down...


