
Instruction Manual
Page 13
...Movie Menu Function Settings 191 7 Handy Features 199 Handy Features 200 Disabling the Beeper 200 Card Reminder 200 Setting the Image Review Time 200 Setting the Auto Power-off Time 201 Adjusting the LCD Monitor Brightness 201 Creating and Selecting a Folder 202 ...File Numbering Methods 204 Setting Copyright Information 206 Auto Rotation of Vertical Images 208 Checking Camera Settings 209 Reverting the Camera to the Default Settings 210 Preventing the LCD Monitor from Turning Off Automatically...... 213 Changing the Shooting Settings Screen...
...Movie Menu Function Settings 191 7 Handy Features 199 Handy Features 200 Disabling the Beeper 200 Card Reminder 200 Setting the Image Review Time 200 Setting the Auto Power-off Time 201 Adjusting the LCD Monitor Brightness 201 Creating and Selecting a Folder 202 ...File Numbering Methods 204 Setting Copyright Information 206 Auto Rotation of Vertical Images 208 Checking Camera Settings 209 Reverting the Camera to the Default Settings 210 Preventing the LCD Monitor from Turning Off Automatically...... 213 Changing the Shooting Settings Screen...
Instruction Manual
Page 19
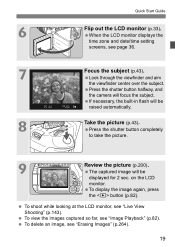
...subject. To view the images captured so far, see page 36. 7 Focus the subject (p.43). Press the shutter button halfway, and the camera will be displayed for 2 sec. Look through the viewfinder and aim the viewfinder center over the subject. Press the shutter button completely to ...take the picture. 9 Review the picture (p.200). To display the image again, press the button (p.82). To delete an image, see "Live View Shooting" (p.143). on...
...subject. To view the images captured so far, see page 36. 7 Focus the subject (p.43). Press the shutter button halfway, and the camera will be displayed for 2 sec. Look through the viewfinder and aim the viewfinder center over the subject. Press the shutter button completely to ...take the picture. 9 Review the picture (p.200). To display the image again, press the button (p.82). To delete an image, see "Live View Shooting" (p.143). on...

Instruction Manual
Page 62
.... 2 Focus the subject. X The Live View image will return to Live View shooting automatically. X When focus is called "Live View shooting". X After the image review ends, the camera will appear on the LCD monitor. A Full Auto Techniques (Scene Intelligent Auto) A Live View Shooting You can also rotate the LCD monitor in different...
.... 2 Focus the subject. X The Live View image will return to Live View shooting automatically. X When focus is called "Live View shooting". X After the image review ends, the camera will appear on the LCD monitor. A Full Auto Techniques (Scene Intelligent Auto) A Live View Shooting You can also rotate the LCD monitor in different...

Instruction Manual
Page 144
...(when the image-recording quality is set for the first shot will focus with the LCD Monitor 1 Display the Live View image. X After the image review ends, the camera will closely reflect the brightness level of -field preview button. In Creative Zone modes, you press the shutter button halfway, the... for Live View shooting. 144 You can also tap the subject on the upper left (p.147). You can check the depth of field by the camera is displayed on the LCD monitor. Press the button to focus (p.153-161) and shoot (p.162). A Shooting with the current AF method (p.153). 3 ...
...(when the image-recording quality is set for the first shot will focus with the LCD Monitor 1 Display the Live View image. X After the image review ends, the camera will closely reflect the brightness level of -field preview button. In Creative Zone modes, you press the shutter button halfway, the... for Live View shooting. 144 You can also tap the subject on the upper left (p.147). You can check the depth of field by the camera is displayed on the LCD monitor. Press the button to focus (p.153-161) and shoot (p.162). A Shooting with the current AF method (p.153). 3 ...
Instruction Manual
Page 199
... Reminder (p.200) Setting the Image Review Time (p.200) Setting the Auto Power-off Time (p.201) Adjusting the LCD Monitor Brightness (p.201) Creating and Selecting a Folder (p.202) File Numbering Methods (p.204) Setting Copyright Information (p.206) Auto Rotation of Vertical Images (p.208) Checking Camera Settings (p.209) Reverting the Camera to the Default Settings (p.210) Preventing...
... Reminder (p.200) Setting the Image Review Time (p.200) Setting the Auto Power-off Time (p.201) Adjusting the LCD Monitor Brightness (p.201) Creating and Selecting a Folder (p.202) File Numbering Methods (p.204) Setting Copyright Information (p.206) Auto Rotation of Vertical Images (p.208) Checking Camera Settings (p.209) Reverting the Camera to the Default Settings (p.210) Preventing...
Instruction Manual
Page 200
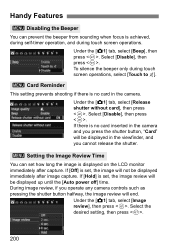
...self-timer operation, and during touch screen operations. During image review, if you cannot release the shutter. 3 Setting the Image Review Time You can prevent the beeper from sounding when focus is no card inserted in the camera and you press the shutter button, "Card" will be ...displayed in the viewfinder, and you operate any camera controls such as pressing the shutter button halfway, the image review will be displayed immediately after capture. If [Off] is displayed on the LCD monitor immediately after image capture. Under the...
...self-timer operation, and during touch screen operations. During image review, if you cannot release the shutter. 3 Setting the Image Review Time You can prevent the beeper from sounding when focus is no card inserted in the camera and you press the shutter button, "Card" will be ...displayed in the viewfinder, and you operate any camera controls such as pressing the shutter button halfway, the image review will be displayed immediately after capture. If [Off] is displayed on the LCD monitor immediately after image capture. Under the...
Instruction Manual
Page 201
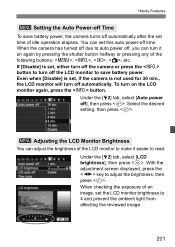
...press the key to auto power off, you can adjust the brightness of the LCD monitor to 4 and prevent the ambient light from affecting the reviewed image. 201 Select the desired setting, then press . 3 Adjusting the LCD Monitor Brightness You can turn on again by pressing the shutter button ... or pressing any of an image, set this auto power-off time. When checking the exposure of the following buttons: , , , , etc. When the camera has turned off due to adjust the brightness, then press . Handy Features 3 Setting the Auto Power-off Time To save battery power. Under the [52...
...press the key to auto power off, you can adjust the brightness of the LCD monitor to 4 and prevent the ambient light from affecting the reviewed image. 201 Select the desired setting, then press . 3 Adjusting the LCD Monitor Brightness You can turn on again by pressing the shutter button ... or pressing any of an image, set this auto power-off time. When checking the exposure of the following buttons: , , , , etc. When the camera has turned off due to adjust the brightness, then press . Handy Features 3 Setting the Auto Power-off Time To save battery power. Under the [52...

Instruction Manual
Page 208
...while [Auto rotate] was set to rotate an image captured when [OnD] had been set , but the image does not rotate during the image review immediately after it is pointed up or down, the image may not be rotated. Select the option, then press . [OnzD] : The vertical image... is automatically rotated during playback on both the camera's LCD monitor and on the computer. [OnD] : The vertical image is automatically rotated only on page 243. Handy Features 3 Auto Rotation of horizontally. ...
...while [Auto rotate] was set to rotate an image captured when [OnD] had been set , but the image does not rotate during the image review immediately after it is pointed up or down, the image may not be rotated. Select the option, then press . [OnzD] : The vertical image... is automatically rotated during playback on both the camera's LCD monitor and on the computer. [OnD] : The vertical image is automatically rotated only on page 243. Handy Features 3 Auto Rotation of horizontally. ...
Instruction Manual
Page 211
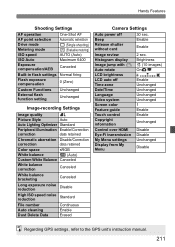
... White balance bracketing Canceled Long exposure noise reduction Disable High ISO speed noise reduction Standard File number Auto cleaning Dust Delete Data Continuous Enable Erased Camera Settings Auto power off Time zone Date/Time Language Video system Screen color Feature guide Touch control Copyright information 2 sec. Enable Enable Image...
... White balance bracketing Canceled Long exposure noise reduction Disable High ISO speed noise reduction Standard File number Auto cleaning Dust Delete Data Continuous Enable Erased Camera Settings Auto power off Time zone Date/Time Language Video system Screen color Feature guide Touch control Copyright information 2 sec. Enable Enable Image...


