
Instruction Manual
Page 9
... Manual exposure Still photo shooting Quick Control Î p.169 Î p.191 Î p.193 Î p.193 Î p.183 Î p.173 Î p.178 Î p.180 Playback Image review time Single-image display Shooting information display Index display Image browsing (Jump display) Magnified view Image rotate Rating Movie playback Editing out movie's first/last...
... Manual exposure Still photo shooting Quick Control Î p.169 Î p.191 Î p.193 Î p.193 Î p.183 Î p.173 Î p.178 Î p.180 Playback Image review time Single-image display Shooting information display Index display Image browsing (Jump display) Magnified view Image rotate Rating Movie playback Editing out movie's first/last...
Instruction Manual
Page 13
... Shooting Video Snapshots 183 Movie Menu Function Settings 191 7 Handy Features 199 Handy Features 200 Disabling the Beeper 200 Card Reminder 200 Setting the Image Review Time 200 Setting the Auto Power-off Time 201 Adjusting the LCD Monitor Brightness 201 Creating and Selecting a Folder 202 File Numbering Methods 204 Setting...
... Shooting Video Snapshots 183 Movie Menu Function Settings 191 7 Handy Features 199 Handy Features 200 Disabling the Beeper 200 Card Reminder 200 Setting the Image Review Time 200 Setting the Auto Power-off Time 201 Adjusting the LCD Monitor Brightness 201 Creating and Selecting a Folder 202 File Numbering Methods 204 Setting...
Instruction Manual
Page 19
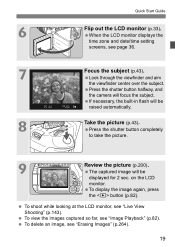
.... 8 Take the picture (p.43). Look through the viewfinder and aim the viewfinder center over the subject. Press the shutter button completely to take the picture. 9 Review the picture (p.200). on the LCD monitor. The captured image will be displayed for 2 sec. Press the shutter button halfway, and the camera will focus...
.... 8 Take the picture (p.43). Look through the viewfinder and aim the viewfinder center over the subject. Press the shutter button completely to take the picture. 9 Review the picture (p.200). on the LCD monitor. The captured image will be displayed for 2 sec. Press the shutter button halfway, and the camera will focus...

Instruction Manual
Page 62
... the shutter button completely. X The picture will appear on the LCD monitor. Normal angle 62 Low angle High angle Press the button. X After the image review ends, the camera will sound. 3 Take the picture. You can shoot while viewing the image on the LCD monitor. This is displayed on the LCD...
... the shutter button completely. X The picture will appear on the LCD monitor. Normal angle 62 Low angle High angle Press the button. X After the image review ends, the camera will sound. 3 Take the picture. You can shoot while viewing the image on the LCD monitor. This is displayed on the LCD...

Instruction Manual
Page 144
... Creative Zone modes, you can also tap the subject on the LCD monitor. You can check the depth of -field preview button. X After the image review ends, the camera will focus with the LCD Monitor 1 Display the Live View image. In the mode, the scene icon for the scene detected by...
... Creative Zone modes, you can also tap the subject on the LCD monitor. You can check the depth of -field preview button. X After the image review ends, the camera will focus with the LCD Monitor 1 Display the Live View image. In the mode, the scene icon for the scene detected by...
Instruction Manual
Page 199
Handy Features Disabling the Beeper (p.200) Card Reminder (p.200) Setting the Image Review Time (p.200) Setting the Auto Power-off Time (p.201) Adjusting the LCD Monitor Brightness (p.201) Creating and Selecting a Folder (p.202) File Numbering Methods (p.204) Setting ...
Handy Features Disabling the Beeper (p.200) Card Reminder (p.200) Setting the Image Review Time (p.200) Setting the Auto Power-off Time (p.201) Adjusting the LCD Monitor Brightness (p.201) Creating and Selecting a Folder (p.202) File Numbering Methods (p.204) Setting ...
Instruction Manual
Page 200
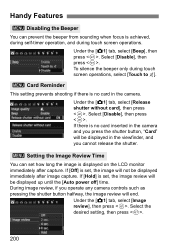
... press . If there is no card in the viewfinder, and you operate any camera controls such as pressing the shutter button halfway, the image review will not be displayed immediately after capture. If [Hold] is set , the image will end. Handy Features 3 Disabling the Beeper You can ...during self-timer operation, and during touch screen operations, select [Touch to ]. 3 Card Reminder This setting prevents shooting if there is set , the image review will be displayed up until the [Auto power off] time. Select the desired setting, then press . 200 Under the [z1] tab, select [Beep], ...
... press . If there is no card in the viewfinder, and you operate any camera controls such as pressing the shutter button halfway, the image review will not be displayed immediately after capture. If [Hold] is set , the image will end. Handy Features 3 Disabling the Beeper You can ...during self-timer operation, and during touch screen operations, select [Touch to ]. 3 Card Reminder This setting prevents shooting if there is set , the image review will be displayed up until the [Auto power off] time. Select the desired setting, then press . 200 Under the [z1] tab, select [Beep], ...
Instruction Manual
Page 201
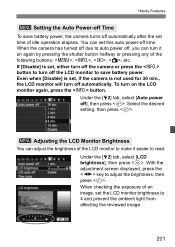
... can set time of the following buttons: , , , , etc. With the adjustment screen displayed, press the key to 4 and prevent the ambient light from affecting the reviewed image. 201 When checking the exposure of the LCD monitor to make it on the LCD monitor again, press the button. If [Disable] is set...
... can set time of the following buttons: , , , , etc. With the adjustment screen displayed, press the key to 4 and prevent the ambient light from affecting the reviewed image. 201 When checking the exposure of the LCD monitor to make it on the LCD monitor again, press the button. If [Disable] is set...

Instruction Manual
Page 208
... Vertical images are rotated automatically so they are described below. Select the option, then press . [OnzD] : The vertical image is automatically rotated during the image review immediately after it is captured. It will be rotated automatically for this feature. FAQ The vertical image is not rotated during playback on both the...
... Vertical images are rotated automatically so they are described below. Select the option, then press . [OnzD] : The vertical image is automatically rotated during the image review immediately after it is captured. It will be rotated automatically for this feature. FAQ The vertical image is not rotated during playback on both the...
Instruction Manual
Page 211
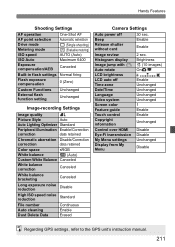
Enable Enable Image review Histogram display Image jump with 6 Auto rotate LCD brightness LCD auto off Beep Release shutter without card 30 sec. Handy Features Shooting Settings AF operation ...
Enable Enable Image review Histogram display Image jump with 6 Auto rotate LCD brightness LCD auto off Beep Release shutter without card 30 sec. Handy Features Shooting Settings AF operation ...

Instruction Manual
Page 240
..., the magnification will return. u/y Magnified View You can turn the dial to view another image at the same magnification. Press the button during the image review immediately after shooting. If you can magnify a captured image by approx. 1.5x to the single-image display. X The image will be magnified. The image cannot...
..., the magnification will return. u/y Magnified View You can turn the dial to view another image at the same magnification. Press the button during the image review immediately after shooting. If you can magnify a captured image by approx. 1.5x to the single-image display. X The image will be magnified. The image cannot...
Instruction Manual
Page 314
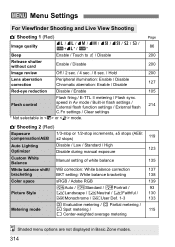
... 1 (Red) Image quality 73 / 83 / 74 / 84 / 7a / 8a / b / c / 1+73* / 1* Beep Enable / Touch to / Disable Release shutter without card Enable / Disable Image review Off / 2 sec. / 4 sec. / 8 sec. / Hold Lens aberration correction Peripheral illumination: Enable / Disable Chromatic aberration: Enable / Disable Red-eye reduction Disable / Enable Flash control Flash firing / E-TTL II metering / Flash...
... 1 (Red) Image quality 73 / 83 / 74 / 84 / 7a / 8a / b / c / 1+73* / 1* Beep Enable / Touch to / Disable Release shutter without card Enable / Disable Image review Off / 2 sec. / 4 sec. / 8 sec. / Hold Lens aberration correction Peripheral illumination: Enable / Disable Chromatic aberration: Enable / Disable Red-eye reduction Disable / Enable Flash control Flash firing / E-TTL II metering / Flash...

Instruction Manual
Page 318
... 1 (Red) Image quality 73 / 83 / 74 / 84 / 7a / 8a / b / c / 1+73 / 1 Beep Enable / Touch to / Disable Release shutter without card Enable / Disable Image review Off / 2 sec. / 4 sec. / 8 sec. / Hold Lens aberration correction Peripheral illumination: Enable / Disable Page 86 200 200 200 127 Shooting 2 (Red) Exposure compensation 1/3-stop or 1/2-stop increments, ±5 stops 119...
... 1 (Red) Image quality 73 / 83 / 74 / 84 / 7a / 8a / b / c / 1+73 / 1 Beep Enable / Touch to / Disable Release shutter without card Enable / Disable Image review Off / 2 sec. / 4 sec. / 8 sec. / Hold Lens aberration correction Peripheral illumination: Enable / Disable Page 86 200 200 200 127 Shooting 2 (Red) Exposure compensation 1/3-stop or 1/2-stop increments, ±5 stops 119...

Instruction Manual
Page 368
..., 130, 133 Index 238 Jump display (Image browsing 239 Magnified view 240 Manual rotate 243 No 204 Playback 82, 237 Protect 262 Rating 244 Review time 200 Shooting information 266 Slide show 254 Transfer 307 View on TV 248, 258 Image area 40 Image dust prevention.. 219, 220, 222 ...Image review 200 Image Stabilizer (lens 41 Image Zone 24 Image-recording quality 86 Index display 238 ISO speed 90 Automatic setting (Auto 91 ISO expansion 294 Maximum ISO speed...
..., 130, 133 Index 238 Jump display (Image browsing 239 Magnified view 240 Manual rotate 243 No 204 Playback 82, 237 Protect 262 Rating 244 Review time 200 Shooting information 266 Slide show 254 Transfer 307 View on TV 248, 258 Image area 40 Image dust prevention.. 219, 220, 222 ...Image review 200 Image Stabilizer (lens 41 Image Zone 24 Image-recording quality 86 Index display 238 ISO speed 90 Automatic setting (Auto 91 ISO expansion 294 Maximum ISO speed...