User Guide
Page 3
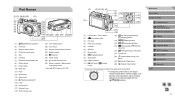
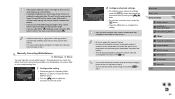
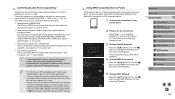
... (11) [ (AE lock)] / [ button (Index)] (12) [ (AF Frame adjustment)] / [ (Magnify)] button (13) [ (Menu)] button (14) [ (Information)] button (15) [ (ISO speed)] / [ (Wi-Fi)] / Up button (16) [ (Manual focus)] / Left button (17) Control dial (18) [ (Quick setting menu)] / Set button (19) [ (Flash)] / Right button (20) [ (Erase)] / Down button * Touch may not be detected...
... (11) [ (AE lock)] / [ button (Index)] (12) [ (AF Frame adjustment)] / [ (Magnify)] button (13) [ (Menu)] button (14) [ (Information)] button (15) [ (ISO speed)] / [ (Wi-Fi)] / Up button (16) [ (Manual focus)] / Left button (17) Control dial (18) [ (Quick setting menu)] / Set button (19) [ (Flash)] / Right button (20) [ (Erase)] / Down button * Touch may not be detected...

User Guide
Page 4
... thread (4) Lens retraction switch (5) Lens mount index (6) Zoom ring (7) Lens retraction index (8) Zoom position index (9) Contacts Conventions Used in this Guide ●● In this manual show the camera with related information (in this example, "xx" represents a page number) ●● Instructions in this guide apply to the camera under default...
... thread (4) Lens retraction switch (5) Lens mount index (6) Zoom ring (7) Lens retraction index (8) Zoom position index (9) Contacts Conventions Used in this Guide ●● In this manual show the camera with related information (in this example, "xx" represents a page number) ●● Instructions in this guide apply to the camera under default...

User Guide
Page 5
... Card 18 Setting the Date and Time 18 Changing the Date and Time 19 Display Language 20 Attaching a Lens 20 Detaching a Lens 21 Lens Instruction Manuals 21 Attaching EF and EF-S Lenses 21 Detaching a Lens 22 Using a Tripod 22 Stabilizing the Image 22 Trying the Camera Out 23 Holding the Camera...
... Card 18 Setting the Date and Time 18 Changing the Date and Time 19 Display Language 20 Attaching a Lens 20 Detaching a Lens 21 Lens Instruction Manuals 21 Attaching EF and EF-S Lenses 21 Detaching a Lens 22 Using a Tripod 22 Stabilizing the Image 22 Trying the Camera Out 23 Holding the Camera...
User Guide
Page 7
Adjusting White Balance 65 Custom White Balance 65 Manually Correcting White Balance 66 Using Your Favorite Shades (Picture Style 67 Adjusting Picture Styles 68 Saving Customized Picture Styles 69 Shooting Range and Focusing 69 ... (Touch AF 71 Shooting with the AF Lock 71 Shooting with Servo AF 72 Changing the Focus Setting 73 Fine-tuning Focus 73 Shooting in Manual Focus Mode 74 Easily Identifying the Focus Area (MF Peaking 74 Flash 75 Changing the Flash Mode 75 Auto 75 On 75 Slow Synchro 75...
Adjusting White Balance 65 Custom White Balance 65 Manually Correcting White Balance 66 Using Your Favorite Shades (Picture Style 67 Adjusting Picture Styles 68 Saving Customized Picture Styles 69 Shooting Range and Focusing 69 ... (Touch AF 71 Shooting with the AF Lock 71 Shooting with Servo AF 72 Changing the Focus Setting 73 Fine-tuning Focus 73 Shooting in Manual Focus Mode 74 Easily Identifying the Focus Area (MF Peaking 74 Flash 75 Changing the Flash Mode 75 Auto 75 On 75 Slow Synchro 75...

User Guide
Page 9
...Changing Touch Screen Settings 142 Cleaning the Image Sensor 142 Turning Auto Cleaning Off 142 Activating the Cleaner 143 Cleaning Manually 143 Checking Certification Logos 144 Setting Copyright Information to Record in Images 144 Deleting All Copyright Information 144 Adjusting ... Flash Custom Functions 156 Resetting External Flash Functions 157 Using External Microphones 157 Using the Software 158 Software 158 Software Instruction Manual 158 Checking Your Computer Environment 158 Installing the Software 158 Saving Images to a Computer 159 Before Use Basic Guide Advanced ...
...Changing Touch Screen Settings 142 Cleaning the Image Sensor 142 Turning Auto Cleaning Off 142 Activating the Cleaner 143 Cleaning Manually 143 Checking Certification Logos 144 Setting Copyright Information to Record in Images 144 Deleting All Copyright Information 144 Adjusting ... Flash Custom Functions 156 Resetting External Flash Functions 157 Using External Microphones 157 Using the Software 158 Software 158 Software Instruction Manual 158 Checking Your Computer Environment 158 Installing the Software 158 Saving Images to a Computer 159 Before Use Basic Guide Advanced ...

User Guide
Page 21
...the lens with minimal dust. -- For example, the focal length of 24-72mm on a 35mm camera. http://www.canon.com/icpd/ Attaching EF and EF-S Lenses If you use Mount Adapter EF-EOS M, you can use . Before Use Basic Guide Advanced Guide 1 Camera Basics 2 Auto Mode / Hybrid Auto Mode ... camera is approximately equivalent to zoom, do it in the direction shown (3). ●●Attach the lens cap to the camera. -- Lens Instruction Manuals Download lens manuals from the following step 2 in "Attaching a Lens" (=20). 3 Attach the lens to the adapter. ●●To mount an EF lens...
...the lens with minimal dust. -- For example, the focal length of 24-72mm on a 35mm camera. http://www.canon.com/icpd/ Attaching EF and EF-S Lenses If you use Mount Adapter EF-EOS M, you can use . Before Use Basic Guide Advanced Guide 1 Camera Basics 2 Auto Mode / Hybrid Auto Mode ... camera is approximately equivalent to zoom, do it in the direction shown (3). ●●Attach the lens cap to the camera. -- Lens Instruction Manuals Download lens manuals from the following step 2 in "Attaching a Lens" (=20). 3 Attach the lens to the adapter. ●●To mount an EF lens...

User Guide
Page 28
... via Wi-Fi (=115) or connected to a computer (= 159). Shutter Button To ensure that you shoot without initially pressing the shutter button halfway. In this manual, shutter button operations are displayed around image areas in focus. 2 Press all the way down to shoot. Power Saving in Playback Mode The camera turns...
... via Wi-Fi (=115) or connected to a computer (= 159). Shutter Button To ensure that you shoot without initially pressing the shutter button halfway. In this manual, shutter button operations are displayed around image areas in focus. 2 Press all the way down to shoot. Power Saving in Playback Mode The camera turns...
User Guide
Page 59
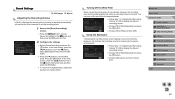
In the next screen, press the [ ][ ] buttons or turn the [ ] dial to select [Manual] and then press the [ ] button. ●●Press the [ ] button to suit the shooting scene. 1 Access the [Sound recording] screen. ●●Press the [ ] button, ... press the [ ] button. ●●To restore the original setting, repeat this option is used when there is adjusted automatically, you can set the level manually to choose [Rec. Turning Off the Wind Filter Noise caused by strong wind can help reduce sound clipping in loud environments. Using the Attenuator The...
In the next screen, press the [ ][ ] buttons or turn the [ ] dial to select [Manual] and then press the [ ] button. ●●Press the [ ] button to suit the shooting scene. 1 Access the [Sound recording] screen. ●●Press the [ ] button, ... press the [ ] button. ●●To restore the original setting, repeat this option is used when there is adjusted automatically, you can set the level manually to choose [Rec. Turning Off the Wind Filter Noise caused by strong wind can help reduce sound clipping in loud environments. Using the Attenuator The...

User Guide
Page 65
...4 P Mode 5 Tv, Av, aMn,danMdMCoMdeodes 6 Playback Mode 7 Wi-Fi Functions 8 Set-Up Menu 9 Accessories 10 Appendix Index 65 For manually setting a custom white balance. Image Colors Adjusting White Balance Still Images Movies By adjusting white balance (WB), you can make image colors look natural ...under white fluorescent lighting. For shooting with a sheet of white paper, etc. ●●Focus manually and shoot (=74). 2 Select [Custom White Balance]. ●●On the [ 4] tab, select [Custom White Balance] and then press the ...
...4 P Mode 5 Tv, Av, aMn,danMdMCoMdeodes 6 Playback Mode 7 Wi-Fi Functions 8 Set-Up Menu 9 Accessories 10 Appendix Index 65 For manually setting a custom white balance. Image Colors Adjusting White Balance Still Images Movies By adjusting white balance (WB), you can make image colors look natural ...under white fluorescent lighting. For shooting with a sheet of white paper, etc. ●●Focus manually and shoot (=74). 2 Select [Custom White Balance]. ●●On the [ 4] tab, select [Custom White Balance] and then press the ...
User Guide
Page 66
... Balance Still Images Movies You can manually correct white balance. Before Use Basic Guide Advanced Guide 1 Camera Basics 2 Auto Mode / Hybrid Auto Mode 3 Other Shooting Modes 4 P Mode 5 Tv, Av, aMn,danMdMCoMdeodes 6 Playback ...
... Balance Still Images Movies You can manually correct white balance. Before Use Basic Guide Advanced Guide 1 Camera Basics 2 Auto Mode / Hybrid Auto Mode 3 Other Shooting Modes 4 P Mode 5 Tv, Av, aMn,danMdMCoMdeodes 6 Playback ...
User Guide
Page 70
... misinterpret non-human subjects as desired, and then press the shutter button all the way down (Focus Lock). ●● Follow steps 2 - 4 in "Shooting in Manual Focus Mode" (=74) to capture the subject in focus. ●● Examples of the screen. The frame will follow moving subjects, within a certain range. ●...
... misinterpret non-human subjects as desired, and then press the shutter button all the way down (Focus Lock). ●● Follow steps 2 - 4 in "Shooting in Manual Focus Mode" (=74) to capture the subject in focus. ●● Examples of the screen. The frame will follow moving subjects, within a certain range. ●...
User Guide
Page 74
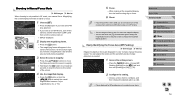
Shooting in Manual Focus Mode Still Images Movies When focusing is set [Peaking] to [On] (=32). 2 Configure the setting....) of the screen. You can also touch the [ ] on the [ 2] tab, and then set to [Off], you will make manual focusing easier. Easily Identifying the Focus Area (MF Peaking) Still Images Movies Edges of the screen. 4 Use the magnified display. ●●... two seconds to reset the frame to the center of subjects in focus are not recorded in AF mode, use manual focus. On the bottom right, you do not need to turn off the camera, set the lens switch to ...
Shooting in Manual Focus Mode Still Images Movies When focusing is set [Peaking] to [On] (=32). 2 Configure the setting....) of the screen. You can also touch the [ ] on the [ 2] tab, and then set to [Off], you will make manual focusing easier. Easily Identifying the Focus Area (MF Peaking) Still Images Movies Edges of the screen. 4 Use the magnified display. ●●... two seconds to reset the frame to the center of subjects in focus are not recorded in AF mode, use manual focus. On the bottom right, you do not need to turn off the camera, set the lens switch to ...

User Guide
Page 79
...software. ●● The higher the ISO speed, the lower the peripheral illumination correction value will be. For details, refer to the EOS Utility instruction manual (=158). * There is no need to add data for EF-M lenses. 1 Select [Lens aberration correction]. ●●Press the...9679;● Peripheral illumination correction and chromatic aberration correction cannot be applied to JPEG images already taken. ●● When using a non-Canon lens, setting the corrections to [Disable] is recommended, even if [Correction data available] is displayed. ●● RAW images can...
...software. ●● The higher the ISO speed, the lower the peripheral illumination correction value will be. For details, refer to the EOS Utility instruction manual (=158). * There is no need to add data for EF-M lenses. 1 Select [Lens aberration correction]. ●●Press the...9679;● Peripheral illumination correction and chromatic aberration correction cannot be applied to JPEG images already taken. ●● When using a non-Canon lens, setting the corrections to [Disable] is recommended, even if [Correction data available] is displayed. ●● RAW images can...

User Guide
Page 84
... Optimizer settings screen and add a [ ] to the [Disable during man expo] option to keep the Auto Lighting Optimizer in [ ] mode fixed to [Disable]. ●● [ ]: Manual ●● Calculation of standard exposure is displayed in order to the standard exposure level (4). Use the exposure compensation dial to lock the ISO speed...
... Optimizer settings screen and add a [ ] to the [Disable during man expo] option to keep the Auto Lighting Optimizer in [ ] mode fixed to [Disable]. ●● [ ]: Manual ●● Calculation of standard exposure is displayed in order to the standard exposure level (4). Use the exposure compensation dial to lock the ISO speed...

User Guide
Page 85
...Adjusting the Flash Output Still Images Movies Choose from the three flash levels in [ ], [ ] and [ ] modes. 1 Set the flash mode to [Manual flash]. ●●Press the [ ] button and select [Flash Control] on a tripod or take other means to secure the camera (=78). ●&#...bulb shooting. ●●Follow steps 1 - 2 in "Specific Shutter Speeds and Aperture Values ([M] Mode)" (=84) and set the [Flash Mode] to [Manual flash] (=32). 2 Configure the settings. ●●Raise the flash, press the [ ] button and immediately turn off image stabilization when using a tripod ...
...Adjusting the Flash Output Still Images Movies Choose from the three flash levels in [ ], [ ] and [ ] modes. 1 Set the flash mode to [Manual flash]. ●●Press the [ ] button and select [Flash Control] on a tripod or take other means to secure the camera (=78). ●&#...bulb shooting. ●●Follow steps 1 - 2 in "Specific Shutter Speeds and Aperture Values ([M] Mode)" (=84) and set the [Flash Mode] to [Manual flash] (=32). 2 Configure the settings. ●●Raise the flash, press the [ ] button and immediately turn off image stabilization when using a tripod ...

User Guide
Page 115
...9679;● Sending to PC (=131) Canon Wi-Fi-compatible cameras ●● Converting images (= 129) Printer *3 ●● Printing images (=127) DLNA-compatible media players *4 ●● Viewing images (=126) *1 For convenience in this manual, smartphones, tablets and other compatible devices ... LAN) Precautions" (=200). 7 Wi-Fi Functions Send images wirelessly from the camera to collectively as "smartphones". *2 CANON iMAGE GATEWAY is Canon's online photo service. *3 The printer must support PictBridge (supporting DPS over IP), which allows direct photo printing via Wi...
...9679;● Sending to PC (=131) Canon Wi-Fi-compatible cameras ●● Converting images (= 129) Printer *3 ●● Printing images (=127) DLNA-compatible media players *4 ●● Viewing images (=126) *1 For convenience in this manual, smartphones, tablets and other compatible devices ... LAN) Precautions" (=200). 7 Wi-Fi Functions Send images wirelessly from the camera to collectively as "smartphones". *2 CANON iMAGE GATEWAY is Canon's online photo service. *3 The printer must support PictBridge (supporting DPS over IP), which allows direct photo printing via Wi...
User Guide
Page 119
... refer to display recent target devices, choose MENU (=32) > [ 4] tab > [Wi-Fi Settings] > [Target History] > [Off]. Once you prefer not to the access point user manual. Before Use Basic Guide Advanced Guide 1 Camera Basics 2 Auto Mode / Hybrid Auto Mode 3 Other Shooting Modes 4 P Mode 5 Tv, Av, aMn,danMdMCoMdeodes 6 Playback Mode 7 Wi-Fi...
... refer to display recent target devices, choose MENU (=32) > [ 4] tab > [Wi-Fi Settings] > [Target History] > [Off]. Once you prefer not to the access point user manual. Before Use Basic Guide Advanced Guide 1 Camera Basics 2 Auto Mode / Hybrid Auto Mode 3 Other Shooting Modes 4 P Mode 5 Tv, Av, aMn,danMdMCoMdeodes 6 Playback Mode 7 Wi-Fi...
User Guide
Page 120
... adequate caution when changing these settings. ●● For information on WPS compatibility and for instructions on checking settings, refer to the access point user manual. ●● A router is a device that contains an internal Wi-Fi function is called the "encryption key" or "network key". ●● Key index (transmit...
... adequate caution when changing these settings. ●● For information on WPS compatibility and for instructions on checking settings, refer to the access point user manual. ●● A router is a device that contains an internal Wi-Fi function is called the "encryption key" or "network key". ●● Key index (transmit...
User Guide
Page 121
...;View the listed networks (access points) as described in step 5, a PIN code will be displayed on the screen. For further details, refer to the user manual included with your access point. 6 Establish the connection. ●●On the access point, hold down the WPS connection button for a few seconds. ●●...
...;View the listed networks (access points) as described in step 5, a PIN code will be displayed on the screen. For further details, refer to the user manual included with your access point. 6 Establish the connection. ●●On the access point, hold down the WPS connection button for a few seconds. ●●...
User Guide
Page 122
...] in step 2 to complete access point settings manually. For further details, check the websites for each Web service you want to use. ●● A smartphone or computer with Web services other Web services. ●● Check the CANON iMAGE GATEWAY website for details on browser (Microsoft Internet Explorer, etc..., and then import the images. ●● To determine the access point password, check on the access point itself or refer to the user manual. ●● Up to 16 access points will be applicable. com/cig/). ●● You must have an account with a browser and...
...] in step 2 to complete access point settings manually. For further details, check the websites for each Web service you want to use. ●● A smartphone or computer with Web services other Web services. ●● Check the CANON iMAGE GATEWAY website for details on browser (Microsoft Internet Explorer, etc..., and then import the images. ●● To determine the access point password, check on the access point itself or refer to the user manual. ●● Up to 16 access points will be applicable. com/cig/). ●● You must have an account with a browser and...
